Jellyseerr
Jellyfin is a request management and media discovery tool for the Jellyfin ecosystem. It will also work for Plex and Emby, though some features may vary.
For more information about this app, follow this link.
Prerequisites
- Media Server – Jellyfin, Plex or Emby.
- Sonarr, Radarr, or Lidarr
Initial Setup
- From your User Control Panel, go to the Installers tab and find Jellyseerr in the list. Click the Install button and wait until the installation has been completed.
Configuration
- After the installation, access the web UI of Jellyseerr from the Apps tab on the User Control Panel.
- You will be given the choice to configure Jellyseerr with your Plex, Jellyfin or Emby instance. We will show you all procedures in this guide and will start with Jellyfin.
Jellyfin
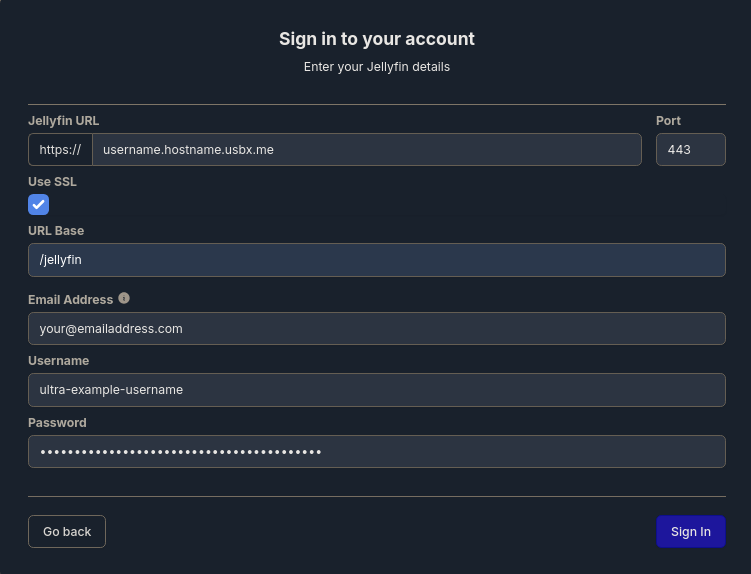
After you have selected to configure Jellyfin, you will be prompted to type in your Jellyfin connection details.
-
Jellyfin URL: Should be in format
<username>.<hostname>.usbx.me. Make sure to replace<username>and<hostname>with your username and hostname, which can be found on the UCP. -
Port:
443 - Use SSL: Yes ☑
-
URL Base:
/jellyfin - Email Address: Use any email you have access to, it does not have to be associated with your Jellyfin instance.
- Username: This is your Ultra.cc username for the service you have installed Jellyfin on, can be found on the UCP.
- Password: The password you chose when installing Jellyfin, can be found on the UCP.
- Click the Sign In button in the bottom right corner.
- Once you have connected to your Jellyfin instance, the next step is to configure the libraries for your media server.
- Scroll down to the Configure Libraries section
Plex
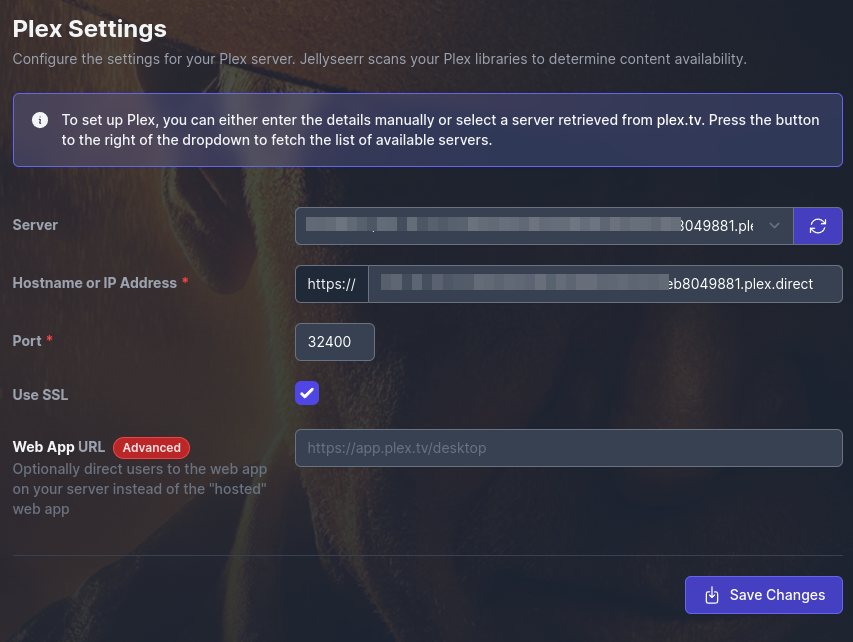
- Once you have logged in to your Plex account, you need to configure the settings for your Plex server.
- As shown in the below image, click on the refresh button.
- Once the server list has been refreshed, expand the dropdown and you should see your Plex server in the list.
- Make sure to select the entry that includes
[local] [secure]at the end. See below image.
- Make sure the Port field is
32400. - Make sure Use SSL is ☑ (enabled).
- If done correctly, it should look like the below image.
- Click the Save Changes button.
- Once you have connected to your Plex instance, the next step is to configure the libraries for your media server.
- Scroll down to the Configure Libraries section
Emby
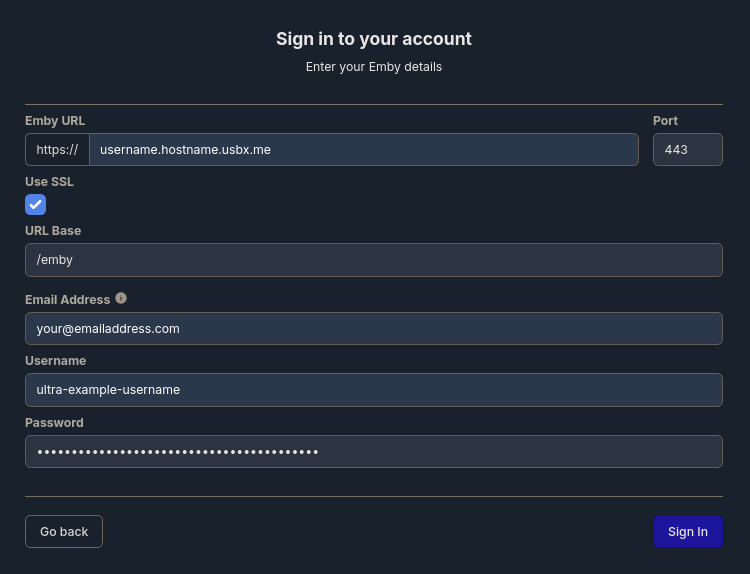
After you have selected to configure Emby, you will be prompted to type in your Emby connection details.
-
Emby URL: Should be in format
<username>.<hostname>.usbx.me. Make sure to replace<username>and<hostname>with your username and hostname, which can be found on the UCP. -
Port:
443 - Use SSL: Yes ☑
-
URL Base:
/emby - Email Address: Use any email you have access to, it does not have to be associated with your Emby instance.
- Username: This is your Ultra.cc username for the service you have installed Emby on, can be found on the UCP.
- Password: The password you chose when installing Emby, can be found on the UCP.
- Click the Sign In button in the bottom right corner.
Configure Libraries
- The process of configuring your media libraries are identical no matter if you have logged in using your Plex or Jellyfin account.
- Once you have logged in to your Jellyfin/Plex account, your media server libraries should appear further down.
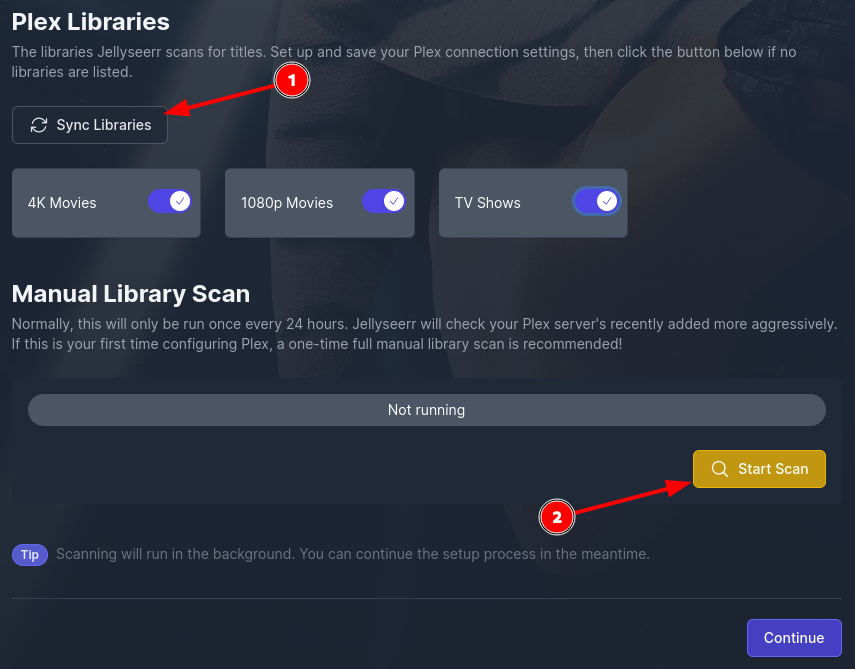
- If no libraries appear, click the Sync Libraries button, as shown in the above image.
- Enable the libraries you want Jellyseerr to access.
- Click the Start Scan button, as shown in the above image. The library scan will run in the background, so you can proceed with the setup process.
- Click the Continue button in the bottom right corner.
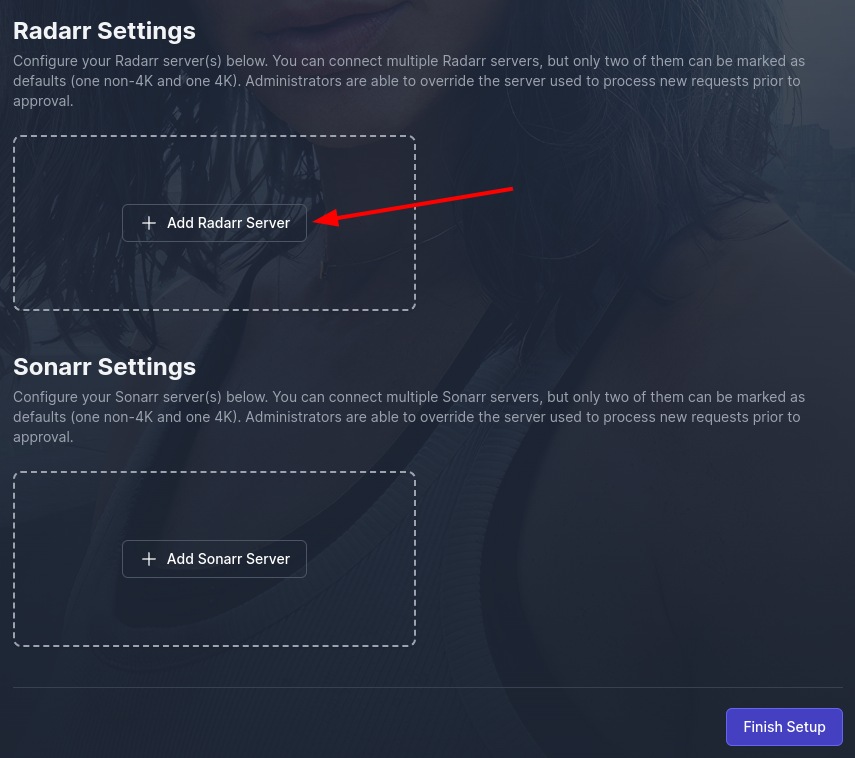
- Click the
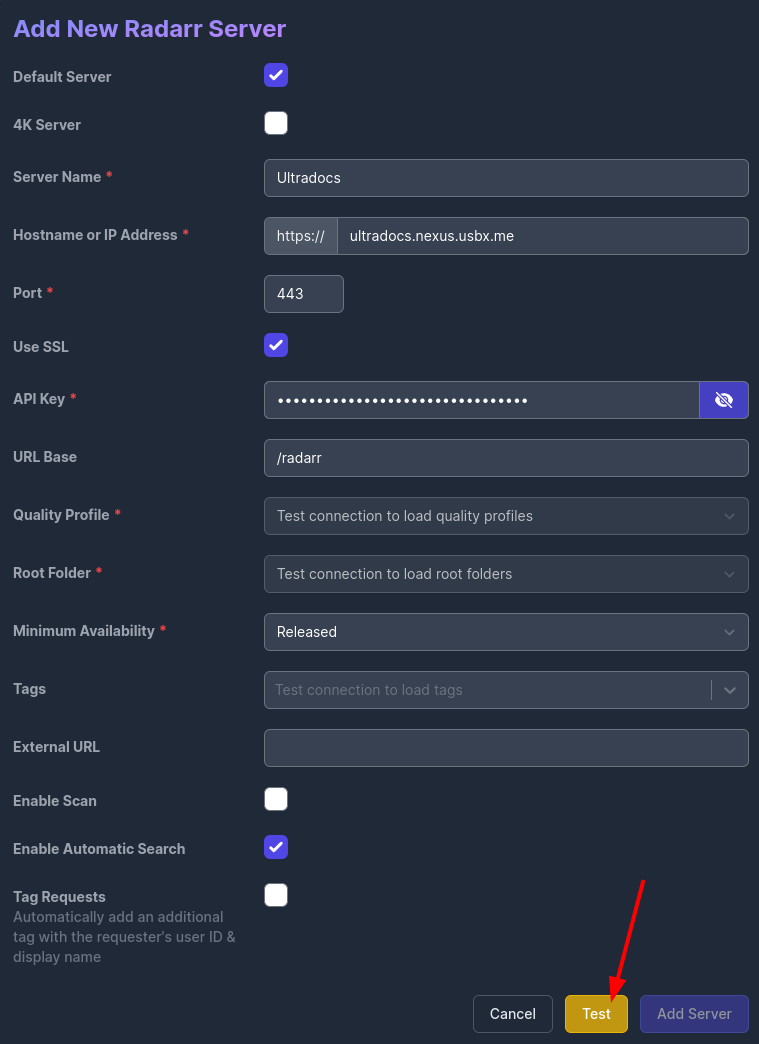
+ Add Radarr Serverbutton. - Tick Default Server
- Choose a Server Name
- Enter Hostname, it should be
<username>.<servername>.usbx.me, in our case it isultradocs.nexus.usbx.me - Set Port to
443 - Tick Use SSL
- Paste API Key, which can be found in Radarr's
Settings > General > Security > API Key - Set Base URL to
/radarr
- Once you have entered all the above details, click the yellow Test button in the bottom right corner.
- If done successfully, you should see the above notification in the top right corner.
- Next, select a Quality Profile, set your Root Folder and set the Minimum Availability.
- Click the Add Server button in the bottom right corner.
Now, if you want to connect your Sonarr instance to Jellyseerr, click on the + Add Sonarr Server button and repeat the above steps. Or if you are done, see the last step below.
- Click the Finish Setup button in the bottom right corner.
Discord Notifications via Webhook
Jellyseerr can be configured to send notifications to Discord for certain events as request pending approval, request available, etc.
- First, create a Discord Webhook for your Discord server. See this link for instructions.
- Copy Webhook URL.
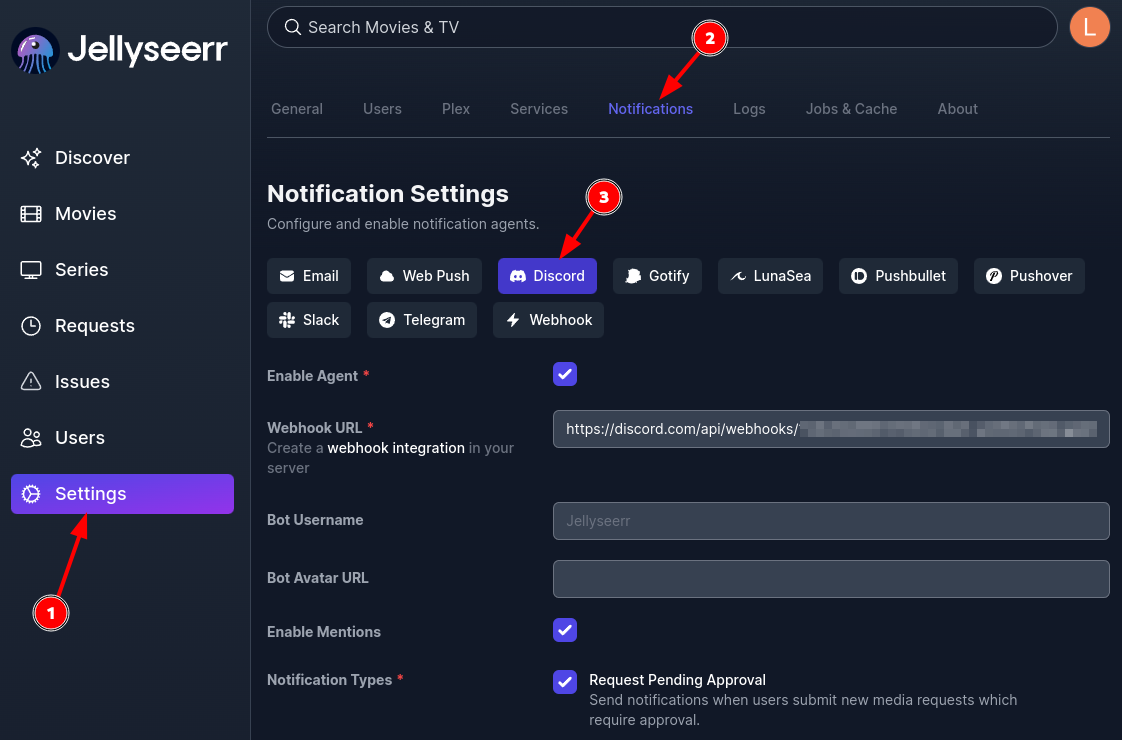
- In the Jellyseer dashboard, go to Settings > Notifications > Discord. As shown in the below image.
- Paste the Discord Webhook URL in the Webhook URL field, as shown in the above image.
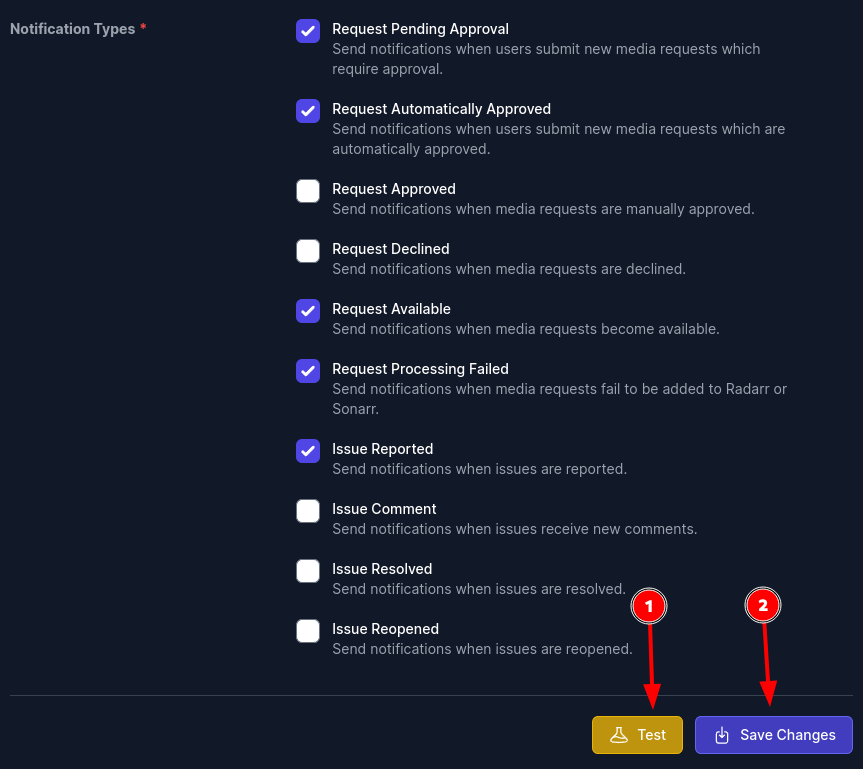
- Next, select the Notification Types you want to be notified of.
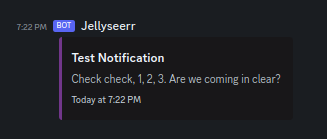
- Next, click the Test button to send a test notification to your Discord server.
- Lastly, click the Save Changes button.
HTTP access to Jellyseerr
- Accessing Jellyseerr via HTTP will eliminate the issue of auth pop-ups appearing while browsing different webpages of Jellyseerr.
- To access it via HTTP, use the following URL:
http://{servername}-direct.usbx.me:{Jellyseerr's Port}. Servername and port can be found on the User Control Panel.
