Generic Software Installation
This guide is provided for your convenience. The guide is provided as-is and may not be updated or maintained by Ultra.cc. Unofficial support may be offered via Discord only and at the sole discretion of Ultra.cc staff. Use at your own risk and only proceed if you are comfortable troubleshooting on your own.
In this guide, we will go overcover some generic ways of installing custom third third-party applications on your Ultra.cc service. It is important to keep in mind that these installation procedures are generic and additional steps may be needed for a successful installation. As these procedures are made for custom applications not supported by Ultra.cc, we will not be able to provide any assistance regarding the installation or issues that may arise once an application has been installed.
There are a lot of applications that can be installed with a click of a button on the User Control Panel. However, if you want to install an application that is not included on the UCP, you are free to do so. As long as you adhere to the Terms of Service and do not break the Fair Usage Policy, you are free to install pretty much any kind of software on your Ultra.cc service.
Important information regarding the installation of custom third-party applications, do note:applications:
- You cannot install an application that requires sudo or root
privileges.privileges, including:- Docker images (look for the local installation instructions instead)
- The placing of files outside of your home directory
- Be mindful of application resource usage and IO utilization. See this guide.
- Custom
thirdthird-party applications are not officially supported by Ultra.cc staff. - Always read the documentation associated with the software you are installing.
Before proceeding with any of the below installation procedures, you need to connect to your Ultra.cc service via SSH.
- Connect to your Ultra.cc slot via SSH, see guide here.
Compile from source
Below you will find generic instructions for how to compile from source. Some applications have specific instructions or required dependencies, so make sure to always check the documentation or website of the application you are installing.
- Download the source. Files can be downloaded using a wide range of utility tools, such as
wget,curl,git, etc.
wget https://example-url.com/appname-1.23.tar.gz
- Extract the source.
tar xvzf appname-1.23.tar.gz
cd appname-1.23
- Configure the application. See
appapp-specific documentation for additional configurations.
./configure --prefix="$HOME/bin && make"
- Install the software
make install
- Add the install directory to the path to enable global execution of the application.
echo "PATH=$HOME/.local/bin:$HOME/bin:$PATH" >> ~/.profile && source ~/.profile
Pre-built binaries
Some software can be available as pre-compiled binaries and do not have to be built within your Ultra.cc service.
- Download the binary.
wget https://example-url.com/appname-1.23.tar.gz
- Extract the binary.
tar xvzf appname-1.23.tar.gz
- Move the binary to a directory within your shell environment PATH.
mv appname ~/bin/
Once the binary has been moved to a directory within your shell environment PATH, you can run the application by executing the filename of the binary. With the name example we are using in this guide, it would look like this: appname
Cloning a repo
Application software can also be installed by cloning a repository. The most popular repository library is GitHub, but there are also others like GitLab for example.
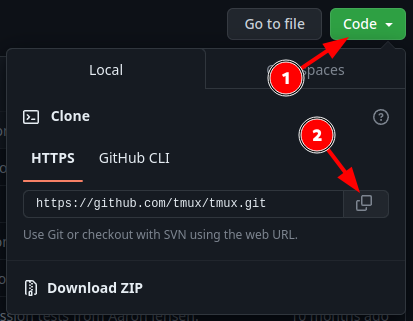
- While in the GitHub repository, in the top right corner, click the green button called Code.
- Copy the URL for the repository, as shown in the above image.
- Change the current working directory of your Ultra.cc shell to the location where you want to clone the repo. This is usually the root of your home directory.
cd
~/
- Clone the repo. Do note,
AUTHORandEXAMPLE-REPOwould be replaced with what matches the repo you are cloning.
git clone https://github.com/AUTHOR/EXAMPLE-REPO
- Next,
cdinto the clonedrepo.repo directory. Do note,EXAMPLE-REPOwould be replaced with what matches the repo you are cloning.
cd EXAMPLE-REPO
Inside the cloned repo directory, you will find all the files of the repository, and you are free to execute any scripts or binaries that are included.included (subject to our Terms of Service).
