Public Key Authentication
SSH key pair authentication is a recommended method of logging into your Slot via SSH for added security and convenience in place of our SSH password. You can place the public key on your slot, and then unlock it by connecting to it with a client that has the private key. When the two matches up, the system unlocks without the need for a password. The major advantage of this is that this authentication method provides greater cryptographic strength than long passwords, rendering it not prone to brute-force attacks. You can increase security even more by protecting your private key with a passphrase.
In this tutorial, we would be showing you on how to generate your own key pair using several tools, how to transfer your public key to your slot and how to login using key pair authentication.
OpenSSH
This should work on Linux, macOS and Windows 10 Users. If you haven't set OpenSSH up, you may refer to on how to connect to your Slot via SSH for installation and setup of OpenSSH for Windows 10, Linux and MacOS.
Creating Public and Private Keys
- On your computer, type in
ssh-keygenand press ENTER. This should start generating public and private key pairs.- By default it generates a 2048-bit RSA key pair which is sufficient in most cases
$ ssh-keygen
Generating public/private rsa key pair.
-
We also recommend to generating the following keys which are more secure than the default.
- To generate an RSA 4096 key:
ssh-keygen -b 4096- Much more secure than 2048 bit is slower when logging into your Slot
- To generate a ed25519 key:
ssh-keygen -t ed25519- New algorithm, has a smaller key size and faster generation with security comparable to RSA ~3000
- To generate an RSA 4096 key:
-
Here, you can press ENTER to save the key pair into the
.ssh/subdirectory in your home directory- For Windows, your User Folder is typically in
C:\Users\username\.ssh - For Linux it's
/home/username/.ssh - You may also specify an alternate path.
- For Windows, your User Folder is typically in
$ ssh-keygen -b 4096
Generating public/private rsa key pair.
Enter file in which to save the key (/your_home/.ssh/id_rsa):
- Here you optionally may enter a secure passphrase. You can press ENTER to skip putting in a passphrase
- It is recommended to add in a passphrase
- A passphrase adds an additional layer of security to prevent unauthorized users from logging in should they have your private key
$ ssh-keygen -b 4096
Generating public/private rsa key pair.
Enter file in which to save the key (/your_home/.ssh/id_rsa):
Enter passphrase (empty for no passphrase):
Enter same passphrase again:
- Then you should see the following output. You now have a public (
id_rsa) and a private key (id_rsa.pub) stored in your Home folder (or on the path you set) that you can use to authenticate when logging into SSH.
$ ssh-keygen -b 4096
Generating public/private rsa key pair.
Enter file in which to save the key (/your_home/.ssh/id_rsa):
Enter passphrase (empty for no passphrase):
Enter same passphrase again:
Your identification has been saved in /your_home/.ssh/id_rsa.
Your public key has been saved in /your_home/.ssh/id_rsa.pub.
The key fingerprint is:
SHA256:x23Tr+Ee5TlowA+U9HEquagnog3O09EYHQ346WY xan@randomPC
The key's randomart image is:
+---[RSA 4096]----+
|=.=. . o+..      |
|.B  o  .oo.      |
|o.o  oo  o       |
|.+ . oo ...      |
| .. .  +S+ .     |
|.      =o==      |
|.o.   o.=o.      |
|o... oE.+o       |
| .. .++..o.      |
+----[SHA256]-----+
Importing Your Public Key into your Slot
Now, we will import the keys you just generated to your Slot. There are several methods for this and is described below.
ssh-copy-id
- This is the easiest and the most recommended but this command only works for Linux.
- For macOS, you might need to install it. To check, open up a terminal and type
ssh-copy-id. - If not found, you can install it using these commands below
- Install using Homebrew:
brew install ssh-copy-id - Install using Macports:
sudo port install openssh +ssh-copy-id - Install using CURL:
curl -L https:``//raw.githubusercontent.com/beautifulcode/ssh-copy-id-for-OSX/master/install.sh | sh
- Install using Homebrew:
- Type in
ssh-copy-id [username@lwxxx.usbx.me] or ssh-copy-id username@lwxxx.usbx.me
$ ssh-copy-id kbguides@kbguides.lw902.usbx.me
- The following output appears. This is normal. This means that your computer does not recognize your Slot. This will happen the first time you connect to a new host. Type
yesand press ENTER to continue.
$ ssh-copy-id kbguides@lw902.usbx.me
/usr/bin/ssh-copy-id: INFO: Source of key(s) to be installed: "/home/xanban/.ssh/id_rsa.pub"
The authenticity of host 'kbguides.lw902.usbx.me (46.182.109.120)' can't be established.
ECDSA key fingerprint is SHA256:9mQKWg1PVPZtzZ6d5nDjcWUb/Flkuq5VHYRrvwTeRTE.
Are you sure you want to continue connecting (yes/no)?
- Type in the SSH password you set in UCP
$ ssh-copy-id kbguides@kbguides.lw902.usbx.me
/usr/bin/ssh-copy-id: INFO: Source of key(s) to be installed: "/home/xanban/.ssh/id_rsa.pub"
The authenticity of host 'kbguides.lw902.usbx.me (46.182.109.120)' can't be established.
ECDSA key fingerprint is SHA256:9mQKWg1PVPZtzZ6d5nDjcWUb/Flkuq5VHYRrvwTeRTE.
Are you sure you want to continue connecting (yes/no)? yes
/usr/bin/ssh-copy-id: INFO: attempting to log in with the new key(s), to filter out any that are already installed
/usr/bin/ssh-copy-id: INFO: 1 key(s) remain to be installed -- if you are prompted now it is to install the new keys
kbguides@kbguides.lw902.usbx.me's password:
- Once you entered your password, OpenSSH will connect to the Slot. It will then copy the contents of your
~/.ssh/id_rsa.pubkey into a file in your Slot's home directory at~/.sshcalledauthorized_keys. Then you should see the following output. At this point, yourid_rsa.pubkey has been uploaded to the Slot.
$ ssh-copy-id kbguides@kbguides.lw902.usbx.me
/usr/bin/ssh-copy-id: INFO: Source of key(s) to be installed: "/home/xanban/.ssh/id_rsa.pub"
The authenticity of host 'kbguides.lw902.usbx.me (46.182.109.120)' can't be established.
ECDSA key fingerprint is SHA256:9mQKWg1PVPZtzZ6d5nDjcWUb/Flkuq5VHYRrvwTeRTE.
Are you sure you want to continue connecting (yes/no)? yes
/usr/bin/ssh-copy-id: INFO: attempting to log in with the new key(s), to filter out any that are already installed
/usr/bin/ssh-copy-id: INFO: 1 key(s) remain to be installed -- if you are prompted now it is to install the new keys
kbguides@kbguides.lw902.usbx.me's password:

Number of key(s) added: 1

Now try logging into the machine, with: "ssh 'kbguides@kbguides.lw902.usbx.me'" and check to make sure that only the key(s) you wanted were added.
- Once everything is done, you can login to your Slot with just
ssh username@lwxxx.usbx.mewhich will go straight to your shell securely. If you set a password for your keys, enter your password.

Manually copying contents of your public key to your Slot
This is another way is to manually copy the contents of your private key file to your Slot should ssh-copy-id failed. This method works on Windows, Linux and macOS users.
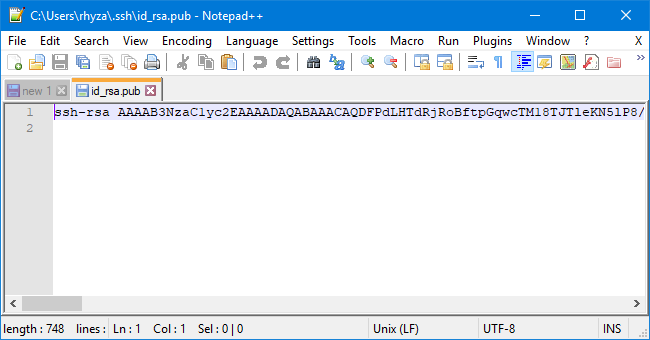
- View your public key file
id_rsa.pubby opening it using your text editor and copy the whole content
- Login to your Slot using the set password in UCP
- Once logged in, create a directory named
.sshwithmkdir -p ~/.ssh - Then do
echo public_key_string >> ~/.ssh/authorized_keysreplacingpublic_key_stringwith the contents of your public key file
kbguides@lw902:~$ mkdir -p ~/.ssh
kbguides@lw902:~$ echo ssh-rsa AAAAB3NzaC1ycrandom_characters_here_lol xanban@randomPC >> ~/.ssh/authorized_keys
- Then type
chmod -R go= ~/.sshto recursively removes all “group” and “other” permissions for the~/.ssh/directory.
kbguides@lw902:~$ chmod -R go= ~/.ssh
kbguides@lw902:~$
- Exit SSH try to login to your Slot with just
ssh [username@lwxxx.usbx.mewhich will go straight to your Slot's shell.- If you set a password for your keys, enter your password.

PuTTYgen
This method works for Windows users only.
Creating Key Pairs Using PuTTYgen
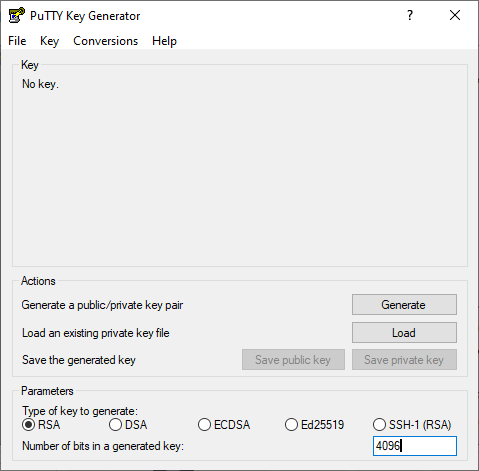
- Open up PuTTYgen. You'll be greeted with this window.
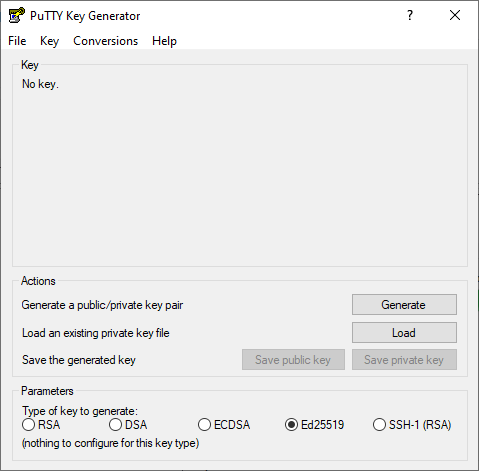
- On the bottom under the Parameters section, you can choose which key do you want to generate and how many bits that you generate
- The default is RSA-2048 which is sufficient in most cases.
- You may also change the parameters to your liking. The following are:
- RSA 4096
- Ed25519
- You may also change the parameters to your liking. The following are:
- Once that's done, click Generate.
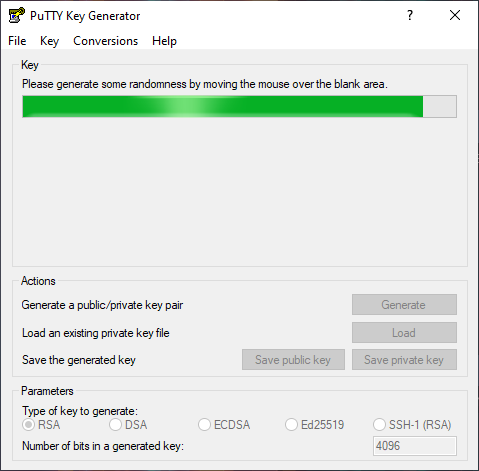
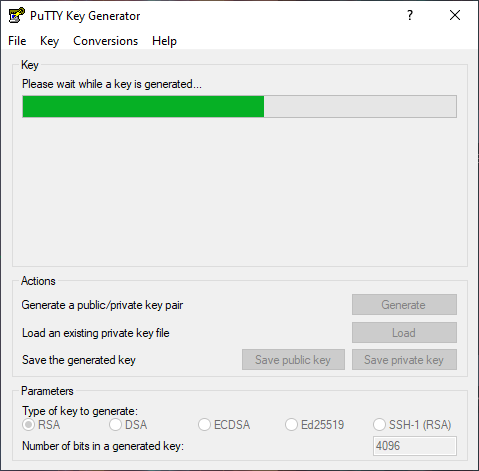
- From here, you're going to follow the instructions on the program. Seen here, you only need to move your cursor within the program.
- This is to create entropy, which is needed by PuTTYgen to generate random numbers needed to generate keys.
- After that, the actual generation of the key takes place.
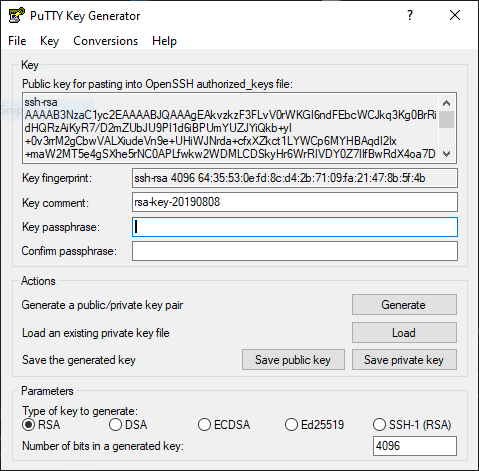
- When finished, you'll see the following information.
- You may optionally enter your password in the Key Passphrase and Confirm passphrase text boxes
- It is recommended to add in a passphrase
- A passphrase adds an additional layer of security to prevent unauthorized users from logging in should they have your private key.
- If you opt to not add a password so you can login to your slot's SSH without inputting any password, you can leave these blank.
- You may optionally enter your password in the Key Passphrase and Confirm passphrase text boxes
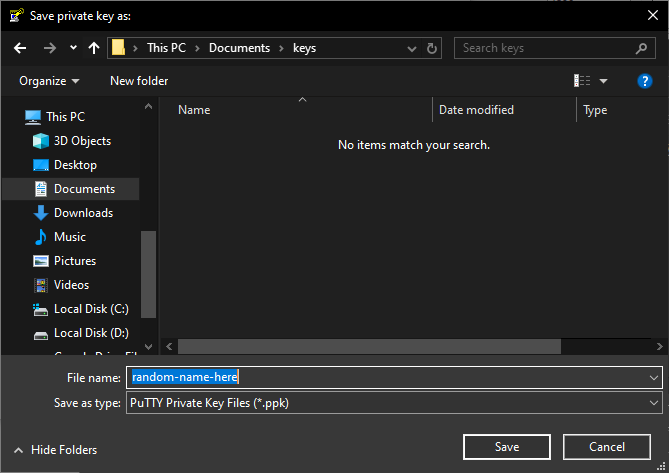
- Hit Save private key, click yes if you did not put a password and save it to a directory you choose.
- This will be saved in
.ppkformat
- This will be saved in
- Copy the contents inside the Public key for pasting into OpenSSH
authorized_keysfile
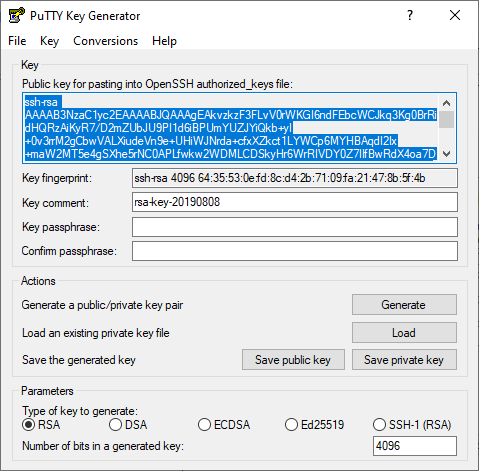
Importing Public Key to your Slot
- Login to your Slot using the set password in UCP
- Once logged in, create a directory named
.sshwithmkdir -p ~/.ssh - Then do
echo public_key_string >> ~/.ssh/authorized_keysreplacingpublic_key_stringwith the generated public key file in PuTTYgen.
kbguides@lw950:~$ mkdir -p ~/.sshkbguides@lw950:~$ echo ssh-rsa AAAAAAAAlol rsa-key-2012-12-12 >> ~/.ssh/authorized_keys
- Then type
chmod -R go= ~/.sshto recursively removes all “group” and “other” permissions for the~/.ssh/directory.
kbguides@lw950:~$ chmod -R go= ~/.ssh
Setting PuTTY to use Key Authentication
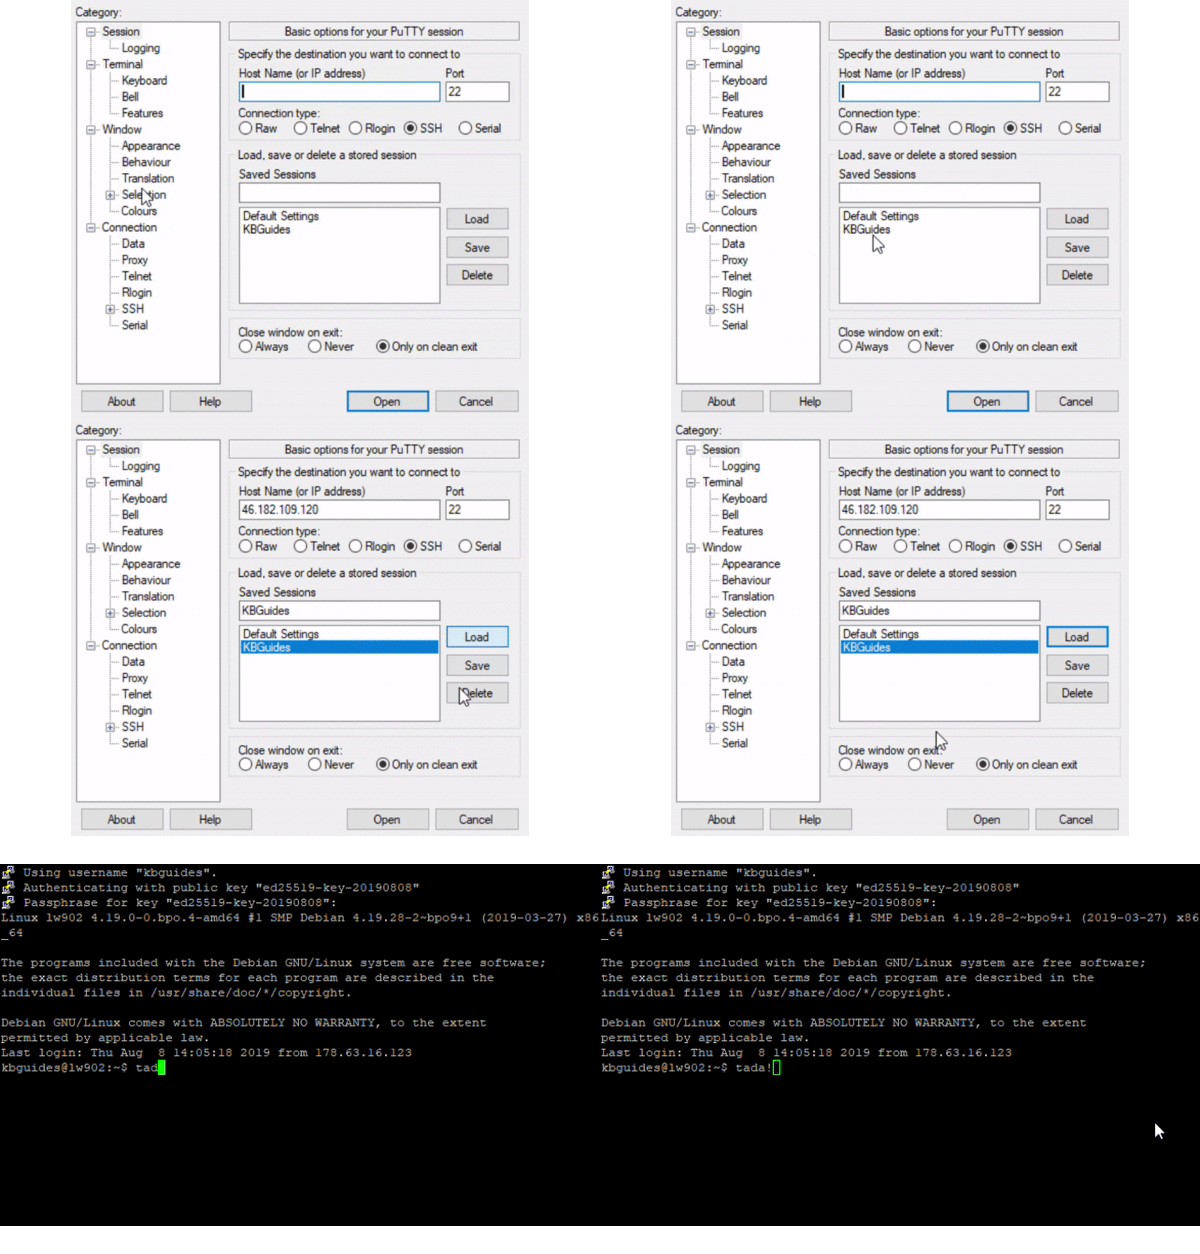
- Open PuTTY and load up your session
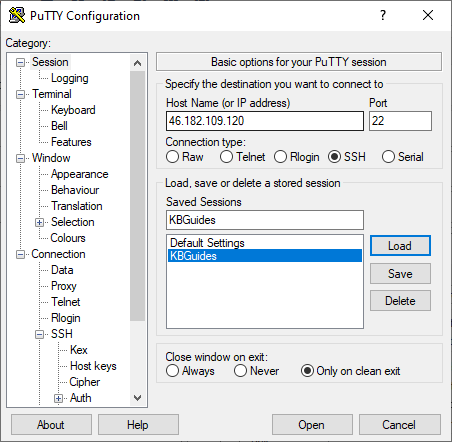
- In Connection → SSH → Auth, you'll see an option for the Private key file for authentication.
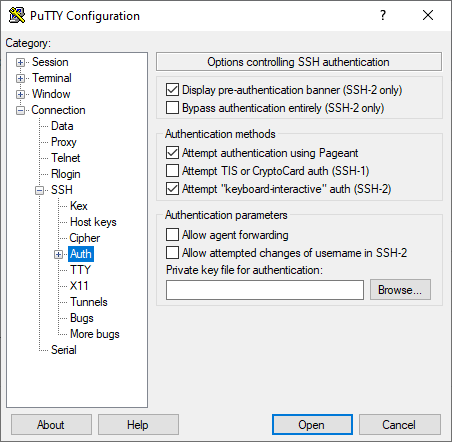
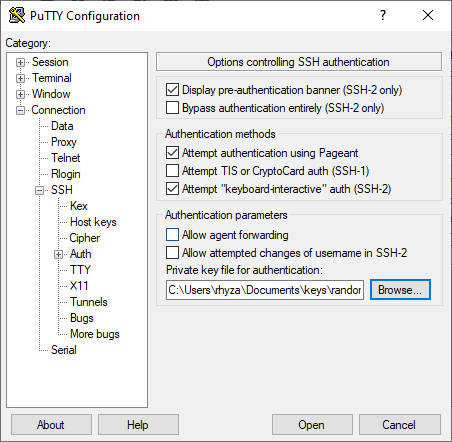
- Save your session by selecting your Session name and hit Save.
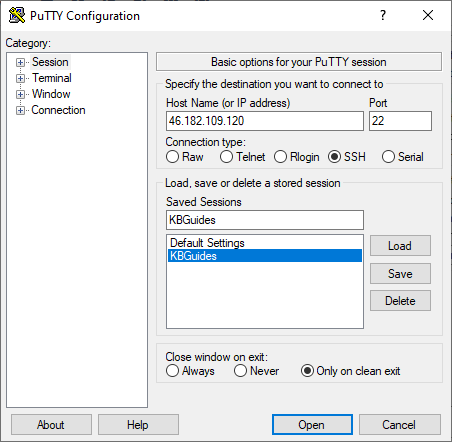
- Now, if setup correctly you can just click Open or double click the session name, enter your password (if you set it) and you can log in to your slot securely.
