Initial Setup
Please make yourself aware of the Ultra.cc Fair Usage Policy. Directly pointing any cloud storage directory using Rclone will create extreme strain on your slot's disk and WILL cause a 24 hour ban on accessing your cloud storage repeatedly. It is your responsibility to ensure usage is within acceptable limits. Ignorance is not an excuse.
Deluge is a full-featured BitTorrent application written in Python 2. It has a variety of features, including but not limited to:
Client/server model DHT support Magnet link support Plug-in system UPnP support Full-stream encryption Proxy support
When the server daemon is running, users can connect to it via a console client, a GTK-based GUI, or a Web-based UI. A complete list of features can be viewed here.
Deluge is already configured and tuned out of the box. Once logged in for the first time, there will be a textbox asking you if you want to change the default password, which you set in UCP. Click No.
Then, the Connection Manager settings will appear. Just click the host in the box and click Connect. After that, you are now logged into Deluge's Web UI.
We recommend that your Deluge password consists of LETTERS and NUMBERS only. This is particularly useful when you're using deluge-console injection for autodl-irssi.
Default File Paths
Default Downloads Folder: ~/downloads/deluge
Deluge's config folder: ~/.config/deluge
Deluge's watch folder: ~/watch/deluge
How to Reset a Forgotten Password for Deluge's Web UI
This section will show you how to reset your Deluge's Web UI password.
Should you need to change your Deluge's *daemon password*, you may need to reinstall your Deluge instance with your preferred password.
Open your Ultra Control Panel and click on the "Access Details" tab. You will find your SSH Access details on this page.
- If you are unsure of your username & password, see the Eye Icon
Connect to your slot's SSH
- For more information, visit How to connect to your slot via SSH to learn more.
Once connected, type the following command: app-deluge stop
Now on the empty line, type the following command and press Enter
sed -i.bak "/pwd_sha1/d" ~/.config/deluge/web.conf
Now on the next empty line, type the following command and press Enter
sed -i.bak "/pwd_salt/d" ~/.config/deluge/web.conf
Now start your deluge instance by running app-deluge start
Once started, enter deluge as your password.
Please note that Deluge version 2.x does not have an official Thin Client at this time for Mac OSX
Setting Up Deluge Thin Client
Deluge's Thin Client is a great way to manage your Deluge instance from your PC. It also gives you more customization to your Deluge instance, and some plug-ins, such as LabelPlus, do require that you need to have the thin client installed for you to access its settings.
This section shows you how to install, configure, and connect your Deluge client to your slot's instance.
Installation
- Download and install Deluge from the links below
Deluge Client version 1.x
    Windows - https://ftp.osuosl.org/pub/deluge/archive/1.3/deluge-1.3.15-win32-py2.7.exe
    MacOS - http://download.deluge-torrent.org/mac_osx/deluge-1.3.15.1-macosx-x64.dmg
    Linux - Refer to your distribution
Deluge Client version 2.x
    Windows - https://ftp.osuosl.org/pub/deluge/windows/deluge-2.1.1-win64-setup.exe
    MacOS - official version 2 client unavailable at this time
    Linux - Refer to your distribution
Please note: Thin Client version must match the version 1.x or version 2.x installed to your Ultra.cc Deluge instance for connection to be successful.
Setting up Deluge Client
- Open up Deluge Client on your PC
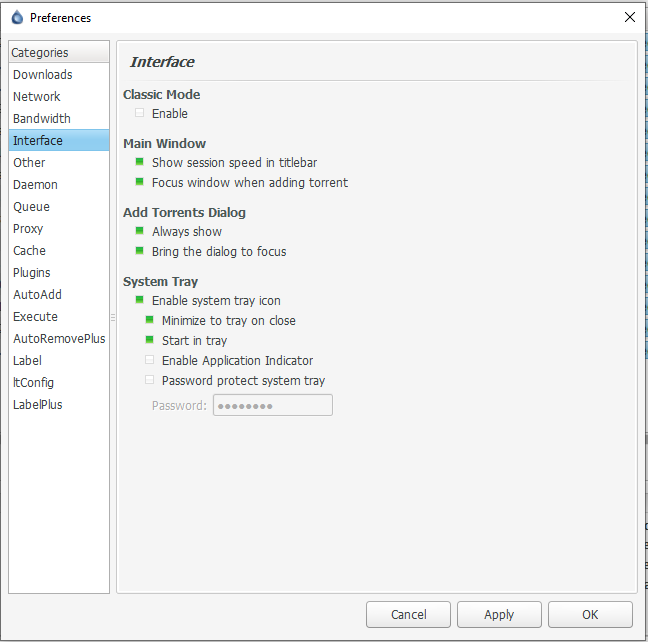
- Click Preferences -> Interface and Uncheck Classic Mode
- Confirm to restart Deluge
- Once Rebooted, a window named Connection Manager appears. Click Add.
- Go back to your UCP, under Applications Tab, find remote client access under Deluge, and input the values accordingly.
- Once that's done, click add and wait for the Green circle to pop up.
- Once that's popped up, highlight your new details and click Connect.
Installing Deluge Plugins
Please note that Deluge 2.X.X uses Python 3.7 egg files.
This section will teach you how to install Deluge plug-ins. Deluge plug-ins extend the functionality of what Deluge provides, giving you more ways to automate processes or simplifying tasks. Take note that you need to check what plug-in you download. Specifically:
If the plug-in is written for Deluge v.1.3.15
It's written using python 2.7
Its extension is .egg
Also, take note if your plug-in can be accessed with the thin client or the web client.
Installing Plugins
Login to your Deluge's Client
Download the plug-in that you want.
Go to Preferences -> Plugin.
Click Install Plugin and navigate to your plugin_name.egg and click Open
- This'll install the plug-in on your PC client and to the slot Client.
- After it's installed, tick the label name and click OK. You may have to do that a few times to get it properly installed.
Enable Public Torrent Seeding (Optional)
- Public torrents are stopped after download by default to avoid HDD IO resource abuse and inadvertent usage of upload traffic. You can easily enable public torrent seeding with the instructions given below.
- Login to your service via SSH. How to connect to your Ultra.cc slot via SSH
- Execute the following SSH command:
app-deluge restart --remove-pubscript
-
That's it.
-
Note that changing the password of the torrent client or re-installing it will disable public torrent seeding again.
Troubleshooting Information
Why does Deluge keep crashing?
This is a typical characteristic of Deluge. It usually happens when downloading, where the client will prioritize torrent traffic over the WebUI. Deluge is aggressive and caches the information into the RAM. In turn, the Deluge WebUI loses connection, and the Daemon would appear offline.
It will come back/stabilize some minutes after the download is completed, and no action needs to be taken at that time.
If it's not coming back, a misconfigured plug-in may be interfering with Deluge. The usual case with this is ltconfig with high-performance seed pre-set engaged. This pre-set most likely crashes Deluge. We recommend using our default tunings first, as it is tuned specifically for our slots.
Why does the main IP of my slot and torrent clients appear different? Which IP should I report to trackers?
Our slot IPs are pooled to avoid clashing on trackers with a more extensive user database to help peers and seeders.
Our slot IPs are pooled to avoid clashing. If you need to submit IP's, then you should use the IP's that are binding to the torrent clients.. You can obtain them by logging into Deluge and go to Settings -> Network -> Interface. Copy the IP from that field.