# Access your Ultra service with WebDAV
In this guide, we will show you how to access your Ultra service via the WebDAV protocol. For more information, follow [this link](https://en.wikipedia.org/wiki/WebDAV).
Before you can use WebDAV, you need to reinstall your webserver. It can be done from the Overview tab on the UCP.
WebDAV is currently offered as a beta feature, and if it is deemed to disrupt our infrastructure, it will be removed from our service without notice.
Do note, data transferred over WebDAV WILL count towards your upload bandwidth quota.
- **WebDAV Access Path:** `https://username.hostname.usbx.me/webdav`
- **WebDAV Password:** Use your HTTP password
- Password can be found on the **Connect** tab of your [UCP](https://cp.ultra.cc)
### Configure Network Drive
#### Windows
Note: Windows Explorer WebDAV mapped drives limit the maximum file size to approx, 4GB. If you intend to copy or stream files larger than that, please use an Rclone mount or other WebDAV client.
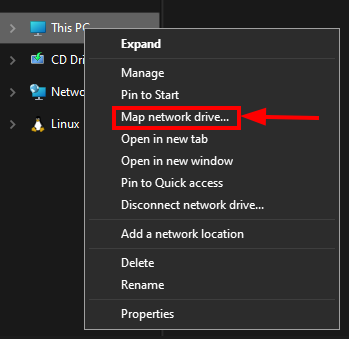
- Open the **File Explorer** by pressing `Win+E`
- Next, right-click **This PC** and click **Map network drive...**
[](https://docs.ultra.cc/uploads/images/gallery/2024-06/image-1719569840338.png)
[](https://docs.ultra.cc/uploads/images/gallery/2024-06/image-1719570427683.png)
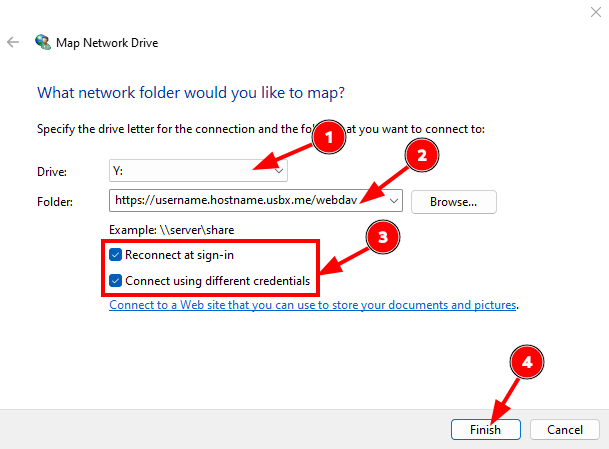
- Select the  `Drive:` letter of your preference
- For
`Drive:` letter of your preference
- For  `Folder:` use `https://username.hostname.usbx.me/webdav`
- username is the username of your Ultra.cc service
- hostname is the Ultra.cc server your service is on
- Check the box
`Folder:` use `https://username.hostname.usbx.me/webdav`
- username is the username of your Ultra.cc service
- hostname is the Ultra.cc server your service is on
- Check the box  `Reconnect at sign-in` and `Connect using different credentials`
- Finally, click
`Reconnect at sign-in` and `Connect using different credentials`
- Finally, click  `Finish`
[](https://docs.ultra.cc/uploads/images/gallery/2024-06/image-1719570527850.png)
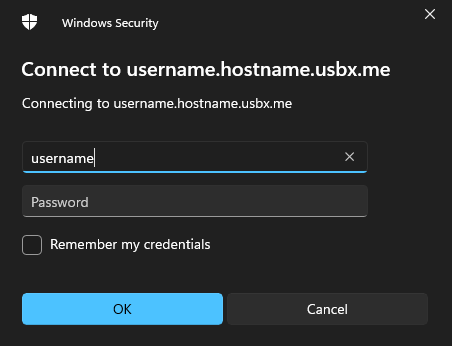
- You will then be presented with a login box requesting your Ultra.cc service username and HTTP password
- You can check the `Remember my credentials` box to save your password
- Enter your username and password, then press the **OK** button.
You will now see your Ultra.cc home path mounted at the drive letter you selected in the previous steps. If you selected `Remember my credentials` then your WebDAV mount will automatically be remounted upon restarting your Windows machine.
#### Mac
- In the **Finder** on your Mac, select **Go** > **Connect to Server**
- In the **Server Address** field, enter `https://username.hostname.usbx.me/webdav`
- Make sure to replace `username` and `hostname` with your Ultra username and the hostname of the server your service is deployed on.
- Click **Connect**
- When prompted to enter your login credentials, use your Ultra username and the HTTP password, which can be found on the **Connect** tab of your [UCP](https://cp.ultra.cc)
- If you want to disconnect your WebDAV mount, find the mount in the **Finder** and Control-click, then choose **Eject**.
#### Linux (Ubuntu)
`Finish`
[](https://docs.ultra.cc/uploads/images/gallery/2024-06/image-1719570527850.png)
- You will then be presented with a login box requesting your Ultra.cc service username and HTTP password
- You can check the `Remember my credentials` box to save your password
- Enter your username and password, then press the **OK** button.
You will now see your Ultra.cc home path mounted at the drive letter you selected in the previous steps. If you selected `Remember my credentials` then your WebDAV mount will automatically be remounted upon restarting your Windows machine.
#### Mac
- In the **Finder** on your Mac, select **Go** > **Connect to Server**
- In the **Server Address** field, enter `https://username.hostname.usbx.me/webdav`
- Make sure to replace `username` and `hostname` with your Ultra username and the hostname of the server your service is deployed on.
- Click **Connect**
- When prompted to enter your login credentials, use your Ultra username and the HTTP password, which can be found on the **Connect** tab of your [UCP](https://cp.ultra.cc)
- If you want to disconnect your WebDAV mount, find the mount in the **Finder** and Control-click, then choose **Eject**.
#### Linux (Ubuntu)
Depending on which Linux distro you are using, the WebDAV URL protocol will be different. For example, the URL could be prepended with davs://, webdavs:// or https://. Always reference the documentation specific to your Linux distro.
The process of configuring a network drive on Linux will be different depending on what distro and packages you are using. But the general steps are as follows.
- Open your **File Explorer**, for example **Dolphin**
- Under the **Network** tab, click **Add Network Location**
- Select **WebFolder** (webdav).
- Enter your WebDAV URL and login credentials
- **URL:** `https://username.hostname.usbx.me/webdav`
- **Username:** Your Ultra username
- **Password:** Your HTTP password, which can be found on the **Connect** tab of your [UCP](https://cp.ultra.cc)
### Rclone
- To access your Ultra service on your local machine with a Rclone WebDAV remote, make sure you have [Rclone](https://rclone.org/) installed.
- Then, execute the following command on your local machine:
```
user@hostname:~$ rclone config
No remotes found - make a new one
n) New remote
s) Set configuration password
q) Quit config
n/s/q>
```
- Press `n` and then `ENTER`. Type the name you wish to use for your WebDAV remote, and then press `ENTER` once more. In this guide, we will use `ultra` as the remote name.
- Scroll through the list of supported remotes and find the WebDAV entry. Once you have found WebDAV, enter the corresponding number and press `ENTER`. As this is a living list of remotes, that grows with time, the number for WebDAV might change.
```
Type of storage to configure.
Enter a string value—Press Enter for the default ("").
Choose a number from below, or type in your own value
...
50 / Uptobox
\ (uptobox)
51 / WebDAV
\ (webdav)
52 / Yandex Disk
\ (yandex)
...
```
- Next, you will be prompted to enter the URL to connect to.
- Enter your WebDAV URL in the format of `https://username.hostname.usbx.me/webdav`
- Make sure to replace `username` and `hostname` with your Ultra username and the hostname of the server your service is deployed on.
```
Option url.
URL of http host to connect to.
E.g. https://example.com.
Enter a value.
url>
```
- Next, you will be asked to select a vendor. Select `Other site/service or software`. Currently, that is number `7`, but this might change in the future.
```
Option vendor.
Name of the WebDAV site/service/software you are using.
Choose a number from below, or type in your own value.
Press Enter to leave empty.
1 / Fastmail Files
\ (fastmail)
2 / Nextcloud
\ (nextcloud)
3 / Owncloud
\ (owncloud)
4 / Sharepoint Online, authenticated by Microsoft account
\ (sharepoint)
5 / Sharepoint with NTLM authentication, usually self-hosted or on-premises
\ (sharepoint-ntlm)
6 / rclone WebDAV server to serve a remote over HTTP via the WebDAV protocol
\ (rclone)
7 / Other site/service or software
\ (other)
vendor>
```
- Next, you will be asked for a username, enter your Ultra username.
```
Option user.
User name.
In case NTLM authentication is used, the username should be in the format 'Domain\User'.
Enter a value. Press Enter to leave empty.
user>
```
- Next, you will be asked to use a password, press `y` and `ENTER` and you will be prompted to enter your password.
- Enter your HTTP password, which can be found on the **Connect** tab of your [UCP](https://cp.ultra.cc)
- Do note, while entering your password, no `**********` characters will be shown.
```
Option pass.
Password.
Choose an alternative below. Press Enter for the default (n).
y) Yes, type in my own password
g) Generate random password
n) No, leave this optional password blank (default)
y/g/n> y
Enter the password:
password:
Confirm the password:
password:
```
- Next, you will be asked to enter a bearer token.
- Press `ENTER` to leave empty.
```
Option bearer_token.
Bearer token instead of user/pass (e.g. a Macaroon).
Enter a value. Press Enter to leave empty.
bearer_token>
```
- Finally, you will be asked to edit the advanced config.
- Enter `n` and press `ENTER`.
```
Edit advanced config?
y) Yes
n) No (default)
y/n>
```
- You will now see a summary of your WebDav remote configuration. Make sure you have entered the correct details.
- Confirm by pressing `y` and `ENTER`.
```
Configuration complete.
Options:
- type: webdav
- url: https://username.hostname.usbx.me/webdav
- vendor: rclone
- user: username
- pass: *** ENCRYPTED ***
Keep this "ultra" remote?
y) Yes this is OK (default)
e) Edit this remote
d) Delete this remote
y/e/d>
```
- Then, press `q` to exit the Rclone configurator.
- To confirm that your Rclone WebDav remote is working as it should, you can list your remote directory contents by executing the following command:
- Make sure to replace `ultra` with the name you previously selected for your remote.
```
rclone lsd ultra:
```
- If successful, you should see the contents of your remote be listed.
```
user@hostname:~$ rclone lsd ultra:
-1 2024-04-29 06:23:13 -1 bin
-1 2024-04-16 11:01:42 -1 downloads
-1 2024-04-16 15:04:29 -1 media
-1 2023-12-03 20:10:21 -1 watch
-1 2024-06-28 11:44:40 -1 webdav
-1 2024-04-16 10:51:45 -1 www
```
- Optionally, you can now set up your WebDAV remote as an mount. Please refer to [this guide](https://rclone.org/commands/rclone_mount/) for more information.
- Done!