Unofficial Utility Scripts
These are unofficial utility scripts made to help you manage and monitor your Ultra.cc service.
- Application Monitor
- Application Update Notifier
- Disk Usage Monitor
- External Backup Script using Rclone
- External Backup Script using Rclone mount
- External Backup Script using Rsync
- Factory Reset
- File Cleaner
- FTP/SFTP Transfer Script
- Remote Sync Tool
- Restore Default File/Folder Structure
- Traffic Monitor
- Storage/Traffic API Endpoint
Application Monitor
The Application monitor script can be used to automatically restart applications if they go offline unexpectedly. The activity can be logged to a log file or be sent to Discord. The script will monitor all official applications that have been installed via the UCP.
This is an unofficial script that is provided for your convenience. The script is provided as-is and may not be updated or maintained by Ultra.cc. Clients are welcome to use and customize unofficial scripts for their unique needs and requirements. Unofficial support may be offered via Discord only and at the sole discretion of Ultra.cc staff. Use at your own risk.
Installation
Before you can proceed with installing the Application monitor script, Python needs to be version 3.6 or above.
Upgrade Python
- Upgrade Python to 3.6 or higher, see guide here
With Python updated to version 3.6 or above, you can proceed the installation.
Install Application Monitor
- Execute the following command:
bash <(wget -qO- https://scripts.ultra.cc/util/All_app_monitor/app_monitor_installer.sh)
- Type
confirmto proceed with the installation. - Next, you will be presented with three options:
Please choose option from below if you want notification on discord or info as a log file on your service
1. Store Applications status on your service at {~/script/app_monitor}
2. To get application status on your Discord(You need Discord Webhook for it)
3. To uninstall the script.
Please select option 1 or 2:
OPTION 1:
- Press
1to store application status in a log file on your service. PressENTERto confirm. - Press
ENTERto confirm.
OPTION 2:
- Press
2to push application status notifications to Discord via webhook. PressENTERto confirm. - Paste your Discord webhook URL.
- Press
ENTERto confirm.
Uninstallation
- Execute the following command:
bash <(wget -qO- https://scripts.ultra.cc/util/All_app_monitor/app_monitor_installer.sh)
- Type
confirmto proceed with the installation. - Next, you will be presented with three options:
- Press
3to uninstall script. PressENTERto confirm.
The script will ask you to confirm the uninstallation with YES or NO.
- Press
1for uninstall. PressENTERto confirm.
Log Location
- For users who are storing logs, they can be found at these locations:
-
Torrent Client Logs:
~/scripts/app_monitor/torrent_clients.log -
Docker Application Logs:
~/scripts/app_monitor/docker_apps.log
Caveats
- An issue that may occur with manual upgrades of containerized applications
The script checks all applications periodically and either restarts or repair them. If you upgrade an application manually, it will be down for a certain amount of time. If the script happens to run when the application is down due to your manual upgrade action, the script will queue another attempt to repair.
Application Update Notifier
The Application Update Notifier script will monitor the applications you have installed from the UCP. When a new update is available, a notification will be sent via Discord Webhook.
From time-to-time, Ultra.cc freeze an application at a particular release due to bugs or instability in newer versions. This script cannot identify these situations.
This is an unofficial script that is provided for your convenience. The script is provided as-is and may not be updated or maintained by Ultra.cc. Clients are welcome to use and customize unofficial scripts for their unique needs and requirements. Unofficial support may be offered via Discord only and at the sole discretion of Ultra.cc staff. Use at your own risk.
Installation
Before starting the installation, make sure to have a Discord Webhook URL ready. For more information on how to create one, follow this link.
- Connect to your Ultra.cc slot via SSH, see guide here
- Once connected, execute the following command:
bash <(wget -qO- https://scripts.ultra.cc/util/Latest-VersionNotifier/main.sh)
- Type
confirmand pressENTERto confirm - Press
1andENTERto proceed with the installation (If the script is already installed, and you want to update the Discord Webhook URL, press3to upgrade the script) - Wait for the installation process to finish
- Paste Discord Webhook URL and press
ENTER
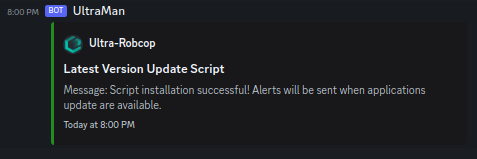
- After the script has been successfully installed, a notification should appear on Discord, as the above image shows.
- Done!
Uninstallation
- Execute the following command:
bash <(wget -qO- https://scripts.ultra.cc/util/Latest-VersionNotifier/main.sh)
- Type
confirmand pressENTERto confirm - Press
2andENTERto proceed the uninstallation - Press
YandENTERto confirm - Done!
Disk Usage Monitor
The Disk Usage Monitor script will monitor your disk space and send a notification via Discord when you are running out of disk space.
This is an unofficial script that is provided for your convenience. The script is provided as-is and may not be updated or maintained by Ultra.cc. Clients are welcome to use and customize unofficial scripts for their unique needs and requirements. Unofficial support may be offered via Discord only and at the sole discretion of Ultra.cc staff. Use at your own risk.
Prerequisites
- Familiarity with the Linux command line.
- Command execution via SSH
- Discord Webhook URL
How It Works
- The script uses the
spaceandquotavalues returned by the commandquota -sto calculate disk usage. - First, you will be asked to choose whether you wish to Install or Uninstall the script.
- Then, you will be asked to provide a Discord Webhook URL. This will be used to send notifications to you when your disk is full.
- The trigger condition is 90% usage of the total disk space.
- Optionally, the script can also stop all torrent clients and usenet downloaders on your service once 90% of your disk space is used up.
The script is experimental. Please do not rely on it to manage your disk usage. Feedback is welcome for improvements via Discord or tickets.
Installation
- Execute the following command via SSH:
bash <(wget -qO- https://scripts.ultra.cc/util-v2/Ultra-Quota-Checker/main.sh)
- Type
1and confirm withENTERto proceed with the installation - When prompted, paste your Discord Webhook URL and press
ENTER - Next, you will be asked if you want to stop torrent clients when your storage quota has been filled
- Type
yesornoand pressENTERto confirm
- Type
- A cronjob to check your storage quota will be set up to run every 3rd minute
- Done!
Logging
-
Log file location:
~/scripts/quota_check/quota.log
Uninstallation
- Execute the following command:
bash <(wget -qO- https://scripts.ultra.cc/util-v2/Ultra-Quota-Checker/main.sh)
- Type
2and confirm withENTERto proceed with the uninstallation - Done!
External Backup Script using Rclone
This script allows for an automatic backup of important information related to the configuration of your applications, excluding Plex. It can then be configured to store it or either Google drive or a local folder on your Ultra.cc service.
This is an unofficial script that is provided for your convenience. The script is provided as-is and may not be updated or maintained by Ultra.cc. Customers are welcome to use and customize unofficial scripts for their unique needs and requirements. Unofficial support may be offered via Discord only and at the sole discretion of Ultra.cc staff. Use at your own risk.
Initial Setup
-
Create three new folders, one may already exist this is fine
-
mkdir ~/lock -
mkdir ~/scripts -
mkdir ~/autobackup
-
-
Then you need to enter the new folder called scripts
-
cd ~/scripts
-
-
And create the script file
-
nano backup.sh
-
-
Paste the following lines into it :
#!/bin/bash
exec {lock_fd}>/home/your-username/lock/BackupLock || exit 1
flock -n "$lock_fd" || { echo "ERROR: flock() failed." >&2; exit 1; }
if [ -z "$STY" ]; then exec screen -dm -S autobackup /bin/bash "$0"; fi

DATE=$(date +%Y-%m-%d-%H%M%S)
tar --exclude="$HOME"/.config/plex -czvf "$HOME"/autobackup/MyUSBbackup-$DATE.tar.gz "$HOME"/.apps "$HOME"/.config


rclone copy -v --bwlimit=5M /home/your-username/autobackup/ remotename:/”My USB Backup”


flock -u "$lock_fd"
- Save it by pressing
Ctrl+X then Y then Enter.
You will need to change the paths home/your-username to match your own home and username. You will also be required to change remotename to match your rclone remote name which can be found with the rclone config command or rclone listremotes. These need to be run via SSH Command line.
Testing
-
So to test first we navigate to ~/scripts folder we made earlier
-
cd ~/scripts
-
-
Then we need to allow the backup.sh permissions to run
-
chmod +x backup.sh
-
-
And finally, run it
-
./backup.sh
-
If all went well * tar -ztvf ~/autobackup/.tar.gz should show a bunch of files starting with /home/username/.config and /home/username/.apps inside.
If the script is running and you were to rerun it, you may see an error message
“Flock Failed” this is a file lock to stop multiple downloads running and is
normal. If you are sure it isn’t running you can delete the lock file from
~/lock. You can also check the progress of the backup script, which is running
in a screen with the command screen -rd autobackup and then to exit the screen while keeping the command running use the keyboard combo CONTROL + A + D
If all is well after the test, we can automate the check via crontab
- Open crontab with:
-
crontab -e
-
- Inside the crontab add a single line under everything else in the file that
looks like this:
-
0 0 */3 * * /home/your-username/scripts/backup.sh
-
- Save it by pressing Ctrl+X then Y then Enter.
The script will now run every 3 days, checking for files that have changed and syncing them to the destination folder.
External Backup Script using Rclone mount
This script will back up your application config files, databases, and torrent sessions (not the torrent data). For it to work you need an rclone mount set up on your service.
This is an unofficial script that is provided for your convenience. The script is provided as-is and may not be updated or maintained by Ultra.cc. Clients are welcome to use and customize unofficial scripts for their unique needs and requirements. Unofficial support may be offered via Discord only and at the sole discretion of Ultra.cc staff. Use at your own risk.
Prerequisites
- Familiarity with the Linux command line.
- Command execution via SSH
- An Rclone mount already setup on your Ultra.cc service.
Installation
- Connect to your service via SSH
- Execute the following command:
bash <(wget -qO- https://scripts.ultra.cc/util-v2/Ultra-Backup/main.sh)
- Type
1andENTERto proceed with the installation - Type your Rclone remote name, e.g
gdriveand pressENTERto confirm - Done!
Configuration
- At 00:00 on every Sunday the script will now upload the backup to your remote cloud storage.
- To change the backup interval, execute
crontab -eand find the line with theUltra_Backupscript. Use crontab.guru to change the interval at the beginning of the line.
Logging
- Log file can be found at
~/scripts/Ultra_Backup/backup.log
Uninstallation
- Connect to your service via SSH
- Execute the following command:
bash <(wget -qO- https://scripts.ultra.cc/util-v2/Ultra-Backup/main.sh)
- Type
2andENTERto proceed with the uninstallation. - Done!
External Backup Script using Rsync
This script will create an archived backup in .tar.gz format and transfer the backup with rsync.
This is an unofficial script that is provided for your convenience. The script is provided as-is and may not be updated or maintained by Ultra.cc. Customers are welcome to use and customize unofficial scripts for their unique needs and requirements. Unofficial support may be offered via Discord only and at the sole discretion of Ultra.cc staff. Use at your own risk.
First you will need to create a SSH key to be later imported to the destination host.
Creating Public and Private Keys
- On your slot, type in
ssh-keygenand press ENTER. This should start generating public and private key pairs.- By default it generates a 2048-bit RSA key pair which is sufficient in most cases
$ ssh-keygen
Generating public/private rsa key pair.
-
We also recommend to generating the following keys which are more secure than the default.
- To generate an RSA 4096 key:
ssh-keygen -b 4096- Much more secure than 2048 bit is slower when logging into your slot
- To generate a ed25519 key:
ssh-keygen -t ed25519- New algorithm, has a smaller key size and faster generation with security comparable to RSA ~3000
- To generate an RSA 4096 key:
-
Here, you can press ENTER to save the key pair into the
.ssh/subdirectory in your home directory.
$ ssh-keygen -b 4096
Generating public/private rsa key pair.
Enter file in which to save the key (/your_home/.ssh/id_rsa):
- Here you optionally may enter a secure passphrase. You can press ENTER to skip putting in a passphrase
- It is recommended to add in a passphrase
- A passphrase adds an additional layer of security to prevent unauthorized users from logging in should they have your private key
$ ssh-keygen -b 4096
Generating public/private rsa key pair.
Enter file in which to save the key (/your_home/.ssh/id_rsa):
Enter passphrase (empty for no passphrase):
Enter same passphrase again:
- Then you should see the following output. You now have a public (
id_rsa) and a private key (id_rsa.pub) stored in your Home folder (or on the path you set) that you can use to authenticate when logging into SSH.
$ ssh-keygen -b 4096
Generating public/private rsa key pair.
Enter file in which to save the key (/your_home/.ssh/id_rsa):
Enter passphrase (empty for no passphrase):
Enter same passphrase again:
Your identification has been saved in /your_home/.ssh/id_rsa.
Your public key has been saved in /your_home/.ssh/id_rsa.pub.
The key fingerprint is:
SHA256:x23Tr+Ee5TlowA+U9HEquagnog3O09EYHQ346WY usbdocs@usbdocs
The key's randomart image is:
+---[RSA 4096]----+
|=.=. . o+..      |
|.B  o  .oo.      |
|o.o  oo  o       |
|.+ . oo ...      |
| .. .  +S+ .     |
|.      =o==      |
|.o.   o.=o.      |
|o... oE.+o       |
| .. .++..o.      |
+----[SHA256]-----+
Copying the new keys to the destination host
Type in ssh-copy-id username@destinationip
$ ssh-copy-id usbdocs@85.145.22.545
- The following output appears. This is normal. This means that your computer does not recognize your slot. This will happen the first time you connect to a new host. Type
yesand press ENTER to continue.
$ ssh-copy-id destinationusername@85.145.22.545
/usr/bin/ssh-copy-id: INFO: Source of key(s) to be installed: "/home/usbdocs/.ssh/id_rsa.pub"
The authenticity of host '85.145.22.545 (85.145.22.545)' can't be established.
ECDSA key fingerprint is SHA256:9mQKWg1PVPZtxcDASEDdasawrqw.
Are you sure you want to continue connecting (yes/no)?
- Type in the SSH password for the destination
$ ssh-copy-id destinationusername@85.145.22.545
/usr/bin/ssh-copy-id: INFO: Source of key(s) to be installed: "/home/usbdocs/.ssh/id_rsa.pub"
The authenticity of host '85.145.22.545 (85.145.22.545)' can't be established.
ECDSA key fingerprint is SHA256:9mQKWg1PVPZtzZ6d5nDjcWUb/Flkuq5VHYRrvwTeRTE.
Are you sure you want to continue connecting (yes/no)? yes
/usr/bin/ssh-copy-id: INFO: attempting to log in with the new key(s), to filter out any that are already installed
/usr/bin/ssh-copy-id: INFO: 1 key(s) remain to be installed -- if you are prompted now it is to install the new keys
kbguides@kbguides.lw902.usbx.me's password:
- Once you entered your password, OpenSSH will connect to the slot. It will then copy the contents of your
~/.ssh/id_rsa.pubkey into a file in your slot's home directory at~/.sshcalledauthorized_keys. Then you should see the following output. At this point, yourid_rsa.pubkey has been uploaded to the slot.
Number of key(s) added: 1

Now try logging into the machine, with: "ssh '85.145.22.545'" and check to make sure that only the key(s) you wanted were added.
- Once everything is done, you can login to your destination from your slot with just
ssh destinationusername@85.145.22.545which will go straight to your shell securely. If you set a password for your keys, enter your password.
The Shell script
This Shell script will allow for an automatic backup of important information related to the configuration of your applications excluding Plex.. It can then be configured to store it or either google drive or a local folder on your Ultras Slot.
Initial Setup and Configuration
Your first step is to find the full path of your home directory
pwd
Something like this will be outputted be sure to make a note of it :
/home1/usbdocs
then create three new folders, one may already exist this is fine
mkdir ~/lock
mkdir ~/scripts
mkdir ~/autobackup
Then you need to enter the new folder called scripts
cd ~/scripts
And create the script file
nano backup.sh
Paste the following lines into it :
#!/bin/bash
exec {lock_fd}>/home1/usbdocs/lock/BackupLock || exit 1
flock -n "$lock_fd" || { echo "ERROR: flock() failed." >&2; exit 1; }
if [ -z "$STY" ]; then exec screen -dm -S autobackup /bin/bash "$0"; fi

DATE=$(date +%Y-%m-%d-%H%M%S)
tar --exclude="$HOME"/.config/plex -czvf "$HOME"/autobackup/MyUSBbackup-$DATE.tar.gz "$HOME"/.apps "$HOME"/.config


rsync -aHAXxv --numeric-ids --info=progress2 -e "ssh -p portnumberhere" /home1/usbdocs/autobackup username@destinationip:/home/username/destination/folder


flock -u "$lock_fd"
Save it by pressing Ctrl+X then Y then Enter.
You will need to change the paths home1/usbdocs to match your own home and username. You will also be required to change destinationip to match your destination
Testing
So to test first we navigate to ~/scripts folder we made earlier
cd ~/scripts
Then we need to allow the backup.sh permissions to run
chmod +x backup.sh
And finally, run it
./backup.sh
If all went well * tar -ztvf ~/autobackup/.tar.gz should show a bunch of files starting with /home/username/.config and /home/username/.apps inside.
If the script is running and you were to rerun it, you may see an error message
“Flock Failed” this is a file lock to stop multiple downloads running and is
normal. If you are sure it isn’t running you can delete the lock file from
~/lock. You can also check the progress of the backup script, which is running
in a screen with the command screen -rd autobackup
If all is well after the test, we can automate the check via crontab
Open crontab with
crontab -e
You may have a choice of editors. We recommend Nano
Inside the crontab add a single line under everything else in the file that looks like this
0 0 */3 * * /home/usbdocs/backup.sh
Save it by pressing Ctrl+X then Y then Enter.
The script will now run every 3 days, checking for files that have changed and syncing them to the destination folder
Factory Reset
This script can be used to completely or partially reset your Ultra.cc service.
This is an unofficial script that is provided for your convenience. The script is provided as-is and may not be updated or maintained by Ultra.cc. Clients are welcome to use and customize unofficial scripts for their unique needs and requirements. Unofficial support may be offered via Discord only and at the sole discretion of Ultra.cc staff. Use at your own risk.
The script cannot uninstall applications from your UCP so you have to uninstall them manually but it will not take more than a second because all containers will be removed by the script.
Any data deleted or application uninstalled by the script cannot be reverted. Please do not run the script without backing up important data.
Usage Instructions
-
Connect to your service via SSH.
-
Execute the following command:
bash <(wget -qO- https://scripts.ultra.cc/util-v2/Ultra-Cleanup/main.sh)
- Once you have executed the script, you will be given the following options.
1) Complete reset - delete all data and config.
2) Delete all extra folders and files.
3) Uninstall all applications and their config but don't delete data.
4) Delete data from default directories
Option 1
This option will delete all data on your service, uninstall all your applications, delete configuration files of your applications and will reinstall your webserver (Nginx). The Bash shell will also be reset to its default state.
Option 2
This option will delete all extra files and directories other than the default files and directories on your service.
The default files and directories are media files downloads .bashrc .bash_history .bash_logout watch .wget-hsts .config .profile www bin .apps .ssh.
Option 3
This option will uninstall all your applications and their configuration files but will not delete your data.
It will not remove the applications from your UCP, as this needs to be handled manually. Due to all application data already being deleted, each application uninstall will only take a couple of seconds.
Option 4
This option will delete all data from the default directories, such as bin downloads media watch www.
File Cleaner
This Shell script allows for automatic deletion of files a set number of days old from the date of creation. For example, your download client downloads something on the 18th of the month and your script is set for 3 days the file will not be deleted until the 22nd which causes it to pass the threshold and be deleted. The number of days can be changed for any number of custom paths by simply copying the template and adjusting the marked values to fit your needs. We will use the ~/archive in this example with a timer of 2 days. You can use this as a template to create your own deletion paths and timers.
This is an unofficial script that is provided for your convenience. The script is provided as-is and may not be updated or maintained by Ultra.cc. Customers are welcome to use and customize unofficial scripts for their unique needs and requirements. Unofficial support may be offered via Discord only and at the sole discretion of Ultra.cc staff. Use at your own risk.
Please be aware that incorrect configuration will remove any number of files. THEY CAN NOT BE RECOVERED. This script will be totally unsupported due to its dangerous nature. PLEASE be VERY careful!
Script Creation
create a new folder if it does not already exist
mkdir ~/scripts
Then you need to enter the new folder
cd ~/scripts
And create the script file
nano cleanup.sh
Paste the following lines into it :
#!/bin/bash
find /home/ultradocs/archive/* -type d -ctime +2 -exec rm -rf {} \;
Save it by pressing Ctrl+X then Y then Enter.
Now before we activate the script we will break it down into its parts that are changeable.
/home/ultradocs/"archive"/*
This can be any path you wish but must include the * symbol at the end or else you risk removing the containing folder itself in this case "archive" we do not wish to do this only to clear old files from the Directory. The quotations around archive are just to tell Linux that the space in the middle is part of the folder’s name and only needs including if the folder your targeting has spaces within the name.
-ctime +2
This tells the find command to pass any file two days older than its creation date to the remove command which can obviously be adjusted to any time frame you wish.
The rest of the commands in the set should not be messed with as it could have unintended results. Just to be sure we highlight another example of the line before we activate the automation and give it a manual test.
find /home/ultradocs/archive/* -type d -ctime +4 -exec rm -rf {} \;
So using what we learn above we can break it down:
The directory being targeted is archive and the path has a * symbol at the end meaning anything inside archive is affected by the removal.
-ctime +4
Is set to 4 meaning it will only delete files 4 days older than their creation (or download) date.
So now we understand how it works let’s test it and activate it
Testing
So to test first we navigate to ~/scripts folder we made earlier
cd ~/scripts
Then we need to allow the cleanup.sh permissions to run
chmod +x cleanup.sh
And finally, run it
./cleanup.sh
You may get output like this :
find: ‘/home/ultradocs/archive/*’: No such file or directory
This is totally fine as either no files match your filter OR its deleted the files that do match your filter and cannot find anymore.
We’d recommend you test this on a folder first with a value of -ctime +0 to confirm all works if the previous test didn’t make it clear. This will delete all files inside a folder so be careful not to put in a pathway you care about.
Setting the automation
If all is well after the test we can automate the check via crontab
Open crontab with
crontab -e
You may have a choice of editors we recommend Nano
Inside the crontab add a single line under everything else in the file that looks like this
0 */4 * * * /home/ultradocs/scripts/cleanup.sh
Save it by pressing Ctrl+X then Y then Enter.
The script will now run every 4 hours checking for files that have crossed the day threshold you have set and remove them.
You can add many lines to the same script by just putting one line under another.
FTP/SFTP Transfer Script
This script will transfer your data from your Ultra.cc slot to another location. Simply add data to the Ultra_Sync directory, and it will automatically be transferred to your destination of choice.
This is an unofficial script that is provided for your convenience. The script is provided as-is and may not be updated or maintained by Ultra.cc. Clients are welcome to use and customize unofficial scripts for their unique needs and requirements. Unofficial support may be offered via Discord only and at the sole discretion of Ultra.cc staff. Use at your own risk.
Requirements
- Both of the remote services need SSH access enabled
- Python 3.6+ needs to be installed on source machine
Installation
Before you can proceed with installing the FTP/SFTP transfer script, Python needs to be version 3.6 or above.
Upgrade Python
- Upgrade Python to 3.6 or higher, see guide here
With Python updated to version 3.6 or above, you can proceed the installation.
Script Installation
- Connect to your Ultra.cc slot via SSH
- Execute the following command:
bash <(wget -qO- https://scripts.ultra.cc/util/Ultra_Sync/ultra_transfer_installer.sh)
- Type
confirmto proceed with the installation - Type
1and press ENTER
At this point in the installation, you will be asked to enter access details for the destination of the transfer. Below you will find explanations for each access detail.
- Username: Username of your destination machine
- Hostname: Hostname (eg. servername.usbx.me or 11.22.33.44) of your destination machine
- Password: SSH/FTP password of your destination machine
- Port: Default port is 22, but if you use another one on your destination machine, enter that one.
- Protocol: FTP or SFTP
When you have your access details ready, proceed with the installation.
- Type your remote destination username and press ENTER
- Type your remote destination hostname and press ENTER
- Type your remote destination password and press ENTER
- Type your remote destination port and press ENTER
- Select your remote destination protocol, press
1for FTP and2for SFTP. Press ENTER to confirm.
If you have entered all the access details successfully, the script installation is finished and the script has been started.
Uninstallation
- Execute the following command:
bash <(wget -qO- https://scripts.ultra.cc/util/Ultra_Sync/ultra_transfer_installer.sh)
- Type
confirmto proceed with the installation. - Next, you will be presented with three options:
- Press
2to uninstall script. PressENTERto confirm.
The script will ask you to confirm the uninstallation with YES or NO.
- Press
1for uninstall. PressENTERto confirm.
Usage Information
-
The script will create two directories. Ultra_sync directory on your source machine and Ultra_transfer on your destination machine. Files that you copy or move to the Ultra_sync directory on your source machine will be automatically transferred to the Ultra_transfer directory on your destination machine.
-
The transfer script will be running in a screen session. To check the progress of the transfer, simply execute
screen -r UltraSynctool. To detach from the screen session and leave the transfer running, pressCTRL+aand then pressd. -
If the script stops moving data, or you by mistake killed the screen session. You can restart the script again. This is done by executing the initial installation command, type
confirmand press ENTER. When presented with the three options, select option 3 (restart) and the script will restart and initiate a new screen session.
Remote Sync Tool
This script will facilitate a sync between two directories on two different remote services.
This is an unofficial script that is provided for your convenience. The script is provided as-is and may not be updated or maintained by Ultra.cc. Clients are welcome to use and customize unofficial scripts for their unique needs and requirements. Unofficial support may be offered via Discord only and at the sole discretion of Ultra.cc staff. Use at your own risk.
Requirements
- Both of the remote services need SSH access enabled
- Rsync needs to be installed on both remote services
Installation
- Login to your remote source service via SSH
- Execute the Ultra Sync Tool installation script via the following SSH command:
bash <(wget -qO- https://scripts.ultra.cc/util-v2/Ultra-Sync/main.sh)
- Type
1and pressENTER - Type your remote destination username and press
ENTER - Type your remote destination hostname and press
ENTER - Type your remote destination SSH password and press
ENTER - Type your remote destination SSH port (22) and press
ENTER - Done!
This script is experimental. Feedback and improvement suggestions are welcome via Discord or ticket.
Usage
- The script will generate an RSA encryption key for the remote source machine and upload it to the destination machine to facilitate passwordless login via SSH.
- Once the RSA encryption key is added to your destination machine, the script will create two directories. Ultra_sync directory on your source machine and Ultra_transfer on your destination machine.
- Lastly, the script will set up a cron job on your source machine that will run a rsync command every 4 hours. This will sync your data between the two directories.
Do NOT increase the rsync transfer speed if you are using a plan with HDD, as this will violate the Fair Usage Policy.
- The content of directory Ultra_sync on your source machine will sync to Ultra_transfer on your destination machine every 4 hours.
- If you delete or move data from Ultra_transfer directory on the destination machine it will be re-transferred at the next sync. To avoid this you need to delete the data from the source machine.
- If you have one of our NVMe plans you can increase the transfer speed by editing the rsync command.
- To edit the rsync command, execute
crontab -eand set--bwlimit=100000 - Press
ctrl+x, you will see a prompt asking to save, pressyandENTER
- To edit the rsync command, execute
Uninstallation
- Execute the following command:
bash <(wget -qO- https://scripts.ultra.cc/util-v2/Ultra-Sync/main.sh)
- Type
2and confirm withENTERto proceed with the uninstallation - Done!
Restore Default File/Folder Structure
This script will restore the mandatory files and directories for your Ultra.cc service to the default structure and re-install your nginx webserver. It will not overwrite any media files or application configuration files, except for any webserver files you have updated in ~/.apps/nginx.
This is an unofficial script that is provided for your convenience. The script is provided as-is and may not be updated or maintained by Ultra.cc. Customers are welcome to use and customize unofficial scripts for their unique needs and requirements. Unofficial support may be offered via Discord only and at the sole discretion of Ultra.cc staff. Use at your own risk.
The script is to be used if you have accidentally deleted the default files and directories required for your service to run.
Listed below are all the files and directories that will be restored.
-
~/.bashrc -
~/.profile -
~/bin -
~/.apps -
~/downloads -
~/media -
~/www
Additionally, a symbolic link will be created between ~/downloads and ~/www
Usage
- Connect to your Ultra.cc slot via SSH, see guide here
- Once connected, execute the following command:
bash <(wget -qO- https://scripts.ultra.cc/util/Ultra_restore/main.sh)
- You should see
Restoration process has been started... - Then you should see
Service has been restored to default - Done!
Traffic Monitor
This script will monitor your traffic usage and notify via Discord or log file at a threshold set by you.
This is an unofficial script that is provided for your convenience. The script is provided as-is and may not be updated or maintained by Ultra.cc. Clients are welcome to use and customize unofficial scripts for their unique needs and requirements. Unofficial support may be offered via Discord only and at the sole discretion of Ultra.cc staff. Use at your own risk.
Prerequisites
- Command execution via SSH
- Discord Webhook URL (Optional)
How It Works
- The script uses the
Traffic Availablevalue returned by the commandapp-traffic infoto calculate traffic usage. - First, you will be asked to choose the interval at which the script will check your traffic usage.
- Then, you will decide between getting notified via Discord and storing the warnings on a file.
- After that, you will get to set the threshold value at which you should get the warning. This is based on the percentage of available traffic.
- Optionally, the script can also stop all installed torrent clients on your service once the set threshold value is reached.
This script is experimental. Please do not rely on it to manage your upload traffic usage.
Installation
- Connect to your service via SSH
- Execute the following command:
bash <(wget -qO- https://scripts.ultra.cc/util-v2/Ultra-Traffic-Monitor/main.sh)
- Type
1and confirm withENTERto proceed with the installation - When prompted, type the interval (in minutes) to check your traffic. Press
ENTERto confirm. - Next, you will be asked if you want threshold warnings to be sent as a Discord notification, or to a text file stored on your service.
- Type
1for Discord notification.- Paste your Discord Webhook URL when prompted, press
ENTERto confirm
- Paste your Discord Webhook URL when prompted, press
- Type
2for text file.
- Type
- Next, set the threshold at which you want a warning notification, press
ENTERto confirm. - Next, you will be asked if you want to stop torrent clients when the traffic threshold has been reached.
- Type
yesornoand pressENTERto confirm
- Type
- A cronjob to check your traffic will be set up to run at the interval your previously selected.
- Done!
Warning File Location
- Only applicable to you if you choose to store the warnings to a file instead of Discord notifications.
- It will be stored at the following location:
~/scripts/traffic_monitor/warning.txt
Uninstallation
- Connect to your service via SSH
- Execute the following command:
bash <(wget -qO- https://scripts.ultra.cc/util-v2/Ultra-Traffic-Monitor/main.sh)
Storage/Traffic API Endpoint
This is an unofficial script that is provided for your convenience. The script is provided as-is and may not be updated or maintained by Ultra.cc. Clients are welcome to use and customize unofficial scripts for their unique needs and requirements. Unofficial support may be offered via Discord only and at the sole discretion of Ultra.cc staff. Use at your own risk.
The Storage/Traffic API Endpoint script will provide three API endpoints to your Ultra.cc service. The script will be installed as a Flask application in ~/scripts/Ultra_API and run in a screen session called UltraAPIpoints. At the moment, three API endpoints are provided, as shown below.
- Storage usage stats using
quota -s. - Traffic stats using
app-traffic info. - The above combined into one endpoint.
Installation
- Connect to your Ultra.cc service via SSH, see guide here
- Once connected, execute the following command:
bash <(wget -qO- https://scripts.ultra.cc/util-v2/Ultra-API/main.sh)
- Type
1andENTERto proceed with the installation- or, if you have already installed the script, and it is not responding. Press
3andENTERto restart the script. - or, if you have already installed the script, and require your authentication token. Press
4andENTER.
- or, if you have already installed the script, and it is not responding. Press
- Next, from the list of your unallocated ports, pick a port to use for the API endpoint script.
- Type the port that you want to use, press
ENTERto confirm. - To confirm your selection of port, type
confirmand pressENTER.
- Type the port that you want to use, press
- After the installation has been successfully completed, the below output should be shown.
- In your URL's,
username.hostnamewill be replaced with the username and hostname of your Ultra.cc service.
- In your URL's,
[INFO] Screen session Ultra-API is running.
[SUCCESS] Ultra service API Endpoints to get your service stats:
  ■ Complete Stats........:  https://username.hostname.usbx.me/ultra-api/total_stats
  ■ Storage Stats.........:  https://username.hostname.usbx.me/ultra-api/get_diskquota
  ■ Traffic Stats.........:  https://username.hostname.usbx.me/ultra-api/get_traffic
- The above URL's are where your API endpoints can be accessed.
Usage
Request Script
The python script below is just an example. It will only work if run from your home directory, not a subdirectory.
Once you have successfully installed the script, you are ready to start sending request to the API endpoints. Execute the below command to download a basic request script that we offer as a demonstration.
wget https://scripts.ultra.cc/util-v2/Ultra-API/requester.py
- Before you can use the request script you need to amend it and add your username, hostname, and authentication token. Execute the following command to open the script in an editor.
nano requester.py
- At the bottom, you will see the following:
url = "https://username.hostname.usbx.me/ultra-api/endpoint"  # Replace with your desired URL
auth_token = "YOUR_AUTH_TOKEN"  # Replace with your actual auth token
- In the URL string, replace
username.hostnamewith the username and hostname of your Ultra.cc service.- Username and hostname can be found on the UCP. The hostname of your service is the name of the server. For example, in
spica.usbx.methe hostname isspica.
- Username and hostname can be found on the UCP. The hostname of your service is the name of the server. For example, in
- In the auth_token string, replace
YOUR_AUTH_TOKENwith the auth token generated during the script installation. By executing the script installation command and selecting option4, it will print the auth token again. - Lastly, you need to amend the last bit of the URL with one of the endpoints printed at script installation. This is done by replacing
/endpointwith either of the three endpoints provided:-
/total-stats -
/get-diskquota -
/get-traffic
-
- If done correctly, it should look something like what you see below, but with your specific details:
url = "https://coolguy69.spica.usbx.me/ultra-api/total_stats"  # Replace with your desired URL
auth_token = "0JQ3LJOnXq7IiJyujlPFzR9S"  # Replace with your actual auth token
- To save your changes and exit the editor, press
ctrl+xandy, then pressENTERto confirm. - Next, run the request script by executing:
python requester.py
- If successful, you should see your stats presented like this:
Data from GET request:
{"service_stats_info":{"free_storage_bytes":9664750157824,"free_storage_gb":9001.0,"last_traffic_reset":"2023-08-22T00:00:00","next_traffic_reset":"2023-08-22T00:00:00","total_storage_unit":"G","total_storage_value":11176,"traffic_available_percentage":97.51,"traffic_used_percentage":2.489999999999995,"used_storage_unit":"G","used_storage_value":2175}}
GET request via curl
- Execute a GET request:
curl -X GET -H "Authorization: Bearer YOUR-AUTH-TOKEN" https://username.hostname.usbx.me/ultra-api/endpoint
- Make sure to replace
YOUR-AUTH-TOKEN,username.hostname, and/endpoint.
Uninstallation
- Execute the following command:
bash <(wget -qO- https://scripts.ultra.cc/util-v2/Ultra-API/main.sh)
- Press
2andENTERto proceed the uninstallation - Done!