This unofficial app installation script is provided for your convenience. The script is provided as-is and may not be updated or maintained by Ultra.cc. Clients are welcome to use and customize unofficial app installers for their unique needs and requirements. Unofficial support may be offered via Discord only and at the sole discretion of Ultra.cc staff. Use at your own risk and only proceed if you are comfortable managing the application on your own.
Autoscan replaces the default method of updating your Plex, Jellyfin, or Emby libraries by the use of webhooks sent from the Connect feature within Sonarr and Radarr. More information can be found here: [github.com/Cloudbox/autoscan](https://github.com/Cloudbox/autoscan) Notable benefits of Autoscan over Radarr/Sonarr Connect: - Will update efficiently the path of the media item(s) only, and not perform a full library scan. - This can lighten the use of HDD IO resources as well as remote storage API calls. - Has the ability to check for anchor files on mounts to prevent library updates in the case of the mount being offline.This installer, and guide, assumes that your Radarr/Sonarr and media server applications such as Plex, Jellyfin, or Emby, are all on the same service
## Prerequisites Autoscan will use a token to gain access to your media server application to perform its update functions. #### Plex Token * To find your Plex token, please visit this Plex article: [Finding an authentication token / X-Plex-Token](https://support.plex.tv/articles/204059436-finding-an-authentication-token-x-plex-token/) #### Jellyfin API Token * To create your Jellyfin API token for Autoscan first navigate to your Jellyfin menu in the top left-hand corner. [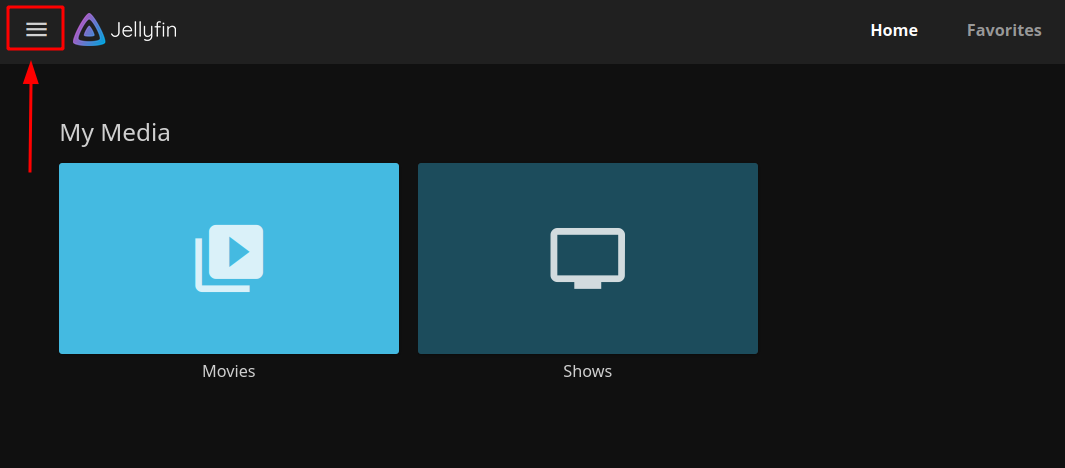](https://docs.ultra.cc/uploads/images/gallery/2023-01/jellyfin-menu.png) * Next select the Jellyfin Dashboard menu [](https://docs.ultra.cc/uploads/images/gallery/2023-01/jellyfin-dashboard.png) * Then select API Keys in the Advanced dashboard menu [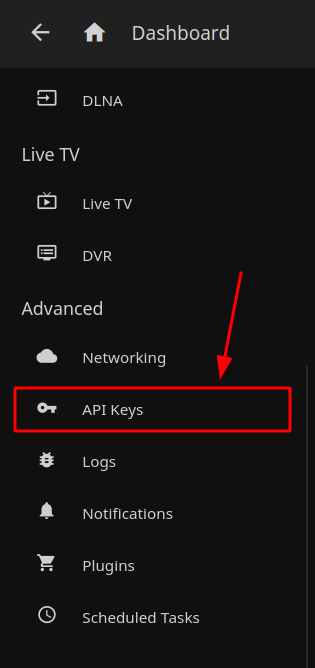](https://docs.ultra.cc/uploads/images/gallery/2023-01/jellyfin-api-keys.png) * Fom here you will need to click the `+` button to create a new API token [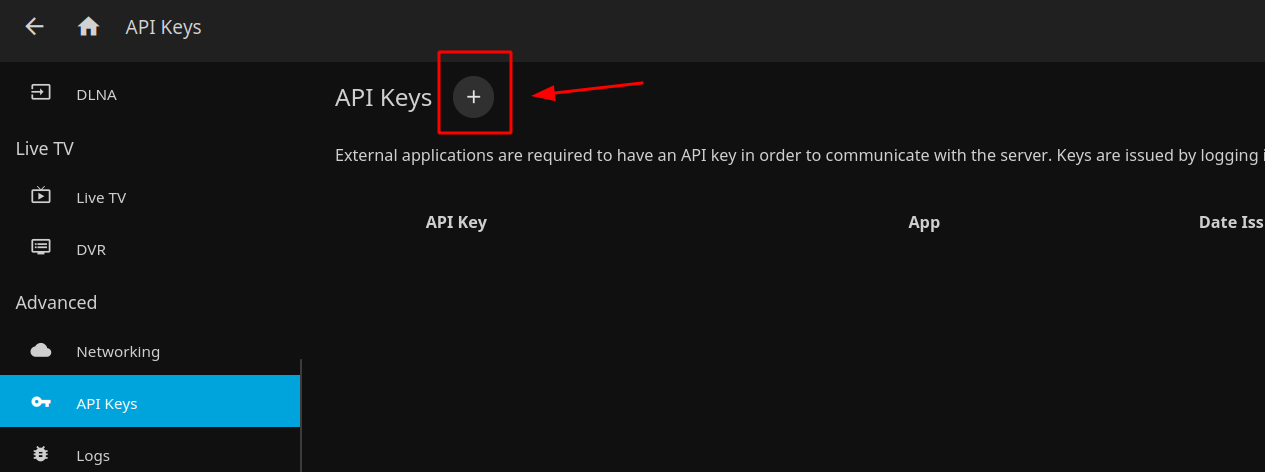](https://docs.ultra.cc/uploads/images/gallery/2023-01/jellyfin-api-keys-add.png) * Name your API Key and save it using the Save button [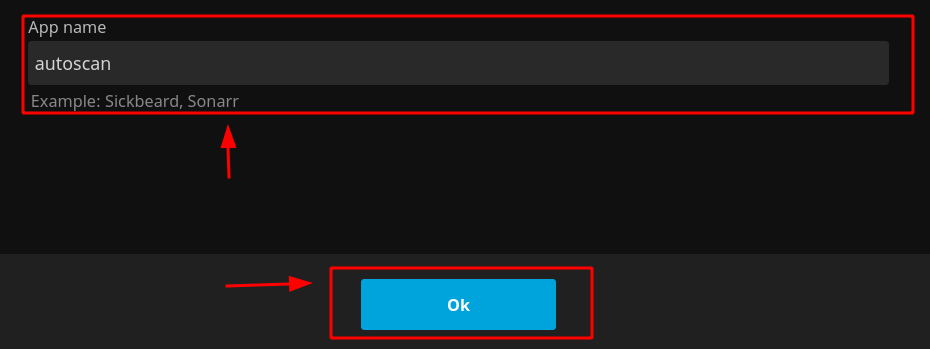](https://docs.ultra.cc/uploads/images/gallery/2023-01/jellyfin-api-key-name-save.png) * Finally, from here you will see your API Key to copy and save so that you may enter it when prompted by the autoscan installer script [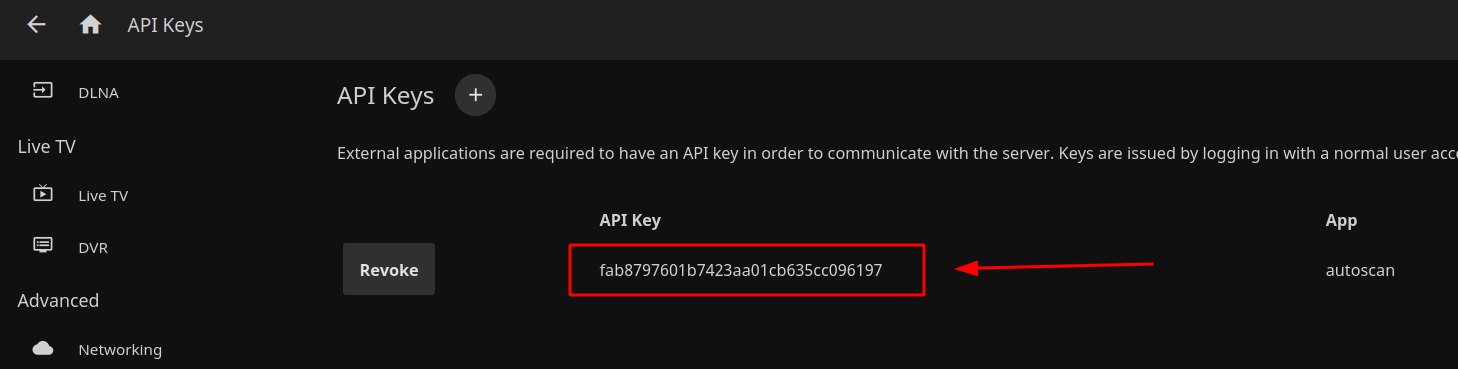](https://docs.ultra.cc/uploads/images/gallery/2023-01/jellyfin-api-keys-copy.png) #### Emby API Token * To create your Emby API token for autoscan first navigate to your Emby admin menu [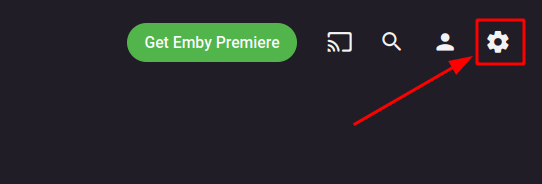](https://docs.ultra.cc/uploads/images/gallery/2023-01/emby-admin-menu.png) * Then select API Keys in the Advanced menu section [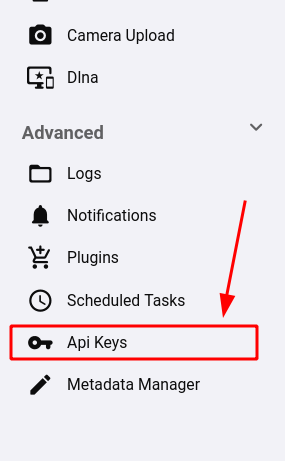](https://docs.ultra.cc/uploads/images/gallery/2023-01/emby-api-keys.png) * From here select the New Api Key button [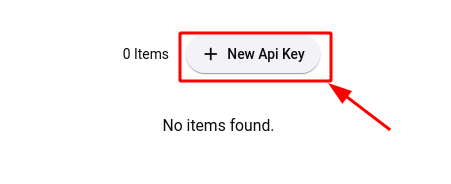](https://docs.ultra.cc/uploads/images/gallery/2023-01/emby-new-api-key.png) * Name your API Key and save it using the Save button [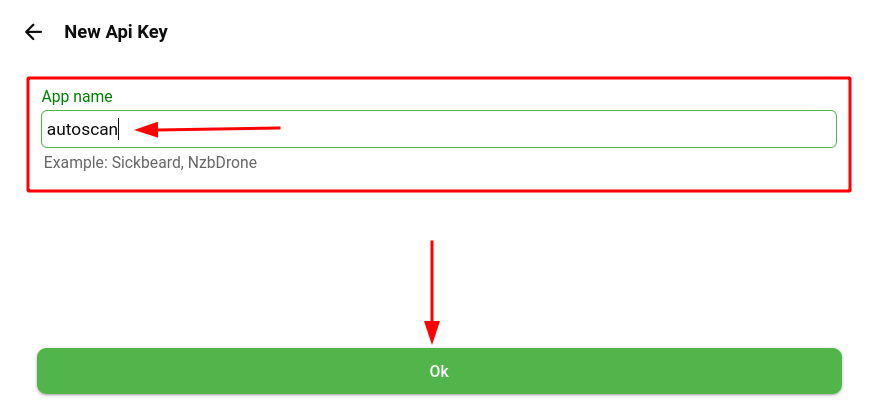](https://docs.ultra.cc/uploads/images/gallery/2023-01/emby-new-api-key-name-save.png) * Finally, from here you will see your API Key to copy and save so that you may enter it when prompted by the autoscan installer script [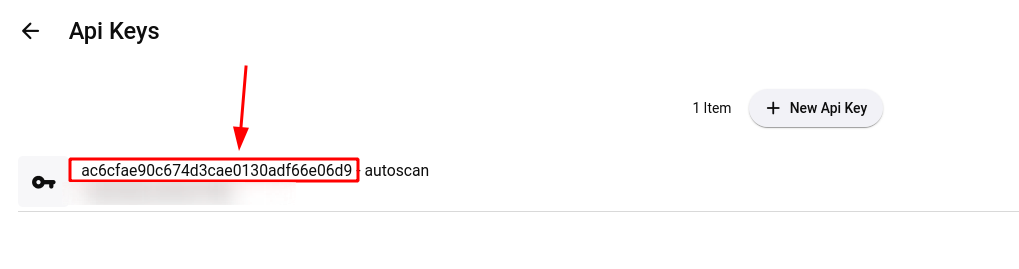](https://docs.ultra.cc/uploads/images/gallery/2023-01/emby-new-api-key-copy.png) ### Disable Media Server's Internal Scans Autoscan is meant to handle your media center's scanning entirely, so it is recommended to disable your Plex, Jellyfin, or Emby's internal scanning settings to avoid any conflicts. #### Disable Plex's Internal Scanning * Navigate to your Plex Server `Settings >> Library` and disable the following: ``` Scan my library automatically: DISABLED Run a partial scan when changes are detected: DISABLED Scan my library periodically: DISABLED ``` #### Disable Jellyfin's Internal Scanning ##### Jellyfin Scan Schedule * Navigate to your Jellyfin `Menu >> Dashboard >> Scheduled Tasks` and select `Scan Media Library` [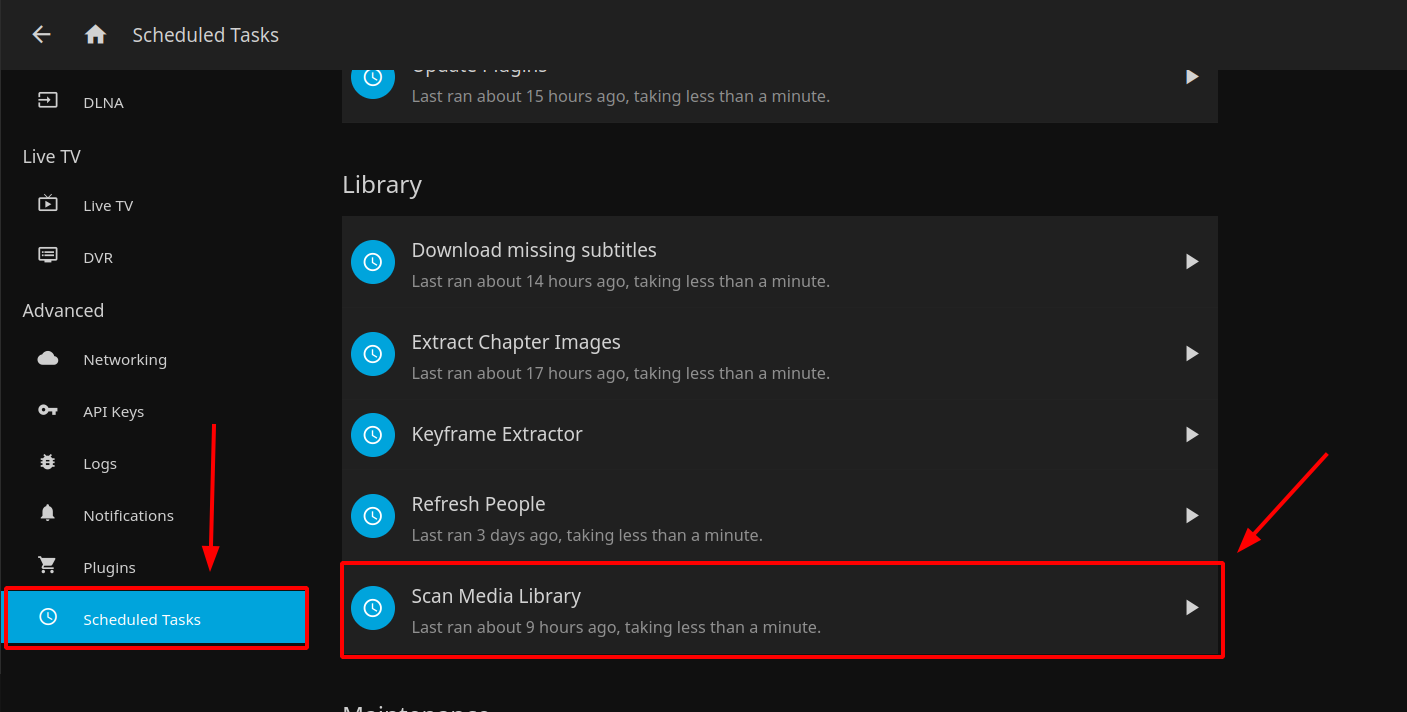](https://docs.ultra.cc/uploads/images/gallery/2023-01/jellyfin-library-scan-schedule.png) * From here you can click the trash icon to delete the Library Scan schedule [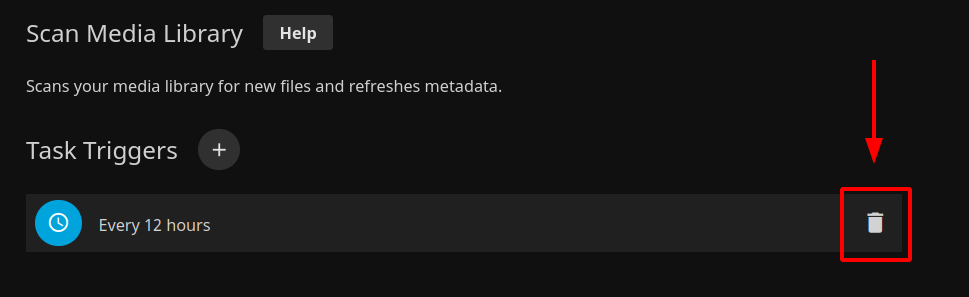](https://docs.ultra.cc/uploads/images/gallery/2023-01/jellyfin-library-scan-schedule-delete.png) ##### Jellyfin Individual Library Settings * Navigate to your Jellyfin `Menu >> Dashboard` and select `Libraries` * For each Individual library settings, you will need to disable the `Enable real time monitoring` feature #### Disable Emby's Internal Scanning ##### Emby Scan Schedule * Navigate to your Emby `Settings Menu >> Scheduled Tasks` and select `Scan Media Library` [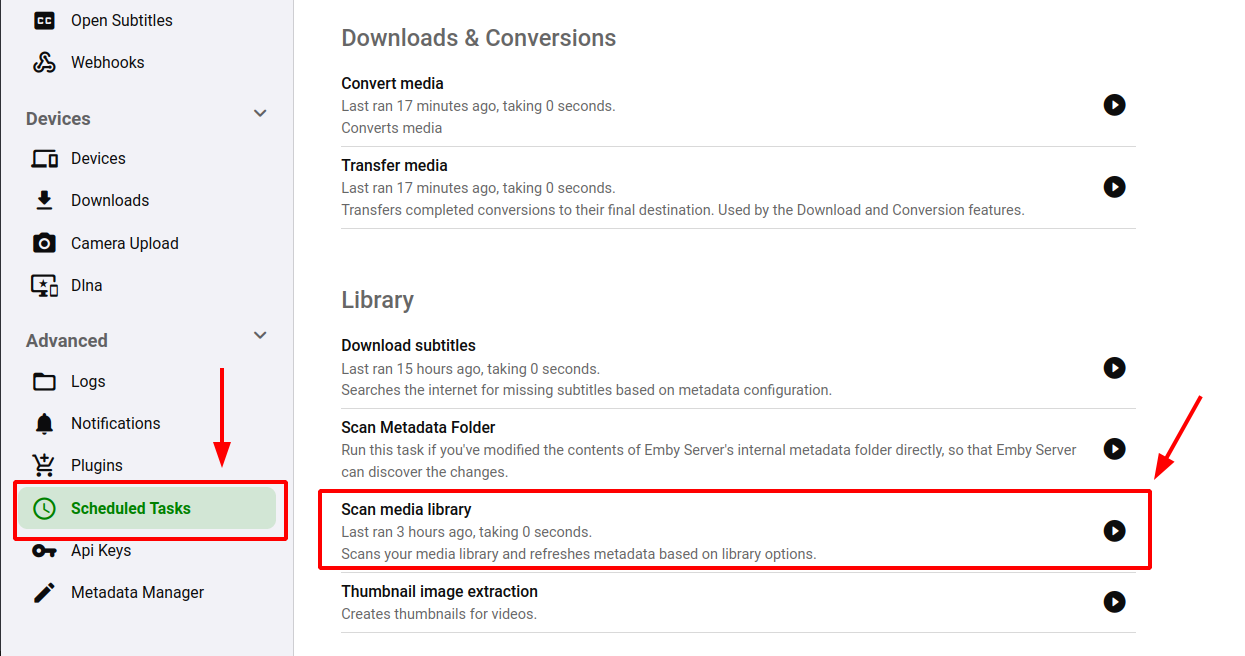](https://docs.ultra.cc/uploads/images/gallery/2023-01/emby-library-scan-schedule.png) * From here you can click the trash icon to delete the Library Scan schedule [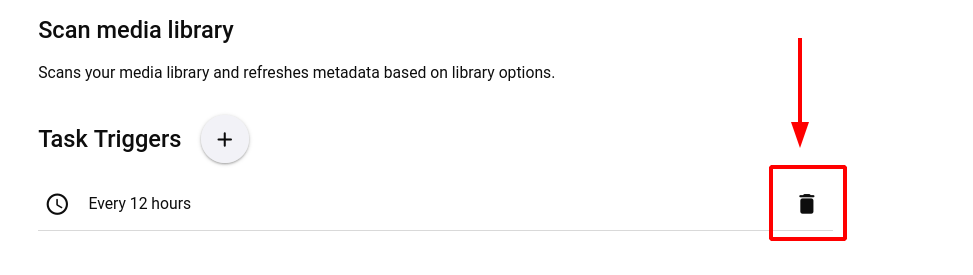](https://docs.ultra.cc/uploads/images/gallery/2023-01/emby-library-scan-schedule-delete.png) ##### Emby Individual Library Settings * Navigate to your Emby `Settings >> Library` and select `Libraries` * For each Individual library settings, you will need to disable the `Enable real time monitoring` feature ## Installation * Login to your service via [SSH](https://docs.ultra.cc/books/secure-shell-%28ssh%29/page/how-to-connect-to-your-ultracc-slot-via-ssh) * Execute the following command to install autoscan: ```sh bash <(wget -qO- https://scripts.ultra.cc/main-v2/Autoscan/main.sh) ``` ### Adding Webhooks to Sonarr and Radarr After successfully installing autoscan via the script you will see the two Webhook URLs shown that are needed to add to your Sonarr and Radarr instances #### Sonarr Webhook * Navigate to `Settings >> Connect >> + >> Webhook` ``` Name: autoscan On Grab: NO On Import: YES On Upgrade: YES On Rename: YES On Series Delete: YES On Episode File Delete: YES On Episode File Delete For Upgrade: YES On Health Issue: NO On Application Update: NO URL: (as shown in SSH terminal per autoscan installer script output) Method: POST Username: {username} Password: (as entered per autoscan installer script prompt) ``` #### Radarr Webhook * Navigate to `Settings >> Connect >> + >> Webhook` ``` Name: autoscan On Grab: NO On Import: YES On Upgrade: YES On Rename: YES On Movie Addded: YES On Movie Delete: YES Movie File Delete: YES Movie File Delete for Upgrade: YES On Health Issue: NO On Application Update: NO URL: (as shown in SSH terminal per autoscan installer script output) Method: POST Username: {username} Password: (as entered per autoscan installer script prompt) ``` ### Optional Setup Settings #### Anchors for Mounts Autoscan has the ability check first for anchor files to prevent library updates in the case of a mount being offline. This can allow the use of the Plex library setting `Empty trash automatically after every scan` safely to avoid the loss of library metadata in the case of a mount going offline. Use at your own riskThe following assumes you've used our rclone mount guides for your mount locations. If you have custom mount paths and/or multiple mounts, then you will need to modify your anchor file locations accordingly
* To enable the anchor feature, first run the following command to create the anchor file in the root of your mount. ``` touch ~/Stuff/Mount/.anchor ``` * Next edit your autoscan configuration file at `~/.apps/autoscan/config.yml` and uncomment the last 2 lines by removing the `#` characters making the last two lines like the following example: ``` anchors: - /home/{USERNAME}/MergerFS/.anchor ```In .yml and .yaml configurations files, improper use of indentation will prevent the configuration file from working correctly. Its important that no blank space be in front of the anchors: line and 2 blank spaces be in front of the - /home/{USERNAME}/MergerFS/.anchor line.
* Finally, run the following command to restart your autoscan to apply the changes. ```bash systemctl --user restart autoscan ``` #### Use With Multiple Media Servers The unofficial autoscan installer is only written for installation with a single media server in mind, however autoscan supports all three Plex, Jellyfin, and Emby media servers. * If you wish to enable autoscan for additional media servers, you can do so by editing your autoscan configuration file at `~/.apps/autoscan/config.yml` * Next, find the `targets:` section in your autoscan configuration file and uncomment the 3 lines for each additional media server you wish to enable * Then, replace the `