Unofficial Application Installers
Contains guides for using scripts that install applications that are not officially supported.
- Auto Remove Torrents
- Autoscan
- FileBot
- FlexGet
- Generic Software Installation
- Kometa
- Notifiarr
- Organizr
- Plex Auto Languages
- Python-PlexAPI
- qBit Manage
- qbittools
- qbittorrent-cli
- Recyclarr
- Second instance of Mediarr
Auto Remove Torrents
This unofficial app installation script is provided for your convenience. The script is provided as-is and may not be updated or maintained by Ultra.cc. Clients are welcome to use and customize unofficial app installers for their unique needs and requirements. Unofficial support may be offered via Discord only and at the sole discretion of Ultra.cc staff. Use at your own risk and only proceed if you are comfortable managing the application on your own.
Autoremove Torrents is an open-source Python project that allows the automatic removal of torrents from various torrent clients based on configurable criteria. It can help manage disk space by deleting torrents when they are finished seeding. Here's the GitHub page of the project.
Features
- Remove torrents automatically based on ratio, seeding time, inactivity and more
- Monitor disk space and remove torrents if space runs low
- Remove oldest, biggest, smallest torrents first
- Support for all major torrent clients
- Dry run mode to test without removing
- Schedule via crontab for hands-off automation
Supported Clients
Autoremove Torrents works with the following torrent clients:
-
It supports connecting to the web UI for qBittorrent and Transmission.
-
For Deluge, it connects directly to the daemon via the RPC protocol.
Installation
- Connect to your Ultra.cc service via SSH
- Execute the following command:
bash <(wget -qO- https://scripts.ultra.cc/main-v2/AutoRemove-Torrents/main.sh)
- Type
1and pressENTERto proceed with the installation. - Done!
Configuration
Autoremove Torrents uses a YAML configuration file to define the torrent clients and removal rules. By default, Autoremove Torrents will look for a configuration file in the shell's current working directory. But, you can store the configuration file somewhere else and point to it while using Autoremove Torrents. See the below usage instructions for more information.
Client Configuration
The script will create a bare minimum configuration file located at ~/.config/autoremove-torrents/config.yml. You will need to edit the configuration file with your login credentials and removal task/strategies.
- Open the configuration file with the editor by executing the following command.
nano ~/.config/autoremove-torrents/config.yml
- Find
usernameandpasswordand replace with the login credentials of your torrent client.- Login credentials can be found on the Apps tab of the UCP.
- Make any other changes specific to your setup, such as removal task/strategies. Documentation can be found here.
- Exit the editor with
ctrl+xandy, pressENTERto confirm. - You can test your configuration with a preview dry-run. To do so, execute the following command.
- Make sure to replace
usernamewith your specific Ultra service username.
- Make sure to replace
autoremove-torrents --conf=/home/username/.config/autoremove-torrents/config.yml --view
Removal Strategies
Next, define removal strategies under each client. For example:
strategies:

  delete_seeds:
    remove: ratio > 2

  clear_space:
    free_space:
      min: 10
      path: /downloads
      action: remove-big-seeds
-
You can customize removal rules based on ratio, seed time, activity, disk space and more. See the full documentation for details on all available options.
-
Strategies will only apply to the client they are defined under. You can create multiple strategies per client.
Usage
- Specify a custom config path:
autoremove-torrents --conf=/path/to/config.yml
- Single Task:
autoremove-torrents --conf=/path/to/config.yml --task transmission
- Dry run:
autoremove-torrents --view --conf=/path/to/config.yml --task transmission
Dry run allows you to see what would be deleted without actually removing anything.
Automation
- Open Crontab using
crontab -e. - Select
1for the nano editor. - You can setup a cron job or scheduled task to run autoremove-torrents automatically. For example:
# Run at 2AM every day
0 2 * * * /home/username/.pyenv/shims/autoremove-torrents --conf=/path/to/config.yml
- Save the crontab file using
ctrl + o& exit usingctrl + x. - A simple and quick resource for cron schedule expressions: Crontab Guru
Uninstallation
- Connect to your Ultra.cc service via SSH
- Execute the following command:
bash <(wget -qO- https://scripts.ultra.cc/main-v2/AutoRemove-Torrents/main.sh)
- Type
2and pressENTERto proceed with the uninstallation.
Autoscan
This unofficial app installation script is provided for your convenience. The script is provided as-is and may not be updated or maintained by Ultra.cc. Clients are welcome to use and customize unofficial app installers for their unique needs and requirements. Unofficial support may be offered via Discord only and at the sole discretion of Ultra.cc staff. Use at your own risk and only proceed if you are comfortable managing the application on your own.
Autoscan replaces the default method of updating your Plex, Jellyfin, or Emby libraries by the use of webhooks sent from the Connect feature within Sonarr and Radarr. More information can be found here: github.com/Cloudbox/autoscan
Notable benefits of Autoscan over Radarr/Sonarr Connect:
- Will update efficiently the path of the media item(s) only, and not perform a full library scan.
- This can lighten the use of HDD IO resources as well as remote storage API calls.
- Has the ability to check for anchor files on mounts to prevent library updates in the case of the mount being offline.
This installer, and guide, assumes that your Radarr/Sonarr and media server applications such as Plex, Jellyfin, or Emby, are all on the same service
Prerequisites
Autoscan will use a token to gain access to your media server application to perform its update functions.
Plex Token
- To find your Plex token, please visit this Plex article: Finding an authentication token / X-Plex-Token
Jellyfin API Token
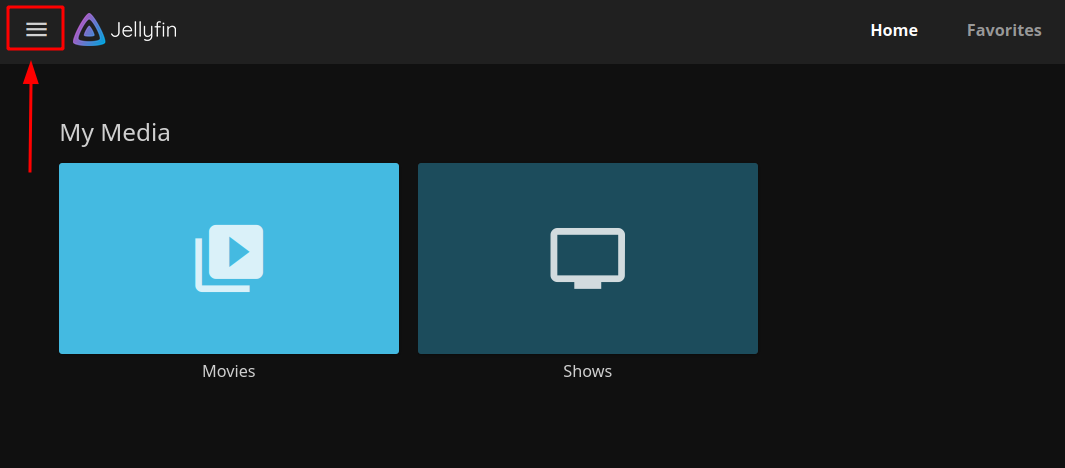
- To create your Jellyfin API token for Autoscan first navigate to your Jellyfin menu in the top left-hand corner.
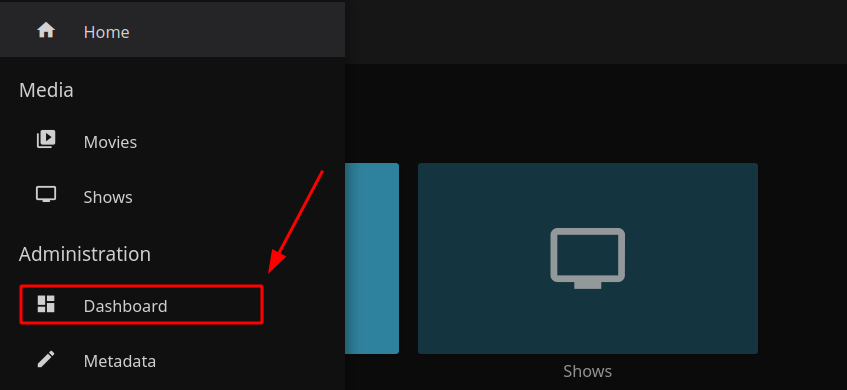
- Next select the Jellyfin Dashboard menu
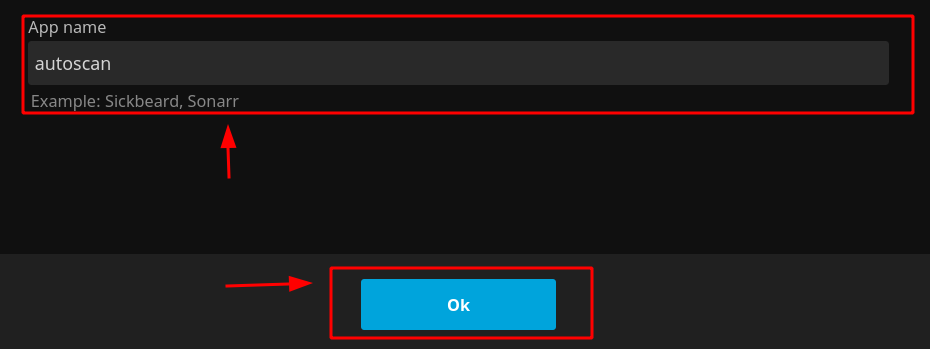
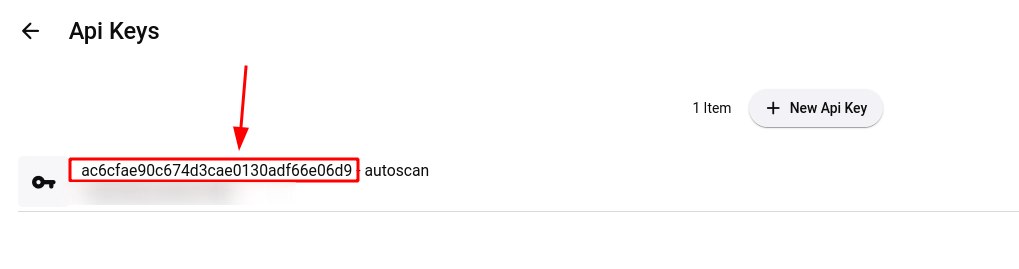
- Then select API Keys in the Advanced dashboard menu

- Fom here you will need to click the
+button to create a new API token

- Name your API Key and save it using the Save button
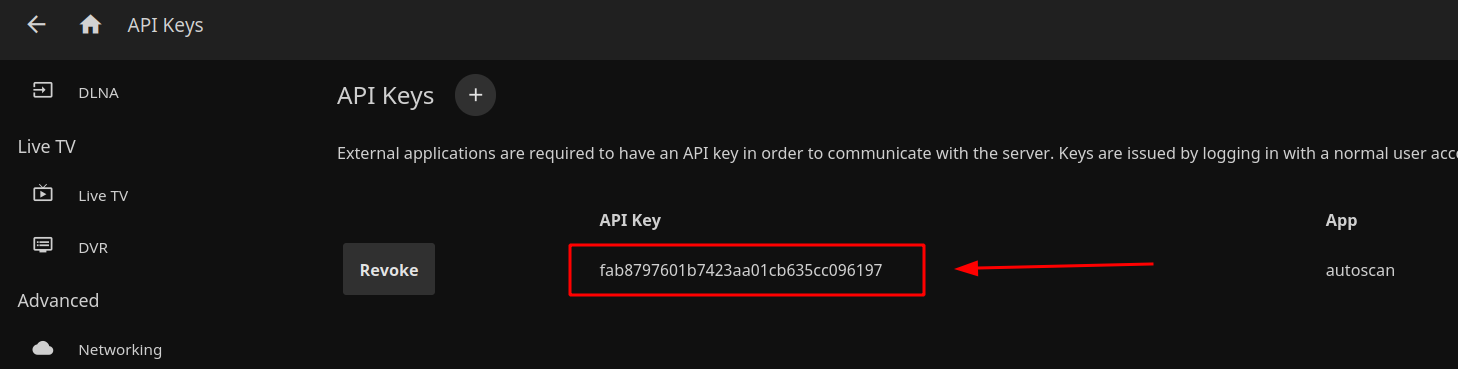
- Finally, from here you will see your API Key to copy and save so that you may enter it when prompted by the autoscan installer script
Emby API Token
- To create your Emby API token for autoscan first navigate to your Emby admin menu
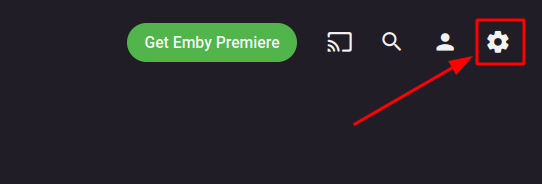
- Then select API Keys in the Advanced menu section
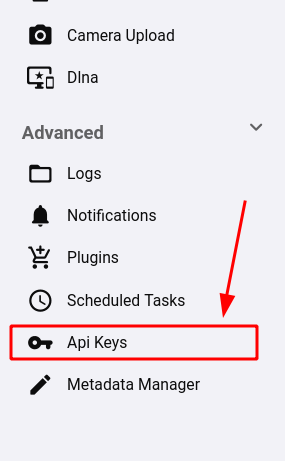
- From here select the New Api Key button
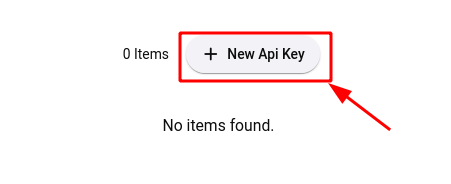
- Name your API Key and save it using the Save button
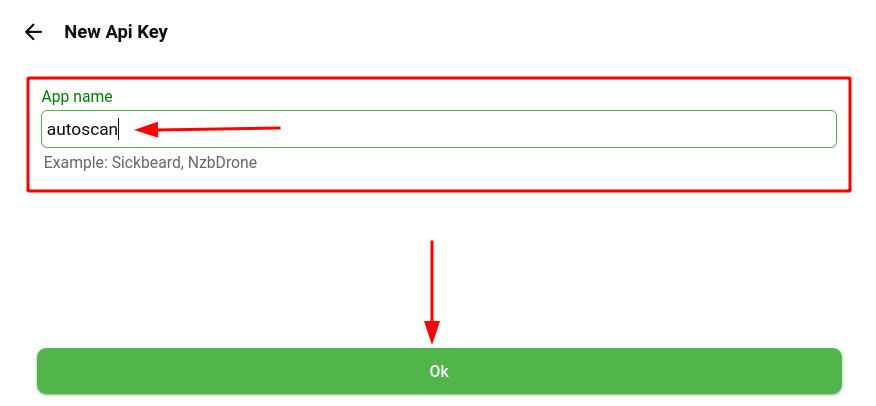
- Finally, from here you will see your API Key to copy and save so that you may enter it when prompted by the autoscan installer script
Disable Media Server's Internal Scans
Autoscan is meant to handle your media center's scanning entirely, so it is recommended to disable your Plex, Jellyfin, or Emby's internal scanning settings to avoid any conflicts.
Disable Plex's Internal Scanning
Scan my library automatically: DISABLED
Run a partial scan when changes are detected: DISABLED
Scan my library periodically: DISABLED
Disable Jellyfin's Internal Scanning
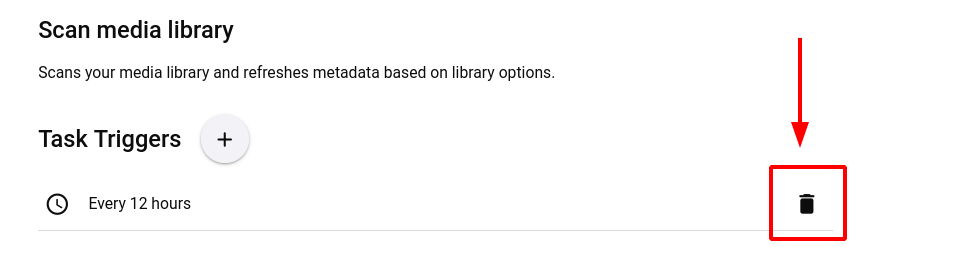
Jellyfin Scan Schedule
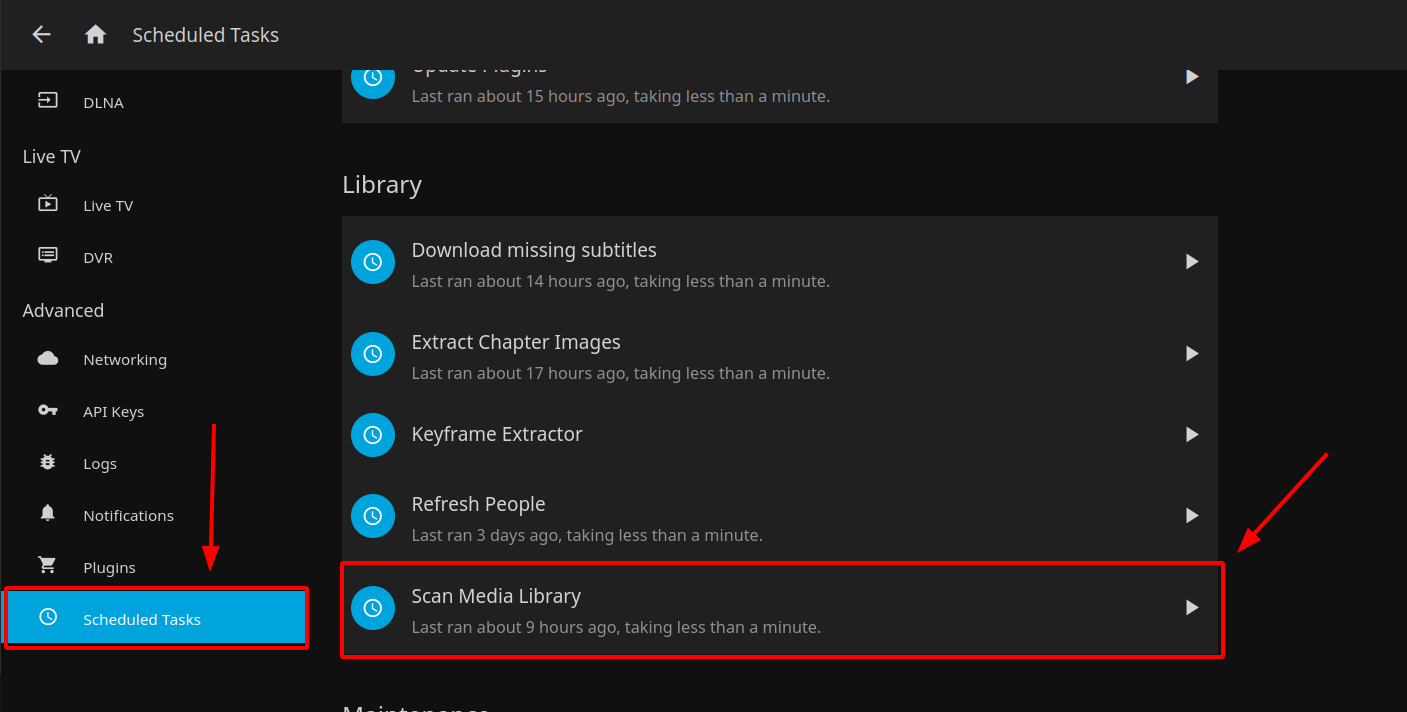
- From here you can click the trash icon to delete the Library Scan schedule

Jellyfin Individual Library Settings
Disable Emby's Internal Scanning
Emby Scan Schedule

- From here you can click the trash icon to delete the Library Scan schedule
Emby Individual Library Settings
Installation
- Login to your service via SSH
- Execute the following command to install autoscan:
bash <(wget -qO- https://scripts.ultra.cc/main-v2/Autoscan/main.sh)
Adding Webhooks to Sonarr and Radarr
After successfully installing autoscan via the script you will see the two Webhook URLs shown that are needed to add to your Sonarr and Radarr instances
Sonarr Webhook
Radarr Webhook
Optional Setup Settings
Anchors for Mounts
Autoscan has the ability check first for anchor files to prevent library updates in the case of a mount being offline. This can allow the use of the Plex library setting Empty trash automatically after every scan safely to avoid the loss of library metadata in the case of a mount going offline. Use at your own risk
The following assumes you've used our rclone mount guides for your mount locations. If you have custom mount paths and/or multiple mounts, then you will need to modify your anchor file locations accordingly
- To enable the anchor feature, first run the following command to create the anchor file in the root of your mount.
touch ~/Stuff/Mount/.anchor
- Next edit your autoscan configuration file at
~/.apps/autoscan/config.ymland uncomment the last 2 lines by removing the#characters making the last two lines like the following example:
anchors:
  - /home/{USERNAME}/MergerFS/.anchor
In .yml and .yaml configurations files, improper use of indentation will prevent the configuration file from working correctly. Its important that no blank space be in front of the anchors: line and 2 blank spaces be in front of the - /home/{USERNAME}/MergerFS/.anchor line.
- Finally, run the following command to restart your autoscan to apply the changes.
systemctl --user restart autoscan
Use With Multiple Media Servers
The unofficial autoscan installer is only written for installation with a single media server in mind, however autoscan supports all three Plex, Jellyfin, and Emby media servers.
- If you wish to enable autoscan for additional media servers, you can do so by editing your autoscan configuration file at
~/.apps/autoscan/config.yml - Next, find the
targets:section in your autoscan configuration file and uncomment the 3 lines for each additional media server you wish to enable - Then, replace the
<token>value with the respective media server token and/or API Key you wish to add - Finally, run the following command to restart your autoscan to apply the changes.
systemctl --user restart autoscan
FileBot
This unofficial app installation script is provided for your convenience. The script is provided as-is and may not be updated or maintained by Ultra.cc. Clients are welcome to use and customize unofficial app installers for their unique needs and requirements. Unofficial support may be offered via Discord only and at the sole discretion of Ultra.cc staff. Use at your own risk and only proceed if you are comfortable managing the application on your own.
To use FileBot you will be required to purchase a FileBot license.
FileBot is a custom application with only a basic custom AMC provided. We can not provide support for FileBot beyond installation.
FileBot has a tendency to try and use resources outside of process limits which can cause problems. We would highly recommend an Indexer such as Sonarr/Radarr to organize your media.
Prerequisites
For the FileBot installation script to work, you may have to do the following:
- Purchase a FileBot license and upload it to your slot using FTPS/SFTP
Installation
- Connect to your service via SSH
- Execute the FileBot installation script via the following SSH command:
bash <(wget -qO- https://scripts.ultra.cc/main-v2/FileBot/main.sh)
- Type
1and press ENTER to proceed with the installation - Choose your preferred version
- After installation has finished. Run
source ~/.bashrcto activate the FileBot command in your environment
Importing Your License
In order for your FileBot to work correctly now, it is now required you acquire a license. This license file can be uploaded via FTP or you can create a new file with nano and paste the license key.
- Execute the FileBot installation script via the following SSH command:
bash <(wget -qO- https://scripts.ultra.cc/main-v2/FileBot/main.sh)
- Type
4and press ENTER - Enter the full path to your FileBot license key, example:
/path/to/FileBot_License_PXXXXXXXX.psm
Activating your license can also be done manually by running the command below.
-
filebot --license /path/to/FileBot_License_P1234567.psm
Installation of AMC script
Installation of AMC script for Rtorrent, Deluge or Transmission.
- Execute the FileBot installation script via the following SSH command:
bash <(wget -qO- https://scripts.ultra.cc/main-v2/FileBot/main.sh)
- Type
5and press ENTER - Choose
1,2or3depending on which torrent client you are using and press ENTER - For Deluge to execute the AMC post-processing script upon torrent completion, follow the instructions shown at the end of the script output in your SSH shell.
- Execute
readlink -f ~/scripts/amc/deluge-amc.shand copy the path to your clipboard. - In Deluge, go to Preferences -> Execute. Click Add button and select Torrent complete as event. Paste the path from your clipboard in the Command field.
- Click Add and Apply changes.
- Restart Deluge from the UCP or execute
app-deluge restart
- Execute
- For Transmission and rTorrent the AMC post-processing script is automatically added by the installer and further steps are needed.
AMC scripts automatically organize your latest media to your library. Once new media is detected, by default, the scripts do the following:
- Unpack archives to
~/files/_extracted - Auto-detect movie and episode files
- Fetch subtitles and transcode to SubRip/UTF-8
- Creates a symbolic link and organizes episodes, movies, and music files to
~/media
You can also edit the scripts to your liking to automate more of your setup. For more information on AMC options, you can visit this link.
Upgrade
- Execute the FileBot installation script via the following SSH command:
bash <(wget -qO- https://scripts.ultra.cc/main-v2/FileBot/main.sh)
- Type
3and press ENTER to proceed with the upgrade - Choose your preferred version
Uninstallation
- Execute the FileBot installation script via the following SSH command:
bash <(wget -qO- https://scripts.ultra.cc/main-v2/FileBot/main.sh)
- Type
confirmto proceed with the uninstallation - Type
2for uninstallation and press ENTER - Type
1to confirm and press ENTER
Issues/Bugs
For any issues/bugs pertaining to FileBot, you may do so to the following channels:
Troubleshooting FAQ for FileBot
Why doesn’t FileBot work? It used to!
Unfortunately, this is because of the TVDB API update around six months ago. The endpoints were updated in the latest versions of FileBot. We provide the last FOSS version. To keep using FileBot, you will need to purchase your license, import and update your FileBot on your slot. You may also find other alternatives.
Why does FileBot keep crashing?
Filebot is designed to compliment torrent clients on our infrastructure. Java, which is one of the dependencies of filebot, has a 1GB proclimit and is not recommended for running filebot in a cron or manage a whole folder at once. This type of action could quickly saturate an entire server’s cores.
FlexGet
This unofficial app installation script is provided for your convenience. The script is provided as-is and may not be updated or maintained by Ultra.cc. Clients are welcome to use and customize unofficial app installers for their unique needs and requirements. Unofficial support may be offered via Discord only and at the sole discretion of Ultra.cc staff. Use at your own risk and only proceed if you are comfortable managing the application on your own.
FlexGet is a multipurpose automation tool for content like torrents, NZBs, podcasts, comics, series, movies, etc, and can handle different kinds of sources like RSS feeds, HTML pages, and CSV files. This allows you to integrate and create powerful automation between your downloaders, organizers, and your media servers.
This guide shows you the following:
- Install FlexGet to your service
- Create your first FlexGet configuration
- Upgrading and Removing FlexGet
Installation of FlexGet via python's virtual environment
- First, log in to your service via SSH
- Execute the following command and follow the instructions. This will install FlexGet into your service.
bash <(wget -qO- https://scripts.ultra.cc/main/Flexget/flexget-install.sh)
Configuring FlexGet
Creating config.yml
- Here, we will now create your first FlexGet YAML. Start by creating FlexGet's config folder by running the following command:
mkdir -p "$HOME"/.config/flexget
cd "$HOME"/.config/flexget
- Create a config.yml with the following
nano config.yml
Refer to FlexGet Configuration for information about making your config as well as FlexGet Cookbook for some basic automation tasks that you can do with FlexGet.
To check if your config is correctly formatted and configured, you may have to use the following commands:
-
flexget checkto check the config file for any errors -
flexget --test executeto test run your configuration.
When you run it the first time, it may grab and download multiple torrents. To mitigate this, run flexget execute --learn. This will save the entries accepted so it won't download again in the future.
Upgrading FlexGet
- To upgrade FlexGet, just run the following command:
"$HOME"/flexget/bin/python -m pip install flexget --upgrade
Removing FlexGet
- To remove FlexGet, delete the
flexgetfolder and your symbolic link.
rm -rfv "$HOME"/flexget
rm "$HOME"/bin/flexget
Generic Software Installation
This guide is provided for your convenience. The guide is provided as-is and may not be updated or maintained by Ultra.cc. Unofficial support may be offered via Discord only and at the sole discretion of Ultra.cc staff. Use at your own risk and only proceed if you are comfortable troubleshooting.
This guide covers some generic ways to install custom third-party applications on your Ultra.cc service. It is important to remember that these installation procedures are generic and additional steps may be needed for a successful installation. As these procedures are made for custom applications not supported by Ultra.cc, we cannot provide any assistance regarding the installation or issues that may arise once an application has been installed.
If you want us to add an application to the User Control Panel and officially support it, you can submit a request on our Feedback site, and we will consider it. Please ensure that you do not add duplicate requests and instead add your vote if the application has already been requested.
Installation
Many applications can be installed with a click of a button on the UCP. However, if you want to install an application not included on the UCP, you can do so. As long as you adhere to the Terms of Service and do not break the Fair Usage Policy, you are free to install pretty much any software on your Ultra.cc service.
While selecting a port for your custom application, select one within the port range assigned to your service; do NOT use the default port the application suggests. It is strictly prohibited to use ports outside of your range. More info can be found here.
Important information regarding the installation of custom third-party applications:
- You cannot install an application that requires sudo or root privileges, including:
- Docker images (look for the local installation instructions instead)
- The placing of files outside your home directory
- Be mindful of application resource usage and IO utilization. See this guide.
- Only use ports assigned to your service. More info can be found here.
- Custom third-party applications are not officially supported by Ultra.cc staff.
- Always read the documentation associated with the software you are installing.
Before proceeding with any of the below installation procedures, you need to connect to your Ultra.cc service via SSH.
- Connect to your Ultra.cc slot via SSH, see guide here.
Compile from Source
Below you will find generic instructions for how to compile from source. Some applications have specific instructions or required dependencies, so always check the documentation or website of the application you are installing.
- Download the source. Files can be downloaded using various utility tools, such as
wget,curl,git, etc.
wget https://example-url.com/appname-1.23.tar.gz
- Extract the source.
tar xvzf appname-1.23.tar.gz
cd appname-1.23
- Configure the application. See app-specific documentation for additional configurations.
./configure --prefix="$HOME/bin" && make
- Install the software
make install
- Add the install directory to the path to enable global application execution.
echo "PATH=$HOME/.local/bin:$HOME/bin:$PATH" >> ~/.profile && source ~/.profile
Pre-built Binaries
Some software is available as pre-compiled binaries and do not have to be built within your Ultra.cc service.
- Download the binary.
wget https://example-url.com/appname-1.23.tar.gz
- Extract the binary.
tar xvzf appname-1.23.tar.gz
- Move the binary to a directory within your shell environment PATH.
mv appname ~/bin/
Once the binary has been moved to a directory within your shell environment PATH, you can run the application by executing the filename of the binary. With the name example we are using in this guide, it would look like this: appname
Cloning a Repo
Application software can also be installed by cloning a repository. The most popular repository library is GitHub, but there are also others like GitLab for example.
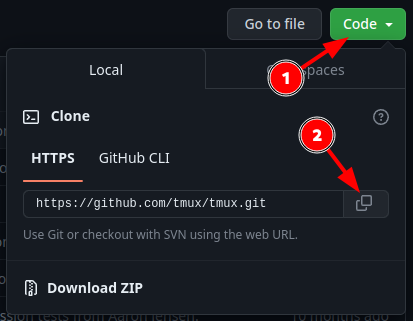
- While in the GitHub repository, in the top right corner, click the green
 Code button.
 - Copy the URL for the repository by clicking the
 Copy button, as shown in the below image.
- Change the current working directory of your Ultra.cc shell to the location where you want to clone the repo. This is usually the root of your home directory.
cd
- Clone the repo. Do note,
AUTHORandEXAMPLE-REPOwould be replaced with what matches the repo you are cloning.
git clone https://github.com/AUTHOR/EXAMPLE-REPO
- Next,
cdinto the cloned repo directory. Do note,EXAMPLE-REPOwould be replaced with what matches the repo you are cloning.
cd EXAMPLE-REPO
Inside the cloned repo directory, you will find all the files of the repository, and you are free to execute any scripts or binaries that are included (subject to our Terms of Service).
Python Applications
In this section, we will show you how to install Python and how to install Python packages with pip. This is useful as cloned repos occasionally require you to install a Python package. However, before taking further action, ensure you have Python installed on your Ultra.cc service.
- To install Python, see this guide.
Install Python Package
Once you have followed the above guide and successfully installed Python on your Ultra.cc service, you are ready to install Python packages. A complete list of all available Python packages can be found on the Python Package Index (PyPI).
- To install a Python package, execute the following command:
pip install <package-name>
- Occasionally a Python application requires you to install multiple packages. This is often handled by a
requirements.txtfile and can be installed with the following command:
pip install -r requirements.txt
- By executing the above command, multiple Python packages will be automatically installed.
Systemd Service
While binaries and scripts can be manually executed or setup as a cron job, you can also set up a systemd service and run your application as a background process. This allows you to have more control and easier management of your custom applications.
- Check the documentation of the application being installed as often guidance will be provided for creating a service.
- To create a systemd service, we need to create a systemd service file. A userland systemd service file is stored at
~/.config/systemd/user. - Create the systemd service file with the below command, make sure to replace
SERVICE-NAMEwith a name of your choice.
touch ~/.config/systemd/user/SERVICE-NAME.service
- Open the systemd service file with the nano editor:
nano ~/.config/systemd/user/SERVICE-NAME.service
- Paste the following into the editor:
[Unit]
Description=A description of my custom application
After=network-online.target

[Service]
Type=exec
Restart=on-failure
ExecStart=%h/bin/MY-CUSTOM-APPLICATION
ExecStop=/bin/kill -s QUIT $MAINPID
StandardOutput=file:%h/path/to/logs/my-custom-application.log

[Install]
WantedBy=default.target
- The above systemd service file is an example of a basic systemd service file.
- By editing the command after
ExecStart=, you can create a systemd service file for a binary, script, etc. - For a deeper understanding on how a systemd service file works, see this guide.
- By editing the command after
- Once you have edited the systemd service file to your liking, press
CTRL+xandyto save and exit, pressENTERto confirm. - Next, whenever a change has been made to a systemd service file, a reload of the systemd daemon is required. To initiate the reload, execute the following command:
Notice the --user option. It is always required when interacting with systemctl on an Ultra.cc service, as leaving it out requires sudo/root privileges.
systemctl --user daemon-reload
- Next, to enable the systemd service, execute the following command:
- Be sure to replace
SERVICE-NAMEwith the name you previously selected for your systemd service file.
- Be sure to replace
systemctl --user enable --now SERVICE-NAME.service
- To check if your systemd service has been successfully enabled, execute the following command:
systemctl --user is-enabled SERVICE-NAME.service
- To check if your systemd service has been successfully executed, executed the following command:
systemctl --user status SERVICE-NAME.service
- If successful, you should see an output like this:
ultradocs@spica:~$ systemctl --user status service-name.service
● service-name.service - A description of my custom application
   Loaded: loaded (/home/ultradocs/.config/systemd/user/service-name.service; enabled; vendor preset: enabled)
   Active: active (running) since Sun 2024-01-08 10:07:17 CEST; 2 days ago
 Main PID: 71643 (service)
   CGroup: /user.slice/user-1104.slice/user@1104.service/service-name.service
           ├─71643 service: master process /home/ultradocs/bin/service -c
           └─71647 service: worker process
- Done!
Enabling HTTPS Encryption
If you have installed a custom application on your Ultra.cc service, and assigned one of your unused ports (see this guide), your application will be accessible via the HTTP protocol. This means that all traffic will be unencrypted. To secure the traffic of your application, you can enable HTTPS encryption via Nginx.
- Create a new configuration file for the custom application:
- Be sure to replace
APP-NAMEwith a name of your choice.
- Be sure to replace
touch ~/.apps/nginx/proxy.d/APP-NAME.conf
- Next, open the configuration file with the nano editor:
nano ~/.apps/nginx/proxy.d/APP-NAME.conf
-
It is not unusual for app developers to provide a pre-made Nginx template for their application. You should always search the application documentation or the internet for such a template, and amend the below template accordingly.
-
If no template can be found, paste the following as-is into the editor:
location /baseurl/ {
    proxy_pass              http://127.0.0.1:PORT;
    proxy_http_version      1.1;
    proxy_set_header        X-Forwarded-Host        $http_host;
}
- Next, in the editor, edit the
/baseurlandPORT.- The
/baseurlis the last part of your custom application URL and can be set to anything that is not already used by another application. For examplehttps://username.hostname.usbx.me/mycustomapp. - Some applications require the baseurl to be added to the application configuration, so check the documentation.
- The
PORTis the 5 digit port you have used to configure your custom application. See this guide for a complete list of the port range assigned to your Ultra.cc service. It is strictly prohibited to use a port outside of your port range, and doing so can lead to a Fair Usage Policy violation.
- The
- Next, save and exit the editor by pressing
CTRL+xandy, pressENTERto confirm. - Next, ensure you have configured your application to use the same
/baseurlas you set in the above Nginx configuration file.
- Restart the webserver from the UCP, or by executing
app-nginx restart. - Lastly, check if the application is accessible via the
/baseurlyou have set up. For example, go tohttps://username.hostname.usbx.me/mycustomappto access the application webUI.
Kometa
This unofficial app installation script is provided for your convenience. The script is provided as-is and may not be updated or maintained by Ultra.cc. Clients are welcome to use and customize unofficial app installers for their unique needs and requirements. Unofficial support may be offered via Discord only and at the sole discretion of Ultra.cc staff. Use at your own risk and only proceed if you are comfortable managing the application on your own.
Kometa (previously known as Plex Meta Manager) is an open source Python 3 project that has been designed to ease the creation and maintenance of metadata, collections, and playlists within a Plex Media Server. The script is able to update information based on sources outside your Plex environment.
Make sure to configure the application properly to avoid breaking our Fair Usage Policy. For detailed instructions on how to configure the application, follow this link.
-
Config file:
~/scripts/kometa/config/config.yml -
Config template:
~/scripts/kometa/config/config.yml.template -
Log file:
~/scripts/kometa/kometa.log
Prerequisites
- Python version 3.8 or above. See here.
- Plex server installed on service.
Installation
- Connect to your Ultra.cc service via SSH
- Execute the following command:
bash <(wget -qO- https://scripts.ultra.cc/main-v2/Kometa/main.sh)
- Type
1and pressENTERto proceed with the installation - When prompted, enter your TMDb API key and press
ENTER - Wait until installation has finished
Usage
Configuration
As Kometa is not a GUI application, all configuration must be done by editing the config file. Luckily, Kometa offers great documentation on their wiki. By default, the unofficial installer script will configure the config file with the bare necessities needed for Kometa to work. This includes your Plex server URL, token and TMDb API key. The latter is manually entered by the user during installation.
-
Config file:
~/scripts/kometa/config/config.yml -
Config template:
~/scripts/kometa/config/config.yml.template
Log file
-
Log file:
~/scripts/kometa/kometa.log
Stop/Restart Kometa
- To stop the service:
systemctl --user stop kometa.service
- To start/restart the service:
systemctl --user restart kometa.service
Uninstallation
- Execute the following command:
bash <(wget -qO- https://scripts.ultra.cc/main-v2/Kometa/main.sh)
- Type
2and pressENTERto proceed with the uninstallation - Done!
Notifiarr
This unofficial app installation script is provided for your convenience. The script is provided as-is and may not be updated or maintained by Ultra.cc. Clients are welcome to use and customize unofficial app installers for their unique needs and requirements. Unofficial support may be offered via Discord only and at the sole discretion of Ultra.cc staff. Use at your own risk and only proceed if you are comfortable managing the application on your own.
Notifiarr is a notification handler for Discord. It can manage media requests and allows for custom integrations with a wide variety of applications.
- Official documentation for Notifiarr can be found here.
Prerequisites
- Registered account on notifiarr.com
- Discord account and private server for the bot application
Installation
- Connect to your Ultra.cc service via SSH
- Once connected, execute the following command:
bash <(wget -qO- https://scripts.ultra.cc/main-v2/Notifiarr/main.sh)
- Next, to install Notifiarr, press
1andENTERto confirm.- To reset password, press
3andENTERto confirm. - To upgrade Notifiarr, press
4andENTERto confirm.
- To reset password, press
- Next, from the list of your unallocated ports, pick a port to use for Notifiarr.
- Type the port that you want to use for Notifiarr, press
ENTERto confirm. - To confirm your selection of port, type
confirmand pressENTER.
- Type the port that you want to use for Notifiarr, press
- Next, paste your Notifiarr API key.
- The API key can be found on your Notifiarr profile page.
- Next, choose a Notifiarr UI password and press
ENTER. - Wait for the installation to finish, then copy the URL to access the Notifiarr client in your web browser.
- The URL should be in the format of:
https://username.hostname.usbx.me/notifiarr/
- The URL should be in the format of:
- Once you have accessed the Notifiarr client in your web browser. Login with your Ultra service username and password that you chose earlier during the installation.
Uninstallation
- Connect to your Ultra.cc service via SSH
- Once connected, execute the following command:
bash <(wget -qO- https://scripts.ultra.cc/main-v2/Notifiarr/main.sh)
- Next, to uninstall Notifiarr, press
2andENTERto confirm. - Done!
Organizr
This unofficial app installation script is provided for your convenience. The script is provided as-is and may not be updated or maintained by Ultra.cc. Clients are welcome to use and customize unofficial app installers for their unique needs and requirements. Unofficial support may be offered via Discord only and at the sole discretion of Ultra.cc staff. Use at your own risk and only proceed if you are comfortable managing the application on your own.
Installation
Before proceeding with the installation, make sure to set an HTTP password under the Connect tab on the UCP.
- Connect to your Ultra.cc service via SSH
- Execute the following command:
bash <(wget -qO- https://scripts.ultra.cc/main-v2/Organizr/main.sh)
- Type
1and pressENTER - Once the installation has finished, the script will output a URL in the terminal. Use it to access Organizrr and login with your HTTP credentials from the UCP.
Uninstallation
- Execute the same command:
bash <(wget -qO- https://scripts.ultra.cc/main-v2/Organizr/main.sh)
- Type
2and pressENTER - Done!
Plex Auto Languages
This unofficial app installation script is provided for your convenience. The script is provided as-is and may not be updated or maintained by Ultra.cc. Clients are welcome to use and customize unofficial app installers for their unique needs and requirements. Unofficial support may be offered via Discord only and at the sole discretion of Ultra.cc staff. Use at your own risk and only proceed if you are comfortable managing the application on your own.
Plex Auto Languages will automatically update the language of your Plex TV Show episodes based on the current language you are using without messing with your existing language preferences. Make sure to configure it properly to avoid breaking our Fair Usage Policy. For detailed instructions on how to configure the application, follow this link.
-
Config file:
~/scripts/Plex_auto_language/config/config.yaml -
Log file:
~/scripts/Plex_auto_language/plex-auto-language.log
Prerequisites
- Python version 3.8 or above. See here.
- Plex server installed on service.
Installation
- Connect to your Ultra.cc service via SSH
- Execute the following command:
bash <(wget -qO- https://scripts.ultra.cc/main-v2/PlexAutoLanguage/main.sh)
- Type
1and pressENTERto proceed with the installation - Done!
Uninstallation
- Execute the same command:
bash <(wget -qO- https://scripts.ultra.cc/main-v2/PlexAutoLanguage/main.sh)
- Type
2and pressENTERto proceed with the uninstallation - Done!
Stop/Restart Service
- To stop the service:
systemctl --user stop plexautolanguage.service
- To start/restart the service:
systemctl --user restart plexautolanguage.service
Python-PlexAPI
This unofficial app installation guide is provided for your convenience. The guide is provided as-is and may not be updated or maintained by Ultra.cc. Unofficial support may be offered via Discord only and at the sole discretion of Ultra.cc staff. Use at your own risk and only proceed if you are comfortable managing the application on your own.
Python-PlexAPI is a utility tool with intent of performing actions on your Plex instance by interacting with the Plex API. Included features are library actions such as scan, analyze, empty trash among many other things.
- More information can be found here.
Prerequisites
Installation
Do note, Python-PlexAPI requires some familiarity with the Linux terminal and scripting in general. If you are new to this, you should start by reading Your Ultra.cc Shell - A Beginner's Guide.
- Connect to your Ultra.cc service via SSH
- Once connected, execute the following command:
pip install plexapi
- Once the installation has completed, you can begin using the utility tool.
- In this guide, we will use our pre-made script that lists all your media titles in a
.txtfile.- However, this is just one of many usecases. Other examples can be found here.
- Start by downloading the script to your Ultra service with the following command.
wget https://scripts.ultra.cc/util/Python-PlexAPI/main.py
- Next, open the file in the Nano editor.
nano main.py
-
Before you can use the script, you need to edit the
plex_url,plex_tokenand the library names of your Plex server.- You can find your Plex IP in the Plex webUI. Navigate to Settings > Remote Access and copy the Private IP. It will be in the format of
172.17.0.xxx. Do note, if Plex is restarted/upgraded, the private IP might change, and you will need to update your script with the new IP. - You can find your Plex token by following the instructions in this link.
- Additionally, you must edit the script to reflect your library names instead of 4K Movies, 1080p Movies and TV Shows.
- The
file.writerow represents what is written to the file by the script. - The
plex.library.sectionrow is the name of the Plex library the script should look for.
- The
- You can find your Plex IP in the Plex webUI. Navigate to Settings > Remote Access and copy the Private IP. It will be in the format of
-
Once you have edited the script with your Plex server details and library names, you can save and exit the editor.
- To save and exit, press
CTRL+XandY, then pressENTERto confirm.
- To save and exit, press
-
To run the script, execute the following command:
python main.py
- Depending on the size of your library, it may take some time to execute.
- If the execution of the script was successful, you should see the following output in your terminal.
ultradocs@spica:~$ python plexapi.py
Media titles with release year have been written to plex_media_titles_with_year.txt
- You can find your media titles listed in
plex_media_titles_with_year.txt
qBit Manage
This unofficial app installation guide is provided for your convenience. The guide is provided as-is and may not be updated or maintained by Ultra.cc. Unofficial support may be offered via Discord only and at the sole discretion of Ultra.cc staff. Use at your own risk and only proceed if you are comfortable managing the application on your own.
qBit Manage is a tool to manage your qBittorrent instance from the CLI. Included features are change tag, categories, remove unregistered torrents, and a lot more.
- More information can be found here.
Prerequisites
- Python version 3.8.1 or above (will be installed by script).
- qBittorrent instance installed on your service.
Installation
- Connect to your Ultra.cc service via SSH
- Once connected, execute the following command:
bash <(wget -qO- https://scripts.ultra.cc/main-v2/qBit-Manage/main.sh)
- Type
1and confirm withENTERto proceed with the installation - Wait for the installation to finish
- Confirm the installation was successful by executing the following command:
python ~/.apps/qbit_manage/qbit_manage.py -h
- If successful, your terminal will output usage instructions for qBit Manage.
Configuration
Once qBit Manage has been installed, you need to edit the configuration file with your qBittorrent connection details. Look at the output of the install script to see the qBit Manage configuration file path.
- Open the configuration file with the editor.
- Find the
qbt:section and add your qBittorrent connection details, which can be found on the UCP.
- Find the
nano ~/.apps/qbit_manage/config/config.yml
- Do note that the configuration file is just a template, and needs to be configured to match your specific setup., refer to qBit Manage documentation for more information.
- Once you have made your changes, press
ctrl+xandyto save your changes and exit. PressENTERto confirm. - Confirm the installation was successful by executing the following command:
- The
-hoption stands for help, and will print the help message.
- The
python ~/.apps/qbit_manage/qbit_manage.py -h
- Done!
Uninstallation
- Uninstalling qBit Manage is easily done by deleting the app directory:
bash <(wget -qO- https://scripts.ultra.cc/main-v2/qBit-Manage/main.sh)
- Type
2and confirm withENTERto proceed with the uninstallation - Done!
qbittools
This unofficial app installation guide is provided for your convenience. The guide is provided as-is and may not be updated or maintained by Ultra.cc. Unofficial support may be offered via Discord only and at the sole discretion of Ultra.cc staff. Use at your own risk and only proceed if you are comfortable managing the application on your own.
qbittools is a feature rich CLI for the management of torrents in qBittorrent. It provides features such as; Add torrents, export, reannounce and more.
- More information can be found here.
Installation
- Connect to your Ultra.cc service via SSH
- Execute the following command:
curl -Ls https://gitlab.com/AlexKM/qbittools/-/raw/master/install.sh | bash -s -- -o ~/bin/qbittools
- Verify it has been installed by executing:
qbittools
- Done!
Usage
-
Print usage instructions:
qbittools --help -
Print command specific usage instructions:
qbt tagging --help -
Upgrade qbittools:
qbittools upgrade
qbittools is great for automating certain tasks. For example, you can tag all torrents and group them by tracker domains, not working trackers, unregistered torrents and duplicates. See the below command:
qbittools tagging -P <your-qbittorrent-password> --duplicates --unregistered --not-working --added-on --trackers
- Detailed usage instructions can be found here.
Uninstallation
- Uninstalling qbittools is easily done by removing the binary:
rm -v ~/bin/qbittools
- Done!
qbittorrent-cli
This unofficial app installation guide is provided for your convenience. The guide is provided as-is and may not be updated or maintained by Ultra.cc. Unofficial support may be offered via Discord only and at the sole discretion of Ultra.cc staff. Use at your own risk and only proceed if you are comfortable managing the application on your own.
qbittorrent-cli is a feature rich CLI to manage qBittorrent. It provides features such as; Add torrents, categories, tags, reannounce and import torrent sessions from other clients.
- More information can be found here.
Installation
- Connect to your Ultra.cc service via SSH
- Once connected, execute the following command:
bash <(wget -qO- https://scripts.ultra.cc/main-v2/qBittorrent-cli/main.sh)
- Type
1and confirm withENTERto proceed with the installation - When prompted, enter your qBittorrent password
- Your qBittorrent password can be found on the UCP
- Confirm the installation was successful by executing the following command:
qbt help
- If successful, your terminal will output usage instructions for qbittorrent-cli.
Usage
-
Print usage instructions:
qbt help -
Print command specific usage instructions:
qbt torrent import help
qbittorrent-cli can do a lot of things. For example, to import your Deluge torrent session into qBittorrent, see the below command. You can do a test run of the command by appending --dry-run to the command.
Before you start migrating your torrent session. Make sure you have set the same Default save path for your destination torrent client, as you have set for your source torrent client. Failing to do so would result in your new torrent client re-downloading all of your torrents again.
- Import torrent session to qBittorrent
qbt torrent import deluge --source-dir ~/.config/deluge/state/ --qbit-dir ~/.local/share/qBittorrent/BT_backup/
- Export torrent session from qBittorrent
qbt torrent export --source ~/.local/share/qBittorrent/BT_backup/ --export-dir ~/watch/deluge
- In the above command, we have used Deluge as an example. The paths can easily be replaced to match the path of other torrent clients. See them listed below.
- Paths to the torrent session state of each torrent client:
-
Deluge:
~/.config/deluge/state -
qBittorrent:
~/.local/share/qBittorrent/BT_backup -
rTorrent:
~/.config/rtorrent/session -
Transmission:
~/.config/transmission-daemon/torrents
-
Deluge:
- Paths to the watch directory of each torrent client:
-
Deluge:
~/watch/deluge -
qBittorrent:
~/watch/qbittorrent -
rTorrent:
~/watch/rtorrent -
Transmission:
~/watch/transmission
-
Deluge:
For more information about torrent session migration, see this guide.
Uninstallation
- Execute the following command:
bash <(wget -qO- https://scripts.ultra.cc/main-v2/qBittorrent-cli/main.sh)
- Type
2and confirm withENTERto proceed with the uninstallation- The uninstallation will leave your configuration file untouched at
~/.config/qbt/.qbt.toml
- The uninstallation will leave your configuration file untouched at
- Done!
Recyclarr
This unofficial app installation script is provided for your convenience. The script is provided as-is and may not be updated or maintained by Ultra.cc. Clients are welcome to use and customize unofficial app installers for their unique needs and requirements. Unofficial support may be offered via Discord only and at the sole discretion of Ultra.cc staff. Use at your own risk and only proceed if you are comfortable managing the application on your own.
Recyclarr is a command-line application that will automatically synchronize recommended settings from TRaSH guides to your Sonarr/Radarr instances.
- Official documentation for Recyclarr can be found here.
Installation
- Connect to your Ultra.cc service via SSH
- Once connected, execute the following command:
bash <(wget -qO- https://scripts.ultra.cc/main-v2/Recyclarr/main.sh)
- Next, to install Recyclarr, press
1andENTERto confirm. - Done!
Configuration
Before you can start using Recyclarr, you need to create at least one YAML configuration file. By following the below instructions, a minimal configuration file will be created at ~/.apps/recyclarr/recyclarr.yml. In this guide, we will only show the bare minimum needed to set up Recyclarr. For more information regarding configuration, see the wiki.
- Create
recyclarr.ymlby executing the following command:
recyclarr config create
- Next, to edit the configuration file, execute the following command to open
recyclarr.ymlin the Nano editor.
nano ~/.apps/recyclarr/recyclarr.yml
- Next, edit
base_urlandapi_keyfor Sonarr/Radarr. See below example:
    base_url: https://username.hostname.usbx.me/radarr
    api_key: <YOUR_API_KEY_HERE>
- Make sure to replace
usernameandhostnamewith your specific username and hostname. - Also, make sure to set the correct Base URL for each section, e.g
/radarrfor the Radarr section, and/sonarrfor the Sonarr section of the configuration file. - Lastly, replace
<YOUR_API_KEY_HERE>for each section. The API key can be found in Settings > General in the webUI of Sonarr/Radarr.
At this point, the bare minimum needed for Recyclarr to work has been done, but before you run recyclarr sync we recommend that you do your own research and thouroghly read the Recyclarr wiki.
Uninstallation
- Connect to your Ultra.cc service via SSH
- Once connected, execute the following command:
bash <(wget -qO- https://scripts.ultra.cc/main-v2/Recyclarr/main.sh)
- Next, to uninstall Recyclarr, press
2andENTERto confirm. - Done!
Second instance of Mediarr
This unofficial app installation script is provided for your convenience. The script is provided as-is and may not be updated or maintained by Ultra.cc. Clients are welcome to use and customize unofficial app installers for their unique needs and requirements. Unofficial support may be offered via Discord only and at the sole discretion of Ultra.cc staff. Use at your own risk and only proceed if you are comfortable managing the application on your own.
We have unfortunately been forced to remove Bazarr as an option for installation. The reason is due to Bazarr being badly optimized in thread management, as a single Bazarr instance can on its own saturate the 2000 userland process limit.
.NET Mediarr
This unofficial installation script lets you install a second instance of the following applications:
Installation
- Connect to your service via SSH
- Execute the following command:
bash <(wget -qO- https://scripts.ultra.cc/main-v2/Mediarr/main.sh)
- You will get to choose which application you wish to install out of Lidarr, Prowlarr, & Readarr.
- Type the number corresponding to the application you want to install, and press
ENTERto confirm. - Select a port from the provided list, type it out and press
ENTERto confirm.- Make sure to not select a port that you have previously selected for another custom installation.
- When prompted, type
confirmand pressENTERto confirm your selection of port. - Next, pick a strong password for your application installation and type it out, press
ENTERto confirm. - Wait for the installation to finish.
Management
Update & Repair
The script will only repair settings such as incorrect port, host, etc. It will not repair corrupted databases or any other factor which breaks your instance.
For each *arr application, the following branch is currently used:
Lidarr: master
Prowlarr: develop
Readarr: develop
If you have changed the branch of the *arr application and used the in-built updater to update to a later development/nightly branch version, there is a chance that your installation will be broken after an update.
For this reason, we recommend not changing branch.
- Connect to your service via SSH
- Execute the following command:
bash <(wget -qO- https://scripts.ultra.cc/main-v2/Mediarr/main.sh)
- In the list of applications, select the one you wish to Update & Repair and type the corresponding number, press
ENTERto confirm. - Type
2to selectUpdate & Repair, pressENTERto confirm. - Done!
Change Password
- Connect to your service via SSH
- Execute the following command:
bash <(wget -qO- https://scripts.ultra.cc/main-v2/Mediarr/main.sh)
- In the list of applications, select the one you wish to change the password for and type the corresponding number, press
ENTERto confirm. - Type
2to selectChange Password, pressENTERto confirm. - Pick a strong password and type it out, press
ENTERto confirm. - Done!
Uninstallation
- Connect to your service via SSH
- Execute the following command:
bash <(wget -qO- https://scripts.ultra.cc/main-v2/Mediarr/main.sh)
- In the list of applications, select the one you wish to uninstall and type the corresponding number, press
ENTERto confirm. - Type
4to selectUninstall, pressENTERto confirm.- A backup of the application configuration files will be created at
~/.apps/backup.
- A backup of the application configuration files will be created at
- Wait for the uninstallation to complete.
- Done!