Torrent Clients
Guides, scripts and tutorials to extend functionality on torrent clients.
- Remote Torrent Adder and Torrent Control
- ruTorrent Ratiocolor plugin
- ruTorrent Ratio Groups
- Electorrent
- Torrent Session Migration
- Find Corrupted Torrents
Remote Torrent Adder and Torrent Control
In this guide, we'll be setting up extensions that send torrent files from your browser to your remote client for downloading torrents without logging into your torrent client's web interface.
Initial Setup
- Install the extension from these links
- Chromium: Remote Torrent Adder
- Firefox: Torrent Control
Configuration
Remote Torrent Adder
- Once installed, right-click the extension and click Options.
- Then, a new tab appears with the Remote Torrent Adder setup page. Click the Add server button to add one. The following connection details are shown below:
ruTorrent
When adding a torrent, you may see Server responded with an irregular HTTP code. You can safely ignore this error.
Server name: {any name}
Server type: ruTorrent WebUI

Host: {username}.{servername}.usbx.me
Port: 443
SSL: Checked
Username: {username}
Password: Password: As configured in UCP under ruTorrent
Relative Path: /rutorrent
Deluge
Server name: {any name}
Server type: Deluge WebUI
Host: {username}.{servername}.usbx.me
Port: 443
SSL: Checked
Username: {username}
Password: Password: As configured in UCP under Deluge
Relative Path: /deluge
Transmission
Server name: {any name}
Server type: Transmission WebUI
Host: {username}.{servername}.usbx.me/transmission/rpc
Port: 443
SSL: Checked
Username: {username}
Password: Password: As configured in UCP under Transmission
qBittorrent
Server name: {any name}
Server type: qBittorrent v4.1+ WebUI
Host: {username}.{servername}.usbx.me
Port: 443/qbittorrent
SSL: Checked
Username: {username}
Password: As configured in UCP under qBittorrent
Torrent Control
- To set Torrent Control up, click the plugin icon. This will take you to its configuration page.
- To add a new server, go to Server Configuration
- On the Current server dropdown, select New Server
ruTorrent
Server name: {any name}
Bittorrent Client: ruTorrent
Server address: https://{username}.{servername}.usbx.me/rutorrent
Username: {username}
Password: As configured in UCP under ruTorrent

Click Save after configuring
Deluge
Server name: {any name}
Bittorrent Client: Deluge
Server address: https://{username}.{servername}.usbx.me/deluge
Password: As configured in UCP under Deluge

Click Save after configuring
Transmission
Server name: {any name}
Bittorrent Client: Transmission
Server address: https://{username}.{servername}.usbx.me/transmission/rpc
Username: {username}
Password: As configured in UCP under Transmission

Click Save after configuring
qBittorrent
Server name: {any name}
Bittorrent client: qBittorrent
Server address: https://{username}.{servername}.usbx.me/qbittorrent
Username: {username}
Password: As configured in UCP under qBittorrent
ruTorrent Ratiocolor plugin
Ratiocolor is a ruTorrent plugin that will colorize the ratio column in different colors depending on the ratio level.
Requirements
- Both rTorrent and ruTorrent needs to be installed
- SSH access, see this guide
Installation
- Login to your Ultra slot via SSH
- Once you've successfully logged in, execute the following command:
cd ~/www/rutorrent/plugins/
- Next, execute the following command:
git clone https://github.com/Gyran/rutorrent-ratiocolor.git ratiocolor
Configuration
- To colorize background only, execute the following command:
sed -i "s:changeWhat = \"font\";:changeWhat = \"cell-background\";:g" ~/www/rutorrent/plugins/ratiocolor/init.js

- To colorize font only, execute the following command:
sed -i "s:changeWhat = \"cell-background\";:changeWhat = \"font\";:g" ~/www/rutorrent/plugins/ratiocolor/init.js

- Refresh your ruTorrent webUI for the changes to take effect.
ruTorrent Ratio Groups
Ratio groups are an advanced feature in rTorrent & ruTorrent that give you precise control over seeding rules and conditions for your torrents. With detailed ratio groups configurations, you can automatically manage seeding and uploading behavior across your entire torrent library.
Features
- Set actions like stopping seeding, moving torrents between trackers, or labeling torrents when certain seeding goals are reached.
- Eliminates the need for manual oversight and intervention as your library grows.
Accessing Ratio Groups Settings
- First, log into your RUtorrent web UI, located at a URL:
https://username.hostname.usbx.me/rutorrent/ - After logging in, click on the Settings gear Icon located in the horizontal menu bar at the top of the page.
- Next, click on the "Ratio Groups" link in the left vertical menu bar. This will open the Ratio Groups settings page.

Ratio Group Conditions
Each ratio group contains a set of conditions that must be met for the configured action to trigger:
-
Minimum Upload Percentage - The minimum percentage of the torrent that must be uploaded before the action occurs. This is calculated as a percentage of the total torrent size.
-
Maximum Upload Percentage - The maximum percentage of the torrent that can be uploaded before the action occurs. This serves as an upper limit on the ratio.
-
Minimum Upload Size - The minimum number of MB or GB that must be uploaded before the action occurs. Useful for controlling absolute upload amounts.
-
Maximum Seed Time - The maximum time in hours for seeding before the action occurs. Allows limiting seeding time regardless of ratio.
Understanding How Ratio Group Conditions Work
-
The minimum percentage and minimum upload size work in conjunction - both conditions must be satisfied for the action to occur. This allows requiring both a minimum ratio and a minimum absolute upload at the same time.
-
The maximum percentage and maximum seed time work independently - if either condition is reached, the action will happen regardless of other conditions. This allows setting hard limits on ratio and time.
Here is a table showing examples of how the conditions interplay to trigger the action:
| Min % | Max % | Min UL | Max Time | Action? | Reasoning |
|---|---|---|---|---|---|
| Yes | No | Yes | No | Yes | Min conditions met |
| No | Yes | No | No | Yes | Max condition met |
| No | No | Yes | No | No | Need both min conditions |
| Yes | No | No | Yes | No | Need both min conditions |
| Yes | Yes | Yes | Yes | Yes | All conditions met |
As shown, the action occurs when:
- Both Min % and Min UL are met
- Either Max % or Max Time occur
So you have full flexibility to combine conditions or isolate certain rules.
Common Ratio Group Configurations
Here are some useful ratio group configurations you may want to employ:
Simple Ratio Stopping
Scenario: Stop seeding when a torrent reaches a specified ratio.
Example:
- Min Ratio: 200%
- Max Ratio: 200%
- Min Upload: 0
- Max Time: -1
- Action: Stop
This will stop all torrents when they reach 2.0 ratio.
Time Limited Seeding
Scenario: Stop seeding after a certain amount of time, regardless of ratio.
Example:
- Min Ratio: 1000%
- Max Ratio: 0
- Min Upload: 0
- Max Time: 48 (hours)
- Action: Stop
This will stop all torrents after 48 hours seeded, no matter the ratio.
Combined Ratio and Time Stopping
Scenario: Stop seeding based on ratio OR time, whichever comes first.
Example:
- Min Ratio: 200%
- Max Ratio: 0
- Min Upload: 0
- Max Time: 48 (hours)
- Action: Stop
This stops at 2.0 ratio or 48 hours, whichever happens first.
Fixed Upload Amount Stopping
Scenario: Stop seeding after uploading a fixed amount of data.
Example:
- Min Ratio: 1000%
- Max Ratio: 0
- Min Upload: 10 (GB)
- Max Time: -1
- Action: Stop
This stops all torrents after 10GB uploaded, regardless of ratio.
Stop Unseeded Torrents
Scenario: Stop torrents that don't reach set ratio after a certain time period.
Example:
- Min Ratio: 150%
- Max Ratio: 0
- Min Upload: 0
- Max Time: 168 (hours)
- Action: Stop
Stops torrents unseeded after 1 week.
Additional Points and Tips
Here are some additional tips to keep in mind when working with ratio groups:
-
Check rules often as library grows - A rule that works for 10 torrents may need tweaking for 100 or 1000 torrents. Reevaluate regularly.
-
Beware of overlapping conditions - Having multiple broad rules may lead to unintended consequences. Check for conflicts.
-
Test heavily before deploying - Create a test label and test ratio groups before unleashing them on your whole library.
-
Start simple - Get basic rules working before moving to intricate conditions with many trackers/labels.
The possibilities are endless for creating automated, intelligent seeding behaviors with ratio groups. Use them wisely and they will make torrent library management a breeze.
Electorrent
Electorrent is a remote control client desktop application for qBittorrent, rTorrent, Transmission, Deluge, µTorrent and Synology. It is used to manage your torrent client instead of using the provided web UI of said torrent client.
More information can be found here.
Installation
- Go to here and download Electorrent for your OS.
- Execute the downloaded file and you should be presented with a window as shown in the below image.
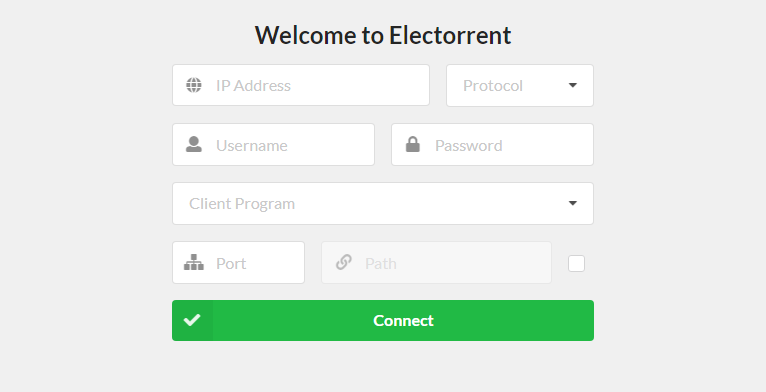
Configuration
Once you successfully launch Electorrent, it will prompt you to enter connection details to access your torrent client. Below, you will find details for your specific torrent client.
Connection Details
Connection details can be found on the UCP by going to the Apps tab. In the list of installed applications, find your torrent client and click the blue Show Info button to reveal the details you need to connect Electorrent to your torrent client.
Deluge
Deluge can only be connected via HTTP protocol because of limitations within Electorrent.
-
IP Address:
username.hostname.usbx.me- Make sure to replace
usernameandhostnamewith your username and hostname.
- Make sure to replace
- Protocol: HTTP
- Username: Your ultra.cc service username
- Password: Password shown under Remote Client Access on the UCP
- Client Program: Deluge
- Port: The WebUI port of Deluge, shown under Port Details on the UCP
- Path: Not needed
qBittorrent
-
IP Address:
username.hostname.usbx.me- Make sure to replace
usernameandhostnamewith your ultra.cc service username and hostname.
- Make sure to replace
- Protocol: HTTPS
- Username: Your ultra.cc service username
- Password: Password for qBittorrent, found on the UCP
- Client Program: qBittorrent
- Port: 443
-
Path:
/qbittorrent
rTorrent/ruTorrent
-
IP Address:
username.hostname.usbx.me- Make sure to replace
usernameandhostnamewith your ultra.cc service username and hostname.
- Make sure to replace
- Protocol: HTTPS
- Username: Your ultra.cc service username
- Password: Password for rTorrent, found on the UCP
- Client Program: rTorrent
- Port: 443
-
Path:
/RPC2
Transmission
-
IP Address:
username.hostname.usbx.me- Make sure to replace
usernameandhostnamewith your ultra.cc service username and hostname.
- Make sure to replace
- Protocol: HTTPS
- Username: Your ultra.cc service username
- Password: Password for Transmission, found on the UCP
- Client Program: Transmission
- Port: 443
-
Path:
/transmission/rpc
Torrent Session Migration
We do not officially support or assist with migrating your torrent session state. There is always a small risk for torrent data to become corrupted while migrating. The below procedures are provided for our clients to use at their own risk.
In this guide, we will cover the procedure of migrating torrent sessions from one client to another. There are multiple ways of getting this done, and we will show you a few of them. Before we begin with the instructions, we will list all torrent clients available on Ultra.cc, and their respective strengths and limitations.
Please note, the below characteristics are highly subjective and may not align with your specific use case. The amount of torrents listed are soft limits.
- Deluge - Unstable and fast downloading, with a limit of 100 torrents for v1 and 2000 torrents for v2
- qBittorrent - Stable and fast seeding, with a limit of 10K torrents
- rTorrent - Unstable and slow seeding, with a limit of 2000 torrents
- Transmission - Slow and featureless, with a limit of 25K torrents
As these torrent clients are running in a shared environment on Ultra.cc. We do not recommend and neither do we officially support torrent clients with torrent sessions above these limitations.
Instructions
Basic Migration
As mentioned previously, there are multiple ways of migrating your torrent session between clients. Below, we will show you one of the more basic ways of doing it.
Before you start migrating your torrent session. Make sure you have set the same default save path for your destination torrent client, as you have set for your source torrent client. Failing to do so would result in your new torrent client re-downloading all of your torrents again.
Please read the rules of your torrent trackers as some do not allow seeding from more than one IP or client.
- Connect to your Ultra.cc service via SSH
- Once connected you can find your torrent session stored in these locations:
-
Deluge:
~/.config/deluge/state -
qBittorrent:
~/.local/share/qBittorrent/BT_backup -
rTorrent:
~/.config/rtorrent/session -
Transmission:
~/.config/transmission-daemon/torrents
-
Deluge:
Next, you would want to copy your torrent files from the torrent session directory of your current torrent client, into the watch directory of the torrent client you are migrating to.
- The watch directory is located at
~/watch/<name-of-torrent-client>- If you are migrating to Deluge, it would be
~/watch/deluge - If you are migrating to qBittorrent, it would be
~/watch/qbittorrent - If you are migrating to rTorrent, it would be
~/watch/rtorrent - If you are migrating to Transmission, it would be
~/watch/transmission
- If you are migrating to Deluge, it would be
- To avoid heavy resource usage, which could lead to your torrent client crashing, do not add more than ~50 torrent files at the same time. Once those torrents you have added has been hashed, you can add a new set of 50 torrents.
- You should set your destination torrent client to Add torrents in a paused state, and then manually resume the torrents in groups of 50 once they have been added to the torrent client.
- You should also set Max Active Downloads to
1to avoid high IO utilization if torrents are re-checked. To monitor your IO utilization, see this guide.
The next step in the procedure is to begin copying your torrent files from your current torrent client's session state directory, to your destination torrent client's watch directory. The session state and watch directories of each torrent client can be found further up in this guide. In the below command, we have used Deluge and qBittorrent as an example.
- Execute the following command:
cp -l ~/.config/deluge/state/* ~/watch/qbittorrent/
- Once the command has successfully been executed, you should see new torrents being added to your destination torrent client.
qbittorrent-cli
WARNING: Make sure to stop both the source client and qBittorrent before importing.
If you are migrating to qBittorrent, there is a great utility tool called qbittorrent-cli which makes the process of migrating your torrents very easy and effortless.
- Install qbittorrent-cli by following the instructions here.
- Once you have successfully installed and configured qbittorrent-cli, you are ready to migrate your torrent session by executing the following command:
qbt torrent import deluge --source-dir ~/.config/deluge/state/ --qbit-dir ~/.local/share/qBittorrent/BT_backup/
-
In the above example, the command would execute a torrent migration from Deluge to qBittorrent. As you can see, it specifies the Deluge torrent session path, but it does not specify the watch directory of qBittorrent. The reason for this is that it is injecting the torrent directly into the qBittorrent client, instead of adding the torrent to the watch directory and letting it be added that way.
-
To export your torrent session from qBittorrent to another torrent client, execute the following command:
qbt torrent export --source ~/.local/share/qBittorrent/BT_backup/ --export-dir ~/watch/deluge
- The
--export-dirof the above command can be replaced with the watch directory of another torrent client. See them listed below.
- Paths to the watch directory of each torrent client:
-
Deluge:
~/watch/deluge -
qBittorrent:
~/watch/qbittorrent -
rTorrent:
~/watch/rtorrent -
Transmission:
~/watch/transmission
-
Deluge:
Find Corrupted Torrents
Take care while deleting files within your torrent session state. We do not take any responsibility for accidental data deletion and cannot restore deleted data. The below procedures are provided for our clients to use at their own risk.
This guide will cover how to find and remove a corrupted torrent in your torrent client. Occasionally, a torrent can become corrupted and cause your torrent client to crash. This can be somewhat complicated to troubleshoot and diagnose, as there are many reasons for why a torrent client might crash.
Before we begin, let's introduce the available torrent clients, their strengths, and weaknesses. The information below will help you decide what torrent client to use. Please note that the below characteristics are highly subjective and may not align with your specific use case. The number of torrents listed is are soft limits.
- Deluge - Unstable and fast downloading, with a limit of 100 torrents for v1 and 2000 torrents for v2
- qBittorrent - Stable and fast seeding, with a limit of 10K torrents
- rTorrent - Unstable and slow seeding, with a limit of 2000 torrents
- Transmission - Slow and featureless, with a limit of 25K torrents
These torrent clients are running in a shared environment on Ultra.cc. We do not recommend nor officially support torrent clients with torrent sessions above these limits.
qBittorrent
If your qBittorrent instance is able to start up, but immediately becomes unreachable, it is possible that you have torrent files that are corrupted. To locate a corrupt torrent file in qBittorrent, you need to monitor the log output. Logging is enabled by default in qBittorrent and no further action is needed to get started.
If the qBittorrent log file throws torrent file errors without the hash string included, you need to locate the torrent hash from someplace else. A possible solution is to upgrade your qBittorrent instance to a newer version (if you aren't already on the newest version) and restore your torrent session. Then, restart qBittorrent and fetch the torrent hash from the webUI before qBittorrent crashes. This is not always possible, but will work in some cases. See our Torrent Session Migration guide for instructions on how to restore a torrent session.
- Connect to your Ultra.cc service via SSH
- Before you begin troubleshooting, you should backup your qBittorrent instance by following the instructions here.
- Alternatively, to manually backup qBittorrent, you can make copies of the below directory paths.
-
~/.local/share/qBittorrent -
~/.config/qBittorrent
-
- Next, you can begin monitoring the qBittorrent log file in real-time by executing the following command:
- To stop the real-time monitoring, press
CTRL+C.
- To stop the real-time monitoring, press
tail -f ~/.local/share/qBittorrent/logs/qbittorrent.log
- While you are monitoring the qBittorrent log file in real-time, proceed to restart your qBittorrent instance.
- Restart qBittorrent from the Apps tab on the UCP, or by executing
app-qbittorrent restart.
- Restart qBittorrent from the Apps tab on the UCP, or by executing
- During the restart of qBittorrent, keep an eye on the real-time monitoring of the log file and look for any errors.
- If errors are found, take note of the error and exit the real-time monitoring by pressing
CTRL+C.
- If errors are found, take note of the error and exit the real-time monitoring by pressing
- Next, if there were any corrupted torrents, you will see errors such as
Unable to resume torrent '<hash>'and/orFile error alert. - Your next course of action would be to locate these torrents, which can be done by executing the following command:
cat ~/.local/qbittorrent/logs/qbittorrent* | grep -i unable
- The above command will list all the corrupted torrent files as
<hash>.torrent. Take not of these files.- The format to note would look like this:
fe44aede8630g8dab52263da06e1e1lblc693136.torrent
- The format to note would look like this:
- Next, stop qBittorrent from the Apps tab on the UCP, or by executing
app-qbittorrent stop. - Once qBittorrent has been stopped, you can proceed to delete all the corrupted torrents.
- To delete a torrent, execute the following command for each of the corrupted torrents:
- Be sure to replace the alphanumerical string with the filenames that you have noted previously.
rm ~/.local/share/qBittorrent/BT_BACKUP/fe44aede868a38dab52263da06e1e1bddc693136.torrent
- Once all the corrupted torrents have been deleted, you can proceed to restart qBittorrent.
- Restart qBittorrent from the Apps tab on the UCP, or by executing
app-qbittorrent restart.
- Restart qBittorrent from the Apps tab on the UCP, or by executing
- If all went well, qBittorrent should start up without issues. However, if qBittorrent still crashes upon start up, you need to restart the procedure and monitor the log file while restarting qBittorrent.
rTorrent
To locate a corrupt torrent file in rTorrent, you need to monitor the log output during the crash of rTorrent. By default, rTorrent logging is disabled and needs to be enabled.
Enabling logging of rTorrent should only be done temporarily. Leaving logging enabled for a prolonged time will create very large log files, and could lead to your storage being filled up.
- Connect to your Ultra.cc service via SSH
- Stop rTorrent from the UCP, or by executing
app-rtorrent stop - Create a
logdirectory and backup torrent session by executing the following command:
mkdir ~/.config/rtorrent/logs && cp -r ~/.config/rtorrent/session ~/.config/rtorrent/session.bak
- Next, to enable logging in rTorrent, open
.rtorrent.rcwith the nano editor:
nano ~/.rtorrent.rc
- At the end of the configuration file, paste the following:
log.open_file = "rtorrent", ~/.config/rtorrent/logs/rtorrent.log
log.open_file = "tracker", ~/.config/rtorrent/logs/tracker.log
log.open_file = "storage", ~/.config/rtorrent/logs/storage.log
log.open_file = "network", ~/.config/rtorrent/logs/network.log
log.add_output = "info", "rtorrent"
log.add_output = "critical", "rtorrent"
log.add_output = "error", "rtorrent"
log.add_output = "warn", "rtorrent"
log.add_output = "notice", "rtorrent"
log.add_output = "debug", "rtorrent"
log.add_output = "dht_debug", "tracker"
log.add_output = "tracker_debug", "tracker"
log.add_output = "storage_debug", "storage"
- Next, restart rTorrent from the UCP, or by executing
app-rtorrent restart - Now, wait until rTorrent crashes and then check the logs to see what torrent was last logged
- To output the log in your terminal, execute the following command:
tail ~/.config/rtorrent/logs/storage.log
- Find the last torrent logged and execute the command in the box below:
- The
TORRENTIDwill be in the format of4CC1F979463A4852574E0DE8E111084C19342F83 - Make sure to include the
*at the end of the command, as it will remove all related files.
- The
rm ~/.config/rtorrent/session/TORRENTID*
- Then, restart rTorrent from the UCP, or by executing
app-rtorrent restart - Next, if rTorrent crashes again, repeat the process.
- Stop rTorrent
- Find the latest torrent ID in the log
- Remove the files associated with the torrent ID
- Restart rTorrent
- Once rTorrent no longer crashes, you can disable logging.
- Stop rTorrent from the UCP, or by executing
app-rtorrent restart - Remove the lines that you previously added to the configuration file
~/.rtorrent.rc - Restart rTorrent from the UCP, or by executing
app-rtorrent restart - Done!