Secure Shell (SSH)
Secure Shell is a cryptographic network protocol for operating network services securely over an unsecured network. Typical applications include remote command-line, login, and remote command execution, but any network service can be secured with SSH.
- How to connect to your Ultra.cc slot via SSH
- Public Key Authentication
- Your Ultra.cc Shell - A Beginner's Guide
- SSH Troubleshooting Information
How to connect to your Ultra.cc slot via SSH
SSH, also known as Secure Shell, is a network protocol that gives users a secure way to access your slot remotely. With SSH, you can do the following:
- Provides secure access for users to your slot
- Can be used for secure file transfers to and from your PC
- Issue remote commands
- Can be used to diagnose and troubleshoot if there are problems with your apps
All of our slot plans come with SSH access.
Please refrain from installing or running custom shell's here at Ultra.cc (zsh,eshell,fish etc) the shell currently running is customized to allow your applications and custom shell commands to function.
Changing your SSH Password
Before logging into your SSH, you should first set your own SSH/FTP password.
- Login to your User Control Panel and log in with the credentials you set and Press Connect
- Go to the Connect tab and click on Change password beside SSH access.
- Set your Password to anything you wish. We recommend using a unique password that you do not use in any of your existing accounts and has the following:
- At least 12 characters
- An uppercase letter
- A lowercase letter
- At least 1 number
- At least 1 symbol
- When you're done, click Confirm change
- A popup saying Password successfully changed should appear on the lower right corner of the page, signifying that the Password is set successfully.

SSH Clients and How to Connect
OpenSSH
OpenSSH is an open-source alternative to the proprietary Secure Shell software suite offered by SSH Communications Security and is bundled with some Linux distributions and macOS. It is also an optional feature in Windows 10 since the October 2018 Update (Version 1809).
Installing OpenSSH in Windows 10
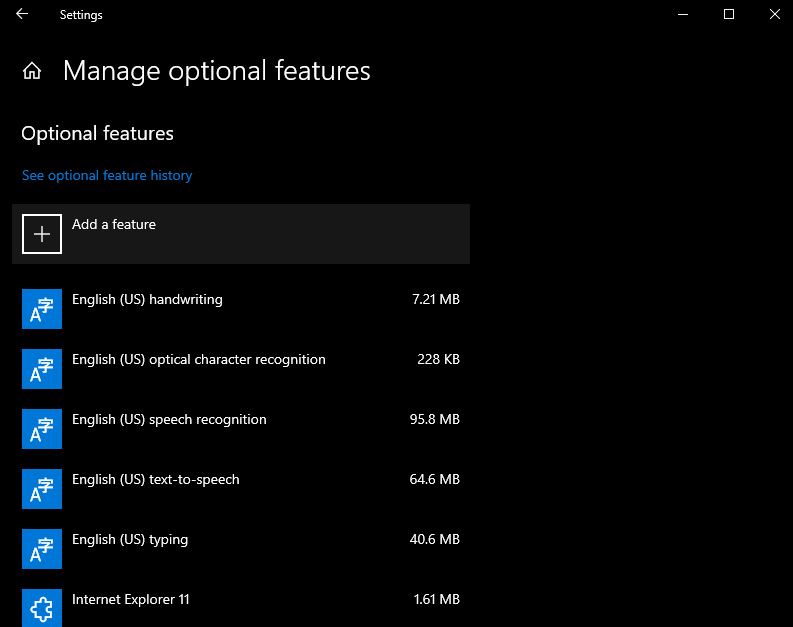
- To install OpenSSH client, go to Settings then go to Apps > Apps and Features > Manage Optional Features. Then, click Add a feature.
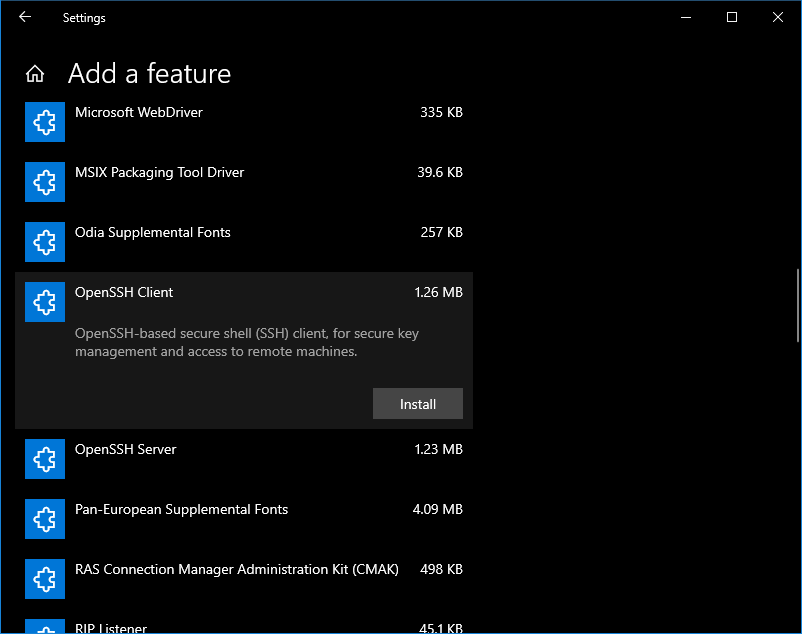
- Then, select OpenSSH Client and click Install.
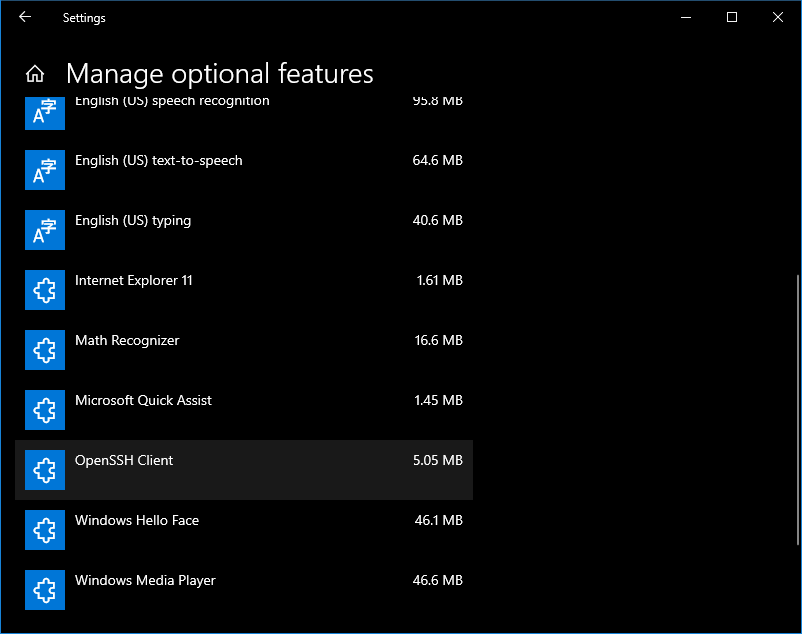
- Once installation is completed, return to Apps > Apps and Features > Manage Optional Features and you should see OpenSSH Client listed under Optional features.
Installing OpenSSH in Linux
Some Linux distributions have OpenSSH client installed as part of their bundle. Provided below are the commands to install OpenSSH clients in some of the popular Linux distributions.
Ubuntu/Debian: sudo apt Install openssh-client

Arch Linux/Manjaro Linux: sudo pacman -Syyu openssh

Fedora: sudo dnf install -y openssh-client;
Accessing slot’s Terminal via OpenSSH
The following screenshots are from Windows' command prompt, but they should be the same on Windows, Linux, and macOS.
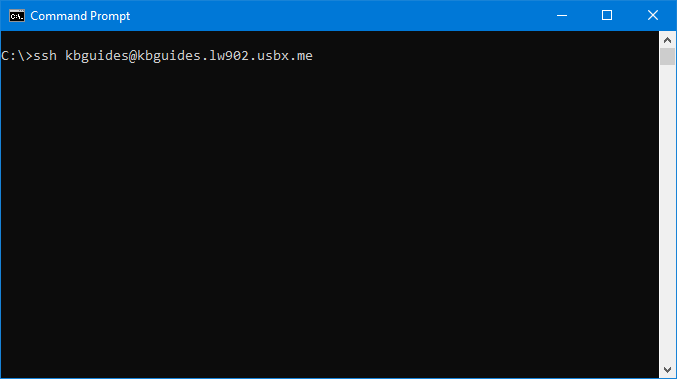
- Open up a command prompt window, Windows PowerShell window, or a terminal window (macOS/Linux) and type in either of the following
ssh username@IP_of_slot (your_username@123.456.789)
ssh username@servername.usbx.me (your_username@jupiter.usbx.me)
ssh username@username.servername.usbx.me (your_username@usbdocs.jupiter.usbx.me)
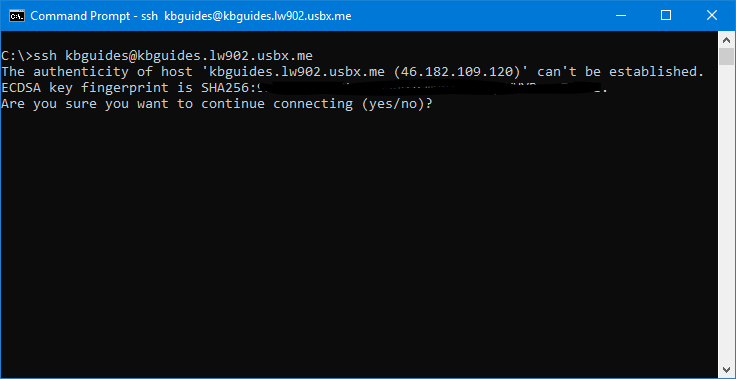
- When you do this the first time, this message appears. This is normal. This means that your computer does not recognize the remote host, which is your slot, and will happen the first time you connect to a new host.
- Type
yesand press ENTER to continue. You can compare your IP address shown here to the one indicated to your UCP, and if it's correct, typeyes.
- Then, enter the Password that you set earlier. Take note that you won't see anything in the password field as you type. This is normal as no visual feedback of passwords given in the terminal is part of the security measures taken by default.
- When you entered the correct Password, you'll enter the shell of your slot.
PuTTY
PuTTY is a free and open-source GUI SSH, Telnet, Rlogin, and serial port connection client for Windows. You may also use this to connect to your slot.
Installation
- Download and install the latest release of PuTTY here.
Setting up PuTTY
- Launch PuTTY, and you'll be greeted with this window.
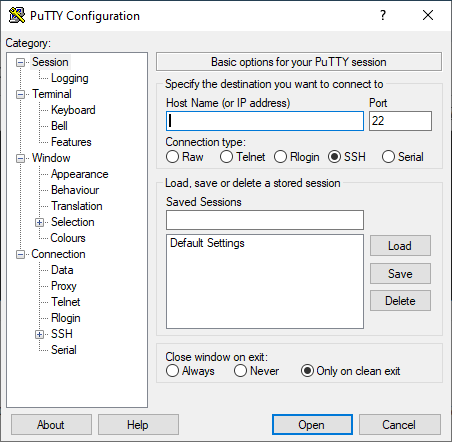
- Login to your UCP and navigate to your Access details Tab
- Put in the hostname or the IP of the slot to the Host Name (or IP Address) text box. In the screenshot, I'll be using the IP of the slot.
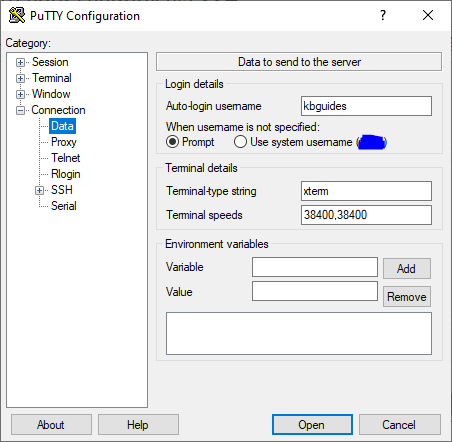
- Make sure that the Port is set to
22and the Connection Type is SSH - In Connection -> Data, enter the username registered on your slot.
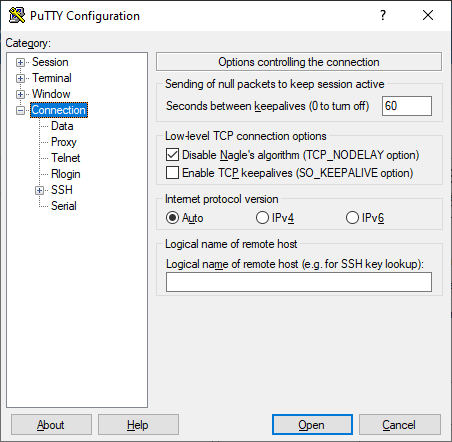
- This is optional, but under Connection, you can set Seconds between keepalives to
60. This is to prevent you from disconnecting from your SSH session whenever you're idle.
- Now, to save your profile, go to Session. Enter any name you want on the Saved sessions text box and click Save.
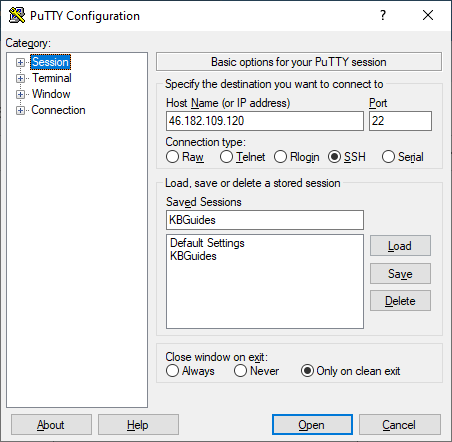
- We will now log in to your slot. Highlight the Saved Session you just made. and click Open.
- Another window will open
- Enter the Password you set. Once logged in, you'll see this message. You're now in your slot's terminal session.
Termius
Termius is a popular SSH client for mobile and desktop devices. It is easy to use and has a variety of features, such as multi-host management, syntax highlighting, and code completion.
Installation
- Download and install the latest release of Termius here.
Setting up Termius
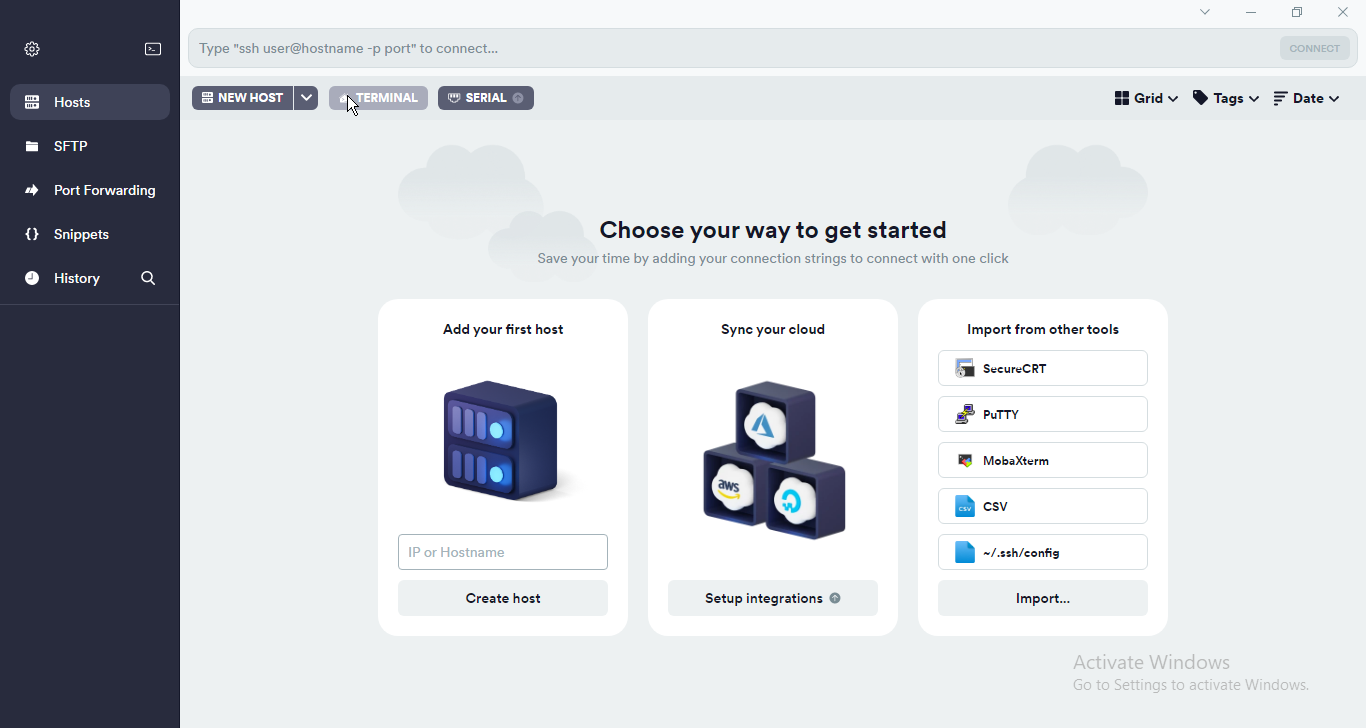
- Launch Termius, and you'll be greeted with this window.
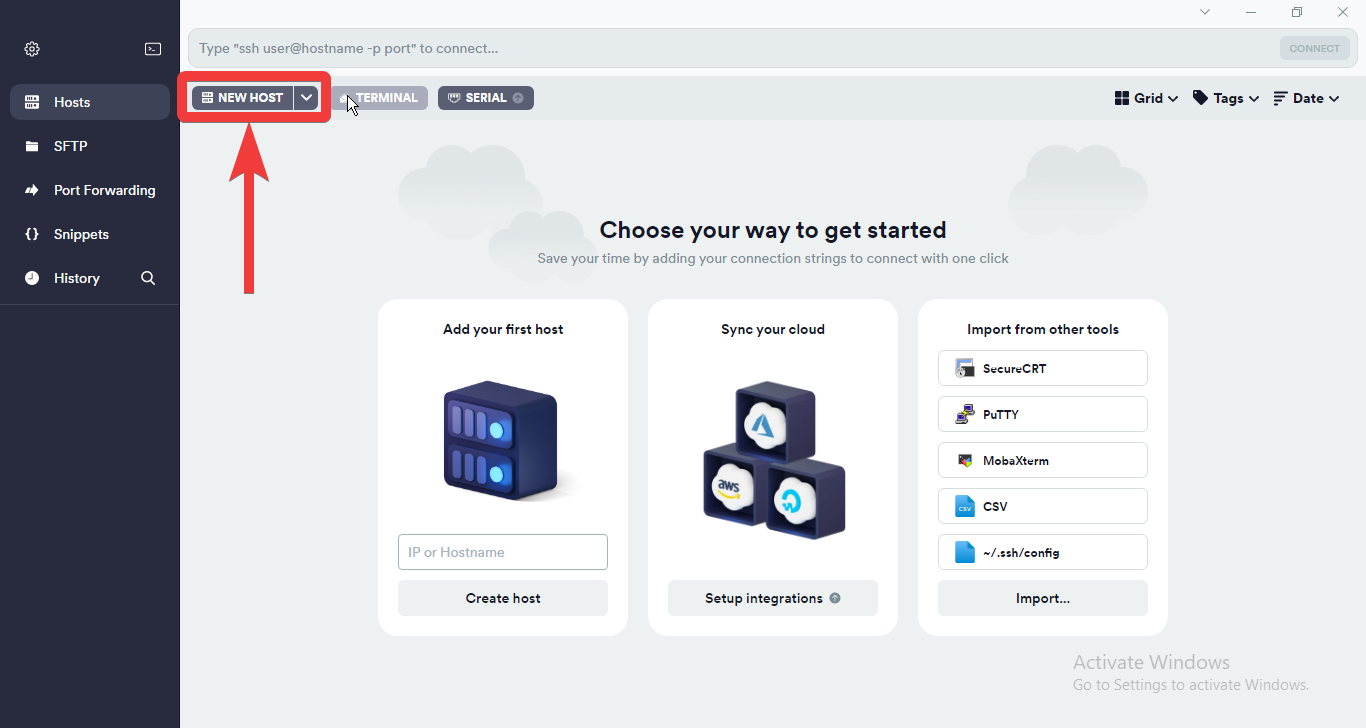
- click the NEW HOST button in the top Left corner to add a new host.
- Login to your UCP and navigate to your Access details Tab
- Put in the hostname or the IP of the slot to
Addressfield . In the screenshot, I'll be using the hostname of the slot. - Enter the username & password in the
Username&Passwordfield respectively. - The SSH port will remain
22which is the default value in Termius.
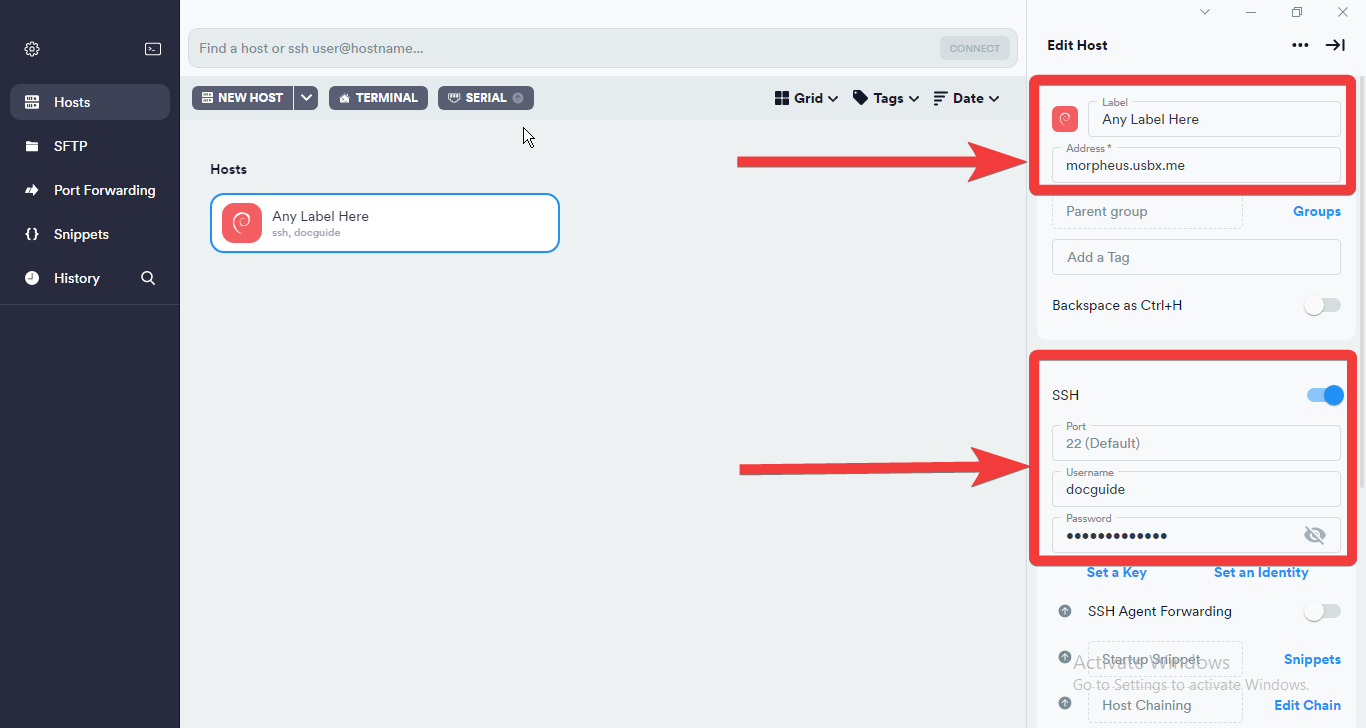
- Entered details are saved automatically. You can either double click on the created host on the left side or use the connect button on the upper right corner.
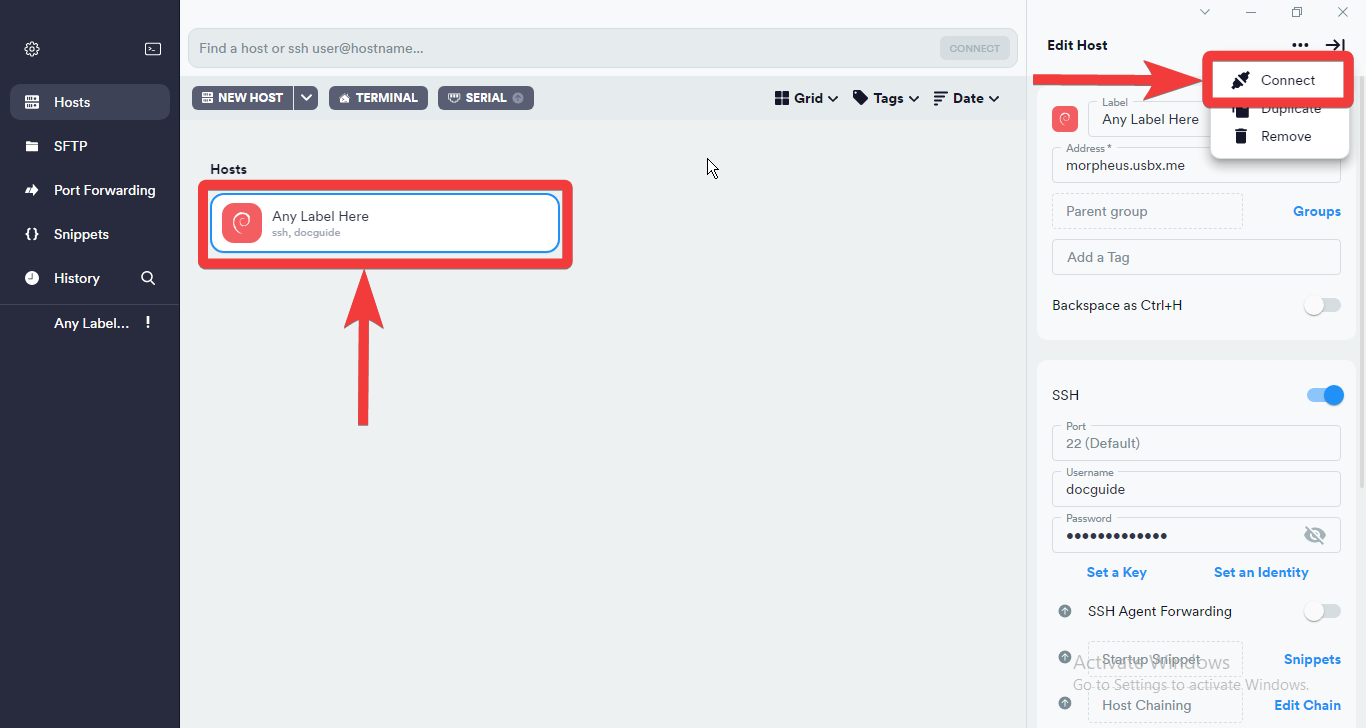
- Select Add and continue next.
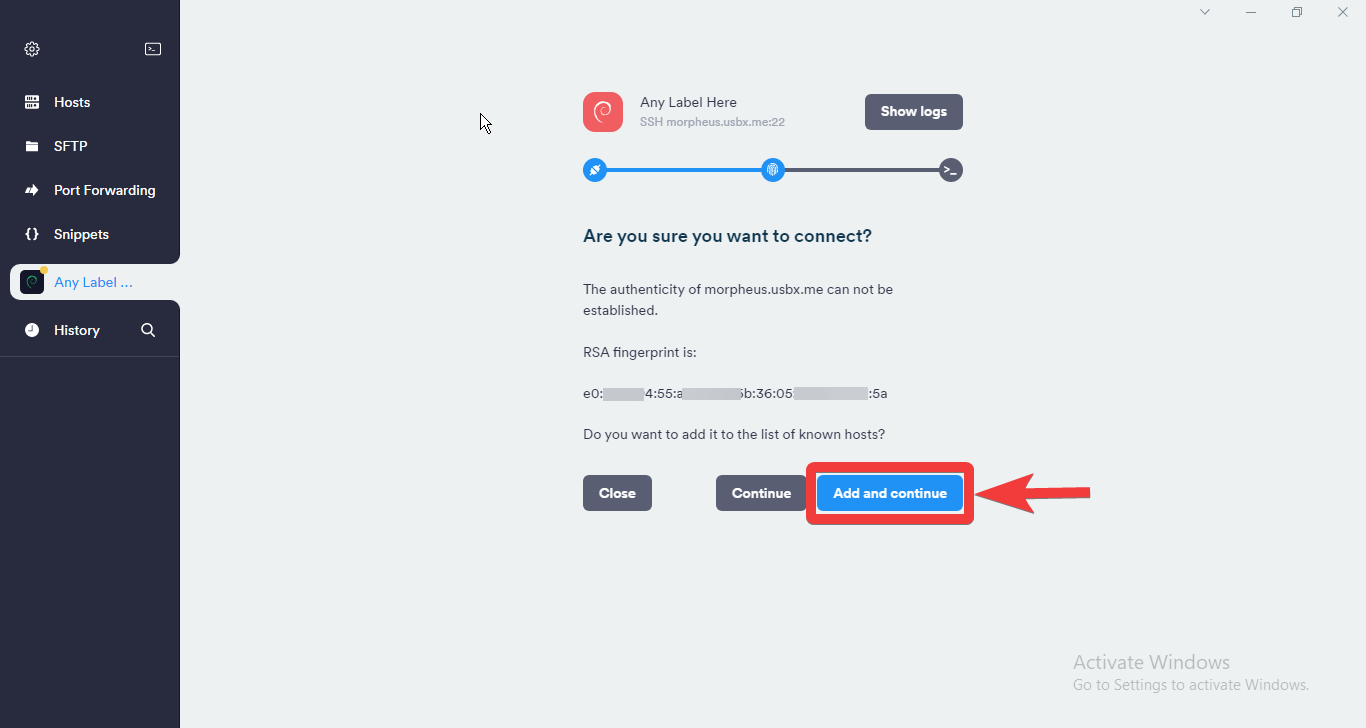
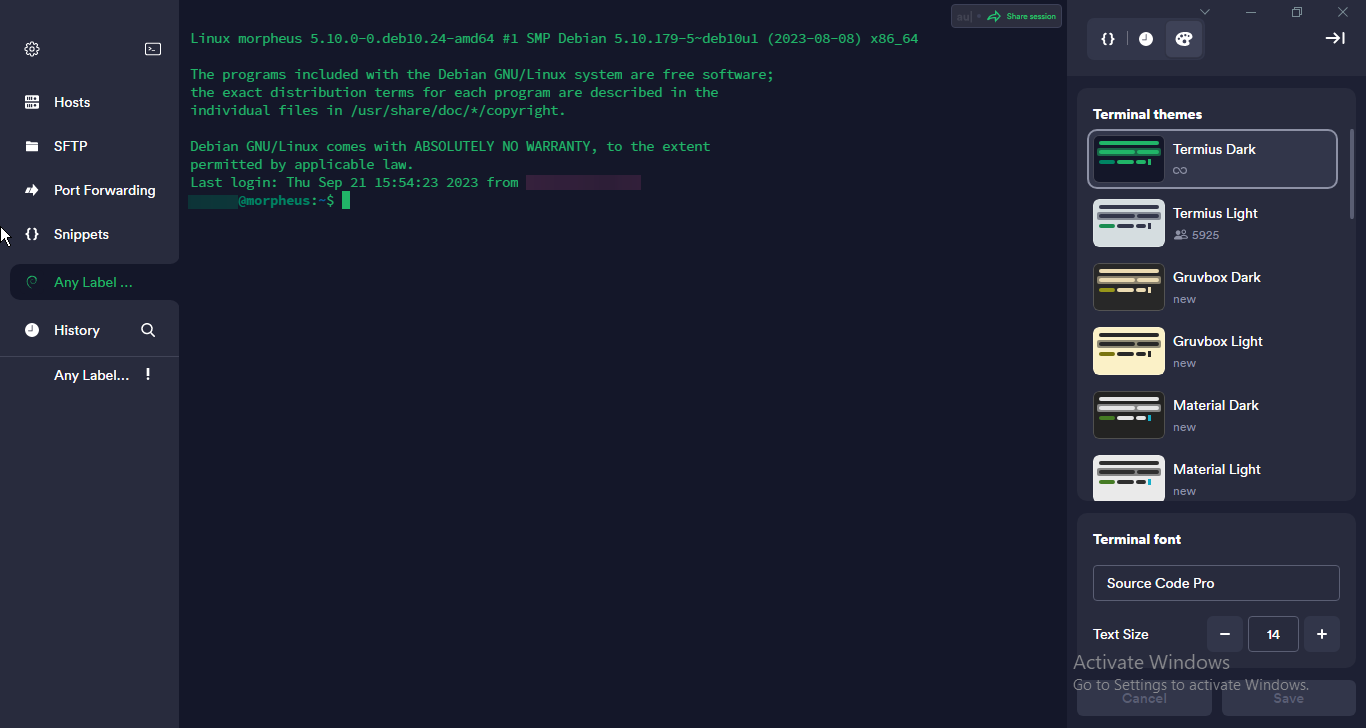
- Now, you will be greeted with your slot's terminal window.
To read more about the Termius options in a detailed manner visit here
Public Key Authentication
SSH key pair authentication is a recommended method of logging into your slot via SSH for added security and convenience in place of our SSH password. You can place the public key on your slot, and then unlock it by connecting to it with a client that has the private key. When the two matches up, the system unlocks without the need for a password. The major advantage of this is that this authentication method provides greater cryptographic strength than long passwords, rendering it not prone to brute-force attacks. You can increase security even more by protecting your private key with a passphrase.
In this tutorial, we would be showing you on how to generate your own key pair using several tools, how to transfer your public key to your slot and how to login using key pair authentication.
OpenSSH
This should work on Linux, macOS and Windows 10 Users. If you haven't set OpenSSH up, you may refer to on how to connect to your slot via SSH for installation and setup of OpenSSH for Windows 10, Linux and MacOS.
Creating Public and Private Keys
- On your computer, type in
ssh-keygenand press ENTER. This should start generating public and private key pairs.- By default it generates a 2048-bit RSA key pair which is sufficient in most cases
$ ssh-keygen
Generating public/private rsa key pair.
-
We also recommend to generating the following keys which are more secure than the default.
- To generate an RSA 4096 key:
ssh-keygen -b 4096- Much more secure than 2048 bit is slower when logging into your slot
- To generate a ed25519 key:
ssh-keygen -t ed25519- New algorithm, has a smaller key size and faster generation with security comparable to RSA ~3000
- To generate an RSA 4096 key:
-
Here, you can press ENTER to save the key pair into the
.ssh/subdirectory in your home directory- For Windows, your User Folder is typically in
C:\Users\username\.ssh - For Linux it's
/home/username/.ssh - You may also specify an alternate path.
- For Windows, your User Folder is typically in
$ ssh-keygen -b 4096
Generating public/private rsa key pair.
Enter file in which to save the key (/your_home/.ssh/id_rsa):
- Here you optionally may enter a secure passphrase. You can press ENTER to skip putting in a passphrase
- It is recommended to add in a passphrase
- A passphrase adds an additional layer of security to prevent unauthorized users from logging in should they have your private key
$ ssh-keygen -b 4096
Generating public/private rsa key pair.
Enter file in which to save the key (/your_home/.ssh/id_rsa):
Enter passphrase (empty for no passphrase):
Enter same passphrase again:
- Then you should see the following output. You now have a public (
id_rsa.pub) and a private key (id_rsa) stored in your home directory (or on the path you set) that you can use to authenticate when logging into SSH.
$ ssh-keygen -b 4096
Generating public/private rsa key pair.
Enter file in which to save the key (/your_home/.ssh/id_rsa):
Enter passphrase (empty for no passphrase):
Enter same passphrase again:
Your identification has been saved in /your_home/.ssh/id_rsa.
Your public key has been saved in /your_home/.ssh/id_rsa.pub.
The key fingerprint is:
SHA256:x23Tr+Ee5TlowA+U9HEquagnog3O09EYHQ346WY xan@randomPC
The key's randomart image is:
+---[RSA 4096]----+
|=.=. . o+..      |
|.B  o  .oo.      |
|o.o  oo  o       |
|.+ . oo ...      |
| .. .  +S+ .     |
|.      =o==      |
|.o.   o.=o.      |
|o... oE.+o       |
| .. .++..o.      |
+----[SHA256]-----+
Importing Your Public Key into your slot
Now, we will import the keys you just generated to your slot. There are several methods for this and is described below.
ssh-copy-id
- This is the easiest and the most recommended but this command only works for Linux.
- For macOS, you might need to install it. To check, open up a terminal and type
ssh-copy-id. - If not found, you can install it using these commands below
- Install using Homebrew:
brew install ssh-copy-id - Install using Macports:
sudo port install openssh +ssh-copy-id - Install using CURL:
curl -L https://raw.githubusercontent.com/beautifulcode/ssh-copy-id-for-OSX/master/install.sh | sh
- Install using Homebrew:
- Type in
ssh-copy-id [ultradocs@servername.usbx.me] or ssh-copy-id ultradocs@servername.usbx.me
$ ssh-copy-id ultradocs@servername.usbx.me
- The following output appears. This is normal. This means that your computer does not recognize your slot. This will happen the first time you connect to a new host. Type
yesand press ENTER to continue.
$ ssh-copy-id ultradocs@servername.usbx.me
/usr/bin/ssh-copy-id: INFO: Source of key(s) to be installed: "/home/xanban/.ssh/id_rsa.pub"
The authenticity of host 'servername.usbx.me (46.182.109.120)' can't be established.
ECDSA key fingerprint is SHA256:9mQKWg1PVPZtzZ6d5nDjcWUb/Flkuq5VHYRrvwTeRTE.
Are you sure you want to continue connecting (yes/no)?
- Type in the SSH password you set in UCP
$ ssh-copy-id ultradocs@servername.usbx.me
/usr/bin/ssh-copy-id: INFO: Source of key(s) to be installed: "/home/xanban/.ssh/id_rsa.pub"
The authenticity of host 'servername.usbx.me (46.182.109.120)' can't be established.
ECDSA key fingerprint is SHA256:9mQKWg1PVPZtzZ6d5nDjcWUb/Flkuq5VHYRrvwTeRTE.
Are you sure you want to continue connecting (yes/no)? yes
/usr/bin/ssh-copy-id: INFO: attempting to log in with the new key(s), to filter out any that are already installed
/usr/bin/ssh-copy-id: INFO: 1 key(s) remain to be installed -- if you are prompted now it is to install the new keys
ultradocs@servername.usbx.me's password:
- Once you entered your password, OpenSSH will connect to the slot. It will then copy the contents of your
~/.ssh/id_rsa.pubkey into a file in your slot's home directory at~/.sshcalledauthorized_keys. Then you should see the following output. At this point, yourid_rsa.pubkey has been uploaded to the slot.
$ ssh-copy-id ultradocs@servername.usbx.me
/usr/bin/ssh-copy-id: INFO: Source of key(s) to be installed: "/home/xanban/.ssh/id_rsa.pub"
The authenticity of host 'servername.usbx.me (46.182.109.120)' can't be established.
ECDSA key fingerprint is SHA256:9mQKWg1PVPZtzZ6d5nDjcWUb/Flkuq5VHYRrvwTeRTE.
Are you sure you want to continue connecting (yes/no)? yes
/usr/bin/ssh-copy-id: INFO: attempting to log in with the new key(s), to filter out any that are already installed
/usr/bin/ssh-copy-id: INFO: 1 key(s) remain to be installed -- if you are prompted now it is to install the new keys
ultradocs@servername.usbx.me's password:

Number of key(s) added: 1

Now try logging into the machine, with: "ssh 'ultradocs@servername.usbx.me'" and check to make sure that only the key(s) you wanted were added.
- Once everything is done, you can login to your slot with just
ssh username@servername.usbx.mewhich will go straight to your shell securely. If you set a password for your keys, enter your password.
Manually copying contents of your public key to your slot
This is another way is to manually copy the contents of your private key file to your slot should ssh-copy-id failed. This method works on Windows, Linux and macOS users.
- View your public key file
id_rsa.pubby opening it using your text editor and copy the whole content - Login to your slot using the set password in UCP
- Once logged in, create a directory named
.sshwithmkdir -p ~/.ssh - Then do
echo public_key_string >> ~/.ssh/authorized_keysreplacingpublic_key_stringwith the contents of your public key file
 mkdir -p ~/.ssh

echo ssh-rsa AAAAB3NzaC1ycrandom_characters_here_lol xanban@randomPC >> ~/.ssh/authorized_keys
- Then type
chmod -R go= ~/.sshto recursively removes all "group" and "other" permissions for the~/.ssh/directory.
chmod -R go= ~/.ssh
- Exit SSH try to login to your slot with just
ssh [username@servername.usbx.mewhich will go straight to your slot's shell.- If you set a password for your keys, enter your password.
PuTTYgen
This method works for Windows users only.
Creating Key Pairs Using PuTTYgen
- Open up PuTTYgen. You'll be greeted with this window.
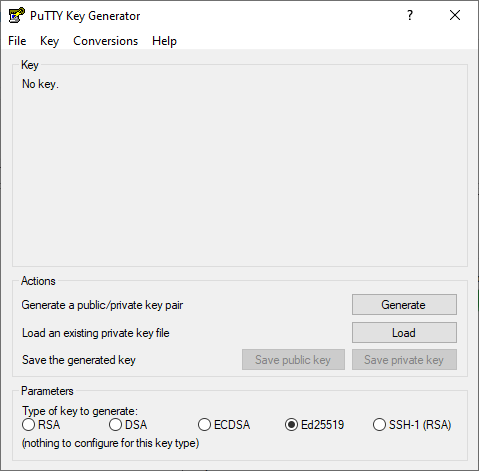
-
On the bottom under the Parameters section, you can choose which key do you want to generate and how many bits that you generate
-
The default is RSA-2048 which is sufficient in most cases.
- You may also change the parameters to your liking. The following are:
- RSA 4096
- Ed25519
- You may also change the parameters to your liking. The following are:
-
Once that's done, click Generate.
-
From here, you're going to follow the instructions on the program. Seen here, you only need to move your cursor within the program.
- This is to create entropy, which is needed by PuTTYgen to generate random numbers needed to generate keys.
-
After that, the actual generation of the key takes place.
-
When finished, you'll see the following information.
- You may optionally enter your password in the Key Passphrase and Confirm passphrase text boxes
- It is recommended to add in a passphrase
- A passphrase adds an additional layer of security to prevent unauthorized users from logging in should they have your private key.
- If you opt to not add a password so you can login to your slot's SSH without inputting any password, you can leave these blank.
- You may optionally enter your password in the Key Passphrase and Confirm passphrase text boxes
-
Hit Save private key, click yes if you did not put a password and save it to a directory you choose.
- This will be saved in
.ppkformat
- This will be saved in
-
Copy the contents inside the Public key for pasting into OpenSSH
authorized_keysfile
Importing Public Key to your slot
- Login to your slot using the set password in UCP
- Once logged in, create a directory named
.sshwithmkdir -p ~/.ssh - Then do
echo public_key_string >> ~/.ssh/authorized_keysreplacingpublic_key_stringwith the generated public key file in PuTTYgen.
ultradocs@servername:~$ mkdir -p ~/.ssh

ultradocs@servername:~$ echo ssh-rsa AAAAAAAAlol rsa-key-2012-12-12 >> ~/.ssh/authorized_keys
- Then type
chmod -R go= ~/.sshto recursively removes all "group" and "other" permissions for the~/.ssh/directory.
ultradocs@servername:~$ chmod -R go= ~/.ssh
Setting PuTTY to use Key Authentication
- Open PuTTY and load up your session
- In Connection → SSH → Auth, you'll see an option for the Private key file for authentication.
- Click Browse, navigate to your newly made private key and select it.
- Save your session by selecting your Session name and hit Save.
- Now, if setup correctly you can just click Open or double click the session name, enter your password (if you set it) and you can log in to your slot securely.
Your Ultra.cc Shell - A Beginner's Guide
The terminal is your gateway to the inner workings of your Ultra.cc slot. It is essentially a remote computer running Linux, and when you SSH into it, you are connecting to that computer's terminal. For instructions on how to connect to your Ultra.cc slot via SSH, follow this link.
A terminal is a powerful tool where you can execute written commands to perform many simple or even very complicated tasks. This guide will help you understand a few simple commands to get you started navigating and using the Linux terminal; it can also serve as a cheat sheet later down the track if you need to recall anything you may have forgotten.
We are also keeping a curated list of pre-installed utility tools that you can use on your Ultra.cc slot. When you have familiarized yourself with the guide you are reading right now. The next step would be to check out the list of pre-installed tools, and it can be found here.
Introduction
Once you have connected to your Ultra.cc service via SSH, your terminal prompt will be placed in your home directory. This can be confirmed with the pwd command, which stands for "print working directory". By executing this command, you will see the absolute path of the current working directory, as shown below.
ultradocs@spica:~$ pwd
/home/ultradocs
However, the /home/ultradocs path is just a symbolic link. As there are multiple users on each server, and all of them require their own home directory. To see the physical home directory path of your home directory, you need to append the -P option to the pwd command. As you can see from the below output, the physical home directory path is different.
ultradocs@spica:~$ pwd -P
/home12/ultradocs
Just as in the Windows operating system where each local user have their files stored in C:/Users/username, Linux also has local users. Each user have their own individual home directory, which is /home/username where username is your Ultra.cc service username.
The absolute path of the Linux home directory is /home/username, but it can also be shortened to ~/, which can be useful when navigating the terminal. However, while editing scripts, or configuring application settings, it is always best to use the absolute path to avoid problems.
Default File/Folder Structure
In the home directory of your Ultra.cc service, there will be a set of default files and folders. Some of them are standard files that are included in every session of Bash, while some are unique to Ultra.cc. In your Ultra.cc service, the default file/folder structure would be what is stated below.
-
~/.bashrc -
~/.profile -
~/bin -
~/.apps -
~/downloads -
~/media -
~/www
These files and folders are an integral part to keep your service functional, and should not be deleted. However, should you by mistake delete any of these files and folders, they can be restored by following the instructions in this guide.
As you can see in the above list of files and folders, some of them have a . prefixed in their name. These files are commonly known as "dotfiles" and usually serves the purpose of being important configuration files for your system. The dot signifies that a file or folder is hidden, and will therefor not show up by default when you browse the folder structure in your FTP client, or when executing the ls command. However, with ls -a, hidden files will be shown in the output.
Bash Startup Files
Whenever you are interacting with the terminal of your Ultra.cc service, you are using a shell called Bash aka Bourne Again Shell. To initialize Bash when you connect via SSH, your home directory must include a set of Bash startup files. The two most important are .bashrc and .profile. These files can be identified by having a prefixed . in their names. Below is examples of Bash files that you might find in your home directory.
-
~/.bashrc -
~/.profile -
~/.bash_profile -
~/.bash_logout -
~/.bash_history
Navigation
In this section, we will detail the commands used to move between directories in Linux; we will also cover how to find your location and the structure of your slot.
cd
The first thing you are going to want to do in your terminal is to navigate between directories. All tasks are performed within different directories, and your current directory affects how a command may run or how you may need to use a command.
When you first SSH into your slot, you will be in your personal home directory. This is the location of all your files; anything you wish to accomplish must be done within the home directory as this is the only folder you have read, write and execute permissions for. If, while navigating your terminal, you wish to return to your home directory, you can do so by typing cd ~.
This brings us to the command you will likely find yourself using a large amount of the time; cd. This command is used to navigate between different directories in Linux and stands for change directory. To use this command, you simply type cd followed by the directory you wish to navigate to.
It is also worth noting that in Linux, . refers to the current working directory and .. refers to the directory above. This is useful in if you want to go back one directory you can type cd .., or if you want to go back two you can use cd ../.. and so on.
ls
pwd
The pwd command is used to show you the exact location you are currently in, fairly simple, really. Running pwd will print the full path to your current working directory. Very useful for when you may be lost.
File and Directory Manipulation
At some point, you are going to want to move files/directories around, copy or delete them. Here we will cover the commands involved in achieving this.
mv
The mv command stands for move; you can use it to move a file or directory to another directory. It is as simple as using the command mv [file or directory you wish to move] [where you wish to move it]. For example, if you wanted to move a directory called media to a directory called files, you would use the command mv media files. If, however, you wish to move all the files from the directory called media into the directory called files, you would use mv media/* files. This tells the operating system to move all the files (signified by /*) located in media directory.
cp
The cp command stands for copy; it is used in much the same way as mv; however, there are a few little details worth covering. The general Syntax is the same as mv; if you wish to copy a file in your current directory named Movie1.mkv to a subdirectory called media you'd used the command cp Movie1.mkv media. The difference comes when you wish to copy an entire directory, when you want to copy an entire directory, you need to tell the cp command to copy recursively. This is signified with a -r after the cp. For example, if you wished to copy the directory called media to files similar to the previous example, you'd use the command cp -r media files. Copying all the files within media to files is pretty much exactly the same; cp media/* files. However, if there are any sub-directories within media that you also wish to copy, you again need to use the -r flag; cp -r media/* files. The -r flag is used whenever you need to copy an entire directory.
rm
The rm command stands for remove, it is used to delete files or directories you no longer wish to use. It is very important to keep in mind that there is no recycling bin in Linux, any files you delete are permanently lost. Syntax for rm is much the same as cp if you wish to remove a file named Movie1.mkv you'd simply type rm Movie1.mkv. If you wish to remove an entire directory, once again, you need to use the -r flag; rm -r media would delete the entire media directory. If you wanted to remove all the files inside the media directory, you'd use rm media/* or rm -r media/* if there are directories inside the media.
unzip
The unzip command can be used to manually decompress a ZIP file via SSH terminal. The steps to unzip a file are simple, simply cd to a path where the ZIP file is located. For example, cd /path/to/location and execute unzip archive-name.zip. This will unpack the ZIP file in the current directory. Check the content using the ls command.
unrar
The unrar command can be used to manually decompress a RAR file via SSH terminal. The steps to unrar a file are simple, simply cd to a path where the RAR file is located. For example, cd /path/to/location and execute unrar x archive-name.rar. This will unpack the RAR file in the current directory. Check the content using the ls command.
For a full list of pre-installed utility tools, see this guide.
Further Info
For any commands, you need to find more information on; you can use the command man [command]. This displays a manual page for the specified command.
Ultra.cc Specific Commands
Application Management
When interacting with your slot through Secure Shell, you may wish to manipulate the applications we offer one-click installers for; to do this, you use the app-[appname] commands.
Installing and Uninstalling Apps
To install an application, we can use the command app-[appname] install. This can be helpful to gain further knowledge as to why certain installations are failing. When installing an application, you will be presented with an output in the SSH prompt showing either true or false.
Likewise, to uninstall an application, we can use the command app-[appname] uninstall. This is especially useful in the case of an application saying it's installed while not being accessible from the UCP.
Stop, Start and Restarting Apps
To change the running state of an application we use app-[appname] [start|stop|restart]. These commands will be useful for you throughout the usage of your USB slot for troubleshooting or further customize your experience.
Checking Used Space
To display your folder structure and space taken by individual files, the ncdu -x command is included in every Ultra.cc slot. After a short scan largest items are displayed top, and size is in descending order
Further Info
For further information regarding specific commands for a particular application run app-[appname] help. This will provide all sub-commands available for the said app.
SSH Troubleshooting Information
Connection Timed Out
The SSH connection will timeout after you have had multiple failed login attempts. This is a soft ban that only lasts for 10 minutes. In this case, please change your SSH password from the Control Panel and wait for 10 minutes. Then, try to log in via SSH using the newly set password. Attempting to log in even with the correct password when you are soft-banned will just get your IP banned again for 10 minutes. Therefore, it is important to wait patiently for 10 minutes.
How to check high disk IO utilization?
If your apps are slow and your slot is running sluggish, this is the most common cause.
Any file access on the disk creates IO load on the HDD, either by you or other clients on the server. This is not an issue with the NVME slots due to their incredibly high IO throughput.
Typical scenarios that cause high IO utilization:
- Torrent clients "checking" torrents
- A very active torrent
- Unpacking files
- Constant Rclone operations to and from providers
- Multiple FTP streams
- Usenet operations (Unpacking, Downloading, Repairing, etc.)
- Plex/Emby/Jellyfin library scans
To check the IO utilization of the disk your service is deployed on, execute the following command in your shell terminal and pay attention to the %util column.
iostat -xk 2 $(findmnt -T ~ | awk 'END {print $2}')
If the utilization is at 100% for a prolonged time, the disk is entirely saturated, which will affect the performance. We recommend reviewing the settings in your installed applications to prevent this, e.g. limiting concurrent activities by utilizing queuing when available. See the following section to find what application or process is causing high disk IO.
Check IO utilization per individual process:
If you suspect that you are the reason for the high IO utilization rather than one of your disk neighbors, you must find out which process is the culprit. There are two ways you can investigate this. The preferred way is to use htop.
- Execute
htopfrom your shell - The
DISK R/Wcolumn will show your disk IO rate per individual process.
See which process has the highest DISK R/W value, paying attention to whether it is B/s, K/s or M/s which is bytes, kilobytes, or megabytes per second respectively.
If the DISK R/W column is not visible in htop, you can enable it by following these instructions:
- Click
F2to open the settings of htop - Press down arrow 4 times to
Columns - Press right arrow 2 times to
Available Columns - Press down arrow until you find
IO_RATE - While
IO_RATEis highlighted, pressENTERto add it toActive Columns - Press left arrow once to navigate to
Active Columnsand withF7/F8you can choose the placement ofIO_RATE - Press
F10to exit settings and see theDISK R/Wcolumn
Besides using htop, you can also use pidstat to see the IO utilization per individual process. Execute the following command:
pidstat -dl 2
If the above steps do not identify any of your processes as causing high disk IO, the issue could still be your FTP activity; please check if your FTP client is downloading multiple streams and/or running without a speed limit. Failing that, another client on the same disk as you may be causing the high disk IO utilization. Please raise a support ticket if the issue continues. The support team will review all clients on the same disk as you.
How to clear up disk space or move data from my slot?
The easiest way to manage any data is by using your favorite S/FTP client. Filezilla is the most popular choice. We recommend using SFTP as your connection of choice because it is more flexible on which folders to manage. You can also drag and drop with an S/FTP client, which makes it incredibly useful as a whole. The downside of this is that it takes time for the client to process your moves. Our help guide for S/FTP is available here.
However, the fastest way is by using SSH, but this might be intimidating for inexperienced users. For starters, you can use Midnight Commander, which is a graphical user interface file manager in your slot. It can be started by executing mc in your shell. You can also read our basic Linux cheat sheet here.
Why am I unable to connect with SSH, and why is there an error "Resource Temporarily Unavailable"?
In most cases, this is your total proclimit being saturated. We implement resource limits in each slot to ensure fair resource usage on all users. Usually, apps like rclone or syncthing are responsible due to hundreds of worker threads spawned by the application. In most cases, restarting your applications before logging into SSH again should fix the issue. If it does not work, you may need to submit a ticket.
Some of my files have duplicates in ~/files or ~/downloads directory and ~/media directory. Are they using double disk space?
If you're using Radarr/Sonarr/Sickchill/Medusa etc., they should not be taking any additional space. By default, these applications create a hardlink of the file to the default root directory of your application. A hard link can be described as a single file located at two different paths but pointing at the same block of data on the disk. Think of it as two signposts from other streets that direct you to the same destination. Hardlinks do not take any extra space. You can compare the inode numbers for both files from the Terminal (SSH Access) with ls -I on both files'. The inode number will be the same.
You can read more about Hard Links here: https://en.wikipedia.org/wiki/Hardlink.