Rclone & MergerFS Explainer
This guide explains the concepts of Rclone and MergerFS to empower you to manage and support your tailored setups. It is not intended to be a detailed “How To” guide. We have a selection of those here.
- Our guides and scripts automate the setup of Rclone and MergerFS for most customers who use Google Drive.
- If you want to use a different cloud storage provider, such as Dropbox or OneDrive, you must either use our guides and their scripts as a template, or do your own thing.
- This is difficult to achieve if you don’t understand the basics of Rclone and MergerFS. This guide attempts to give you the information you need!
Overview
You can mount and interact with your cloud storage as if it is a directory (folder) within your home directory. For example, you can create a directory called Gdrive on your server that contains all the files stored on your Google Drive.
- You can read and write to that directory like any other on your Ultra.cc server.
- However, you must never use a mounted directory as the download directory for torrent or nzb download clients.
- Trying to download, to seed, extract (unrar), or repair files on a mounted directory will cause instability and potentially get API bans from your cloud storage provider.
- As well as mounting cloud storage, you can also mount other servers using FTP. For example, if you have two ultra.cc services, you can create a mount from server1 to server2.
To achieve this, we use an open-source tool called Rclone to connect to cloud storage and create mounted directories. The basic steps are:
- Download the latest version of Rclone. Your ultra.cc service comes with Rclone pre-installed, but it is only updated occasionally, so it’s better to have your own up-to-date version.
- Create an Rclone remote. This means configuring Rclone with details about the cloud storage provider (or server) you want to connect to. Once this step is completed, you can interact with your cloud storage using
rclone <command> <remotename:>. - Use the Rclone remote created in step 2 to mount your cloud storage to a directory using the
rclone mount <remotename:>command. - Set up MergerFS to union your cloud files and local files into a single directory.
Rclone
Installation (Part 1)
-
To configure Rclone, you need to first connect to your service via ssh. We have a guide to help with this here.
-
Rclone is pre-installed on all services. However, you should install your own copy of Rclone to keep it up to date with the latest features. You can do this by pasting this command into your ssh client*:
curl https://scripts.ultra.cc/main-v2/MergerFS-Rclone/Installer%20Scripts/rclone-install-stable.sh | bash
*If you are installing rclone to use at home or elsewhere, download rclone from the official site and manually install it.
-
Log out and back into your ssh client.
-
You can always check the version of Rclone you have installed with this command:
rclone version
-
If the version says 1.60.1 (after you have logged back in, then the installation failed, as that is the default version pre-installed on your server.
-
Once you have installed your own copy of Rclone, you should update it occasionally as new features and bug fixes are released regularly. To update use this command:
rclone selfupdate
Configuring a Rclone Remote (Part 2)
Now that you have the latest version of Rclone, you can configure a connection to any supported storage provider. The process is similar for all storage providers, but each has specific options that need to be considered.
To create a new Rclone remote:
rclone config
- Select
nfor New Remote
user@server:~$ rclone config
No remotes found, make a new one?
n) New remote
s) Set configuration password
q) Quit config
n/s/q> n
- Select a name of your choice. It makes sense to select a meaningful name; for example, if you’re creating a connection to Dropbox, select something like
dropboxordropbox1if you plan on having more than one!
Enter name for new remote.
name> dropbox
- Type the number next to the storage provider you want to connect to. When Rclone adds new providers, all the numbers can change, so ensure you select the correct one. At the time of writing, if connecting to Dropbox, I would type
13and press ENTER.
....
13 / Dropbox
   \ (dropbox)
....
Storage> 13
- From this point forward, the options you will be prompted to supply will differ for each storage provider. Jump to https://rclone.org and select the required option from the Storage Systems dropdown menu. This will guide you through the specifics of each provider.
-
Some storage providers require that you authorize Rclone via a web browser. This can be a bit confusing, so that is what we will discuss next!
-
If you are prompted with something like “Use web browser to automatically authenticate rclone with remote?” you must select
Nas you can’t open a web browser on your Ultra.cc service. -
Leave your Ultra.cc ssh session running - we will return to it shortly. You then need to move to a device with a web browser installed. Typically, you will do this on the PC/Mac you are currently sitting at!
On your local PC:
- Install Rclone locally. You can find the installation files here: https://rclone.org/downloads/
- Drop into the command shell (Command Prompt on Windows, Terminal on Mac).
- Change to the directory (using the
cdcommand) that you installed Rclone in to, for example:cd \rclone. - Type
rclone versionto ensure it works. The version number should be displayed. If it isn’t, review steps 5 to 7 above.
Microsoft Windows [Version 10.0.22621.2715]
(c) Microsoft Corporation. All rights reserved.

C:\Users\yourname>cd\rclone

C:\rclone>rclone version
rclone v1.64.2
- os/version: Microsoft Windows 11 Pro 22H2 (64 bit)
- os/kernel: 10.0.22621.2715 (x86_64)
- os/type: windows
- os/arch: amd64
- go/version: go1.21.3
- go/linking: static
- go/tags: cmount
- Now jump back to your Ultra.cc ssh session and copy the Rclone command from there into your Command Prompt/Terminal. For example, for Dropbox, you would copy this line to your local device:
rclone authorize "dropbox"
- A web browser session will open. Log in to the cloud storage provider using the credentials you signed up with. If you have switched on Two Factor Authentication with your cloud storage provider, you will need to supply those details too.
- You will then be asked to Approve/Accept Rclone. Ensure you are happy to do so, and click on Approve/Accept (or similar).
- Now go back to the Command Prompt/Terminal on your local PC/Mac and you will see a token displayed. Copy this to your clipboard (everything between the
--->and<---)
- It will look similar to this on your local device:
C:\Users\username>cd\rclone

C:\rclone>rclone authorize "dropbox"
2023/11/30 16:01:20 NOTICE: If your browser doesn't open automatically go to the following link: http://127.0.0.1:53682/auth?state=m5bBA0FfH8nMZyHmGkP0Tg
2023/11/30 16:01:20 NOTICE: Log in and authorize rclone for access
2023/11/30 16:01:20 NOTICE: Waiting for code...
2023/11/30 16:06:29 NOTICE: Got code
Paste the following into your remote machine --->
{"access_token":"sl.Bq2irrOkj8l6-ngKY6apc6Gkhbxb0tRnJECnNG1iw6PAF9s6TzPuDG4Baegb9da3yBeDCzP1D9ZtQ4_LYuDAJLmOjPuFyFPiw2lnlP_TpUS26oNMX_SZPGSrWHFJHHorvaYe46jVvFFBiaU","token_type":"bearer","refresh_token":"jGekUl1W1UIAAAAAAAAAAd1zHanzbZlMaSMlC8ogY79hyvV1mNUVbFOt6nPJnCUM","expiry":"2023-11-30T20:06:30.642061Z"}
<---End paste
On your Ultra.cc ssh session:
- Switch back to your Ultra.cc ssh session and paste the token.
- Your Ultra.cc ssh session will look similar to this:
Use web browser to automatically authenticate rclone with remote?
 * Say Y if the machine running rclone has a web browser you can use
 * Say N if running rclone on a (remote) machine without web browser access
If not sure try Y. If Y failed, try N.

y) Yes (default)
n) No
y/n> n

Option config_token.
For this to work, you will need rclone available on a machine that has
a web browser available.
For more help and alternate methods see: https://rclone.org/remote_setup/
Execute the following on the machine with the web browser (same rclone
version recommended):
        rclone authorize "dropbox"
Then paste the result.
Enter a value.
config_token> {"access_token":"sl.Bq2irrOkj8l6-ngKY6apc6Gkhbxb0tRnJECnNG1iw6PAF9s6TzPuDG4Baegb9da3yBeDCzP1D9ZtQ4_LYuDAJLmOjPuFyFPiw2lnlP_TpUS26oNMX_SZPGSrWHFJHHorvaYe46jVvFFBiaU","token_type":"bearer","refresh_token":"jGekUl1W1UIAAAAAAAAAAd1zHanzbZlMaSMlC8ogY79hyvV1mNUVbFOt6nPJnCUM","expiry":"2023-11-30T20:06:30.642061Z"}
- Finish the remaining configuration options.
- You can now test and see if your Rclone remote works.
rclone lsd remotename:
-
where remotename = the name you chose in Step 2. Don’t forget, for all Rclone commands you need to add a
:to the end of remotename. -
The command should display all folders stored on your provider.
-
To copy a file to your cloud provider, use
rclone copy yourlocalfile remotename:folder-path
-
where folder-path is the path to the folder on your cloud provider, e.g. it could be
remotename:Media/TV -
To copy a file from your cloud provider, use
rclone copy remotename:full-path-and-filename localpath
-
A complete list or Rclone commands may be found here: https://rclone.org/commands/
-
You can create as many Rclone remotes as you need, just add more using the
rclone configcommand. However, you shouldn’t mount more than 2 or 3 Rclone remotes as it can cause stability issues. -
You can also combine some rclone remote types, for example, you can create a Crypt remote that connects to a Dropbox remote.
-
Then when you use
rclone copy yourlocalfile cryptremotename:your files will automatically be encrypted. This is outside of the scope of this guide.
Creating a Mount (Part 3)
- With everything you’ve done so far, you can access your cloud files with
rclone copyorrclone move. - We now want to make your cloud files accessible from a directory on your Ultra.cc service.
- Create a new directory that will be used as access your cloud files - this can be called anything you chose and doesn’t need to be the same as your rclone remote name you created above (step 2) but it can be the same if you find that easier.
mkdir DropBoxFiles
- Now we want to mount our Rclone remote to that directory:
rclone mount remotename: directoryname
- For our example,
rclone remote dropbox: DropBoxFiles
- This command will continue to run until you press CTRL+C. So how do you test? Open up another ssh session, leaving the rclone mount running.
- In your new ssh session,
ls -al directoryname
- In our example, directoryname (from step 1) is DropBoxFiles
ls -al DropBoxFiles
-
Note that
rclone mount remotename: directorynameis the most basic mount. -
You can enhance the performance by adding additional options to the end of the command. Check the Rclone mount documentation here.
-
You don’t want to leave an ssh session running all the time to keep access to your cloud files.
-
We therefore recommend you run the
rclone mountcommand as a systemd service. We have a guide for this here. -
We recommend using
rclone copyorrclone moveto transfer files from your Ultra.cc service to your cloud storage provider. -
While you can copy files to and from your mount in the same way as you would on a local disk (e.g. with the
cpormvlinux commands), using the Rclone commands will be faster and more reliable.
You now have the knowledge to create a mount to any cloud storage provider that Rclone supports! Next, you should consider MergerFS.
MergerFS (Step 4)
While Ultra.cc services come pre-installed with MergerFS, it is better to download your own version so you can keep it up to date. See the Install MergerFS part of this guide.
- MergerFS is an open-source utility that allows the contents of one or more directories to be accessed from a single directory.
- We call this a union, which means include all files and sub-directories from each stated directory:
MergerFS = Directory_A UNION Directory_B (UNION Directory_C...)
-
Why is this useful to you? Applications, such as Radarr, Sonarr, Plex, Emby, JellyFin, etc., need access to your media library.
-
If your media library is stored on your cloud storage, you don’t want to wait for new media to be uploaded to the cloud before they are viewable; you want them immediately!
-
The way we get this to work is to point all of your media applications to a single merged directory that contains the media on your Ultra.cc drive UNIONED with the media on you cloud storage.
The following visualizes how the union works:
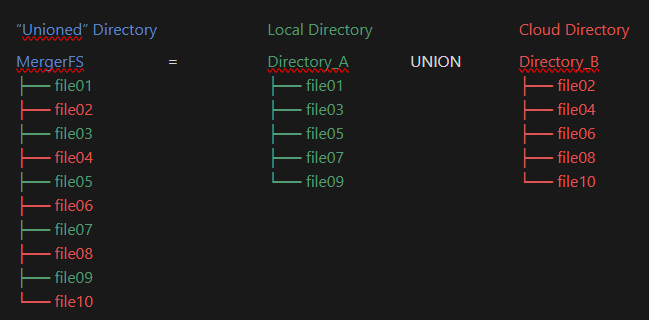
- MergerFS is a physical directory, but it doesn’t contain any files of it’s own.
-
Directory_A would typically be a directory stored on your Ultra.cc service (e.g.
~/Stuff/Local) -
Directory_B would typically be a Rclone mount directory pointing to your cloud storage (e.g.
~/Stuff/Mount)
-
If you use our
rclone-upload.shscript, or your own script to move files to your cloud storage, then all you are doing is moving files from Directory_A to DIrectory_B (usingrclone move). -
As the MergerFS directory is a union of both, it doesn’t matter which of the directories the files are in.
-
With this method, there should be no rush to get your files from local storage to cloud storage, which is good for the performance of everyone on the same disk as you!
-
Just trickle the transfer of files over a few hours by setting
--bwlimit 8Mto yourrclone movecommand. -
The most basic MergerFS mount can be simply set-up with:
mergerfs ~/Directory_A:~/Directory_B ~/MergerFS
-
Note that
~/is the same as the full path/home/yourusername/- you can use either format when running scripts manually. If you are creating a service file, use the full path or%h/instead of~/ -
You can merge more than two directories, just use a
:between the directory names, for example:
mergerfs ~/Directory_A:~/Directory_B:~/Directory_C:~/Directory_D ~/MergerFS
- This can be useful if you have more than one cloud provider (and therefore more than one Rclone mount) as you can split your media library across each cloud provider. For example:
mergerfs ~/Stuff/Local:~/Stuff/Gdrive:~/Stuff/Dropbox ~/MergerFS
where:
- ~/Stuff/Local is a directory stored on your Ultra.cc drive.
- ~/Stuff/Gdrive is a Rclone mount to Google Drive.
- ~/Stuff/Dropbox is a Rclone mount to Dropbox
- ~/MergerFS is an empty directory where the mergerfs will be mounted.
- You should set-up a service for MergerFS. You can use this as a template.
[Unit]
Description = MergerFS Service
After=rclone-vfs.service
RequiresMountsFor=%h/Stuff/Local
RequiresMountsFor=%h/Stuff/Mount

[Service]
Type=forking
TimeoutStopSec=60
ExecStart=%h/bin/mergerfs \
    -o use_ino,func.getattr=newest,category.action=all \
    -o category.create=ff,cache.files=auto-full,threads=8 \
    %h/Stuff/Local:%h/Stuff/Mount %h/MergerFS

StandardOutput=file:%h/scripts/mergerfs_mount.log
ExecStop=/bin/fusermount -uz %h/MergerFS
Restart=on-failure

[Install]
WantedBy=default.target
-
Create a file with
nano ~/.config/systemd/user/mergerfs.serviceand paste in the above. -
Ensure all the directories exist, in the template example:
mkdir -p ~/Stuff/Local  for your local files
mkdir -p ~/Stuff/Mount  for your rclone mount
mkdir ~/MergerFS        for your mergerfs unioned mount
mksir ~/scripts         for the log file & upload script
- To enable and start the service:
systemctl --user enable --now mergerfs.service
- Note that the order of the directories in the mergerfs command matters. When you use the option
-o category.create=ffany file created in the%h/MergerFSmount will be written to the first directory defined:
%h/Stuff/Local:%h/Stuff/Mount %h/MergerFS
-
In this example, creating a file in
%h/MergerFSwill write to%h/Stuff/Local. This is an important feature as you want to write to the local drive as it will perform better. Your upload script will later move the files from%Stuff/Localto%Stuff/Mount. -
The final step is to create an upload script to move files between your local device and cloud storage. We have an example here. Now that you understand Rclone, you should be able to edit the service file to your specific requirements.
-
If you are not using Google Drive, you will need to remove the lines starting with
--driveas those options are for Google Drive only. Check the options available for your cloud provider on the Rclone website under Storage Systems.
Multiple Cloud Providers
Using the information you have learned here should mean you can create Rclone mounts for all your cloud providers and add them to your MergerFS mount. Just keep in mind:
- Each connection to a cloud provider needs its own Rclone remote (
rclone config) - Each cloud provider needs its own directory to display the files (
rclone mount) - Each cloud provider needs its own service file to perform the mount
(
nano ~/.config/systemd/user/rclone-mountname.service) - Each cloud provider mount directory needs to be added to your MergerFS service file
(
nano ~/.config/systemd/user/mergerfs.service) - Remember, any time you edit a service file, run
systemctl --user daemon-reloador you will get an error telling you to do so. - You need to restart your service files for them to take effect after your edits
(
systemctl —user restart servicefilename)
Troubleshooting
- If a Rclone or MergerFS mount is broken, you can try to fix with this command:
fusermount -uz path-to-mount
-
For example,
fusermount -uz ~/Stuff/Mountandfusermount -uz ~/MergerFSif you use Ultra.cc scripts. But change the path to be whatever you have used. -
You can also check for rouge processes,
	ps ux | grep -i mergerfs         for MergerFS issues

	ps us | grep -i rclone           for Rclone issue
- This will return something like this:
username@servername:~$ ps ux | grep -i rclone
username   36384  0.1  0.0 1364856 65748 pts/140 Sl+  Sep25 105:16 rclone mount Gdrive: /home/username/Stuff/Mount --cache-db-purge --dir-cache-time 5000h -vvv --log-file /home/username/.config/rclone/rclone.log --poll-interval 15s --vfs-cache-mode write
username  128007  0.0  0.0 218480   824  pts/77   S+   15:32   0:00 grep -i rclone
- You can kill the mount process by selecting the PID (number after your username) and using the
killcommand, for example:
kill -9 36384
-
If you run the
pscommand again, the process should be gone. You may need to do thefusermountfix above after this. -
Once the old process has been killed, you can try to restart your mount again.
We hope you find this guide useful and that you now feel confident to experiment with your own set-up.
If you are having trouble with this, you can open a support ticket here!
Feedback and suggestions regarding this article are welcome in our Discord server