rclone
rclone is a powerful tool that allows you to interact with a cloud storage provider using a CLI. It supports many cloud providers. With rclone installed and configured properly, you can quickly copy files from your service and vice versa to a remote storage provider such as Google Drive quickly. Not only this, but with more detailed configurations you are able to use cloud storage providers as virtual disks on your service.
- Rclone & MergerFS Explainer
- Installation, Configuration & Usage of rclone
- Rclone VFS and MergerFS Setup
- Rclone Mount using Systemd
- Rclone Optimizations for Apps
- Rclone Mount on Apple Silicon
- Using Rclone FTPS
- Troubleshooting Information
Rclone & MergerFS Explainer
This guide explains the concepts of Rclone and MergerFS to empower you to manage and support your tailored setups. It is not intended to be a detailed “How To” guide. We have a selection of those here.
- Our guides and scripts automate the setup of Rclone and MergerFS for most customers who use Google Drive.
- If you want to use a different cloud storage provider, such as Dropbox or OneDrive, you must either use our guides and their scripts as a template, or do your own thing.
- This is difficult to achieve if you don’t understand the basics of Rclone and MergerFS. This guide attempts to give you the information you need!
Overview
You can mount and interact with your cloud storage as if it is a directory (folder) within your home directory. For example, you can create a directory called Gdrive on your server that contains all the files stored on your Google Drive.
- You can read and write to that directory like any other on your Ultra.cc server.
- However, you must never use a mounted directory as the download directory for torrent or nzb download clients.
- Trying to download, to seed, extract (unrar), or repair files on a mounted directory will cause instability and potentially get API bans from your cloud storage provider.
- As well as mounting cloud storage, you can also mount other servers using FTP. For example, if you have two ultra.cc services, you can create a mount from server1 to server2.
To achieve this, we use an open-source tool called Rclone to connect to cloud storage and create mounted directories. The basic steps are:
- Download the latest version of Rclone. Your ultra.cc service comes with Rclone pre-installed, but it is only updated occasionally, so it’s better to have your own up-to-date version.
- Create an Rclone remote. This means configuring Rclone with details about the cloud storage provider (or server) you want to connect to. Once this step is completed, you can interact with your cloud storage using
rclone <command> <remotename:>. - Use the Rclone remote created in step 2 to mount your cloud storage to a directory using the
rclone mount <remotename:>command. - Set up MergerFS to union your cloud files and local files into a single directory.
Rclone
Installation (Part 1)
-
To configure Rclone, you need to first connect to your service via ssh. We have a guide to help with this here.
-
Rclone is pre-installed on all services. However, you should install your own copy of Rclone to keep it up to date with the latest features. You can do this by pasting this command into your ssh client*:
curl https://scripts.ultra.cc/main/MergerFS-Rclone/Installer%20Scripts/rclone-install-stable.sh | bash
*If you are installing rclone to use at home or elsewhere, download rclone from the official site and manually install it.
-
Log out and back into your ssh client.
-
You can always check the version of Rclone you have installed with this command:
rclone version
-
If the version says 1.60.1 (after you have logged back in, then the installation failed, as that is the default version pre-installed on your server.
-
Once you have installed your own copy of Rclone, you should update it occasionally as new features and bug fixes are released regularly. To update use this command:
rclone selfupdate
Configuring a Rclone Remote (Part 2)
Now that you have the latest version of Rclone, you can configure a connection to any supported storage provider. The process is similar for all storage providers, but each has specific options that need to be considered.
To create a new Rclone remote:
rclone config
- Select
nfor New Remote
user@server:~$ rclone config
No remotes found, make a new one?
n) New remote
s) Set configuration password
q) Quit config
n/s/q> n
- Select a name of your choice. It makes sense to select a meaningful name; for example, if you’re creating a connection to Dropbox, select something like
dropboxordropbox1if you plan on having more than one!
Enter name for new remote.
name> dropbox
- Type the number next to the storage provider you want to connect to. When Rclone adds new providers, all the numbers can change, so ensure you select the correct one. At the time of writing, if connecting to Dropbox, I would type
13and press ENTER.
....
13 / Dropbox
   \ (dropbox)
....
Storage> 13
- From this point forward, the options you will be prompted to supply will differ for each storage provider. Jump to https://rclone.org and select the required option from the Storage Systems dropdown menu. This will guide you through the specifics of each provider.
-
Some storage providers require that you authorize Rclone via a web browser. This can be a bit confusing, so that is what we will discuss next!
-
If you are prompted with something like “Use web browser to automatically authenticate rclone with remote?” you must select
Nas you can’t open a web browser on your Ultra.cc service. -
Leave your Ultra.cc ssh session running - we will return to it shortly. You then need to move to a device with a web browser installed. Typically, you will do this on the PC/Mac you are currently sitting at!
On your local PC:
- Install Rclone locally. You can find the installation files here: https://rclone.org/downloads/
- Drop into the command shell (Command Prompt on Windows, Terminal on Mac).
- Change to the directory (using the
cdcommand) that you installed Rclone in to, for example:cd \rclone. - Type
rclone versionto ensure it works. The version number should be displayed. If it isn’t, review steps 5 to 7 above.
Microsoft Windows [Version 10.0.22621.2715]
(c) Microsoft Corporation. All rights reserved.

C:\Users\yourname>cd\rclone

C:\rclone>rclone version
rclone v1.64.2
- os/version: Microsoft Windows 11 Pro 22H2 (64 bit)
- os/kernel: 10.0.22621.2715 (x86_64)
- os/type: windows
- os/arch: amd64
- go/version: go1.21.3
- go/linking: static
- go/tags: cmount
- Now jump back to your Ultra.cc ssh session and copy the Rclone command from there into your Command Prompt/Terminal. For example, for Dropbox, you would copy this line to your local device:
rclone authorize "dropbox"
- A web browser session will open. Log in to the cloud storage provider using the credentials you signed up with. If you have switched on Two Factor Authentication with your cloud storage provider, you will need to supply those details too.
- You will then be asked to Approve/Accept Rclone. Ensure you are happy to do so, and click on Approve/Accept (or similar).
- Now go back to the Command Prompt/Terminal on your local PC/Mac and you will see a token displayed. Copy this to your clipboard (everything between the
--->and<---)
- It will look similar to this on your local device:
C:\Users\username>cd\rclone

C:\rclone>rclone authorize "dropbox"
2023/11/30 16:01:20 NOTICE: If your browser doesn't open automatically go to the following link: http://127.0.0.1:53682/auth?state=m5bBA0FfH8nMZyHmGkP0Tg
2023/11/30 16:01:20 NOTICE: Log in and authorize rclone for access
2023/11/30 16:01:20 NOTICE: Waiting for code...
2023/11/30 16:06:29 NOTICE: Got code
Paste the following into your remote machine --->
{"access_token":"sl.Bq2irrOkj8l6-ngKY6apc6Gkhbxb0tRnJECnNG1iw6PAF9s6TzPuDG4Baegb9da3yBeDCzP1D9ZtQ4_LYuDAJLmOjPuFyFPiw2lnlP_TpUS26oNMX_SZPGSrWHFJHHorvaYe46jVvFFBiaU","token_type":"bearer","refresh_token":"jGekUl1W1UIAAAAAAAAAAd1zHanzbZlMaSMlC8ogY79hyvV1mNUVbFOt6nPJnCUM","expiry":"2023-11-30T20:06:30.642061Z"}
<---End paste
On your Ultra.cc ssh session:
- Switch back to your Ultra.cc ssh session and paste the token.
- Your Ultra.cc ssh session will look similar to this:
Use web browser to automatically authenticate rclone with remote?
 * Say Y if the machine running rclone has a web browser you can use
 * Say N if running rclone on a (remote) machine without web browser access
If not sure try Y. If Y failed, try N.

y) Yes (default)
n) No
y/n> n

Option config_token.
For this to work, you will need rclone available on a machine that has
a web browser available.
For more help and alternate methods see: https://rclone.org/remote_setup/
Execute the following on the machine with the web browser (same rclone
version recommended):
        rclone authorize "dropbox"
Then paste the result.
Enter a value.
config_token> {"access_token":"sl.Bq2irrOkj8l6-ngKY6apc6Gkhbxb0tRnJECnNG1iw6PAF9s6TzPuDG4Baegb9da3yBeDCzP1D9ZtQ4_LYuDAJLmOjPuFyFPiw2lnlP_TpUS26oNMX_SZPGSrWHFJHHorvaYe46jVvFFBiaU","token_type":"bearer","refresh_token":"jGekUl1W1UIAAAAAAAAAAd1zHanzbZlMaSMlC8ogY79hyvV1mNUVbFOt6nPJnCUM","expiry":"2023-11-30T20:06:30.642061Z"}
- Finish the remaining configuration options.
- You can now test and see if your Rclone remote works.
rclone lsd remotename:
-
where remotename = the name you chose in Step 2. Don’t forget, for all Rclone commands you need to add a
:to the end of remotename. -
The command should display all folders stored on your provider.
-
To copy a file to your cloud provider, use
rclone copy yourlocalfile remotename:folder-path
-
where folder-path is the path to the folder on your cloud provider, e.g. it could be
remotename:Media/TV -
To copy a file from your cloud provider, use
rclone copy remotename:full-path-and-filename localpath
-
A complete list or Rclone commands may be found here: https://rclone.org/commands/
-
You can create as many Rclone remotes as you need, just add more using the
rclone configcommand. However, you shouldn’t mount more than 2 or 3 Rclone remotes as it can cause stability issues. -
You can also combine some rclone remote types, for example, you can create a Crypt remote that connects to a Dropbox remote.
-
Then when you use
rclone copy yourlocalfile cryptremotename:your files will automatically be encrypted. This is outside of the scope of this guide.
Creating a Mount (Part 3)
- With everything you’ve done so far, you can access your cloud files with
rclone copyorrclone move. - We now want to make your cloud files accessible from a directory on your Ultra.cc service.
- Create a new directory that will be used as access your cloud files - this can be called anything you chose and doesn’t need to be the same as your rclone remote name you created above (step 2) but it can be the same if you find that easier.
mkdir DropBoxFiles
- Now we want to mount our Rclone remote to that directory:
rclone mount remotename: directoryname
- For our example,
rclone remote dropbox: DropBoxFiles
- This command will continue to run until you press CTRL+C. So how do you test? Open up another ssh session, leaving the rclone mount running.
- In your new ssh session,
ls -al directoryname
- In our example, directoryname (from step 1) is DropBoxFiles
ls -al DropBoxFiles
-
Note that
rclone mount remotename: directorynameis the most basic mount. -
You can enhance the performance by adding additional options to the end of the command. Check the Rclone mount documentation here.
-
You don’t want to leave an ssh session running all the time to keep access to your cloud files.
-
We therefore recommend you run the
rclone mountcommand as a systemd service. We have a guide for this here. -
We recommend using
rclone copyorrclone moveto transfer files from your Ultra.cc service to your cloud storage provider. -
While you can copy files to and from your mount in the same way as you would on a local disk (e.g. with the
cpormvlinux commands), using the Rclone commands will be faster and more reliable.
You now have the knowledge to create a mount to any cloud storage provider that Rclone supports! Next, you should consider MergerFS.
MergerFS (Step 4)
While Ultra.cc services come pre-installed with MergerFS, it is better to download your own version so you can keep it up to date. See the Install MergerFS part of this guide.
- MergerFS is an open-source utility that allows the contents of one or more directories to be accessed from a single directory.
- We call this a union, which means include all files and sub-directories from each stated directory:
MergerFS = Directory_A UNION Directory_B (UNION Directory_C...)
-
Why is this useful to you? Applications, such as Radarr, Sonarr, Plex, Emby, JellyFin, etc., need access to your media library.
-
If your media library is stored on your cloud storage, you don’t want to wait for new media to be uploaded to the cloud before they are viewable; you want them immediately!
-
The way we get this to work is to point all of your media applications to a single merged directory that contains the media on your Ultra.cc drive UNIONED with the media on you cloud storage.
The following visualizes how the union works:
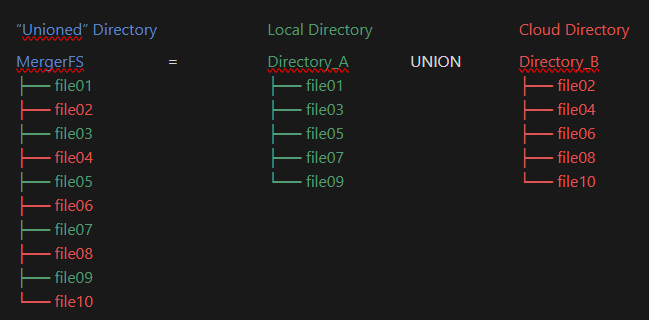
- MergerFS is a physical directory, but it doesn’t contain any files of it’s own.
-
Directory_A would typically be a directory stored on your Ultra.cc service (e.g.
~/Stuff/Local) -
Directory_B would typically be a Rclone mount directory pointing to your cloud storage (e.g.
~/Stuff/Mount)
-
If you use our
rclone-upload.shscript, or your own script to move files to your cloud storage, then all you are doing is moving files from Directory_A to DIrectory_B (usingrclone move). -
As the MergerFS directory is a union of both, it doesn’t matter which of the directories the files are in.
-
With this method, there should be no rush to get your files from local storage to cloud storage, which is good for the performance of everyone on the same disk as you!
-
Just trickle the transfer of files over a few hours by setting
--bwlimit 8Mto yourrclone movecommand. -
The most basic MergerFS mount can be simply set-up with:
mergerfs ~/Directory_A:~/Directory_B ~/MergerFS
-
Note that
~/is the same as the full path/home/yourusername/- you can use either format when running scripts manually. If you are creating a service file, use the full path or%h/instead of~/ -
You can merge more than two directories, just use a
:between the directory names, for example:
mergerfs ~/Directory_A:~/Directory_B:~/Directory_C:~/Directory_D ~/MergerFS
- This can be useful if you have more than one cloud provider (and therefore more than one Rclone mount) as you can split your media library across each cloud provider. For example:
mergerfs ~/Stuff/Local:~/Stuff/Gdrive:~/Stuff/Dropbox ~/MergerFS
where:
- ~/Stuff/Local is a directory stored on your Ultra.cc drive.
- ~/Stuff/Gdrive is a Rclone mount to Google Drive.
- ~/Stuff/Dropbox is a Rclone mount to Dropbox
- ~/MergerFS is an empty directory where the mergerfs will be mounted.
- You should set-up a service for MergerFS. You can use this as a template.
[Unit]
Description = MergerFS Service
After=rclone-vfs.service
RequiresMountsFor=%h/Stuff/Local
RequiresMountsFor=%h/Stuff/Mount

[Service]
Type=forking
TimeoutStopSec=60
ExecStart=%h/bin/mergerfs \
    -o use_ino,func.getattr=newest,category.action=all \
    -o category.create=ff,cache.files=auto-full,threads=8 \
    %h/Stuff/Local:%h/Stuff/Mount %h/MergerFS

StandardOutput=file:%h/scripts/mergerfs_mount.log
ExecStop=/bin/fusermount -uz %h/MergerFS
Restart=on-failure

[Install]
WantedBy=default.target
-
Create a file with
nano ~/.config/systemd/user/mergerfs.serviceand paste in the above. -
Ensure all the directories exist, in the template example:
mkdir -p ~/Stuff/Local  for your local files
mkdir -p ~/Stuff/Mount  for your rclone mount
mkdir ~/MergerFS        for your mergerfs unioned mount
mksir ~/scripts         for the log file & upload script
- To enable and start the service:
systemctl --user enable --now mergerfs.service
- Note that the order of the directories in the mergerfs command matters. When you use the option
-o category.create=ffany file created in the%h/MergerFSmount will be written to the first directory defined:
%h/Stuff/Local:%h/Stuff/Mount %h/MergerFS
-
In this example, creating a file in
%h/MergerFSwill write to%h/Stuff/Local. This is an important feature as you want to write to the local drive as it will perform better. Your upload script will later move the files from%Stuff/Localto%Stuff/Mount. -
The final step is to create an upload script to move files between your local device and cloud storage. We have an example here. Now that you understand Rclone, you should be able to edit the service file to your specific requirements.
-
If you are not using Google Drive, you will need to remove the lines starting with
--driveas those options are for Google Drive only. Check the options available for your cloud provider on the Rclone website under Storage Systems.
Multiple Cloud Providers
Using the information you have learned here should mean you can create Rclone mounts for all your cloud providers and add them to your MergerFS mount. Just keep in mind:
- Each connection to a cloud provider needs its own Rclone remote (
rclone config) - Each cloud provider needs its own directory to display the files (
rclone mount) - Each cloud provider needs its own service file to perform the mount
(
nano ~/.config/systemd/user/rclone-mountname.service) - Each cloud provider mount directory needs to be added to your MergerFS service file
(
nano ~/.config/systemd/user/mergerfs.service) - Remember, any time you edit a service file, run
systemctl --user daemon-reloador you will get an error telling you to do so. - You need to restart your service files for them to take effect after your edits
(
systemctl —user restart servicefilename)
Troubleshooting
- If a Rclone or MergerFS mount is broken, you can try to fix with this command:
fusermount -uz path-to-mount
-
For example,
fusermount -uz ~/Stuff/Mountandfusermount -uz ~/MergerFSif you use Ultra.cc scripts. But change the path to be whatever you have used. -
You can also check for rouge processes,
	ps ux | grep -i mergerfs         for MergerFS issues

	ps us | grep -i rclone           for Rclone issue
- This will return something like this:
username@servername:~$ ps ux | grep -i rclone
username   36384  0.1  0.0 1364856 65748 pts/140 Sl+  Sep25 105:16 rclone mount Gdrive: /home/username/Stuff/Mount --cache-db-purge --dir-cache-time 5000h -vvv --log-file /home/username/.config/rclone/rclone.log --poll-interval 15s --vfs-cache-mode write
username  128007  0.0  0.0 218480   824  pts/77   S+   15:32   0:00 grep -i rclone
- You can kill the mount process by selecting the PID (number after your username) and using the
killcommand, for example:
kill -9 36384
-
If you run the
pscommand again, the process should be gone. You may need to do thefusermountfix above after this. -
Once the old process has been killed, you can try to restart your mount again.
We hope you find this guide useful and that you now feel confident to experiment with your own set-up.
If you are having trouble with this, you can open a support ticket here!
Feedback and suggestions regarding this article are welcome in our Discord server
Installation, Configuration & Usage of rclone
Ultra.cc support is unable to provide support for rclone, this is due to the large volume of variables and different configurations possible with rclone. The guides found here on the knowledge-base should be able to guide you through using rclone, and any further questions can easily be answered with a quick Google search. You may also be able to find community support for rclone through our community Discord server or the Rclone forums.
Please make yourself aware of the Ultra.cc Fair Usage Policy. It is very important not to mount your Cloud storage to any of the premade folders. Do not download directly to a rclone mount from a torrent or nzbget client. Both will create massive instability for both you and everyone else on your server. Always follow the documentation and create a new folder for mounting. It is your responsibility to ensure usage is within acceptable limits.
Please do not mount to any of the default directories such as:
downloads
files
media
bin
.apps
.config
www
/homexx/username/
or any pre-created directory found on your Ultra.cc Slot
In this guide, we will be going over the installation of rclone. We'll also cover the basic usages such as setting up a remote and how to copy files between your slot and a remote file host.
Installation on your Ultra.cc Service
To begin, make sure you know how to SSH into your slot. All rclone commands are performed via SSH. You can find a guide on SSH here.
To install rclone, run the command below; this command will automatically install rclone to your slot for you.
rclone stable
curl https://scripts.ultra.cc/main/MergerFS-Rclone/Installer%20Scripts/rclone-install-stable.sh | bash
rclone beta
curl https://scripts.ultra.cc/main/MergerFS-Rclone/Installer%20Scripts/rclone-install-beta.sh | bash
Installation on your local PC
Windows
- Download the latest rclone version.
- Extract the compressed zip file to any location of your liking using software like 7zip or WinRAR.
- Move
rclone.exeto the following folderC:\Windows\System32.
MacOS
- Open a terminal window.
- Install brew with the command given below:
/bin/bash -c "$(curl -fsSL https://raw.githubusercontent.com/Homebrew/install/master/install.sh)"
- Install sudo and macfuse with brew using the commands below:
brew install macfuse
brew install sudo
- Switch to root and finally install rclone using the commands below:
sudo su
curl https://rclone.org/install.sh | sudo bash
Linux
- Open a terminal window.
- Run the command given below:
curl https://rclone.org/install.sh | sudo bash
Configuration
OAuth (Google Drive)

- Click Enable APIs and Services, search for Drive and select Google Drive.
- Click Enable on the window that pops up.

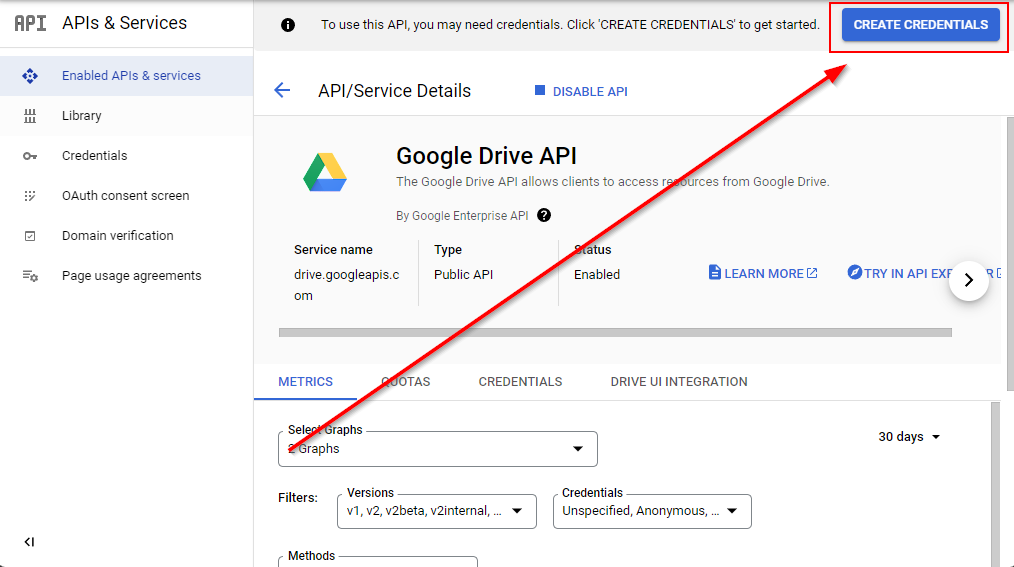
- Click Create Credentials on the top right side of the screen.
- Select User data and click Next.
- Fill out App name and email addresses as you see fit. Then Save and Continue.
- Click Save and Continue again. No need to set Scopes.
- Set Application type to Desktop app and then click on Create.
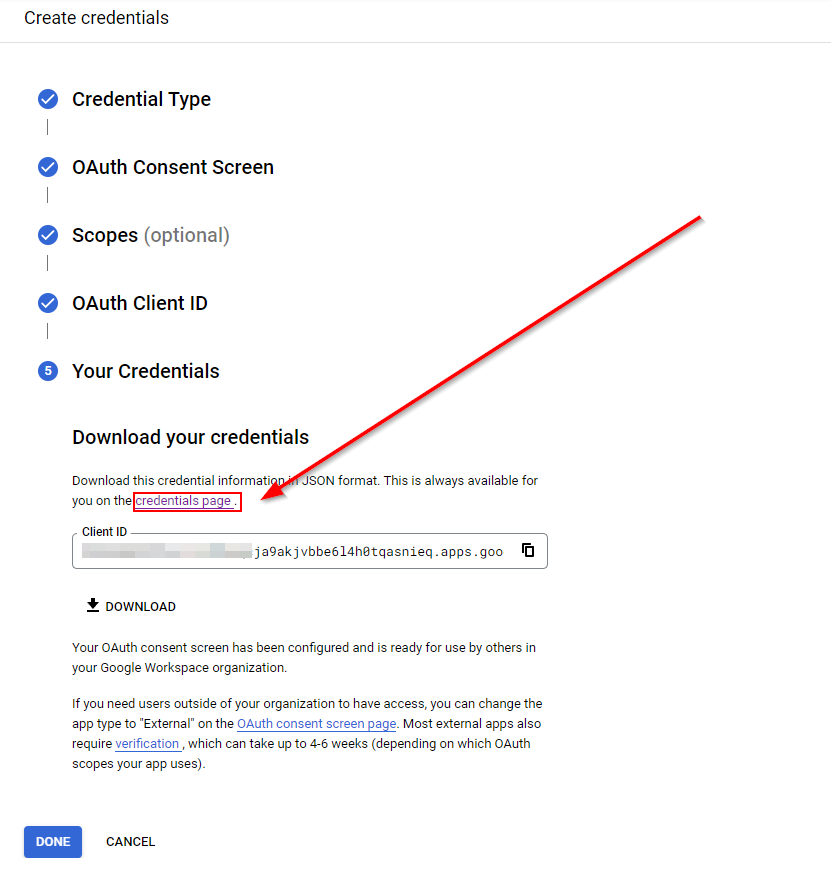
- Then you will be given the option to Download your credentials and also a link to your credentials page.
- You can download them to save them locally, but they will always be visible in your Google account's cloud console.
- Click on the credentials page link to go to your Credentials page. Here you will find your credentials under OAuth2.0 Client IDs.
rclone
Now we need to configure a remote to use with rclone. For this guide, we will be configuring Google Drive. This is the most common remote people tend to use as it offers ample storage capacities for a reasonable price. Should you wish to use a different cloud host, feel free to modify the steps, you take.
- Run the command
rclone config
kbguides@lw914:~$ rclone config
2019/06/15 18:16:33 NOTICE: Config file "/home27/kbguides/.config/rclone/rclone.conf" not found - using defaults
No remotes found - make a new one
n) New remote
s) Set configuration password
q) Quit config
n/s/q>
- Press
nand then Enter. Type the name you wish to use for your remote and then press Enter once more. Here, we'll usegdriveas our remote name. - Scroll through the list of supported remotes and pick the one you wish. For this example, we will be using Google Drive, so we will search through the listed remote providers and select the number corresponding with Google Drive.
Type of storage to configure.
Enter a string value—Press Enter for the default ("").
Choose a number from below, or type in your own value
...
14 / Google Cloud Storage (this is not Google Drive)
   \ "google cloud storage"
15 / Google Drive
   \ "drive"
16 / Hubic
   \ "hubic"
...
- You will be prompted to enter your
client_idthat we created earlier in the guide. Please head over to your credentials page in your goolge developer console. - Once you have followed the steps in the guide, copy your client ID and paste it into the terminal, next press Enter. Now copy your client secret, paste it in, and again press Enter.
Google Application Client Id
Setting your own is recommended.
See https://rclone.org/drive/#making-your-own-client-id for how to create your own.
If you leave this blank, it will use an internal key which is low performance.
Enter a string value. Press Enter for the default ("").
client_id> example12345

Enter a string value. Press Enter for the default ("").
client_secret> example12345
- Choose the scope you wish to give to rclone. Full Access is safe and is likely the most useful one to you, so in this case we will type
1then press Enter.
Scope that rclone should use when requesting Access from Drive.
Enter a string value. Press Enter for the default ("").
Choose a number from below, or type in your own value
 1 / Full access to all files, excluding Application Data Folder.
   \ "drive"
 2 / Read-only access to file metadata and file contents.
   \ "Drive.readonly"
   / Access to files created by rclone only.
 3 | These are visible on the drive website.
   | File authorization is revoked when the user deauthorizes the app.
   \ "Drive.file"
   / Allows read and write Access to the Application Data folder.
 4 | This is not visible in the drive website.
   \ "Drive.appfolder"
   / Allows read-only Access to file metadata but
 5 | does not allow any access to read or download file content.
   \ "drive.metadata.readonly"
scope> 1
- Unless you know what you are doing, leave the
root folderblank and press Enter. Leave Service Account Credentials JSON file path blank also, again press Enter. Then typento choose to not edit advanced config and press Enter.
The ID of the root folder
Leave blank normally.
Fill in to access "Computers" folders. (see docs).
Enter a string value. Press Enter for the default ("").
root_folder_id>

Service Account Credentials JSON file path
Leave blank normally.
Needed only if you want use SA instead of interactive login.
Enter a string value. Press **Enter** for the default ("").
service_account_file>

Edit advanced config? (y/n)
y) Yes
n) No
y/n> n
- Type
nto choose to not use auto-config and press Enter. - Next, you will be provided with an rclone command that you must execute on your local PC.
- Copy the
rclone authorize "drive" "your_token"command from your Ultra.cc terminal and paste it on your local PC's terminal. This will open your browser automatically.- Refer to the earlier section of installing rclone on your local PC if required.
- Choose the Google Drive account you wish to use and click Allow, giving rclone permission to use it.
- Go back to the terminal of your local PC. Rclone will have generated a code, which you must copy.
- Paste the code in your Ultra.cc terminal and press Enter.
- Finally, type
nto choose to not configure as a team drive and press Enter.
Use auto config?
 * Say Y if not sure
 * Say N if you are working on a remote or headless machine

y) Yes (default)
n) No
y/n> n
Option config_token.
For this to work, you will need rclone available on a machine that has
a web browser available.
For more help and alternate methods see: https://rclone.org/remote_setup/
Execute the following on the machine with the web browser (same rclone
version recommended):
        rclone authorize "drive" "eyJjbGllbnRfaWQiOiI5OTIyMjQwOTkzNTYtMWtsZmJrYnFjamE5YWtqdmJiZTZsNGgwdHFhc25pZXEuYXBw"
Then paste the result.
Enter a value.
config_token>
- You will be shown a confirmation screen. If all is OK, type
yand then press Enter to save your configuration. - If you notice any issues, you can edit them from here by typing
e, or delete them usingd. Finally, pressqand then Enter to quit the rclone config wizard.
--------------------
[gdrive]
type = drive
client_id = 78311[REDACTED].apps.googleusercontent.com
client_secret = O34[REDACTED]
scope = drive
token = {"access_token":[REDACTED]}
team_drive =
--------------------
y) Yes this is OK (default)
e) Edit this remote
d) Delete this remote
y/e/d>
Usage
rclone is interacted with purely through SSH. Please ensure you are familiar with the Linux terminal and using SSH prior to using rclone.
General Commands
These commands are helpful to remember. They allow you to interact with rclone and move files around between your local and remote storage or even between two remote destinations.
config - Execute this command to add, modify or remove remote file hosts.
Usage: rclone config

copy - Used to copy files between two locations, remote -> remote, remote -> local, local -> remote
Usage: rclone copy [-P] {origin} {destination}

move - Same as copy however, it does not leave the files at the source
Usage: rclone move [-P] {origin} {destination}

sync - Will make the destination directory identical to the origin. If files exist on the destination that does not exist on origin, they will be deleted. Be careful with the sync command, as it can cause data loss.
Usage: rclone sync [-P] {origin} {destination}

When dealing with remote filesystems, use:
{remote}:{path}

For example, if you wished to copy a file named movie.mkv from your current working directory to a path named Movies in a remote name Drive you'd use this command:
rclone copy movie.mkv Drive:Movies
Rclone VFS and MergerFS Setup
This guide is for advanced users only. Ultra.cc is not responsible for any data loss or application errors due to this setup. We do not provide official support for Rclone or MergerFS. You may visit our #community-support channel on our Discord server for assistance.
Please make yourself aware of the Ultra.cc Fair Usage Policy. It is very important not to mount your Cloud storage to any of the premade folders. Do not download directly to a Rclone mount from a torrent or nzbget client. Both will create massive instability for both you and everyone else on your server. Always follow the documentation and create a new folder for mounting. It is your responsibility to ensure usage is within acceptable limits.
Please do not mount to any of the default directories such as:
downloads
files
media
bin
.apps
.config
www
/homexx/username/
or any pre-created directory found on your Ultra.cc Slot
Introduction
This section will teach you how to set up a Rclone VFS mount and MergerFS on Ultra.cc slots, and it assumes the following:
- You have a working Rclone setup, especially correctly configured remotes of your preferred cloud storage provider. In this tutorial, we'll be using Google Drive. If you use another cloud storage provider, change the flags that are appropriate to your setup and visit Rclone documentation for more information.
- You have the appropriate knowledge of setting up and running your own systemd services.
- You are comfortable working in CLI, compiling from sources and setting up cron jobs.
The workflow of the setup is as follows:
- There are 2 folders, one local and the Rclone mount named Mount.
- These 2 folders are merged via MergerFS and is mounted to another folder. All apps such as Plex, Radarr, Sonarr, and such will be pointed to this folder.
- When you copy a file to MergerFS, this will be copied to Local First. Directory structures will be retained.
- A Rclone move script moves all the contents inside Local every 19:00 CET, retaining the directory structures.
- Applications that are pointed to MergerFS wouldn't know the difference.
The Pros of this setup are as follows:
- New files will be immediately available in Plex and have faster loading times due to it being available locally.
- Uploads are less prone to errors than moving files directly via Rclone mount.
- It's essentially a "set it and forget it" setup.
And, the cons of this setup are as follows:
- New files will not be available on Google Drive until you run the Rclone move script.
- There will be 3 points of failure on this setup, Rclone, apps that are connected to the MergerFS folder and MergerFS.
- Monitoring functions such as Plex's "Update my library automatically" will not work for mounts. You may need to set your application to periodically scan the mount.
Before we proceed, it is imperative to stop all Rclone/plexdrive processes and stop all the apps that are connected to your Rclone mount before proceeding.
Preparation
Install and Configure Rclone
Install and configure Rclone if you haven't already. Refer here for more information: Installation, Configuration & Usage of rclone
Install mergerfs
- Run the command given below in your terminal. This should automatically install MergerFS to your slot.
- Select 1 or 2 when prompted. We recommend selecting
2when prompted by the installer.
bash <(wget -qO- https://scripts.ultra.cc/main/MergerFS-Rclone/Installer%20Scripts/mergerfs-install.sh)
- To confirm if the installation is completed, do
which mergerfs
ultradocs@pollux:~$ which mergerfs
/home/ultradocs/bin/mergerfs
Change Application Settings
Change your application settings according to rclone Optimizations for Apps.
Setup the Work Flow using a Script
What does the script do?
- The script will set up the workflow for you.
- It will create the following directories on your service:
-
~/Stuff/Mount -
~/.tmp-rclone -
~/Stuff/Local/Downloads/torrents -
~/Stuff/Local/Downloads/usenet -
~/MergerFS/Movies -
~/MergerFS/TV Shows -
~/scripts
-
- The following systemd services will be created by it to mount rclone-vfs and mergerfs respectively:
-
~/.config/systemd/user/rclone-vfs.service -
~/.config/systemd/user/mergerfs.service
-
- Finally, it will also save the rclone-upload script and set a cronjob to run it in your crontab.
- You will be given a choice between two kinds of rclone-upload scripts. One will be a normal script that will only upload your data and the other will also send a discord notification.
- In the case that you chooose the
Discord-Notificationtype, make sure that you have aDiscord Webhook URLready for it. - The
rclone-upload.shscript will be saved in the following location:-
~/scripts/rclone-upload.sh
-
- The
rclone-upload.shscript will be set to move data to your cloud drive daily at 19:00 CET and optionally also send a discord notification upon completion.
Run the Script
- It is absolutely necessary that you know the rclone remote name which you set up in Installation, Configuration & Usage of rclone before running this script.
- You can confirm your rclone remote name by executing the following SSH command:
rclone listremotes
- Optionally, you should also have a Discord Webhook URL ready if you wish to receive discord notifications from
rclone-upload.sh. - To execute the rclone-mergerfs workflow setup script, run the SSH command given below:
bash <(wget -qO- https://scripts.ultra.cc/main/MergerFS-Rclone/rclone-mergerfs.sh)
- Confirm that rclone-vfs and mergerfs are set up correctly by executing the following SSH command:
ls ~/MergerFS
- It should list files from your cloud drive.
Set Sonarr Correctly
- To take advantage of your new MergerFS work flow, you must set up Sonarr correctly.
- As soon as you login to Sonarr, go to
Settingsand click on the cog that saysShow Advanced.
Enable Hardlinks
- Go to
Settings -> Media Management - Check
Use Hardlinks Instead of CopyunderImporting - Click on
Save Changesin the top-left.
Set Root Folder
- Go to
Settings -> Media Management - Click on
Add Root FolderunderRoot Folders - Browse to
/home/your_username/MergerFS/TV Shows - Click
Ok. - All Series in Sonarr should have
/home/your_username/MergerFS/TV Showsas theirRoot Folder.- You can have other Root Folders, but they all should be inside
/home/your_username/MergerFS.
- You can have other Root Folders, but they all should be inside
Remote Path Mapping
- Go to
Settings -> Download Clients - Ensure that you have already set up your Download Clients! Click here for the Guide.
- Click on the
+button to the right-hand side underRemote Path Mappings. - Set up the Remote Path Mapping as given below:
Host: {username}.{servername}.usbx.me
Remote Path: /home/your_username/Stuff/Local/Downloads
Local Path: /home/your_username/MergerFS/Downloads
- Click on Save.
Set Radarr Correctly
- To take advantage of your new MergerFS work flow, you must set up Radarr correctly.
- As soon as you login to Radarr, go to
Settingsand click on the cog that saysShow Advanced.
Enable Hardlinks
- Go to
Settings -> Media Management - Check
Use Hardlinks Instead of CopyunderImporting - Click on
Save Changesin the top-left.
Set Root Folder
- Go to
Settings -> Media Management - Click on
Add Root FolderunderRoot Folders - Browse to
/home/your_username/MergerFS/Movies - Click
Ok. - All Movies in Radarr should have
/home/your_username/MergerFS/Moviesas theirRoot Folder.- You can have other Root Folders, but they all should be inside
/home/your_username/MergerFS.
- You can have other Root Folders, but they all should be inside
Remote Path Mapping
- Go to
Settings -> Download Clients - Ensure that you have already set up your Download Clients! Click here for the Guide.
- Click on the
+button to the right-hand side underRemote Path Mappings. - Set up the Remote Path Mapping as given below:
Host: {username}.{servername}.usbx.me
Remote Path: /home/your_username/Stuff/Local/Downloads
Local Path: /home/your_username/MergerFS/Downloads
- Click on Save.
Connect Sonarr & Radarr to Plex / Emby
Plex Media Server
- In Plex Media Server, go to
Settings -> Networkand setSecure ConnectionstoPreferred. Then, click onSave Changes. - In both Sonarr & Radarr, go to
Settings -> Connectand click on the+button. - Choose
Plex Media Server. - Set it up with the details given below:
Name : Anything as per your preference.
Notification Triggers: Check `On Download`, `On Upgrade`, `On Rename`.
Host: 172.17.0.1
Port: 16825 (The port of your Plex Media Server, visible in the Control Panel)
Use SSL: Unchecked
Update Library: Checked
- Click on
Authenticate with Plex.tv. - A browser pop-up window will open. Login using your Plex account.
- After authenticationg with Plex.tv, the
Auth Tokenfield will be filled automatically. - Click on
Testand thenSave.
Emby
- Login to your Emby instance.
- Go to
Manage Emby Server -> Advanced -> Api Keys - Click on
+ New Api Keyand add the App name asArrs. Then clickok. - In both Sonarr & Radarr, go to
Settings -> Connectand click on the+button. - Choose
Emby. - Set it up with the details given below:
Name : Anything as per your preference.
Notification Triggers: Check `On Download`, `On Upgrade`, `On Rename`.
Host: 172.17.0.1
Port: Emby's port as given in your Ultra Control Panel.
Use SSL: Unchecked
API Key: Paste the one which was created earlier.
Update Library: Checked
- Click on
Testand thenSave.
Set your Download Clients Correctly
In both Sonarr & Radarr, you must click on the cog that says Show Advanced in Settings. Some required fields for the Download client settings will not be visible otherwise.
- Before proceeding with this secion, set up your download clients normally in both Sonarr and Radarr. Click here for that Guide.
- Sonarr and Radarr both must add their downloads to directories inside
/home/your_username/Stuff/Local/Downloads. - To achieve this, you will have to make changes in your download clients.
Torrent Clients
rTorrent
- In Sonarr/Radarr itself, go to
Settings -> Download Clients. - Click on the rTorrent download client.
- Locate the
Directorysetting and set it to:/home/your_username/Stuff/Local/Downloads/torrents - Click on
Save.
Deluge
- In Deluge, it's default download path will have to changed. Therefore, it is not recommmended to use Deluge in this work flow.
- Login to your Deluge instance.
- Click on
Preferencesand go toDownloads - Set the
Download to:folder to/home/your_username/Stuff/Local/Downloads/torrents - Click on
Apply, and thenOk.
qBittorrent
- Login to your qBittorrent instance.
- Go to
Options -> Downloads. - Under
Saving Management, set the following settings:
Default Torrent Management Mode: Automatic
When Torrent Category changed: Relocate torrent
- Click on
Save. - For Sonarr
- Find the
tv-sonarrcategory. If your Sonarr is using a different category with qBittorrent, edit that one. - Right-click on it and choose
Edit category.. - Set the
Save path:to/home/your_username/Stuff/Local/Downloads/torrents
- Find the
- For Radarr
- Find the
radarrcategory. If your Radarr is using a different category with qBittorrent, edit that one. - Right-click on it and choose
Edit category.. - Set the
Save path:to/home/your_username/Stuff/Local/Downloads/torrents
- Find the
Transmission
- In Sonarr/Radarr itself, go to
Settings -> Download Clients. - Click on the Transmission download client.
- Locate the
Directorysetting and set it to:/home/your_username/Stuff/Local/Downloads/torrents - Click on
Save.
Usenet Clients
- You can optionally create two more directories to better sort your Series and Movies.
- To do so, run the following SSH commands:
mkdir -p ~/Stuff/Local/Downloads/usenet/Sonarr
mkdir -p ~/Stuff/Local/Downloads/usenet/Radarr
NZBGet
- For Radarr
- By default, Radarr sets the NZBGet download client to use the
Moviescategory. - You must change the
DestDirof this category in your NZBGet instance. If you are using a different category, change theDestDirof that one. - Login to your NZBGet instance.
- Go to
CATEGORIESand find theMoviescategory. - Set the
DestDirto/home/your_username/Stuff/Local/Downloads/usenet/Radarr - Click on
Save all changes.
- By default, Radarr sets the NZBGet download client to use the
- For Sonarr
- By default, Sonarr sets the NZBGet download client to use the
tvcategory. However, this is not already present in NZBGet and often has to be added. - You must change the
DestDirof the category in your NZBGet instance. If you are using a different category, change theDestDirof that one. - Login to your NZBGet instance.
- Go to
CATEGORIESand find thetvcategory. - Set the
DestDirto/home/your_username/Stuff/Local/Downloads/usenet/Sonarr - Click on
Save all changes.
- By default, Sonarr sets the NZBGet download client to use the
SABnzbd
- For Radarr
- By default, Radarr sets the SABnzbd download client to use the
moviescategory. - You must change the
Folder/Pathof this category in your SABnzbd instance. If you are using a different category, change theFolder/Pathof that one. - Login to your SABnzbd instance.
- Go to
Config -> Categoriesand find themoviescategory. - Set the
Folder/Pathto/home/your_username/Stuff/Local/Downloads/usenet/Radarr - Click on
Save.
- By default, Radarr sets the SABnzbd download client to use the
- For Sonarr
- By default, Sonarr sets the SABnzbd download client to use the
tvcategory. - You must change the
Folder/Pathof this category in your SABnzbd instance. If you are using a different category, change theFolder/Pathof that one. - Login to your SABnzbd instance.
- Go to
Config -> Categoriesand find thetvcategory. - Set the
Folder/Pathto/home/your_username/Stuff/Local/Downloads/usenet/Sonarr - Click on
Save.
- By default, Sonarr sets the SABnzbd download client to use the
Set your Media Server Applications Correctly
Plex Media Server
- Your
Movieslibrary should point to the following folder:/home/your_username/MergerFS/Movies. - Your
TV Showslibrary should point to the following folder:/home/your_username/MergerFS/TV Shows. - Any other library folders should also be inside
/home/your_username/MergerFS. - Official Plex support article on Editing Libraries.
Emby
- Your
Movieslibrary should point to the following folder:/home/your_username/MergerFS/Movies. - Your
TV Showslibrary should point to the following folder:/home/your_username/MergerFS/TV Shows. - Any other library folders should also be inside
/home/your_username/MergerFS.
JellyFin
- Your
Movieslibrary should point to the following folder:/home/your_username/MergerFS/Movies. - Your
TV Showslibrary should point to the following folder:/home/your_username/MergerFS/TV Shows. - Any other library folders should also be inside
/home/your_username/MergerFS.
Helpful Information for managing this new Work Flow
- Log locations:
rclone-vfs mount: ~/scripts/rclone_vfs_mount.log
mergerfs mount: ~/scripts/mergerfs_mount.log
rclone-upload script: ~/scripts/rclone-upload.log
- Systemd commands:
Restart Mounts: systemctl --user restart rclone-vfs.service mergerfs.service
Stop Mounts: systemctl --user stop rclone-vfs.service mergerfs.service
Disable mounts: systemctl --user disable --now rclone-vfs.service mergerfs.service
Understanding the rclone-upload Script
- If you followed everything properly thus far, you have a script installed that moves all data from
~/Stuff/Localto your cloud drive excluding~/Stuff/Local/Downloadsat every19:00CET. - The script is saved at the following location:
~/scripts/rclone-upload.sh - Depending on your choice, it also optionally sends a Discord notification.
- In the case that you wish to execute the script manually, it can be done with the following SSH command:
bash ~/scripts/rclone-upload.sh - The log of the script is saved at the following location:
~/scripts/rclone-upload.log - Both of the scripts are discussed below individually.
Normal rclone-upload.sh
- Example:
#!/bin/bash

lock_file="$HOME/scripts/rclone-upload.lock"

trap 'rm -f "$lock_file"; exit 0' SIGINT SIGTERM
if [ -e "$lock_file" ]
then
    echo "Rclone upload script is already running."
    exit
else
    rm "$HOME"/scripts/rclone-upload.log
    touch "$lock_file"
    "$HOME"/bin/rclone move "$HOME"/Stuff/Local/ your_remote_name: \
        --config="$HOME"/.config/rclone/rclone.conf \
        --exclude "Downloads/**" \
        --drive-chunk-size 64M \
        --tpslimit 5 \
        -vvv \
        --drive-stop-on-upload-limit \
        --delete-empty-src-dirs \
        --bwlimit=8M \
        --use-mmap \
        --transfers=2 \
        --checkers=4 \
        --log-file "$HOME"/scripts/rclone-upload.log
    rm -f "$lock_file"
    trap - SIGINT SIGTERM
    exit
fi
- It is executed at every
19:00CET by a cronjob saved in your crontab.
rclone-upload.sh with Discord Notification
- Example:
#!/bin/bash

# Rclone upload script with optional Discord notification upon move completion (if something is moved)
#
# Recommended for use via cron
# For example: */10 * * * * /path/to/rclone-upload.sh >/dev/null 2>&1
# -----------------------------------------------------------------------------

SOURCE_DIR="$HOME/Stuff/Local/"
DESTINATION_DIR="your_remote_name:"

DISCORD_WEBHOOK_URL=""
DISCORD_ICON_OVERRIDE="https://i.imgur.com/MZYwA1I.png"
DISCORD_NAME_OVERRIDE="RCLONE"

LOCK_FILE="$HOME/rclone-upload.lock"
LOG_FILE="$HOME/rclone-upload.log"

# DO NOT EDIT BELOW THIS LINE UNLESS YOU KNOW WHAT YOU'RE DOING
# -----------------------------------------------------------------------------

trap 'rm -f $LOCK_FILE; exit 0' SIGINT SIGTERM
if [ -e "$LOCK_FILE" ]
then
  echo "$0 is already running."
  exit
else
  touch "$LOCK_FILE"

  rclone_move() {
    rclone_command=$(
      "$HOME"/bin/rclone move -vP \
      --config="$HOME"/.config/rclone/rclone.conf \
      --exclude "Downloads/**" \
      --drive-chunk-size 64M \
      --use-mmap \
      --delete-empty-src-dirs \
      --log-file="$LOG_FILE" \
      --stats=9999m \
      --tpslimit=5 \
      --transfers=2 \
      --checkers=4 \
      --bwlimit=8M \
      --drive-stop-on-upload-limit \
      "$SOURCE_DIR" "$DESTINATION_DIR" 2>&1
    )
    # "--stats=9999m" mitigates early stats output
    # "2>&1" ensures error output when running via command line
    echo "$rclone_command"
  }
  rclone_move

  if [ "$DISCORD_WEBHOOK_URL" != "" ]; then

    rclone_sani_command="$(echo $rclone_command | sed 's/\x1b\[[0-9;]*[a-zA-Z]//g')" # Remove all escape sequences

    # Notifications assume following rclone ouput:
    # Transferred: 0 / 0 Bytes, -, 0 Bytes/s, ETA - Errors: 0 Checks: 0 / 0, - Transferred: 0 / 0, - Elapsed time: 0.0s

    transferred_amount=${rclone_sani_command#*Transferred: }
    transferred_amount=${transferred_amount%% /*}

    send_notification() {
      output_transferred_main=${rclone_sani_command#*Transferred: }
      output_transferred_main=${output_transferred_main% Errors*}
      output_errors=${rclone_sani_command#*Errors: }
      output_errors=${output_errors% Checks*}
      output_checks=${rclone_sani_command#*Checks: }
      output_checks=${output_checks% Transferred*}
      output_transferred=${rclone_sani_command##*Transferred: }
      output_transferred=${output_transferred% Elapsed*}
      output_elapsed=${rclone_sani_command##*Elapsed time: }

      notification_data='{
        "username": "'"$DISCORD_NAME_OVERRIDE"'",
        "avatar_url": "'"$DISCORD_ICON_OVERRIDE"'",
        "content": null,
        "embeds": [
          {
            "title": "Rclone Upload Task: Success!",
            "color": 4094126,
            "fields": [
              {
                "name": "Transferred",
                "value": "'"$output_transferred_main"'"
              },
              {
                "name": "Errors",
                "value": "'"$output_errors"'"
              },
              {
                "name": "Checks",
                "value": "'"$output_checks"'"
              },
              {
                "name": "Transferred",
                "value": "'"$output_transferred"'"
              },
              {
                "name": "Elapsed time",
                "value": "'"$output_elapsed"'"
              }
            ],
            "thumbnail": {
              "url": null
            }
          }
        ]
      }'

      /usr/bin/curl -H "Content-Type: application/json" -d "$notification_data" $DISCORD_WEBHOOK_URL
    }

    if [ "$transferred_amount" != "0 B" ]; then
      send_notification
    fi

  fi

  rm -f "$LOCK_FILE"
  trap - SIGINT SIGTERM
  exit
fi
- It is executed at every
19:00CET by a cronjob saved in your crontab. - Optionally, you can edit the script and change the following variables as you like:
-
DISCORD_WEBHOOK_URLis set by the script already. In case you didn't enter it correctly or wish to change it, you can do so here. -
DISCORD_ICON_OVERRIDEhas a default rclone logo set. You can change this as per your preference. -
DISCORD_NAME_OVERRIDEis the name of the Discord Bot being used to send the notifications. This can be set as per your preference.
-
Changing the time at which rclone-upload.sh is executed (Optional)
Please do not execute the upload script more than once a day. It can lead to the violation of our Terms of Service.
- As explained previously, the script is being executed daily at
19:00CET by your crontab. - You can edit your crontab with the following SSH command:
crontab -e - If this is your first time editing the crontab, it will prompt you to select a text editor:
Select an editor.  To change later, run 'select-editor'.
  1. /bin/nano        <---- easiest
  2. /usr/bin/vim.basic
  3. /usr/bin/mcedit
  4. /usr/bin/vim.tiny

Choose 1-4 [1]:
- Type in
1and then pressEnter. - It will show you the crontab entry for your
rclone-upload.shscript.
0 19 * * * /home/your_username/scripts/rclone-upload.sh > /dev/null 2>&1
- You can edit the cron schedule expression as you like. Here is a simple tool that can help you find the right cron schedule expression: Crontab.guru
- Once changes are made use the key combination
Ctrl + Oand pressEnterto save them. - Then use the key combination
Ctrl + Xto exit thenanotext editor.
Rclone Mount using Systemd
This guide is for advanced users only and it serves as a guide for you to use rclone. The systemd files here are the recommended settings for our slots and will subject to change whenever there are new configurations that are appropriate for the slots. Furthermore, Ultra.cc is not responsible for any data loss or application errors due to this setup should you proceed and will not provide official support for it due to the large volume of variables and different configurations possible with rclone. You may visit the community discord server for help.
Please make yourself aware of the Ultra.cc Fair Usage Policy. It is very important not to mount your Cloud storage to any of the premade folders. Do not download directly to a rclone mount from a torrent or nzbget client. Both will create massive instability for both you and everyone else on your server. Always follow the documentation and create a new folder for mounting. It is your responsibility to ensure usage is within acceptable limits.
Please do not mount to any of the default directories such as:
downloads
files
media
bin
.apps
.config
www
/homexx/username/
or any pre-created directory found on your Ultra.cc Slot
Is this method of rclone mounting suitable for your use case?
This method is not suitable for you if you wish to upload/write data to your rclone mount.
- Follow this method only if you plan to read from your rclone mount and not upload/write any data to it periodically.
- In the case that you wish to upload data to your cloud drive periodically, please follow Rclone VFS and MergerFS Setup.
Overview
Rclone's Mount allows you to mount any of your cloud storage accounts as part of your slot's file system using FUSE. In this guide, we will teach you how to run a rclone mount using systemd. Take note that this guide is setup using Google Drive as the cloud storage provider used. Should you use any other cloud storage providers, you may need consult rclone documentation for the appropriate flags for your setup.
There are many ways to mount rclone. You can run the rclone Mount using the screen utility, create a script for running rclone Mount, and checking if the command is still alive, using the --daemon flag, just to mention a few.
We recommend using systemd for several reasons:
- Easy to set up and configure
- Restarts rclone Mount automatically when there's a server restart or error
- You can manually restart the service when there're problems.
rclone mount with no mergerfs
If you don't need to upload files to your mount, follow this guide.
Should you need to upload files or you're planning an automated setup involving your cloud storage, we recommend using Rclone VFS and MergerFS Setup instead.
Preparation
- Login to your service via SSH.
- Ensure Rclone is installed following Rclone Installation Mounting will not work without this.
- Then, create the mount and temp folder
- For this guide, we'll be making a folder named Mount. So we will run
mkdir -p ~/Stuff/Mount && mkdir ~/.tmp-rclone
kbguides@lw902:~$ mkdir -p ~/Stuff/Mount && mkdir ~/.tmp-rclone
kbguides@lw902:~$
- Next, create a folder named
scripts. This is where you'll find logs of the rclone mounts should there be any problems.
kbguides@lw902:~$ mkdir ~/scripts
kbguides@lw902:~$
- Confirm your remote name by running
rclone listremotesand take note of the name you've set.
$ @lw902:~$ rclone listremotes
Gsuite:
Downloading Rclone Service File
- Choose and run the following command below
- There are 2 systemd files listed here. You have to choose either one of these files.
- The first one should work on most remotes supported by rclone.
- The second one is specific for Google Drive that is optimized for streaming.
Rclone Mount for Most Remotes
wget -P ~/.config/systemd/user/ https://scripts.ultra.cc/main/MergerFS-Rclone/Service%20Files/rclone-normal.service && nano ~/.config/systemd/user/rclone-normal.service
Google Drive Rclone Mount for Media Streaming
wget -P ~/.config/systemd/user/ https://scripts.ultra.cc/main/MergerFS-Rclone/Service%20Files/rclone-vfs.service && nano ~/.config/systemd/user/rclone-vfs.service
Editing your service file
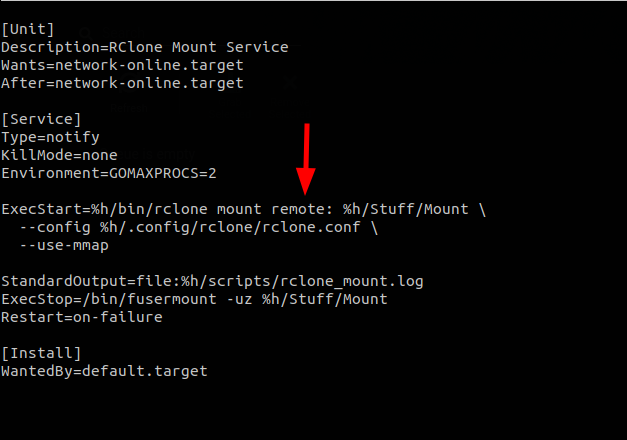
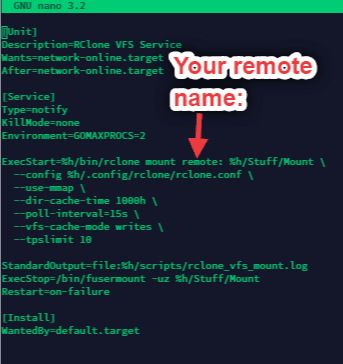
- After you run the command, a nano text window appears. In this example service file, we'll be using Google Drive Rclone Mount for Plex Streaming.
- Replace
remote:to the remote name you set previously from the previous guide. - You may also add or edit some rclone flags here if you wish.
- Then save it by doing CTRL + O, press ENTER then exit nano by doing CTRL + X.
Example rclone-normal.service
Example rclone-vfs.service
Systemd Commands
{mount-name} refers to the service of your choice. Either rclone-normal.service or rclone-vfs.service
Enabling and starting Rclone mount: systemctl --user enable --now {mount-name}.service
Restart Rclone Mount: systemctl --user restart {mount-name}.service
Stop Rclone Mount: systemctl --user stop {mount-name}.service
Stop and disable Rclone mount: systemctl --user disable --now {mount-name}.service (Remove service file after)
Rclone Optimizations for Apps
This guide lists optimizations when using rclone mount to host your files to your slot. This is to lessen the API request hits made by rclone to your cloud streaming service and to not hit your cloud streaming's download quotas.
Media Centers
Plex
Settings ⇾ Library
-
Scan my library periodically: Daily- This lessens the API requests sent.
- You can set this down to 6 hours if necessary.
- You may also use Sonarr/Radarr's Connect to update your libraries if there are any new episodes/movies uploaded with periodic scanning daily.
-
Empty Trash Automatically after each scan: unticked- This is only a requirment if running a Cloud Mounting system using Rclone.
-
Generate video preview thumbnails: never -
Generate intro video markers: never -
Generate credit video markers: never -
Generate chapter thumbnails: never -
Analyze audio tracks for loudness: never- The following settings do a full download of the file and are only used to create intro markers, generate thumbnails and analyze the audio track of each file.
Settings ⇾ Scheduled Tasks
-
Perform extensive media analysis during maintenance: Unchecked- This does a full download and is only used for bandwidth analysis with streaming.
Emby/Jellyfin
Settings ⇾ Advanced ⇾ Scheduled Tasks
-
Scan Media Library: Every 24 Hours- This lessens the API requests sent.
- You can set this down to 6 hours if necessary.
- You may also use Sonarr/Radarr's Connect to update your libraries if there are any new episodes/movies uploaded with periodic scanning daily.
-
Thumbnail Image Extraction: none- It does the full download of the file and is only used to generate thumbnails. This can be set per library.
Downloaders
Sonarr/Radarr
Settings ⇾ Media Management ⇾ File Management
-
Analyze video files: Unchecked- It downloads the media file in full to perform media analysis (Extracting video information from the media file)
- This should be turned off as this frequently happens on library refreshes if left on.
Rclone Mount on Apple Silicon
Creating an Rclone Mount on Apple Silicon (M1 Chips)
These steps may work on intel based machines but are untested and M1 Chips require extra steps due to the unique architecture.
Installing Homebrew installer
Homebrew installs the stuff you need that Apple (or your Linux system) didn’t. If your familiar with linux you will find a few normal functions are missing or work differently on MacOS “brew” helps bridge this gap.
You can find out more here: https://brew.sh/
Installing Brew is very simple simply run the command bellow and follow the prompts.
/bin/bash -c "$(curl -fsSL https://raw.githubusercontent.com/Homebrew/install/HEAD/install.sh)
Installing MacFuse and Sudo
brew install macfuse
brew install sudo
Install rclone under sudo
Installing Rclone is easy but once again Apple will have you jump a few hoops to do so, First you must switch to a root user to allow for rclone to install. For some reason running the command directly as your user even with sudo installed will fail due to permissions.
To switch to root simply run
sudo su
Then enter your Mac Password
You will find your prompt has changed on the left and removed your username
You can now install rclone:
curl https://rclone.org/install.sh | sudo bash
Once installed successfully you can now exit the root user by typing exit then pressing enter
Now that your back into your main user you need to create a mount folder change username to match your mac username
mkdir /Users/username/Documents/Rclone
Creating a Rclone remote to connect to your Ultra slot
Configuring our Rclone FTP remote The first step is to invoke the rclone config menu with the rclone config command This will present a list of options
e) Edit existing remote
n) New remote
d) Delete remote
r) Rename remote
c) Copy remote
s) Set configuration password
q) Quit config
e/n/d/r/c/s/q>
| Field | Value |
|---|---|
| Host | Your Ultra Address (servername.usbx.me) or IP (185.123.123.123) |
| User | Your Ultra Username |
| Port | Port 21 is standard. You can press Enter |
| FTP password | Press Y, then enter your FTP Password. You will be asked for this twice. |
| Use FTPS over TLS (Implicit) | False |
| Use FTP over TLS (Explicit) | True |
| Edit advanced config? (y/n) | Press Y |
| Maximum number of FTP simultaneous connections, 0 for unlimited | Press enter |
| no_check_certificate | True |
| Disable using EPSV even if server advertises support | Press Enter |
| Enter a encoder.MultiEncoder value. Press Enter for the default ("Slash,Del,Ctl,RightSpace,Dot"). | Press Enter |
| y) Yes this is OK (default) | Press Y to complete the rclone configuration |
Configuring Mac Permissions for FUSE
Upon your first attempt to mount your new remote you will be greeted by a rather angry looking denied message as well as pop up explaining that you will need to change your security settings in order to allow macfuse to run.
To change the security setting on your MacBook with the M1 chip, you need to go into macOS Recovery mode.
- Turn on your MacBook holding the power button. Click "Security Policy..." on Startup Security Utility". If you do not see the Startup disk, follow the steps below.
- Click "Continue of Options" and "Select a user you know the password for : " will appear. Select your account and click Next. Then enter your password. Select "Utilities" on the top left and select "Startup Security Utility". Click "Unlock", enter your password and click "Security Policy...".
- On the screen below, choose "Reduced Security", check "Allow user management of kernel extensions from identified developers" and click "OK".
- Reboot and visit System Preferences > Security and Privacy > General. Click the lock icon at the bottom, enter your password and click Allow in front of the message that says System Extension by Benjamin Fleischer was blocked.
Test the mount
Install screen using brew as it will allow you to keep the mount running without leaving a command window open.
brew install screen
Now enter a new screen screen -S mounttest
And attempt to mount
rclone cmount Gsuite: /Users/jackalblood/Documents/Rclone
If all is well it will appear as if nothing has happened this is fine. Press Command + A then D to detach leaving the mount running
Since we are in a command window already we can go ahead and use this to verify it is functional, to do so simply run :
cd /Users/username/Documents/Rclone substitute username with your mac username
Then run the command ls you should now see all of the folders you have on your ultra slot, They will also be visible in a folder now called ultra in your documents folder (Mac OS changes the name based on the remote mounted
Using Rclone FTPS
Ultra.cc support is unable to provide support for rclone, this is due to the large volume of variables and different configurations possible with rclone. The guides found here on the knowledge-base should be able to guide you through using rclone, and any further questions can easily be answered with a quick Google search. You may also be able to find community support for rclone through our community Discord server or the Rclone forums.
Rclone is a software primarily used with cloud storage providers; however, it is also an easy-to-use Command-line download manager for many protocols, including FTP/FTPS/SFTP. We will show you today how to install rclone onto a Linux machine on your local network and how to set up automatic downloading from your Ultra.cc Slot.
Requirements:
Host machine on your home/local network running a Linux distribution (Mac OS can also be used but is not in the scope of this guide; however, it may still work as a general guide)
Ultra.cc FTP Slot details
Installing Rclone on the Host Machine
Installing rclone is made incredibly easy by the developer. First login to your
Host via SSH; this can be under a sudo user, but it is recommended to
install rclone as root user and later set up rclone under a sudo/sub-user,
never set up under root.
Once logged in, run this curl command
curl https://rclone.org/install.sh | sudo bash
If you receive a message telling you that the “curl command cannot be found,”
you will need to install it and run the command above again. To install curl,
run apt-get install curl -y
Once rclone is installed, it is recommended you switch to a new user and configure under that user. If you have not created a new user, the steps are simple.
adduser <username> and make sure to replace <username> with a username of your choice.
Follow the on-screen prompts for user information and password. Once that is completed, it is an excellent idea to promote this user to sudo; this allows for the execution of higher privileged commands, which are not required for Rclone but are certainly worth setting up.
To add a user to sudo after creation, run this command.
adduser <username> sudo
If, for some odd reason, your distro did not have sudo installed, now might be a good time to run an install just in case:
apt-get install sudo -y
Now we can switch to our <username> user
su <username>
Type cd to jump to the user home folder. This isn’t strictly required but is
best practice.
Configuring our Rclone FTP remote
The first step is to invoke the rclone config menu with the rclone config
command
This will present a list of options
e) Edit existing remote

n) New remote

d) Delete remote

r) Rename remote

c) Copy remote

s) Set configuration password

q) Quit config

e/n/d/r/c/s/q\>
Press N then enter
Now enter a remote name: you will need this later when writing our automated script.
Now you will be presented with an extremely long list of options at the time of
writing this 16 is FTP, but this may change as updates release
| Field | Value |
|---|---|
| Host | Your Ultra Address (servername.usbx.me) or IP (185.123.123.123) |
| User | Your Ultra Username |
| Port | Port 21 is standard. You can press Enter |
| FTP password | Press Y, then enter your FTP Password. You will be asked for this twice. |
| Use FTPS over TLS (Implicit) | False |
| Use FTP over TLS (Explicit) | True |
| Edit advanced config? (y/n) | Press Y |
| Maximum number of FTP simultaneous connections, 0 for unlimited | Press enter |
| no_check_certificate | True |
| Disable using EPSV even if server advertises support | Press Enter |
| Enter a encoder.MultiEncoder value. Press Enter for the default ("Slash,Del,Ctl,RightSpace,Dot"). | Press Enter |
| y) Yes this is OK (default) | Press Y to complete the rclone configuration |
Testing Remote for access
Once the configuration of the remote is completed, it is a relatively simple job to check if all is configured correctly
One command should list all of the folders in your Ultra Slot Home folder.
rclone lsd remote-name: Replace remote-name with the remote name you chose previously.
Automating download from Ultra.cc
Before using this script on any machine other than your Ultra service, make sure screen is installed.
Our first step is to write a simple script. We will set up a lock folder for
a file lock system so the script will not run if it is already running
Create the lock folder with mkdir -p ~/lock
If you ever get a flock failed command, delete any files in ~/lock with the
command rm -rdf ~/lock/*
And create the script file
nano FTP.sh
Paste the following lines into it :
#!/bin/bash

exec {lock_fd}>/home/<username>/lock/FTPLOCK || exit 1

flock -n "$lock_fd" || { echo "ERROR: flock() failed." >&2; exit 1; }

if [ -z "$STY" ]; then exec screen -dm -S FTP /bin/bash "$0"; fi

rclone copy -v remote-name:/ultraslotfoldertocopy /home/<username>/pathtosavefiles

flock -u "$lock_fd"
Save it by pressing Ctrl+X then Y Enter.
You will need to change the paths ultraslotfoldertocopy to match the folder
you wish to download. You will also be required to alter remote-name to match
your rclone remote name that you chose previously. It can be found with the rclone config command
or rclone listremotes. These need to be run via the SSH Command line.
Now we need to allow it to run with the command chmod +x FTP.sh
And finally, run it
./FTP.sh
If the script is running and you were to rerun it, you may see an error message
“Flock Failed”, this is a file lock to stop multiple downloads running and is
normal. If you are sure it isn’t running you can delete the lock file inside
~/lock. You can also check the progress of the backup script, which is running
in a screen with the command screen -rd FTP
If all is well after the test, we can automate the check via crontab
Open crontab with
crontab -e
You may have a choice of editors. We recommend Nano
Inside the crontab add a single line under everything else in the file that looks like this
* * * * * /home/ultra/FTP.sh
Save it by pressing Ctrl+X then Y then Enter.
The script will now run every 1 minute, checking for files that have changed and syncing them to the destination folder
Troubleshooting Information
Can you help me with rclone?
Rclone is a powerful tool that allows you to create virtual drives or mount points. The following help in this section will assume that you have installed your rclone with the help of our documentation and guidelines.
While it is an excellent tool, it is not very reliable. It should never be used to write data directly to your cloud services with our applications. Use mergerfs for that purpose. It is also essential that those who utilize them will know how to troubleshoot them when needed.
Please do not mount to any of the default directories such as:
-
files -
downloads -
media -
bin -
.apps -
.config -
www -
/homexx/username/
This will lead to instabilities within your slot.
Please click here to go to our Rclone setup guide.
Due to these variables involved, official support for rclone or applications utilizing these applications will not be provided.
Job for rclone-vfs.service failed because the control process exited with error code. See "systemctl --user status rclone-vfs.service" and "journalctl --user -xe" for details.
This may be due to the following reasons:
- Check your service file for typos.
- Make sure all the paths referenced in the file exist.
- You need to create the following folders:
Stuff,Stuff/Mount,Stuff/Local(if using MergerFS Setup), andscripts. - We recommend using the default settings as it is specifically tuned to our slots.
- You need to create the following folders:
- What does
~/bin/rclone versionreturn in SSH?- If the output is
No such file/directory, this means you have not downloaded rclone.
- If the output is
- Execute
~/bin/rclone listremotes. Is the remote name the same as the one in the first configuration line? For example, it should return gdrive such as
ExecStart=/homexx/yyyyy/bin/rclone mount **gdrive**: /homexx/yyyyy/Stuff/Mount \
Following the advice above, you should find the issue, and when you have, do not forget to execute systemctl --user daemon-reload before trying to enable it again.
ls: cannot access 'SomeDirectory': Transport endpoint is not connected
This means the rclone process/mount is dead, but the mount is still fused. If you’re using systemd following our guide, please stop your mount using systemctl:
- Run the following command:
systemctl --user stop rclone-vfs
- If using mergerfs
systemctl --user stop mergerfs
- Then, execute the following command:
mount | grep $USER
- Disconnect the rclone mount with the following command:
fusermount -zu /path/to/SomeDirectory
- Finally, kill all remaining rclone processes by running the following command:
killall rclone
Now follow the process to restart your mount below.
How do I restart my rclone cloud or mergerfs mount?
Execute the following in your shell terminal (SSH)
- Stop all currently running applications that utilize the mount. This applies to Plex, Radarr, Sonarr, etc. (can be done in UCP or ssh using
app-[name] stop). - SSH into your slot.
- Run
systemctl --user stop rclone-vfsandsystemctl --user stop mergerfsif using mergerfs - Run
fusermount -uq /path/to/mountandfusermount -uq /path/to/mergerfsif using mergerfs - Run
systemctl --user start rclone-vfsandsystemctl --user start mergerfsif running mergerfs - Verify that the mount is working by going into your mount folder and running
ls -lato verify we are connected. If using mergerfs, check the mergerfs folder too. - Start all applications from the UCP or ssh using
app-[name] start. (replace [name] with app name, app-plex start.)
I use rclone or a cloud mount, and my xx application is not working or is slow. Why is that?
As stated, you should not use rclone or cloud mount directly with applications that will attempt to write directly to it. It would be best if you used MergerFS for that. Please check our resource for MergerFS here.
My mount is failing. Why?
There may be many things that can cause rclone/mounting to not work correctly, something as simple as a mistype; if you find yourself stuck, it is possible to add debug logging to your rclone systemd file. The steps to do so will be listed below:
- First kill the mount if mounted
systemctl --user stop rclone-vfs
- If using mergerfs
systemctl --user stop mergerfs
- Then, execute the following command:
mount | grep $USER
- Disconnect the rclone mount with the following command:
fusermount -zu /path/to/SomeDirectory
- Finally, fill all remaining rclone processes by running the following command:
killall rclone
- Add debug flag to mounting systemd file
Example
[Unit]
Description=RClone VFS Service
Wants=network-online.target
After=network-online.target

[Service]
Type=notify
KillMode=none
Environment=GOMAXPROCS=2

ExecStart=%h/bin/rclone mount remote: %h/Mount \
  --config %h/.config/rclone/rclone.conf \
  --use-mmap \
  --dir-cache-time 1000h \
  --poll-interval=15s \
  --vfs-cache-mode writes \
  --log-level DEBUG --log-file "%h/scripts/rclone-debug.log" \
  --tpslimit 10

StandardOutput=file:%h/scripts/rclone_vfs_mount.log
ExecStop=/bin/fusermount -uz %h/Mount
Restart=on-failure

[Install]
WantedBy=default.target
This edit will work for each rclone systemd file, please be sure to edit your log output path accordingly to match your home and user paths.
- Reload Systemd file with the new flag
systemctl --user daemon-reload
systemctl --user start rclone-vfs
systemctl --user start mergerfs if running mergerfs
- Reading the debug logs
watch tail -n 15 ~/scripts/rclone-debug.log
This will show you the output of the log and refresh its output every 15 seconds. You can change the -n 15 value if you wish to make it more frequent.