Mobile Apps
Mobile Apps
This section shows you the different apps that you can use to manage your Ultra.cc slot.
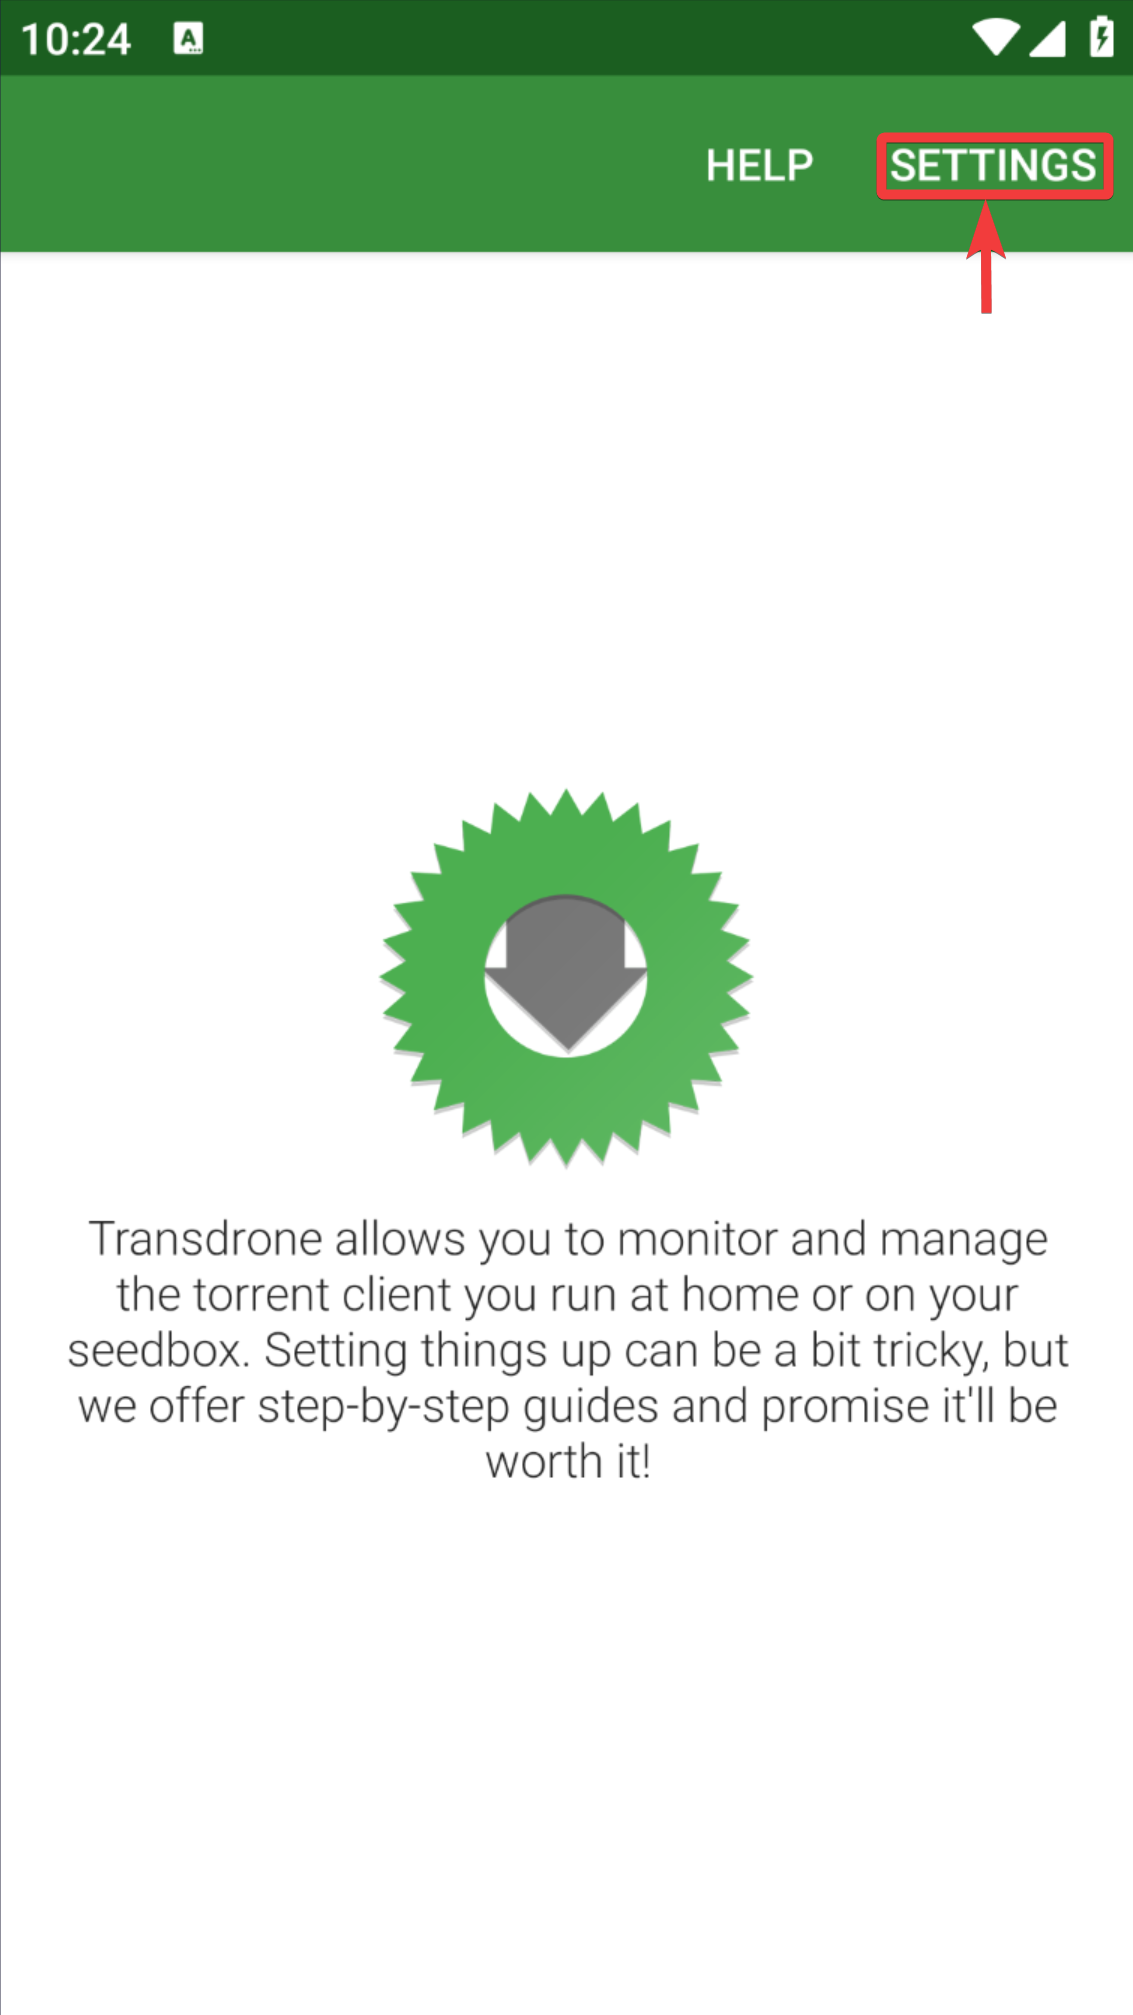
Transdrone
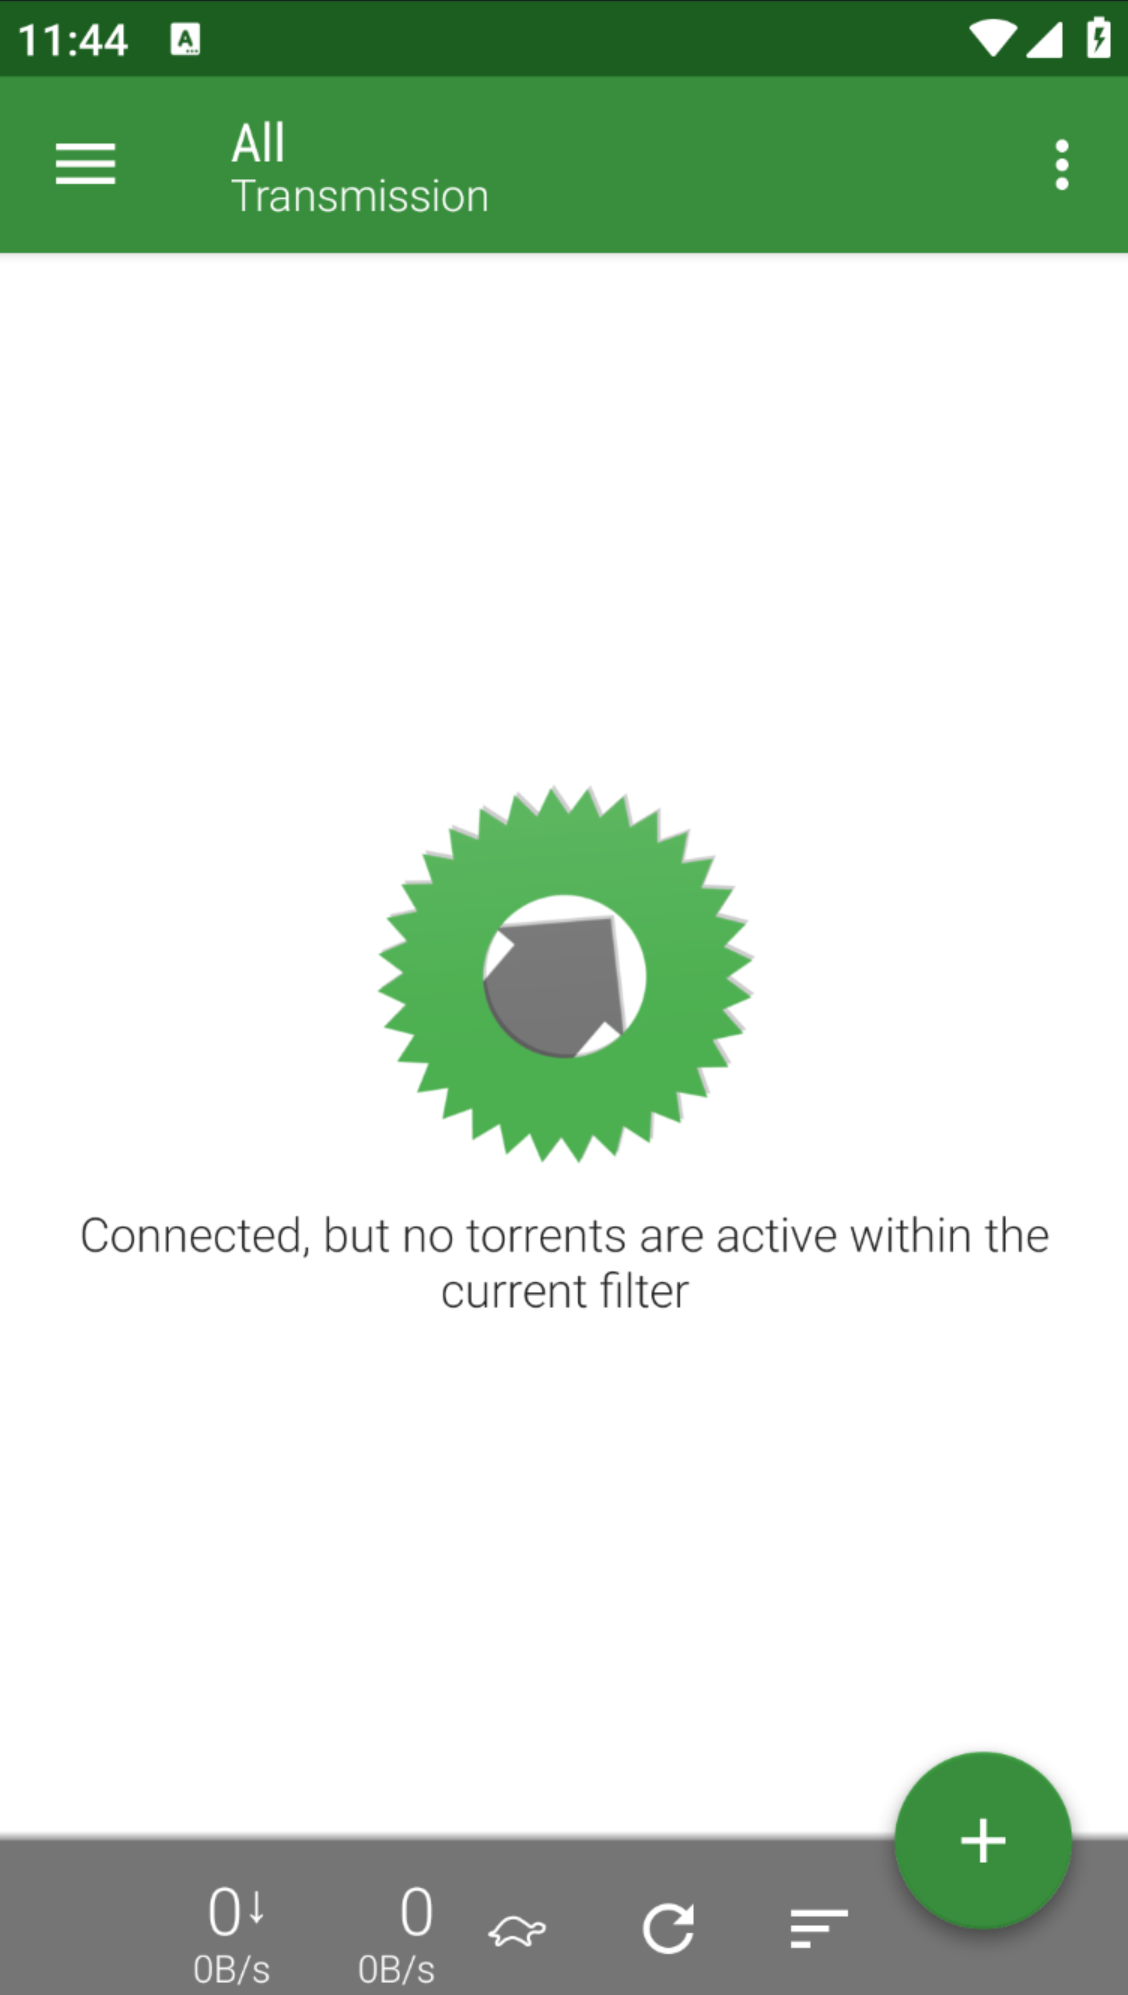
Manage your torrents from your Android device with Transdrone. All popular clients are supported: µTorrent, Transmission, rTorrent, Vuze, Deluge, BitTorrent 6, qBittorrent, and many more. You can view and manage running torrents and individual files. Adding is accessible via the integrated search or RSS feeds (full version required). Monitor progress using the home screen widget or background alarm service.
You can download Trandrone from their links:
- Google Play Store: https://play.google.com/store/apps/details?id=org.transdroid.lite&hl=en&gl=US
- F-Droid: https://f-droid.org/en/packages/org.transdroid.lite/
Connecting to your Ultra.cc server
Deluge
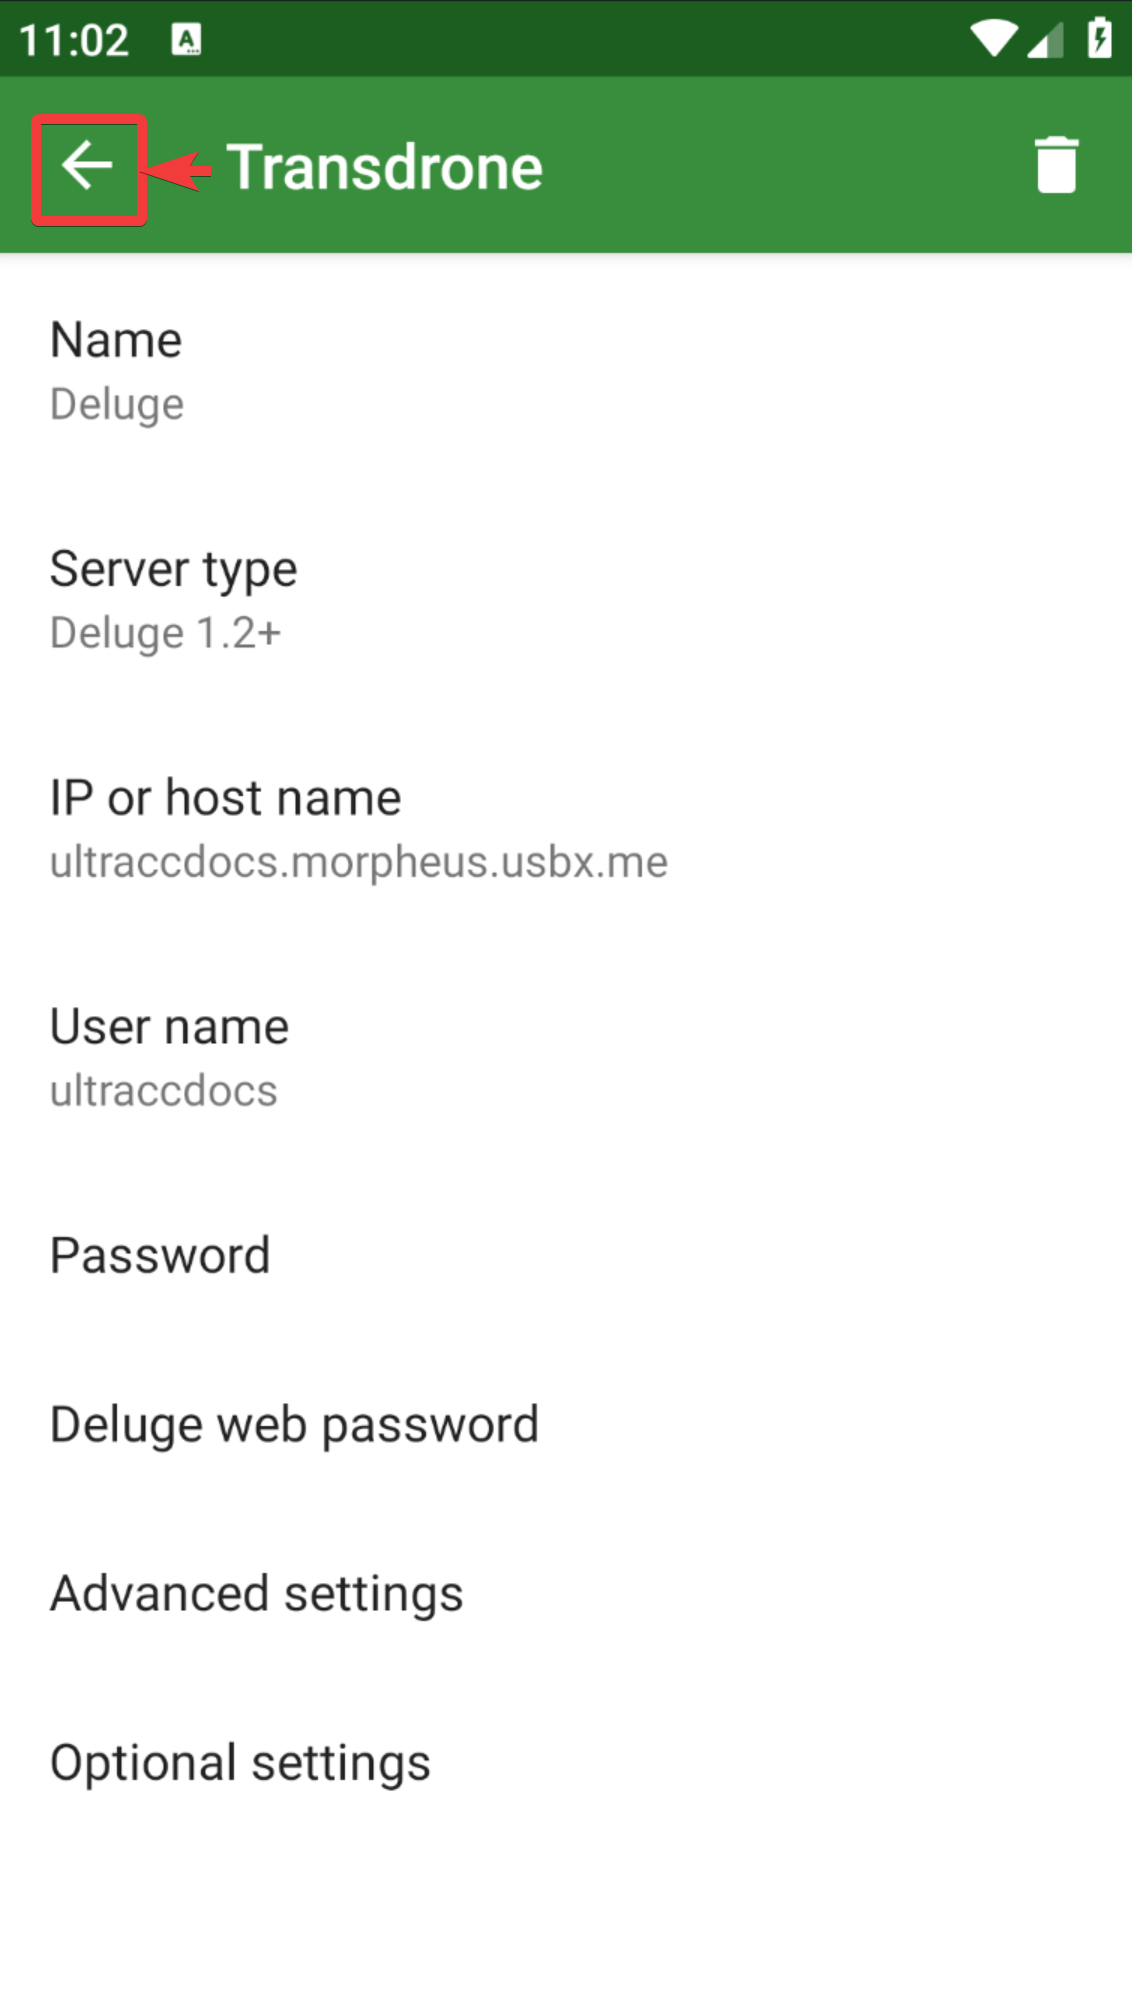
Name: This is just for your reference and can be any name you wish
Server Type: Here is where you choose which client you wish to interface with. For this section, we will be using Deluge 1.2+
IP or hostname: Here, you need to add your Ultra.cc URL, which can be found in the first half of your web UI URL
The format looks like this username.servername.usbx.me
Username: Deluge username, which can be found in the application tab of your control panel under show info for Deluge
Password: Deluge password, which can be found in the application tab of your control panel under show info for Deluge under Username (you may need to click the eyeball icon to reveal it)
Advance Settings: Advanced Settings only contains a few settings you need to address:
- Port number: 443
- Folder: /deluge
- Use SSL: Checked
- Accept all SSL certificates: Checked
Optional Settings: Most of these options are non-applicable; however, you may want to check notifications when a new torrent is added and torrent finished notifications depending on your preference
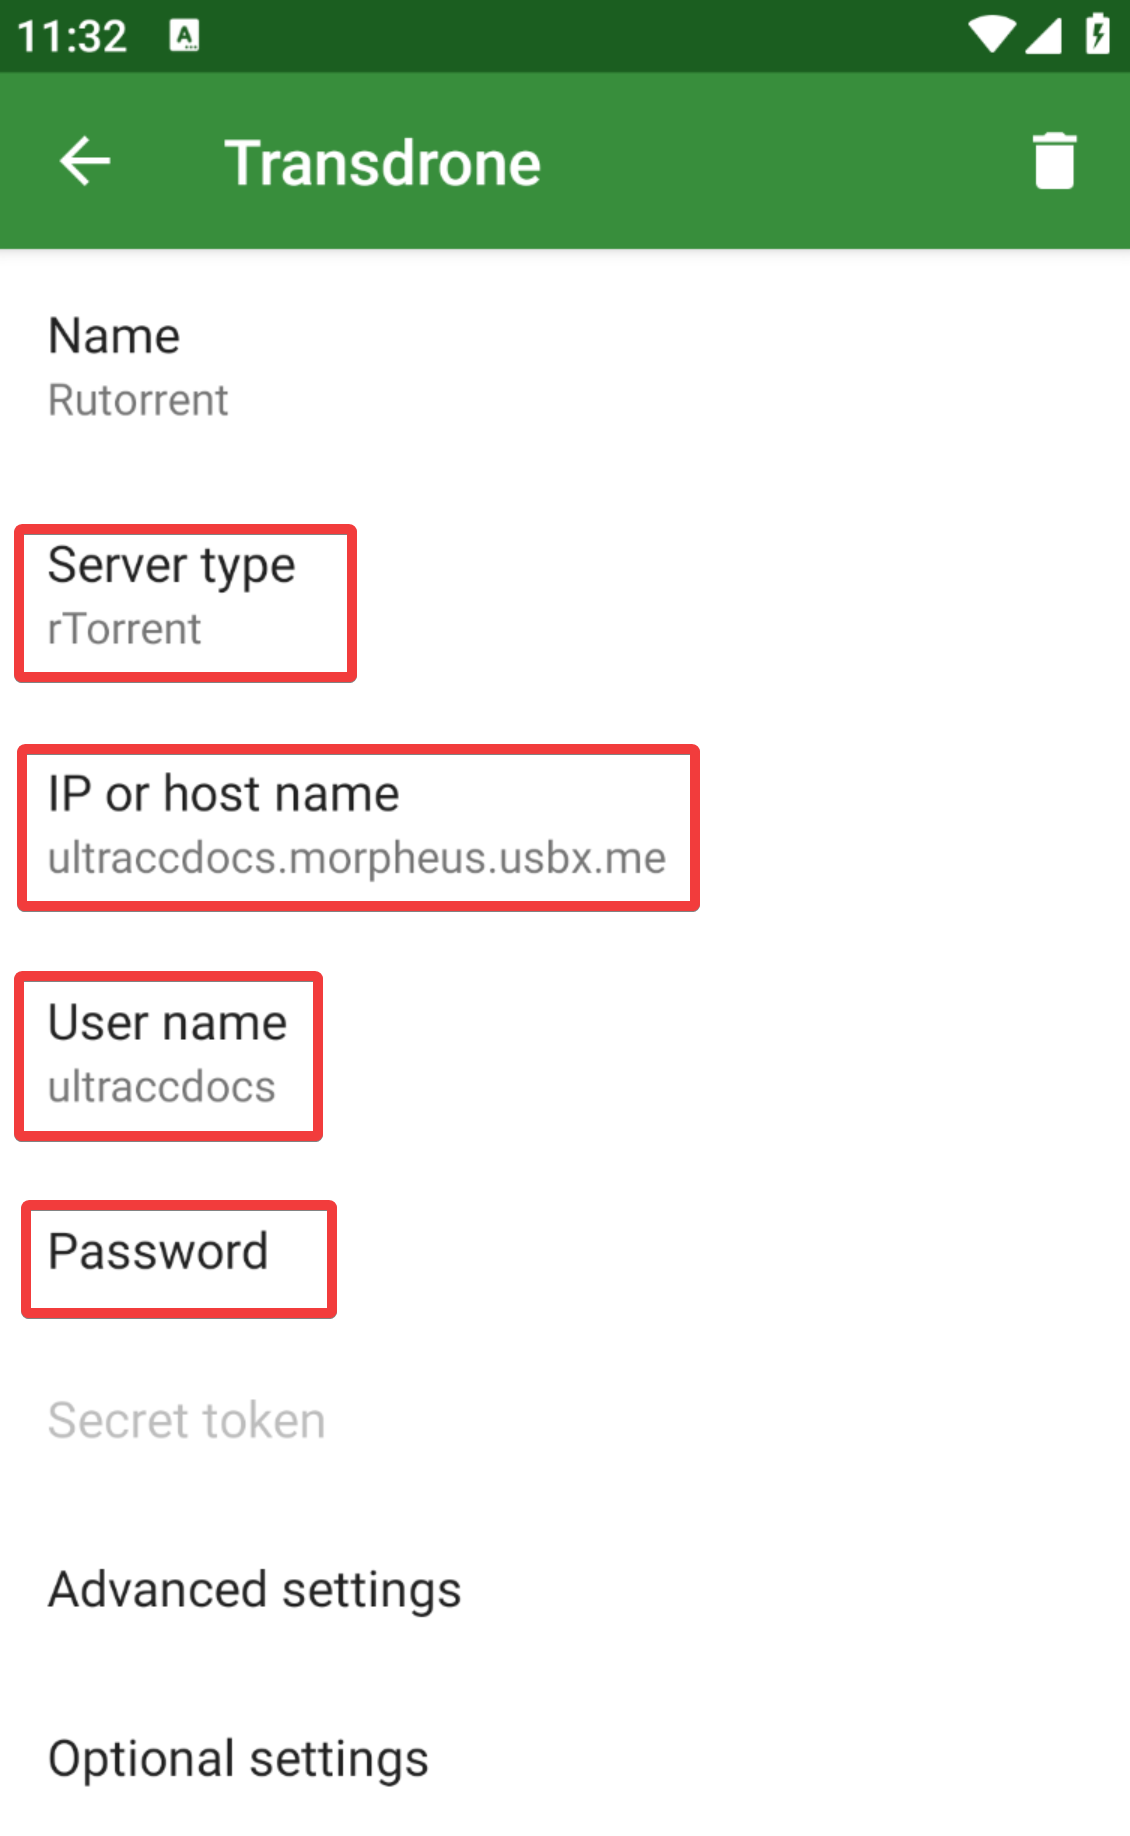
ruTorrent
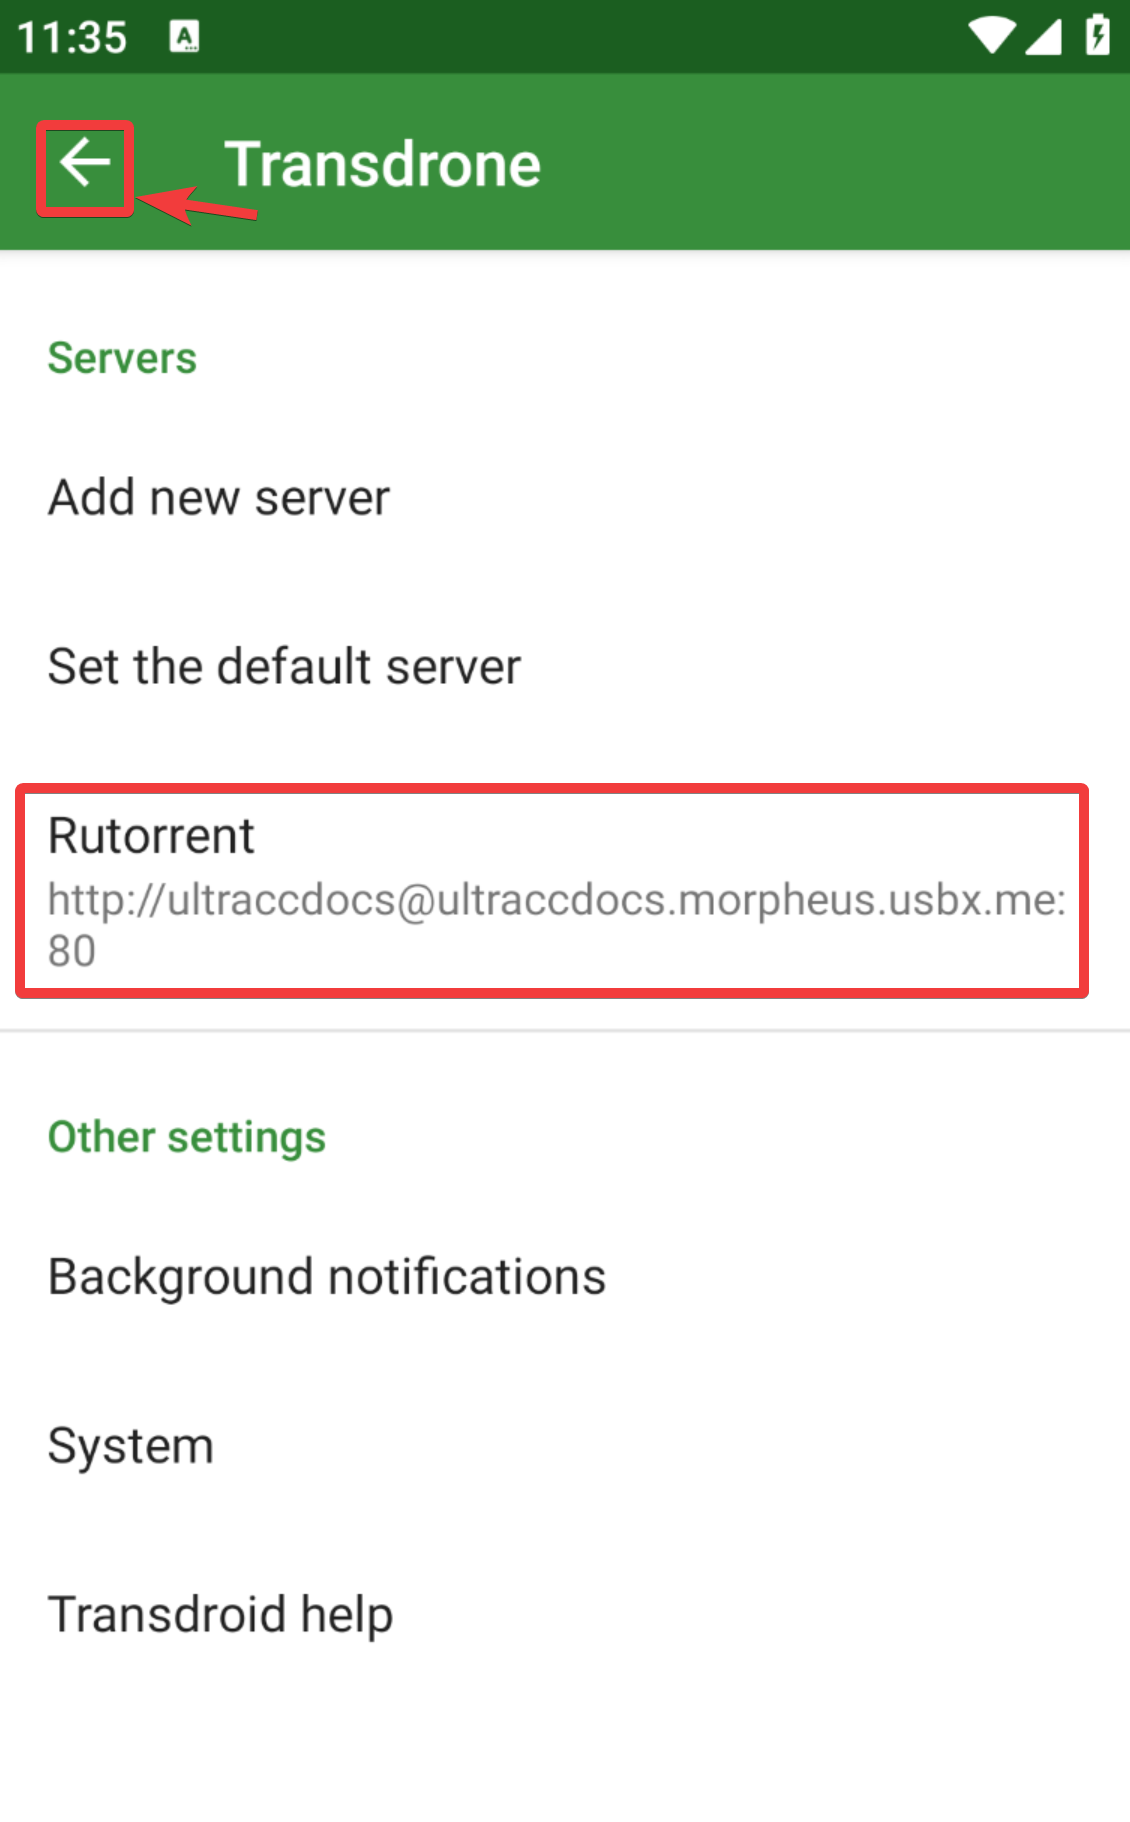
Upon opening Transdrone, you will need to click the three dots on the top right-hand side of your screen and press settings, then add a server. Then a pop-up will appear, to select "add normal, custom server."
Name: This is just for your reference and can be any name you wish
Server Type: Here is where you choose which client you wish to interface with. For this section, we will be using rtorrent
IP or hostname: Here, you need to add your hostname, which can be found in the Ultra.cc Control panel under rutorrent and will include your Username like below it may consist of https:// this must be removed when adding to transdrone.
username.servername.usbx.me
Username: Rutorrent username, which can be found in the application tab of your control panel under show info for rutorrent
Password: Rutorrent password, which can be found in the application tab of your control panel under show info for Rutorrent under Username (you may need to click the eyeball icon to reveal it)
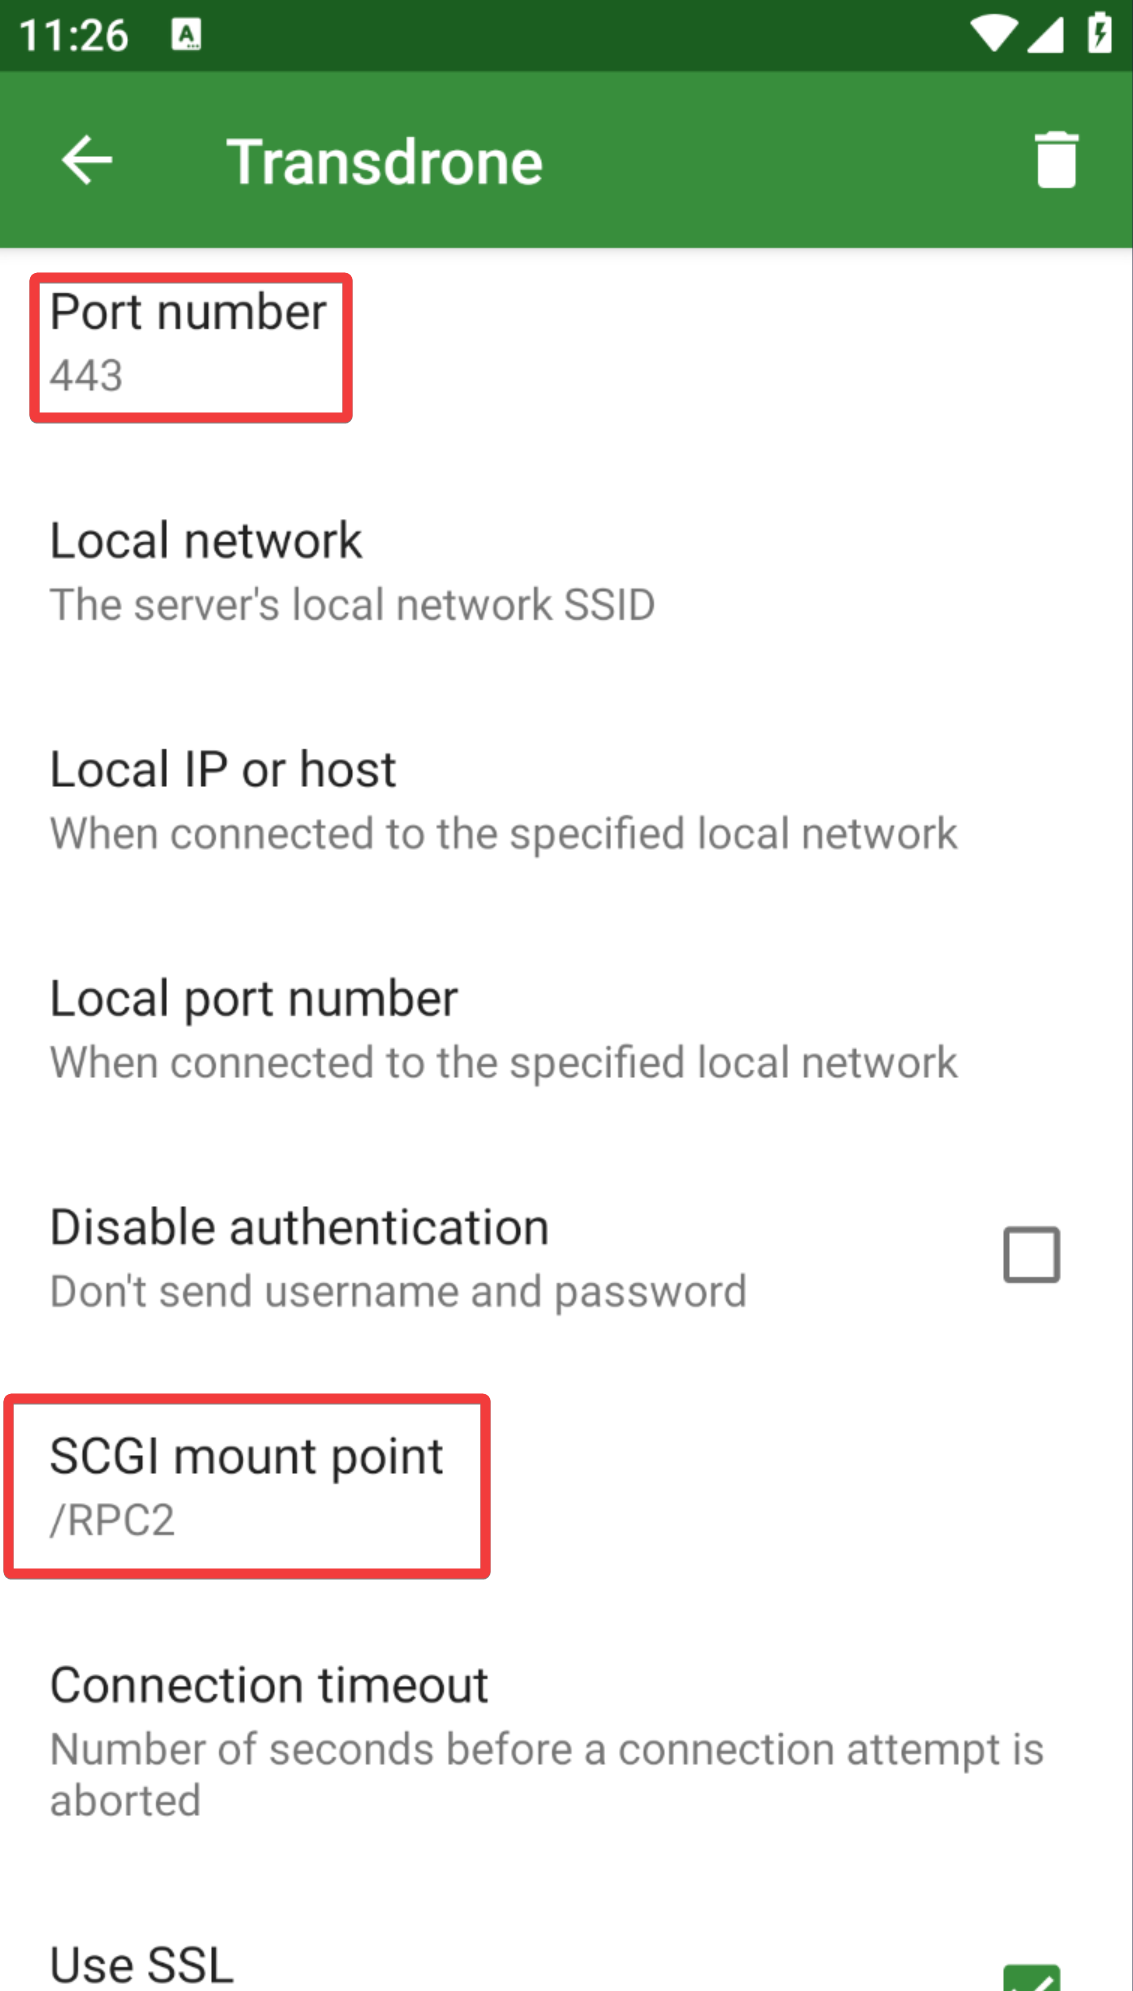
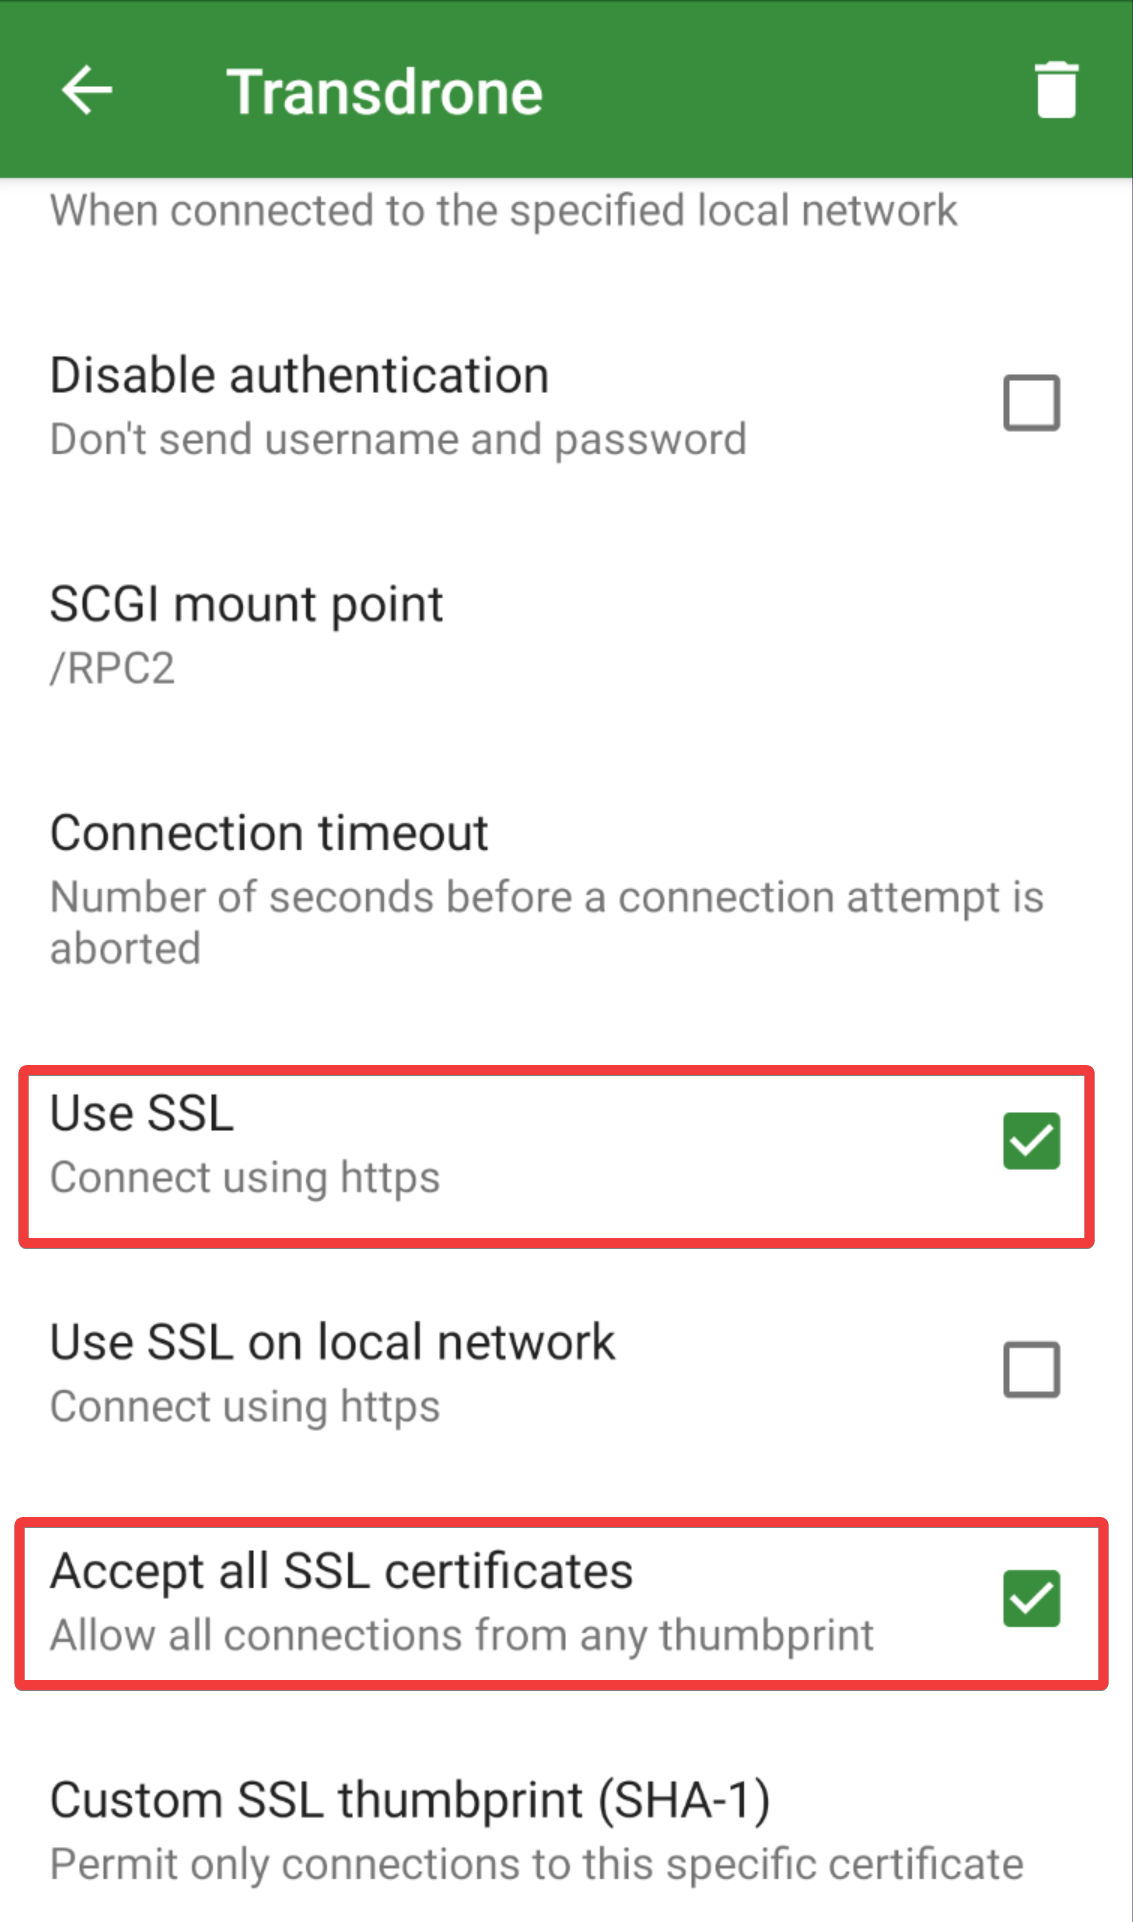
Advance Settings: Advance Settings contains four settings you need to address
- Port: 443
- SCGI mount point: /RPC2
- Use SSL: Ticked
- Accept all SSL certificates: Ticked
Optional Settings: Most of these options are non-applicable; however, you may want to check notifications when a new torrent is added and torrent finished notifications depending on your preference
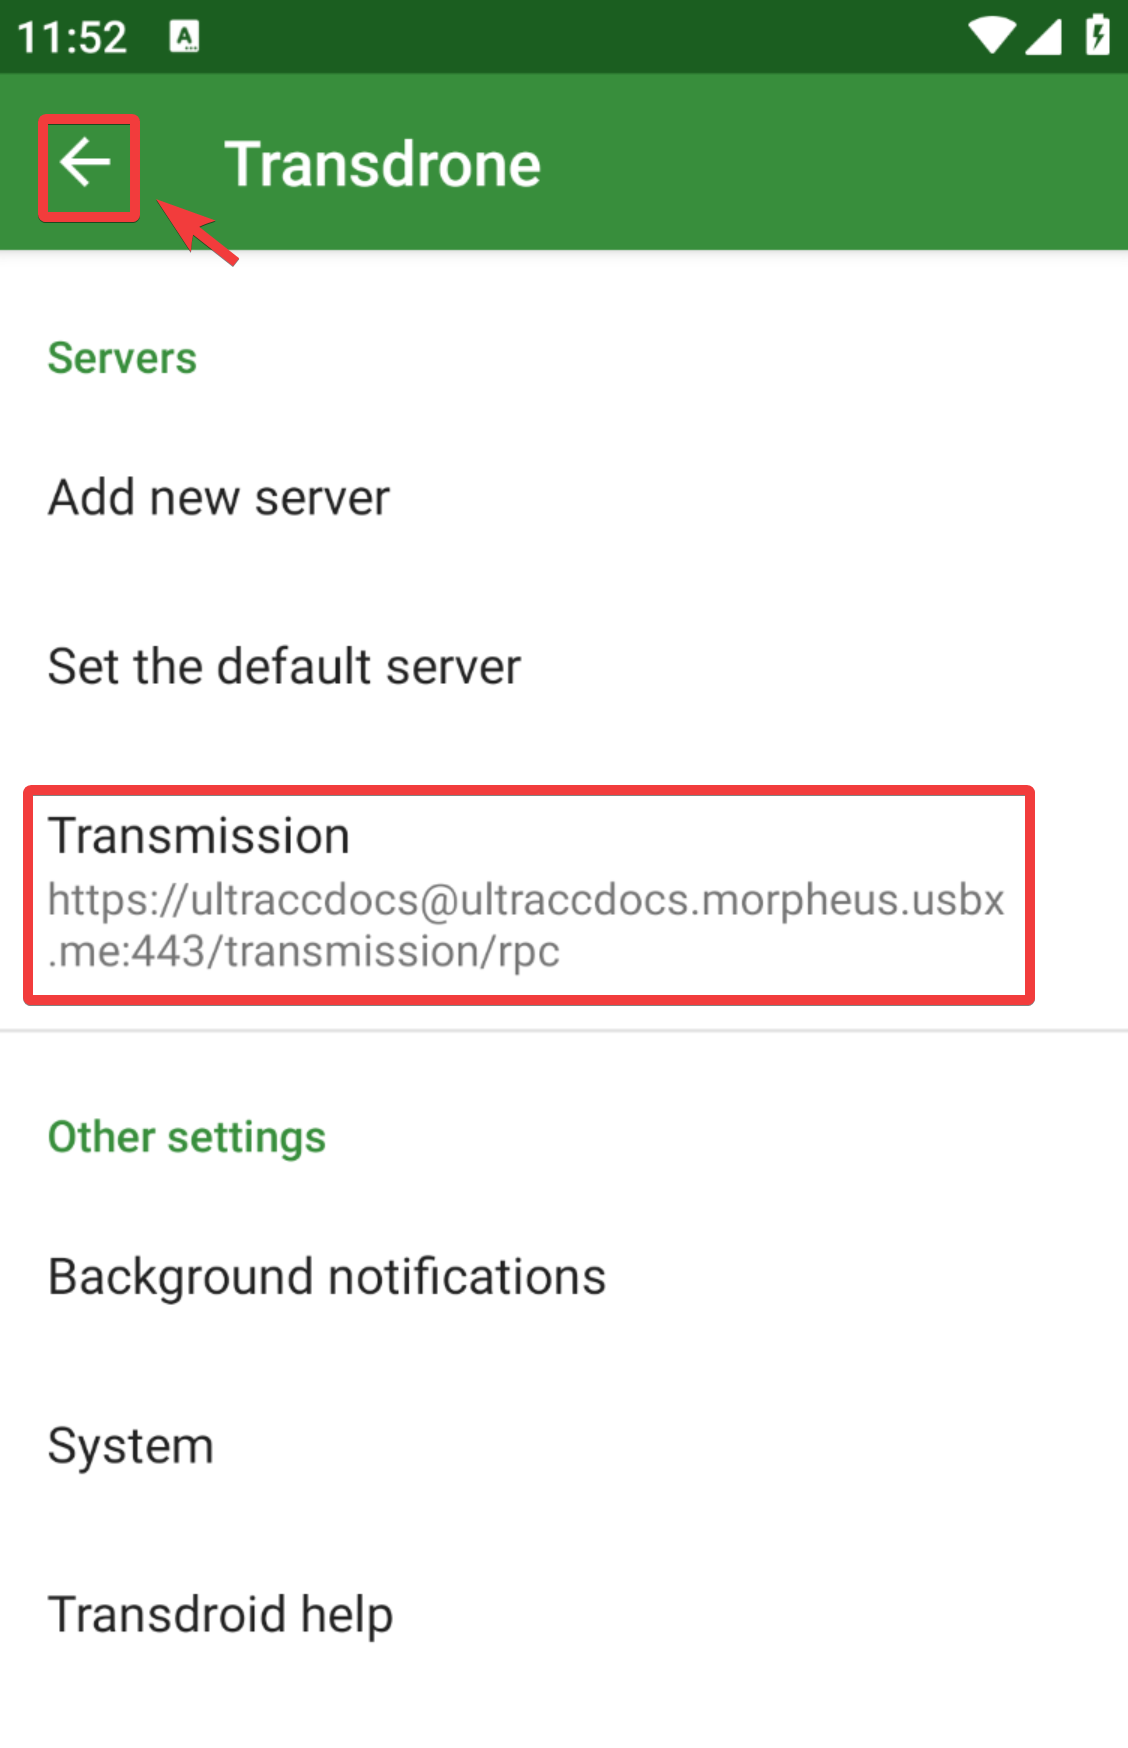
Transmission
Upon opening Transdrone, you will need to click the three dots on your screen's top right-hand side and press settings, and then add server. Then a pop-up will appear select "add normal, custom server."
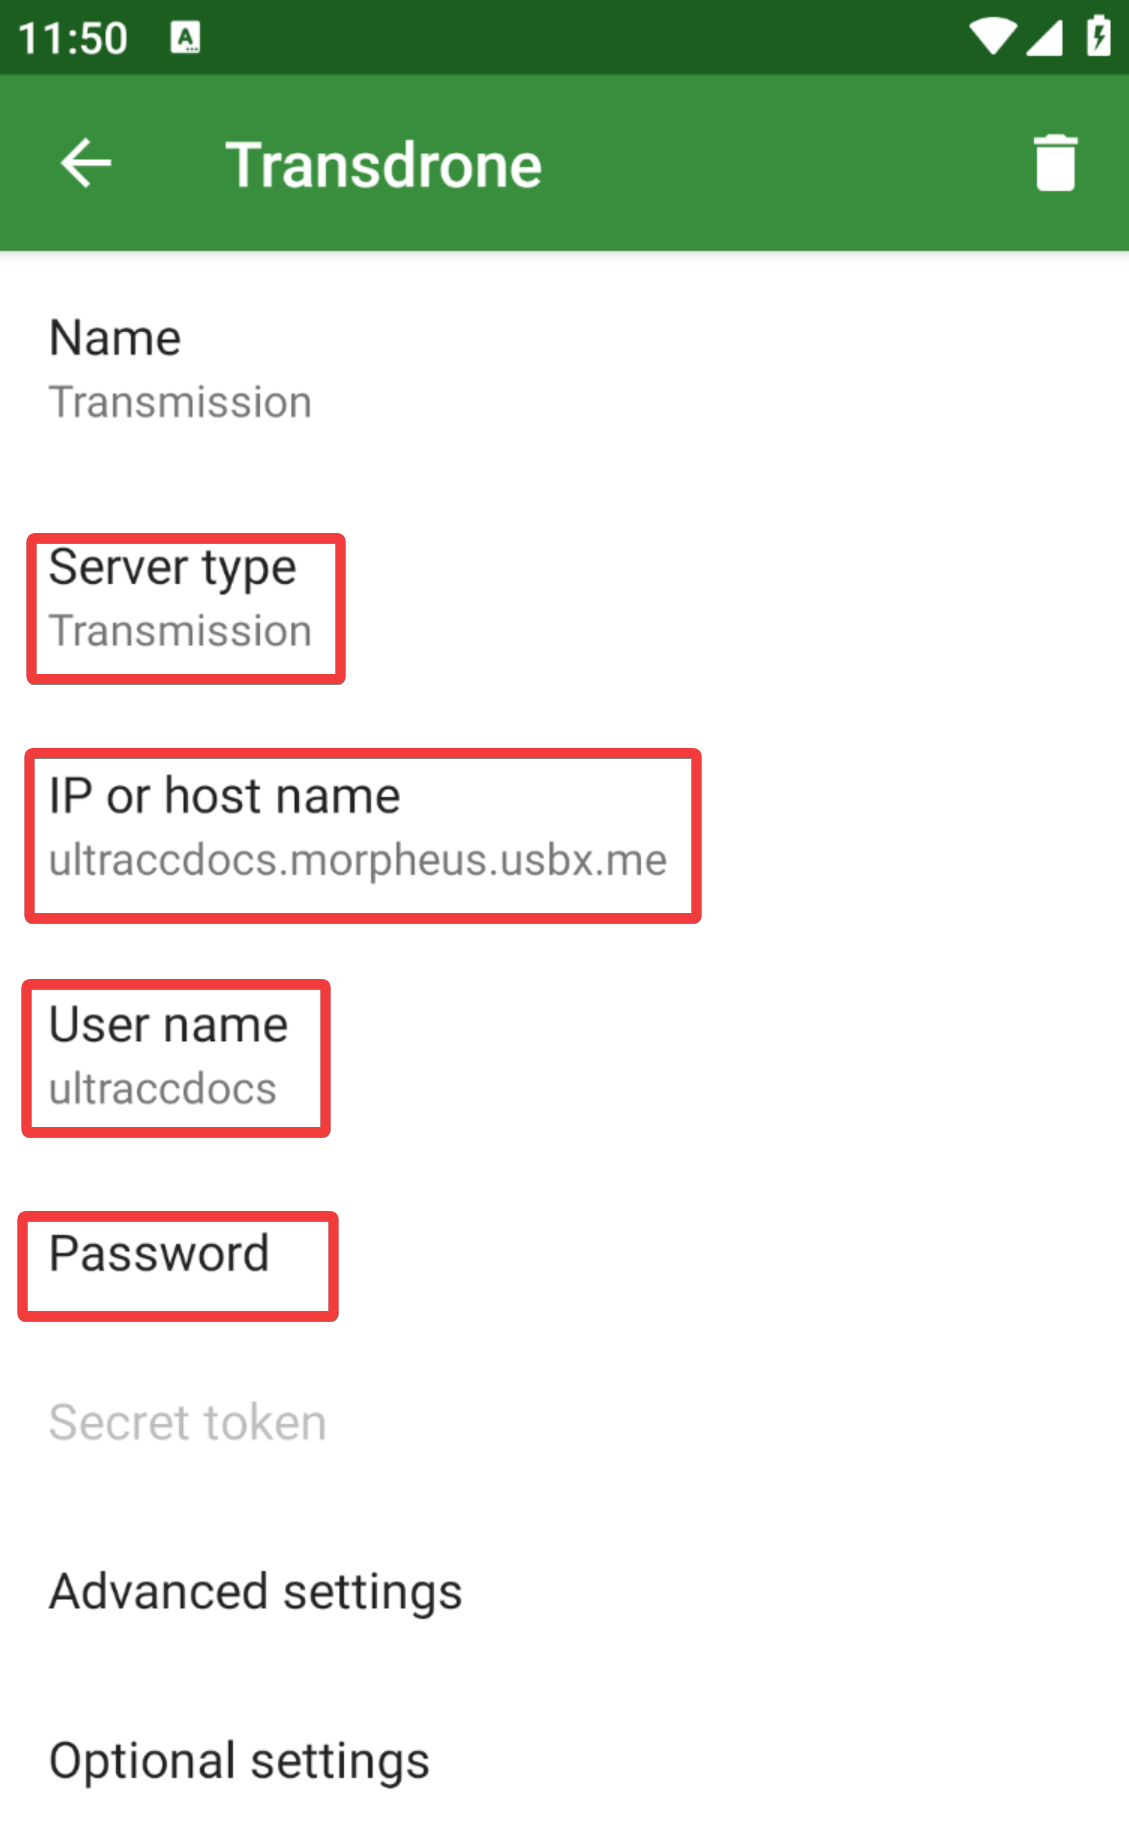
Name: This is just for your reference and can be any name you wish
Server Type: Here is where you choose which client you wish to interface with. For this section, we will be using Transmission.
IP or hostname: Here, you need to add your hostname, which can be found in the Ultra.cc Control panel under Transmission and will include your Username like below it may consist of https:// this must be removed when adding to Transdrone.
username.servername.usbx.me
Username: Transmission username, which can be found in the application tab of your control panel under show info for Transmission
Password: Transmission password, which can be found in the application tab of your control panel under show info for Transmission under Username (you may need to click the eyeball icon to reveal it)
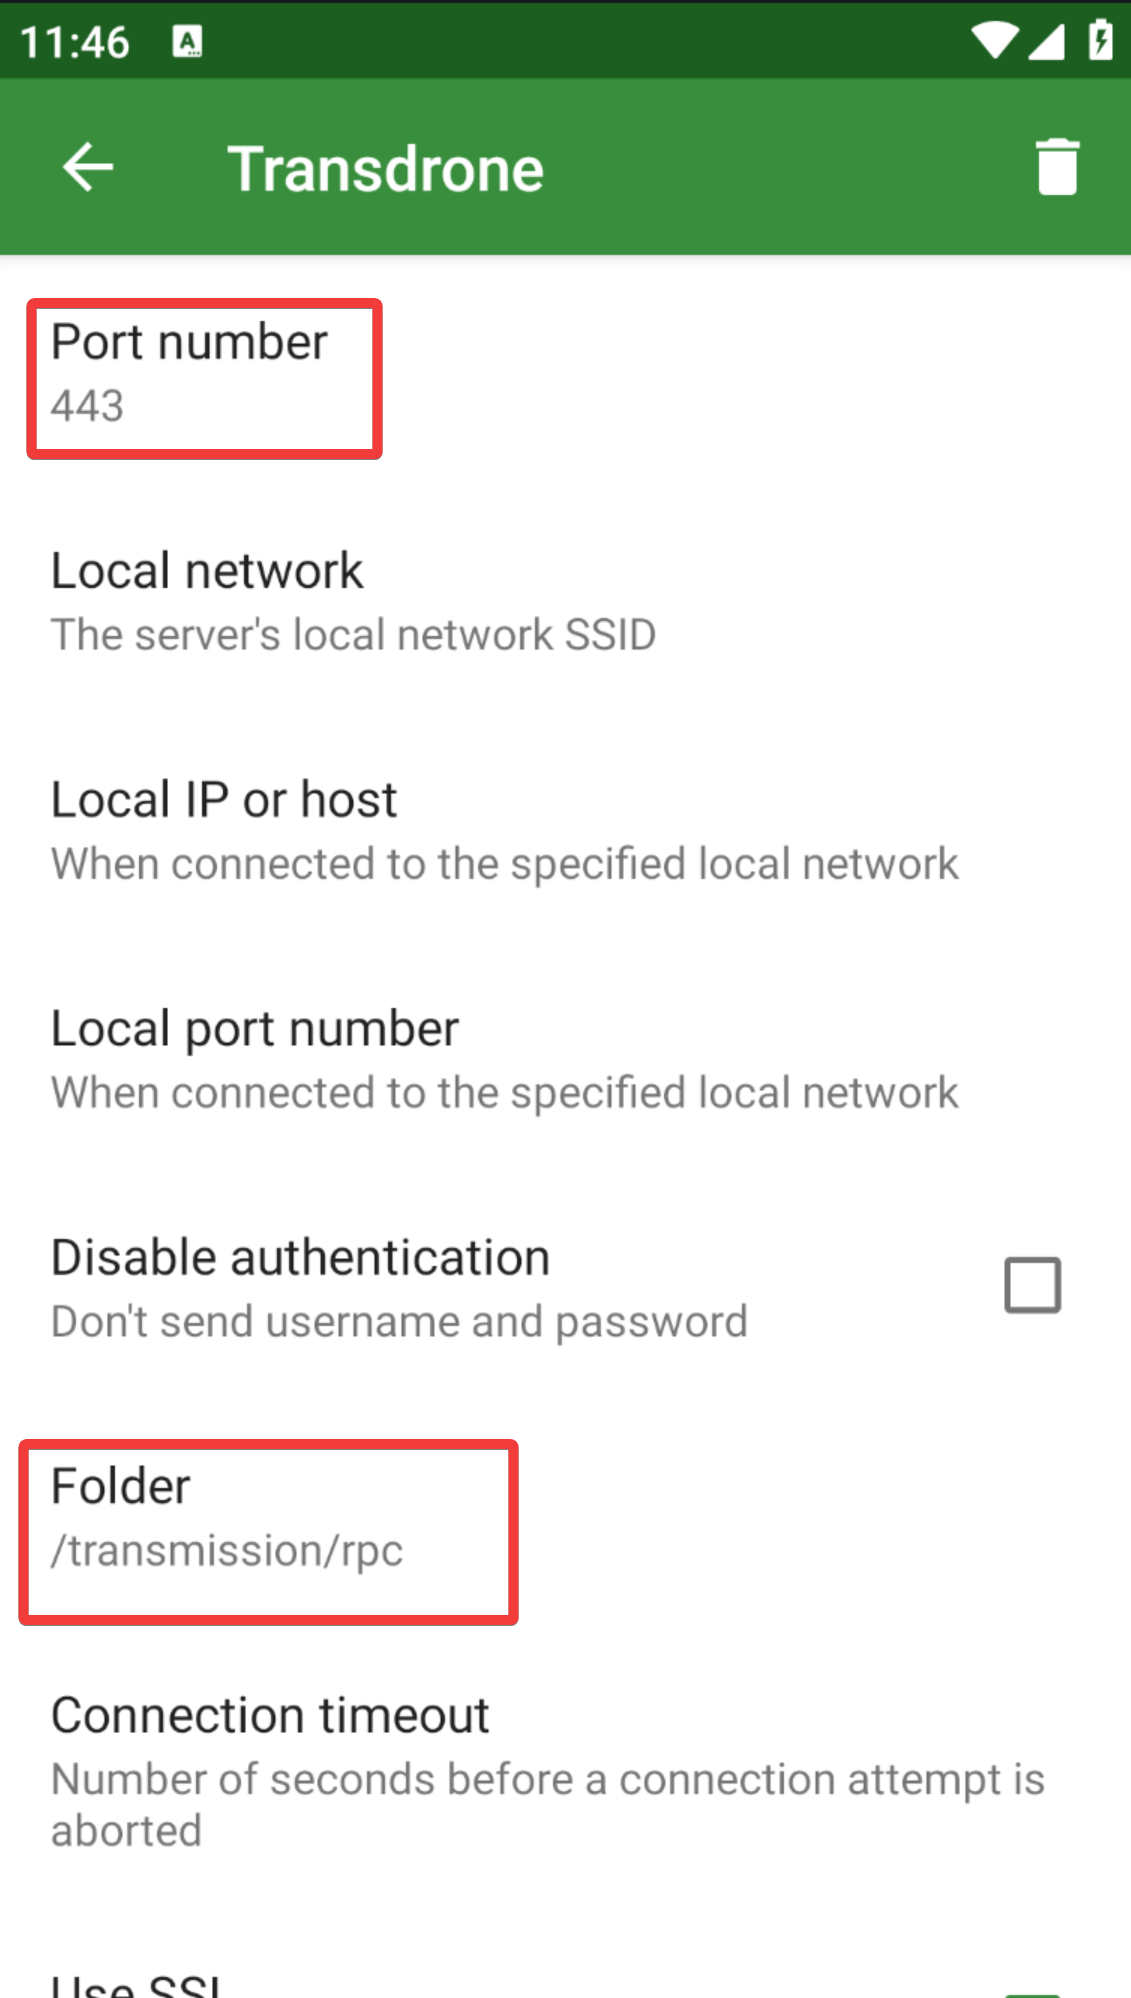
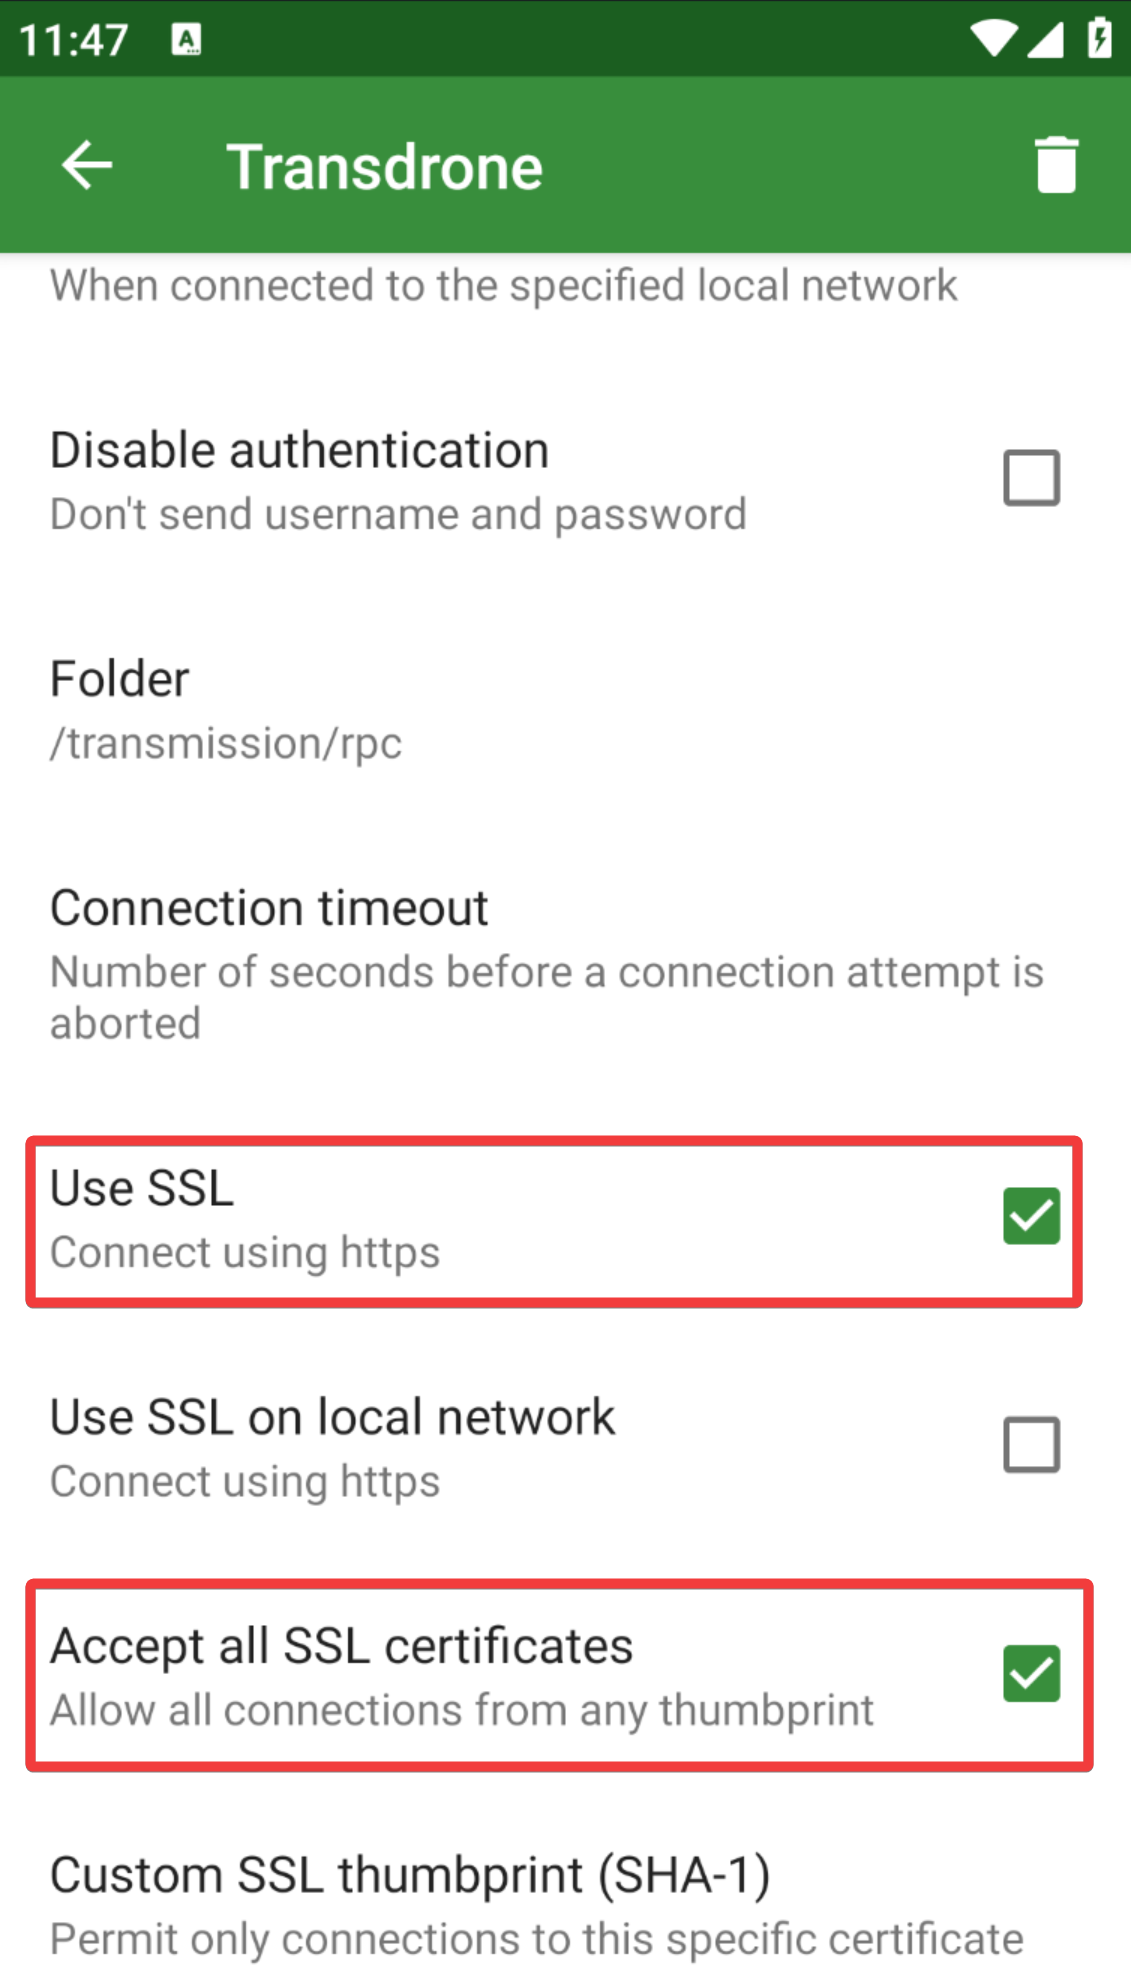
Advanced Settings: Advanced Settings only contains a few settings you need to address:
- Port number: 443
- Folder: /transmission/rpc
- Use SSL: Checked
- Accept all SSL certificates: Checked
Optional Settings: Most of these options are non-applicable; however, you may want to check notifications when a new torrent is added and torrent finished notifications depending on your preference
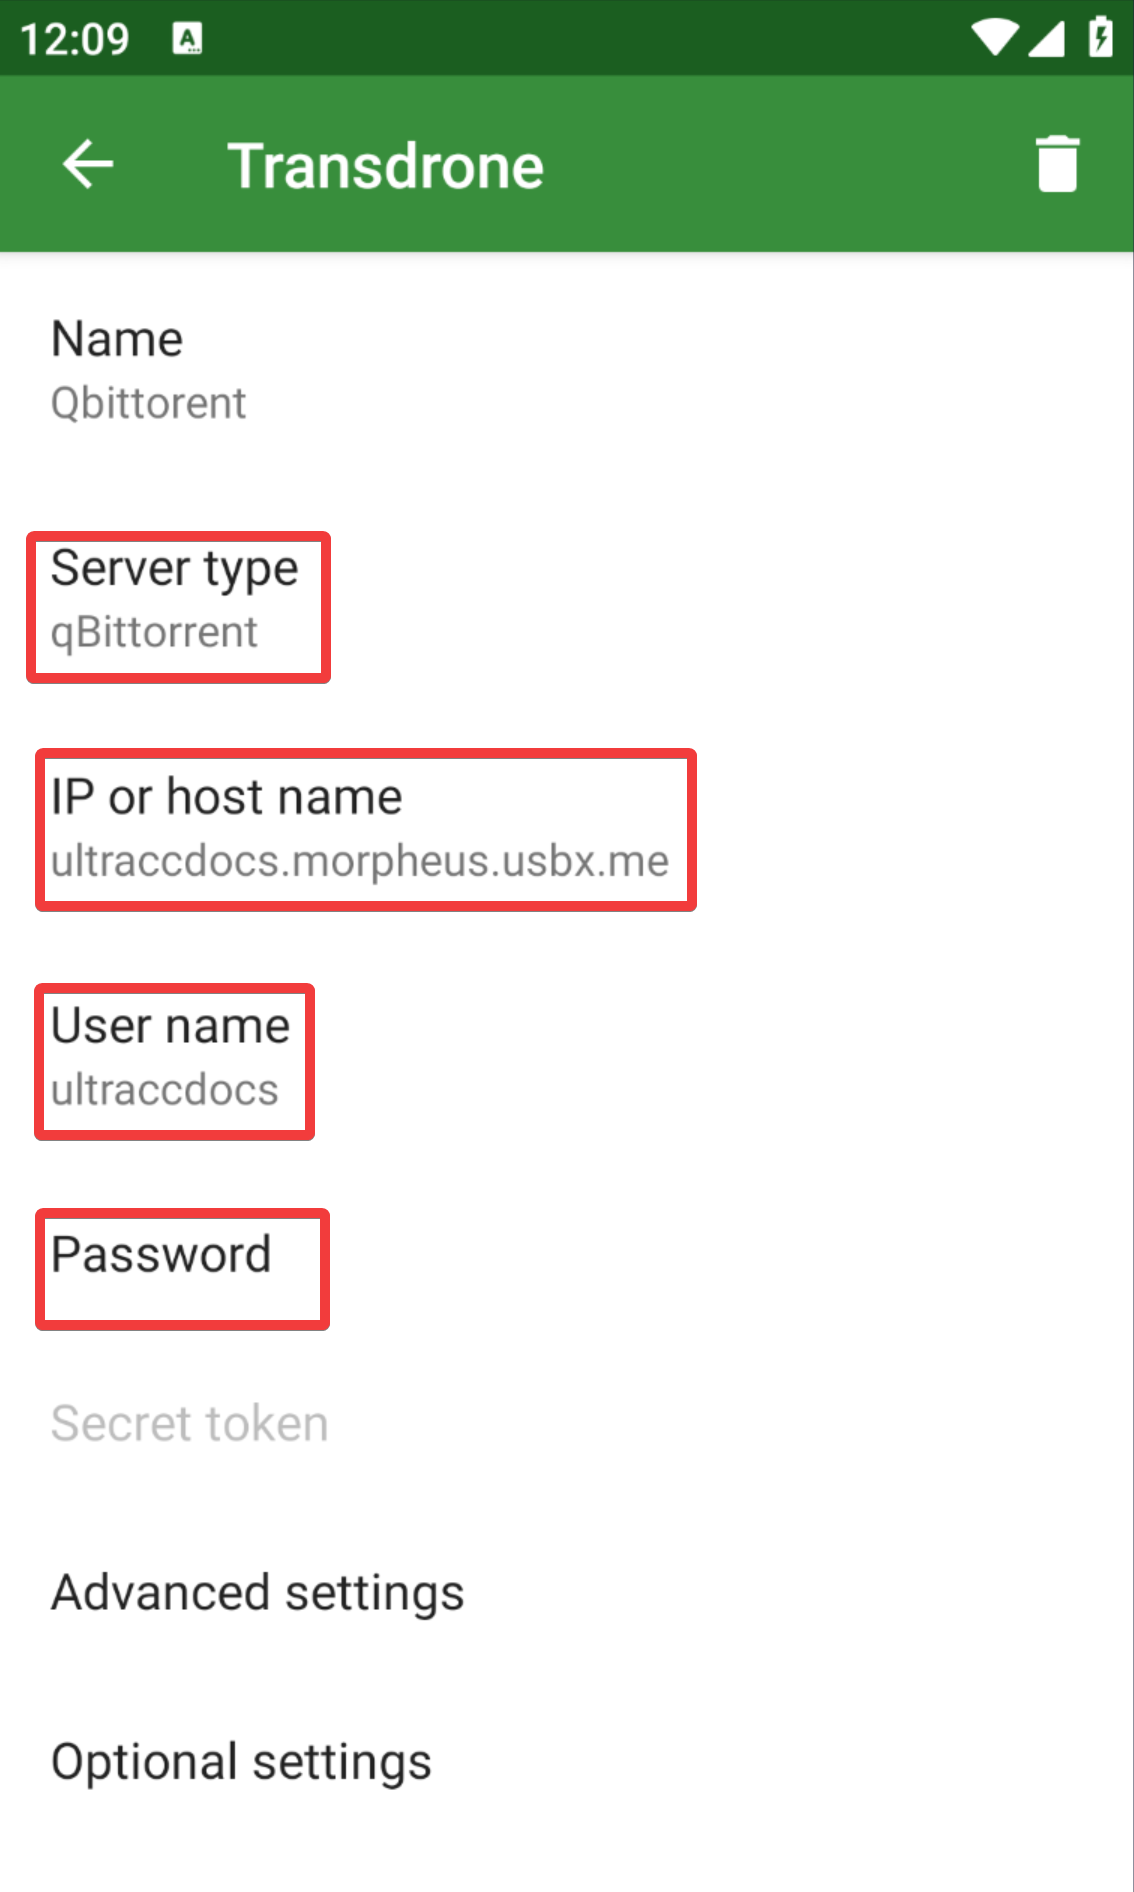
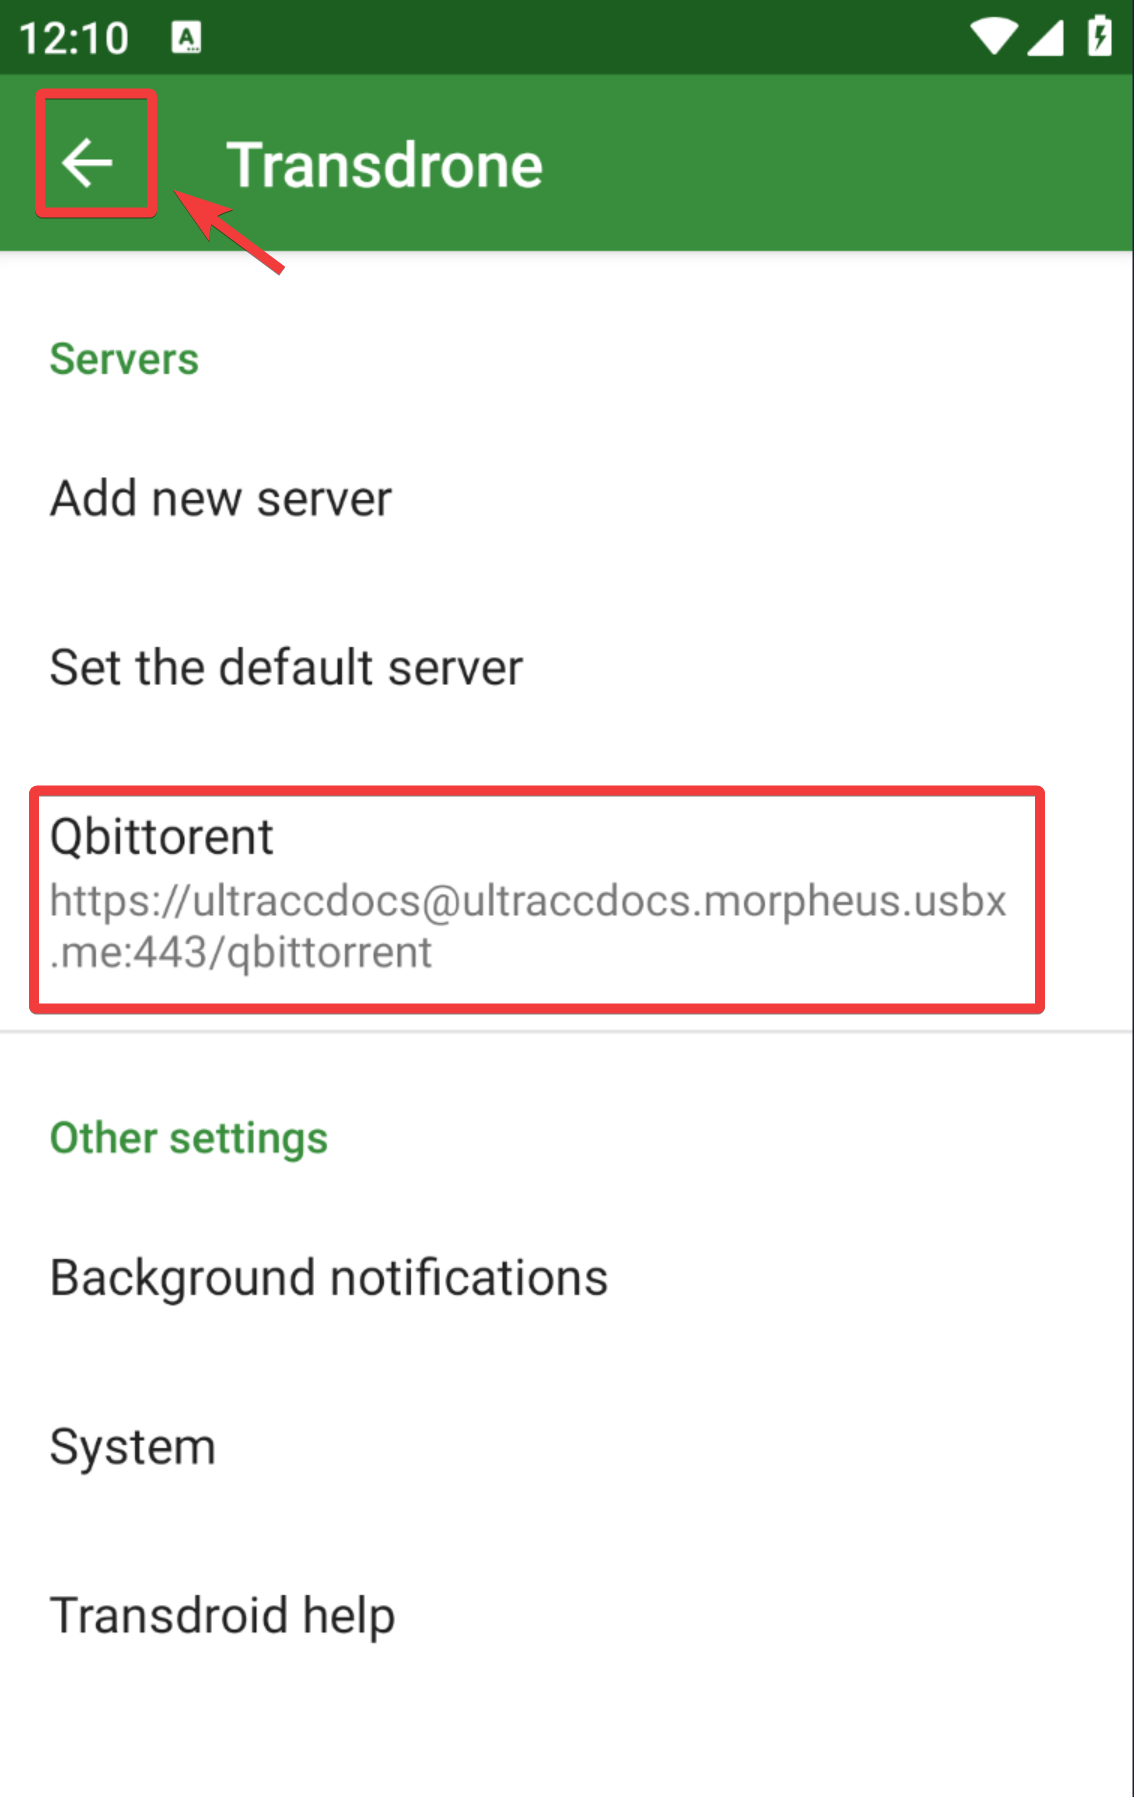
Qbittorrent
Name: This is just for your reference and can be any name you wish
Server Type: Here is where you choose which client you wish to interface with. For this section, we will be using Qbittorrent
IP or hostname: Here, you need to add your Ultra.cc URL, which can be found in the first half of your web UI URL
The format looks like this username.servername.usbx.me
Username: Qbittorrent username, which can be found in the application tab of your control panel under show info for Qbittorrent
Password: Qbittorrent password, which can be found in the application tab of your control panel under show info for Qbittorrent under Username (you may need to click the eyeball icon to reveal it)
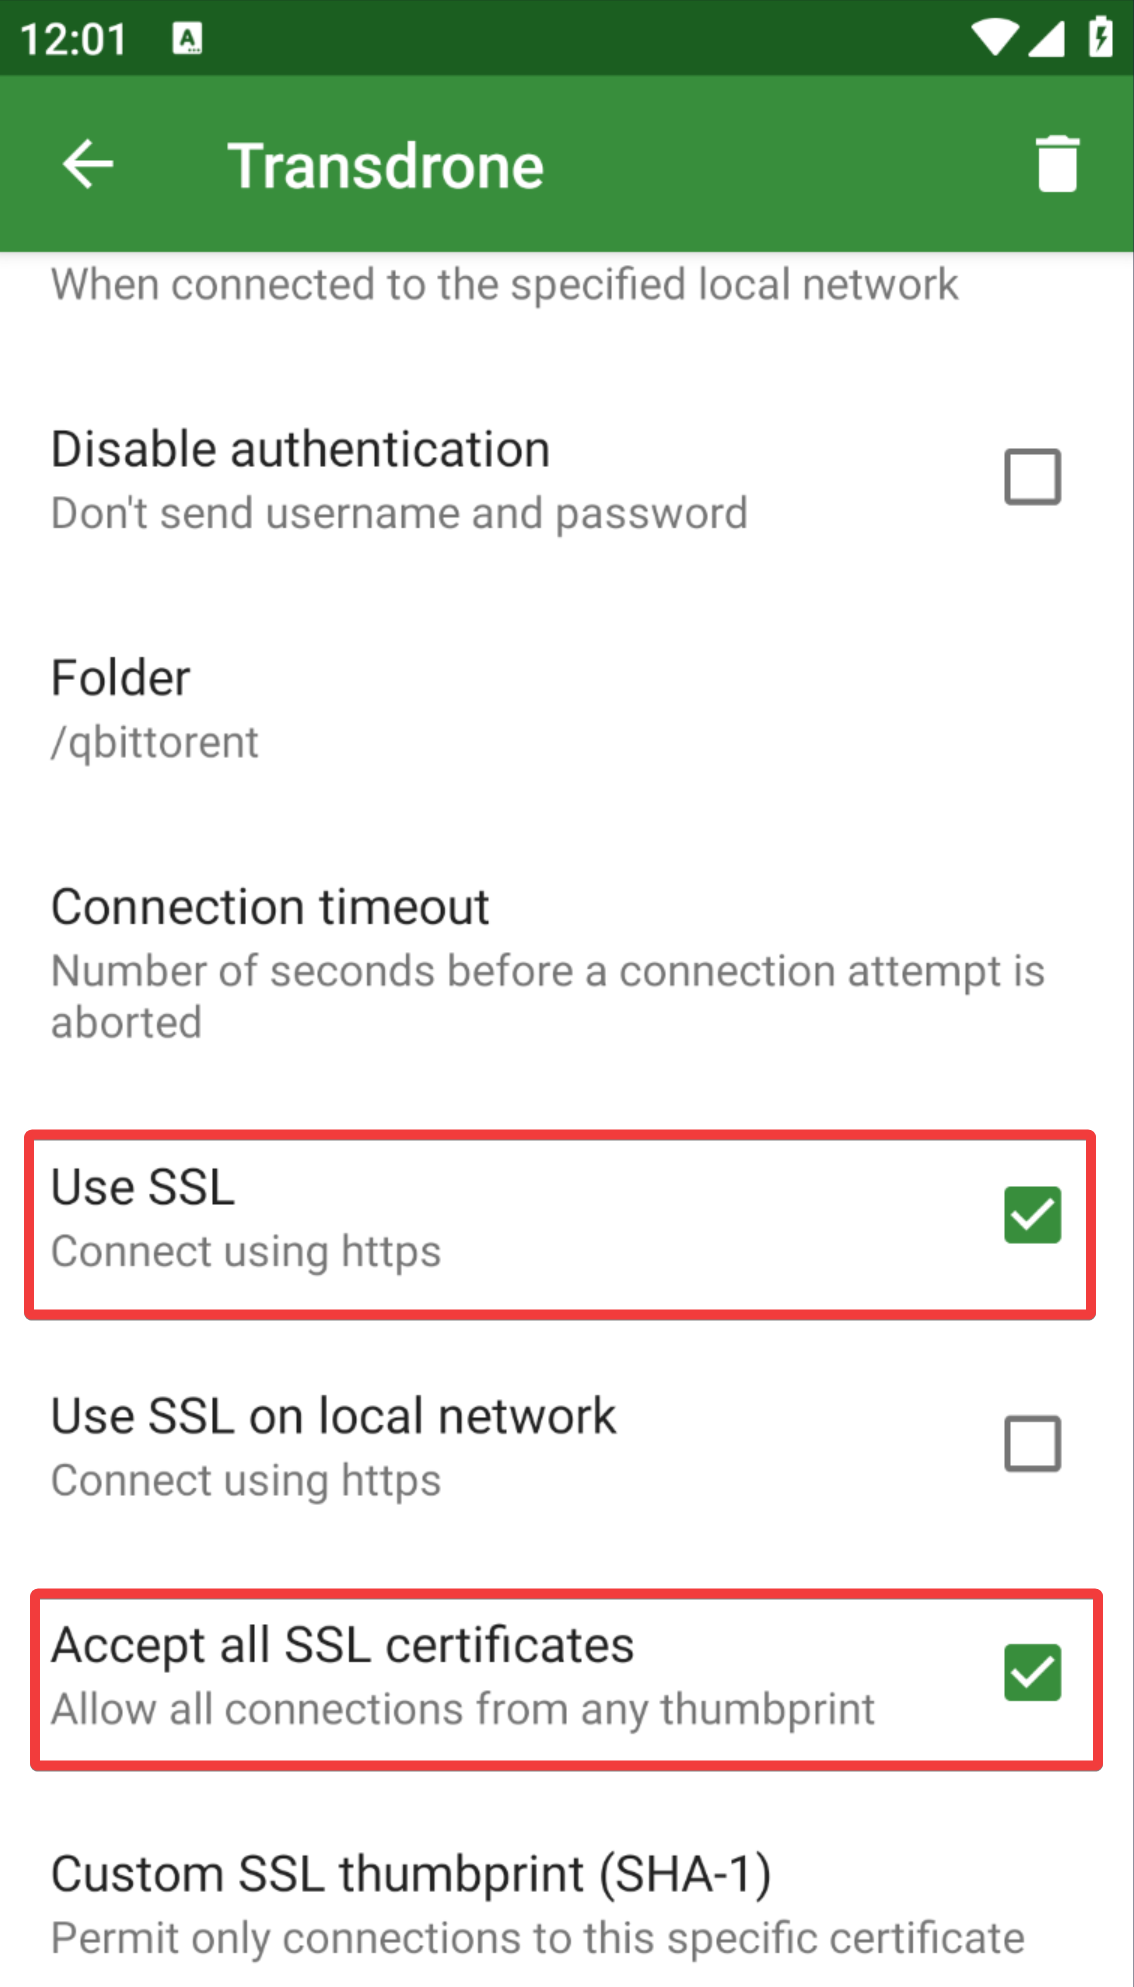
Advance Settings: Advanced Settings only contains a few settings you need to address:
- Port number: 443
- Folder: /qbittorrent
- Use SSL: Checked
- Accept all SSL certificates: Checked
Optional Settings: Most of these options are non-applicable; however, you may want to check notifications when a new torrent is added and torrent finished notifications depending on your preference
NZB360
nzb360 is a full-featured NZB manager that focuses on providing the best experience possible for controlling all of your Usenet, media, and automation needs. It is available only on Android and is free to try; however, most useful features are inaccessible until purchased.
You can visit their site here: https://nzb360.com/.
In this guide, we’ll be setting up NZB360 to manage your apps in your Ultra.cc service easily.
After the installation of NZB360, you will be welcomed to the app. Your first step is to access settings, which can be found by tapping the three horizontal lines in the top left-hand corner of the screen,
Each application has a set of settings, and each differs slightly. We will document the most relevant settings in most applications to allow you to connect and use your Ultra application remotely from your Android device.
NZBGet
| Field | Value |
|---|---|
| Primary address | https://username.servername.usbx.me/nzbget |
| Username | Set during NZBGet install |
| Password | Set during NZBGet install |
SABnzbd
| Field | Value |
|---|---|
| Primary Address | https://username.servername.usbx.me/sabnzbd |
| SABnzbd API Key | The API key is straightforward to find but is tucked away in the SABnzbd interface settings which can be accessed using the cog icon in the top right corner of the Sabnzbd webpage. To find the key itself you will need to navigate to General then scroll down to API Key. |
Sonarr
| Field | Value |
|---|---|
| Primary Address | https://username.servername.usbx.me/sonarr |
| Sonarr API Key | Finding your API Key is simple to do first open Sonarr, open settings > general. Your API key will be listed there make a note of this. |
Radarr
| Field | Value |
|---|---|
| Primary Address | https://username.servername.usbx.me/radarr |
| Radarr API Key | Finding your API Key is simple to do first open Radarr, open settings > general. Your API key will be listed there make a note of this. |
Torrents
Rutorrent
| Field | Value |
|---|---|
| Enable Torrents | Activate slider |
| Primary connection address | https://username.servername.usbx.me |
| Username | Rutorrent username which can be found in the application tab of your control panel under show info for Rutorrent |
| Password | Rutorrent password which can be found in the application tab of your control panel under show info for Rutorrent under username (you may need to click the eyeball icon to reveal it) |
| Path to XML-RPC API | /RPC2 |
Deluge
| Field | Value |
|---|---|
| Primary connection address | https://username.servername.usbx.me/deluge |
| Password | Deluge password which can be found in the application tab of your control panel under show info for Deluge under username (you may need to click the eyeball icon to reveal it) |
Transmission
Setting up Transmission is a little more tricky to set up due to a built-in lockout feature in transmission I will describe this at the bottom of this section. Upon navigating to NZB360 Settings you will need to select the Torrent Settings option.
| Field | Value |
|---|---|
| Primary connection address | https://username.servername.usbx.me/transmission |
| Username | username which can be found in the application tab of your control panel under show info for Transmission |
| Password | Transmission password which can be found in the application tab of your control panel under show info for Transmission under username (you may need to click the eyeball icon to reveal it) |
If your settings perfectly match the settings described above and you still cannot connect, Please open Transmission Web Interface and check you have not been locked out due to too many incorrect attempts. If you find you have been locked out simply restart the Transmission Service from your Ultra Control Panel.
Ultra.cc Android Application Guide
This guide provides recommendations for Android applications that can be utilized to access and manage various services hosted on our platform. With these apps, you can conveniently monitor and control your hosted apps, transfer files, and access your server directly from your mobile Android device. Instructions are provided for configuring the integration where applicable.
Prerequisite
- Login to the UCP to obtain the necessary credentials to be used in the guide below for connection details.
Server Access
Termius
- SSH and telnet client with modern interface and robust features.
- Securely access your server terminal with this app.
- Google Play Store link
Connection Details
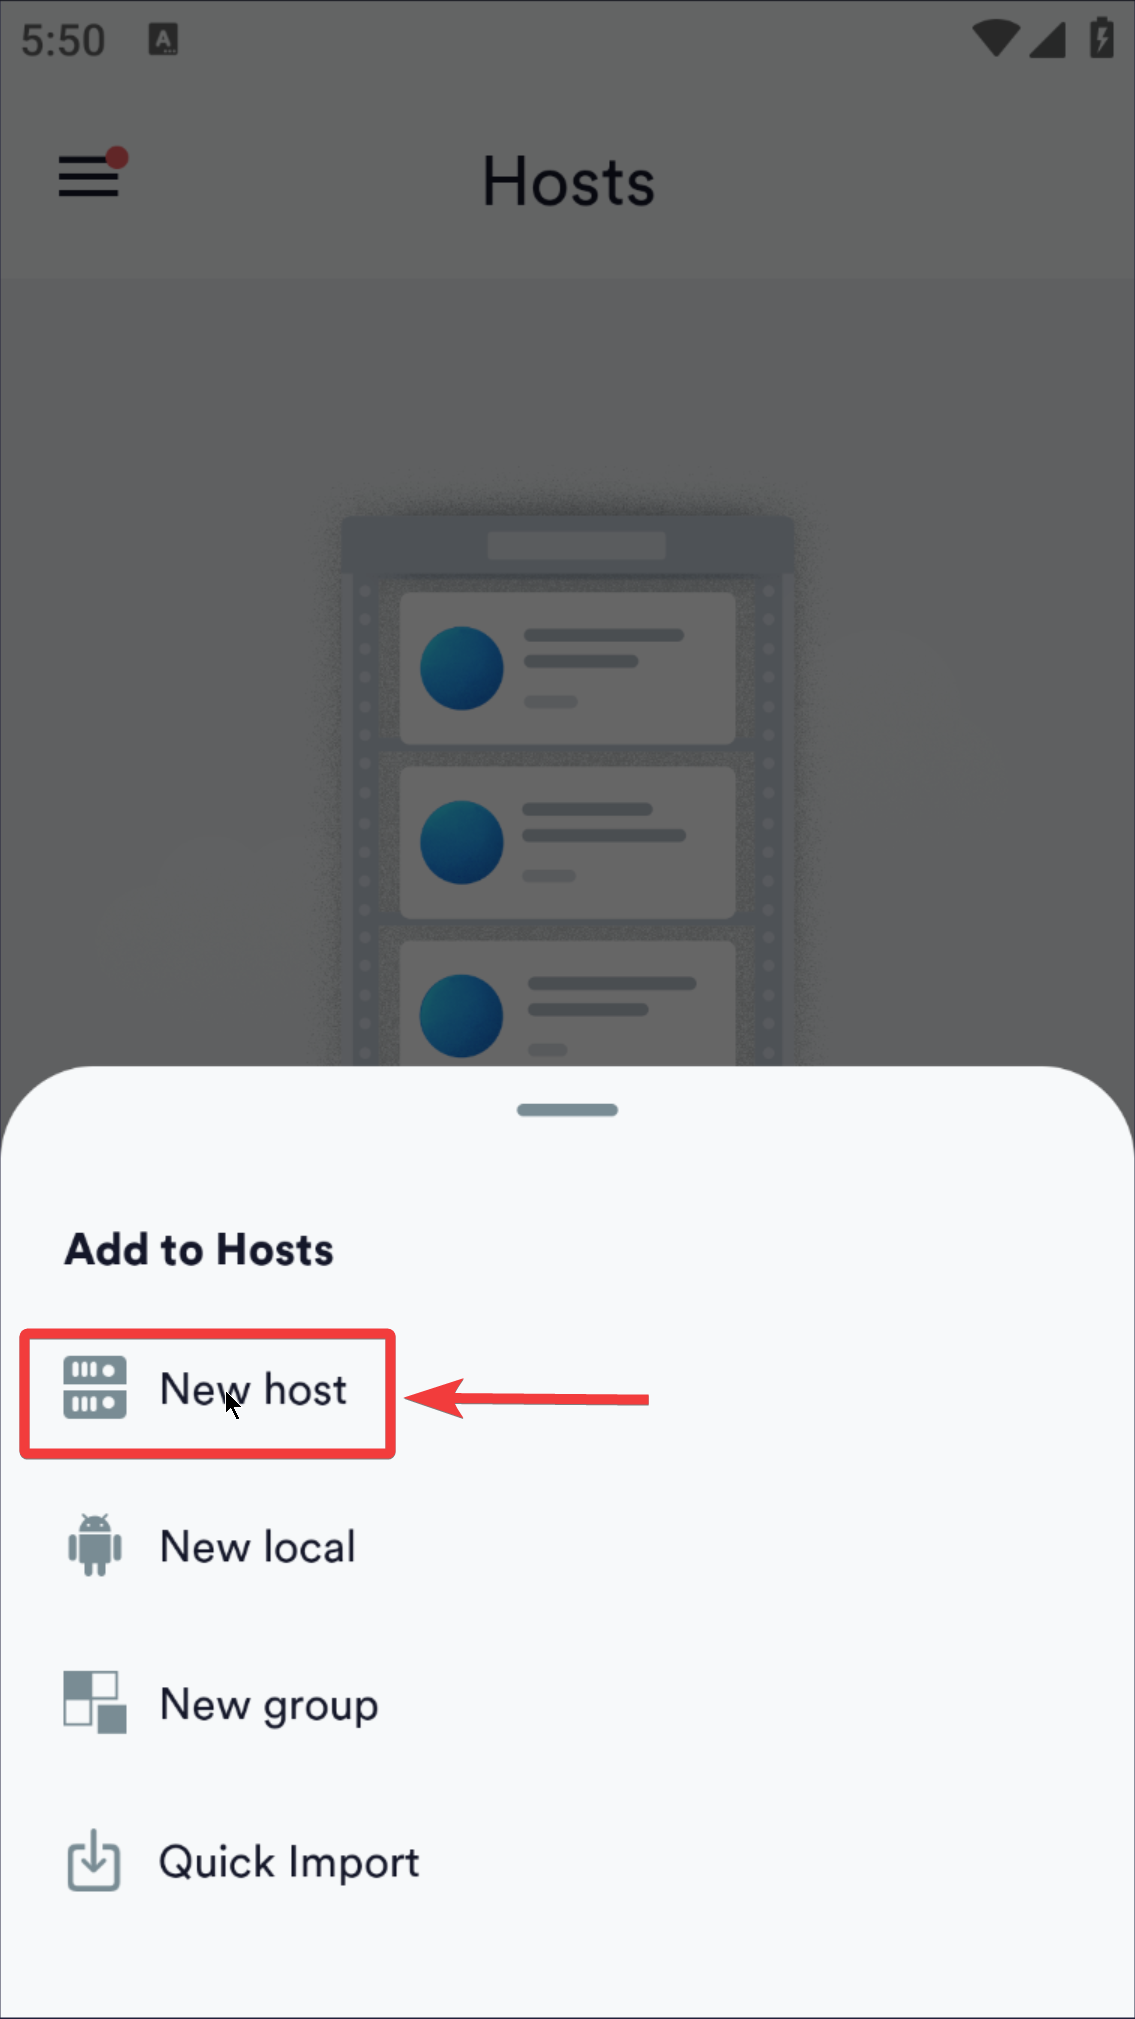
- Click the
+on the bottom right to addNew Hostin Termius.
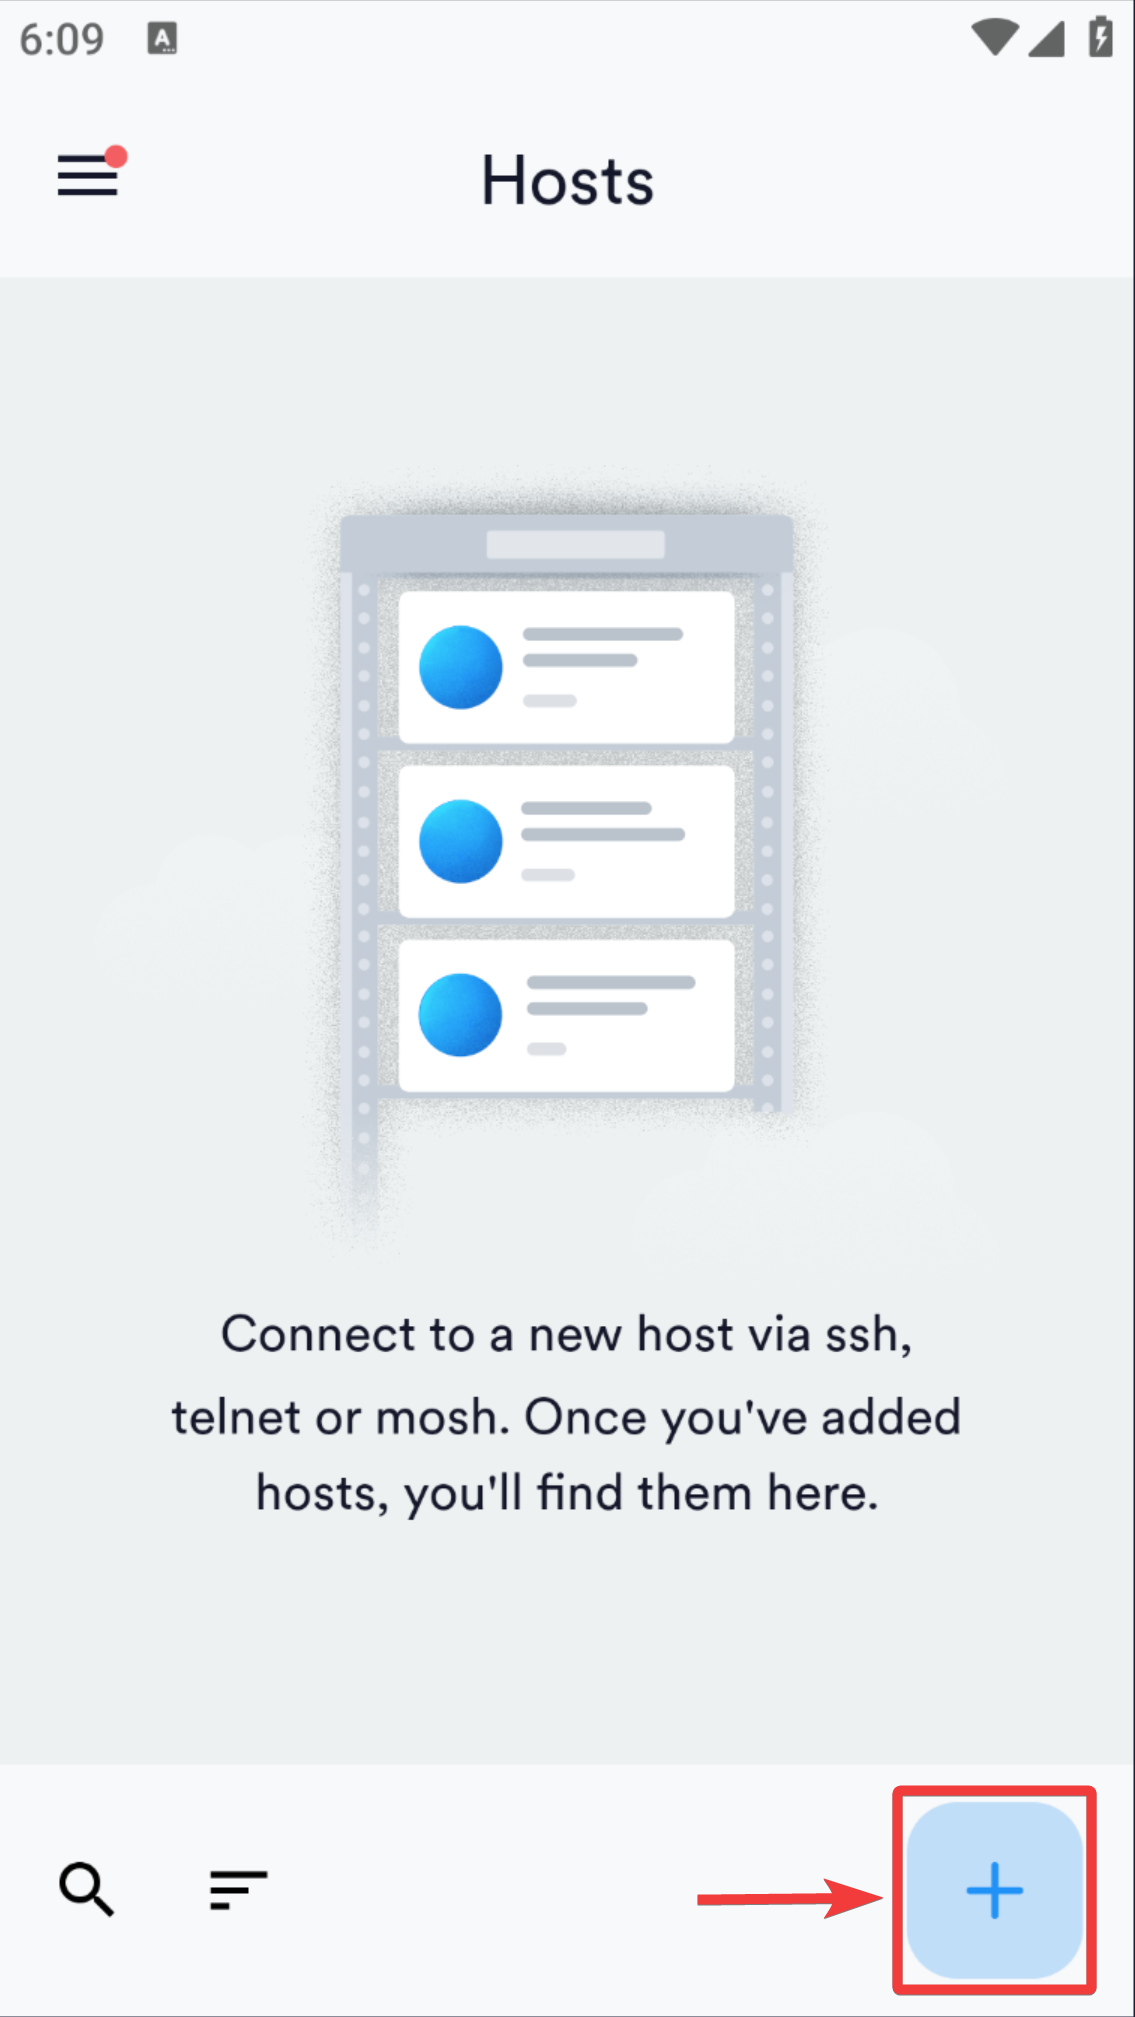
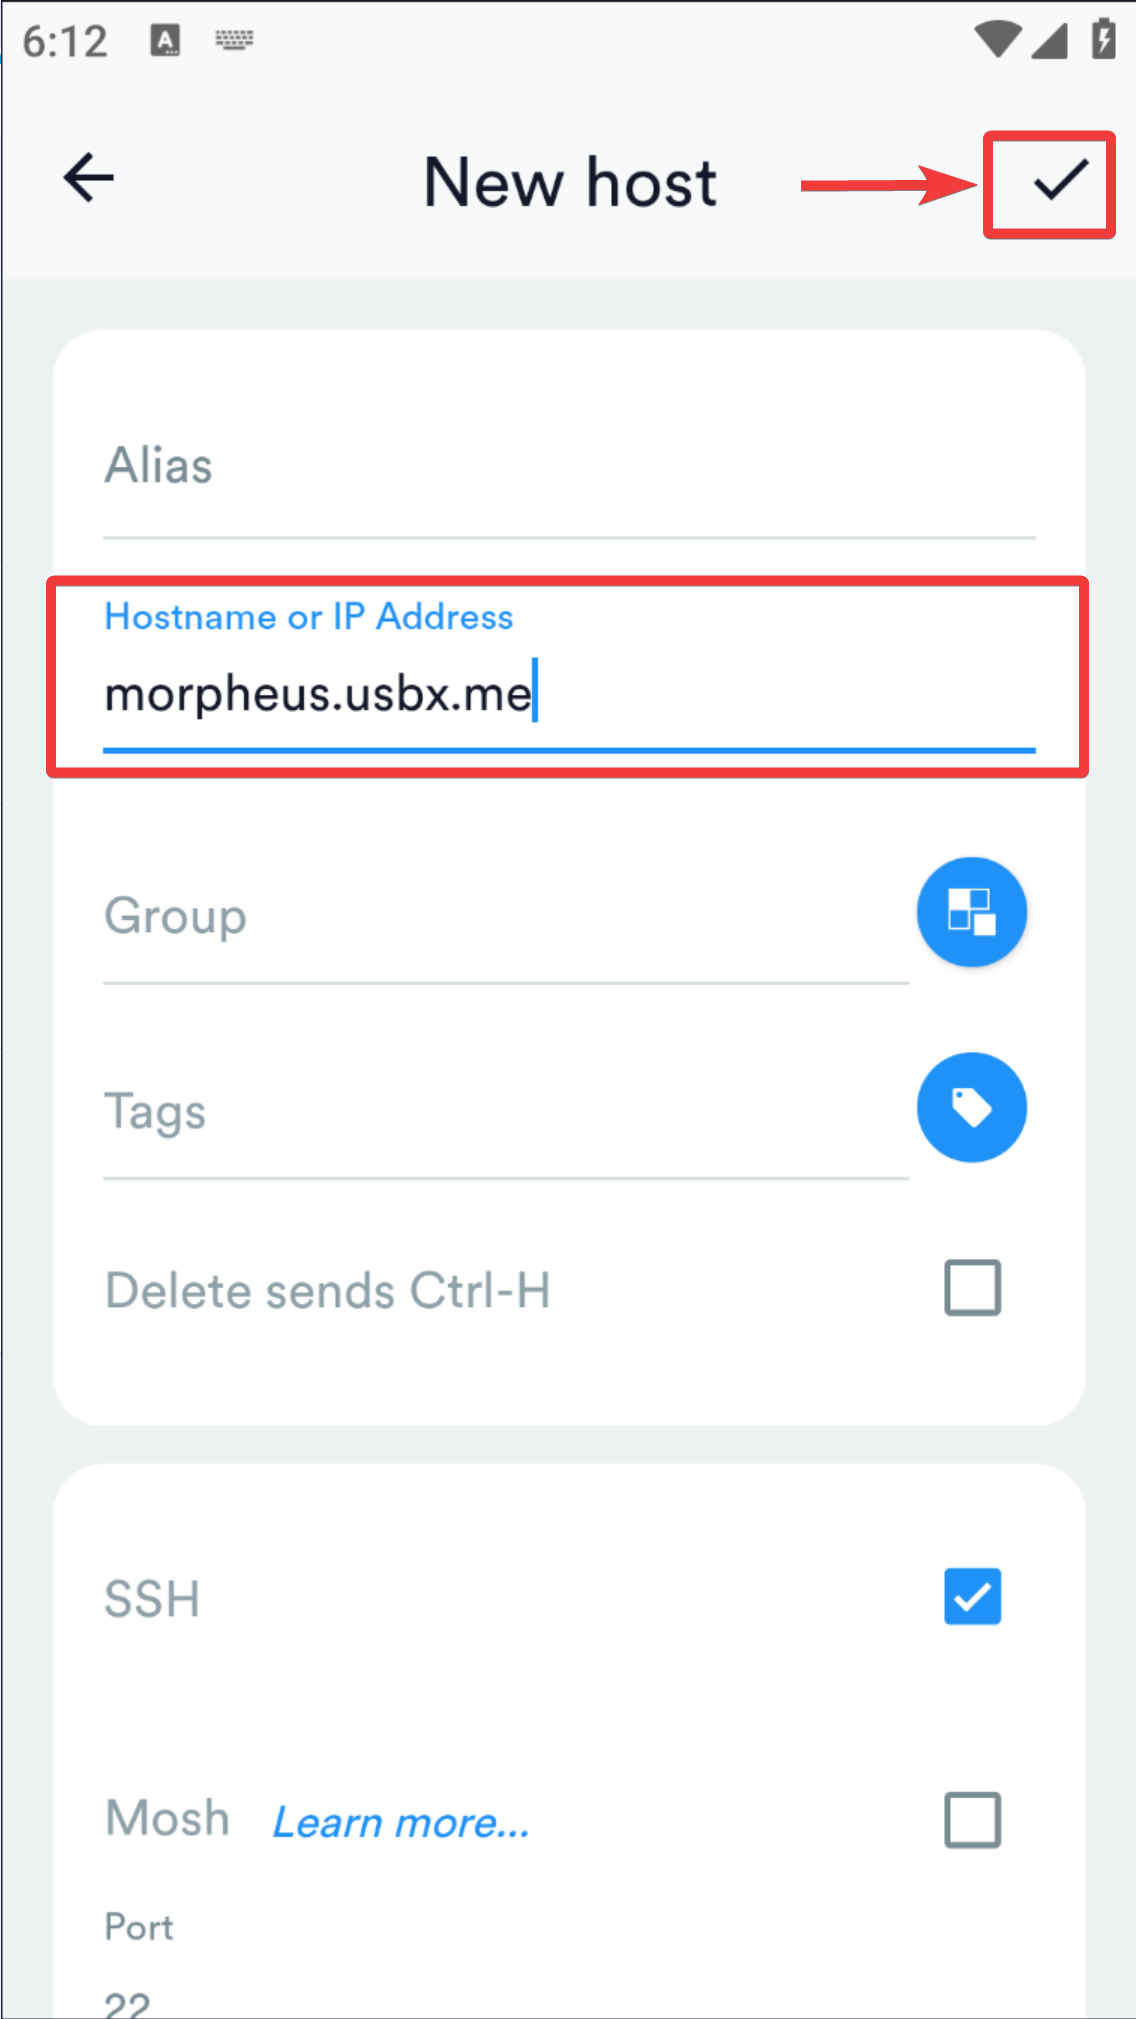
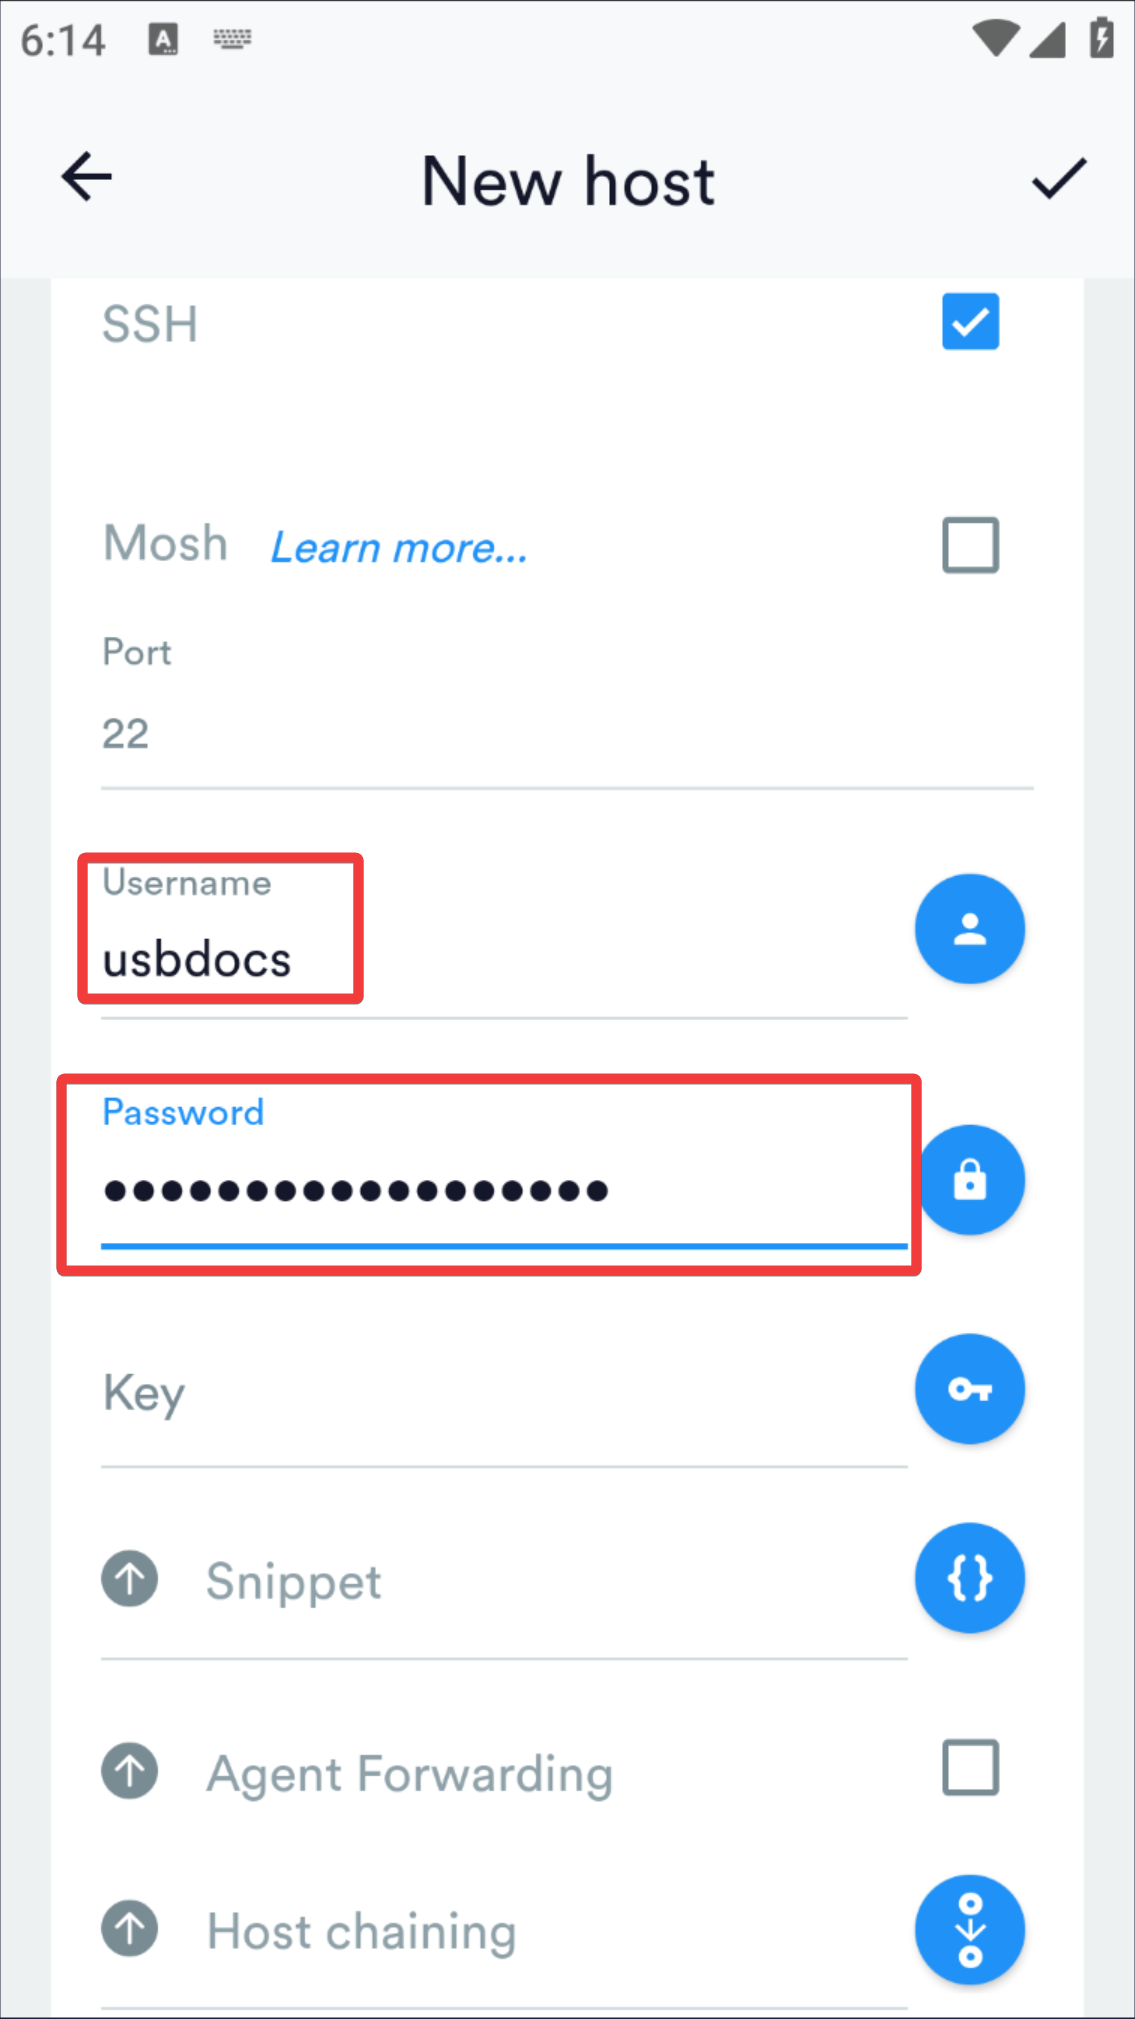
- Next, we need to enter the
Hostname or IP Address,Username&Password. - Everything else can be left as it is.
- Once done, we click the
Check markon the top right to save the new host details.
- New host will be added to Termius now.
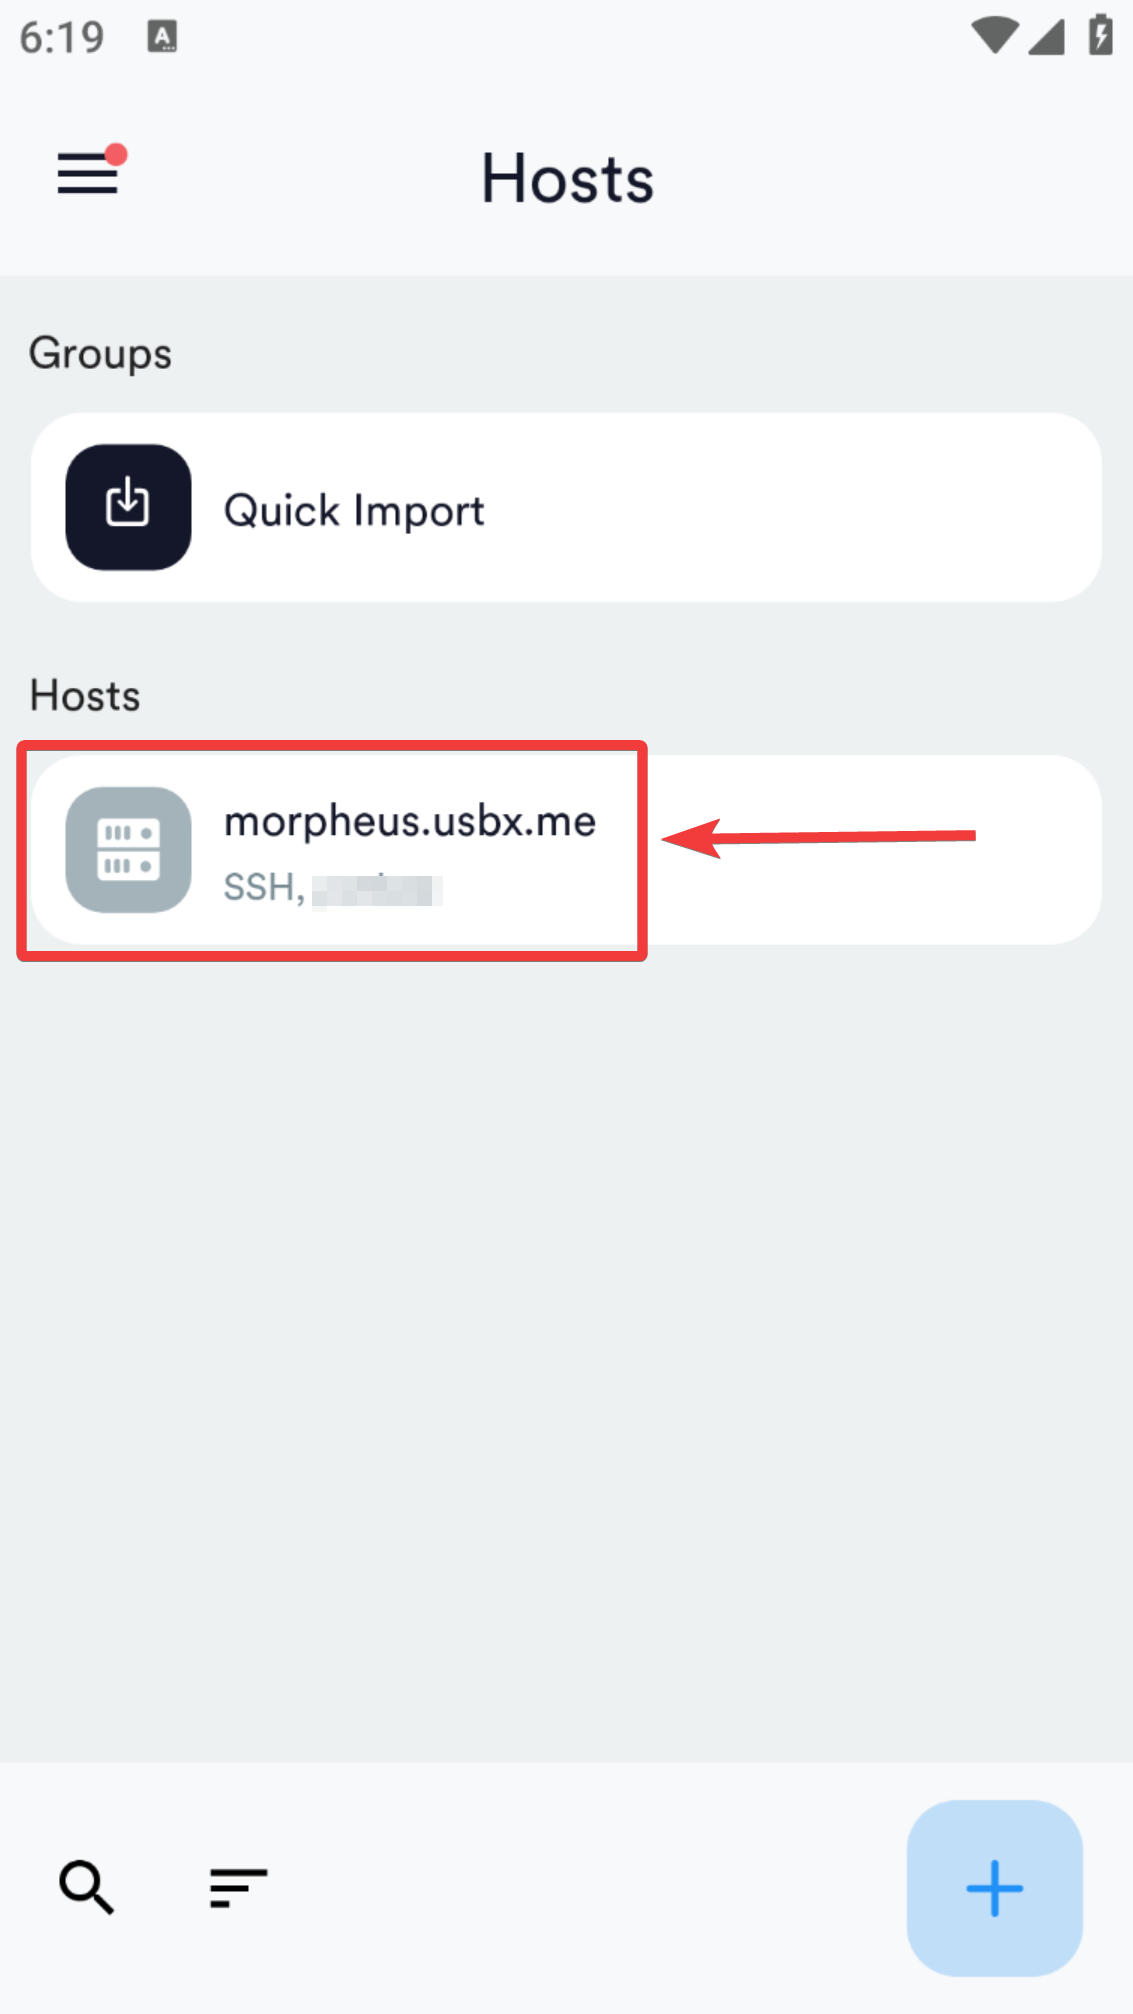
- Press upon the newly added host to start the connection to your server.
- It will prompt for the fingerprint approval, press continue here.
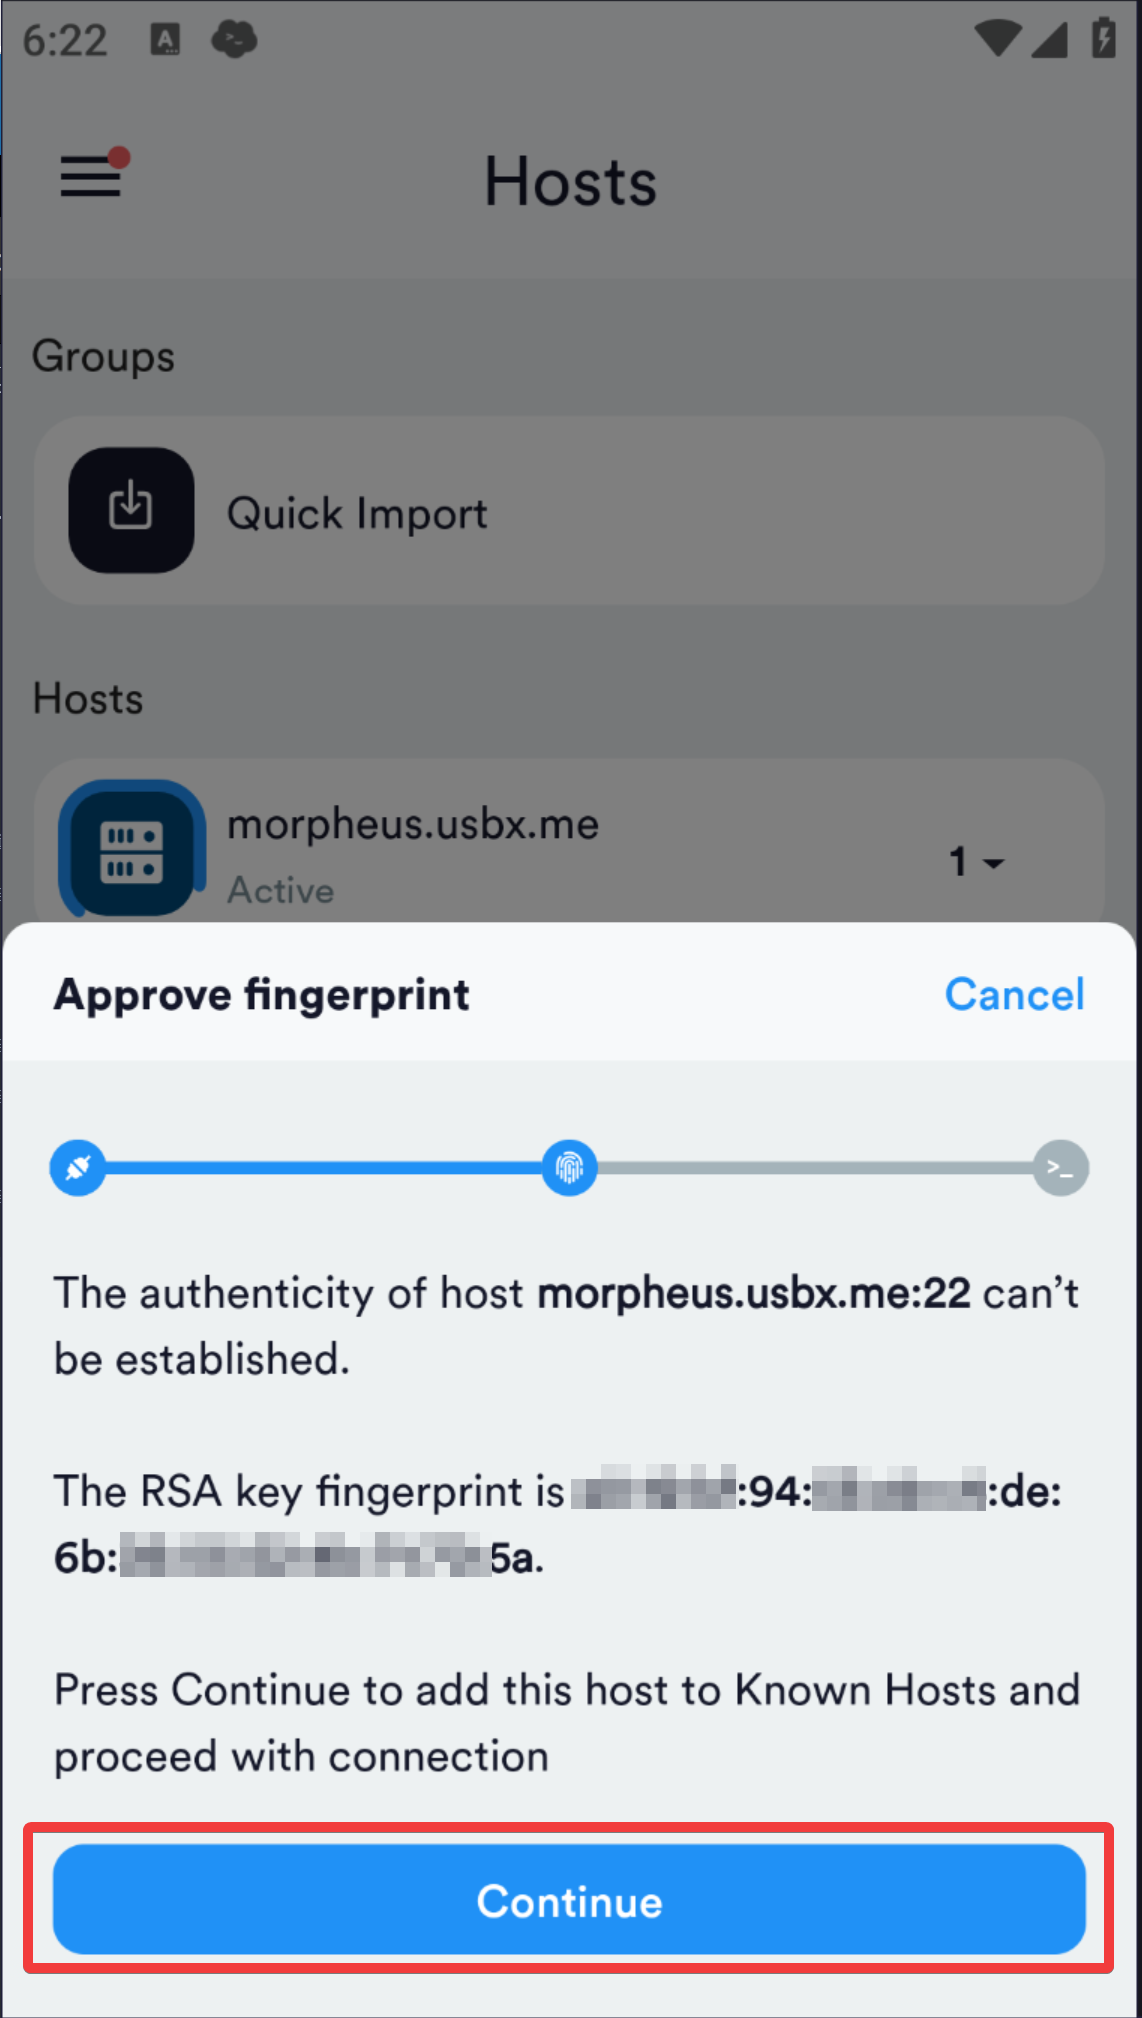
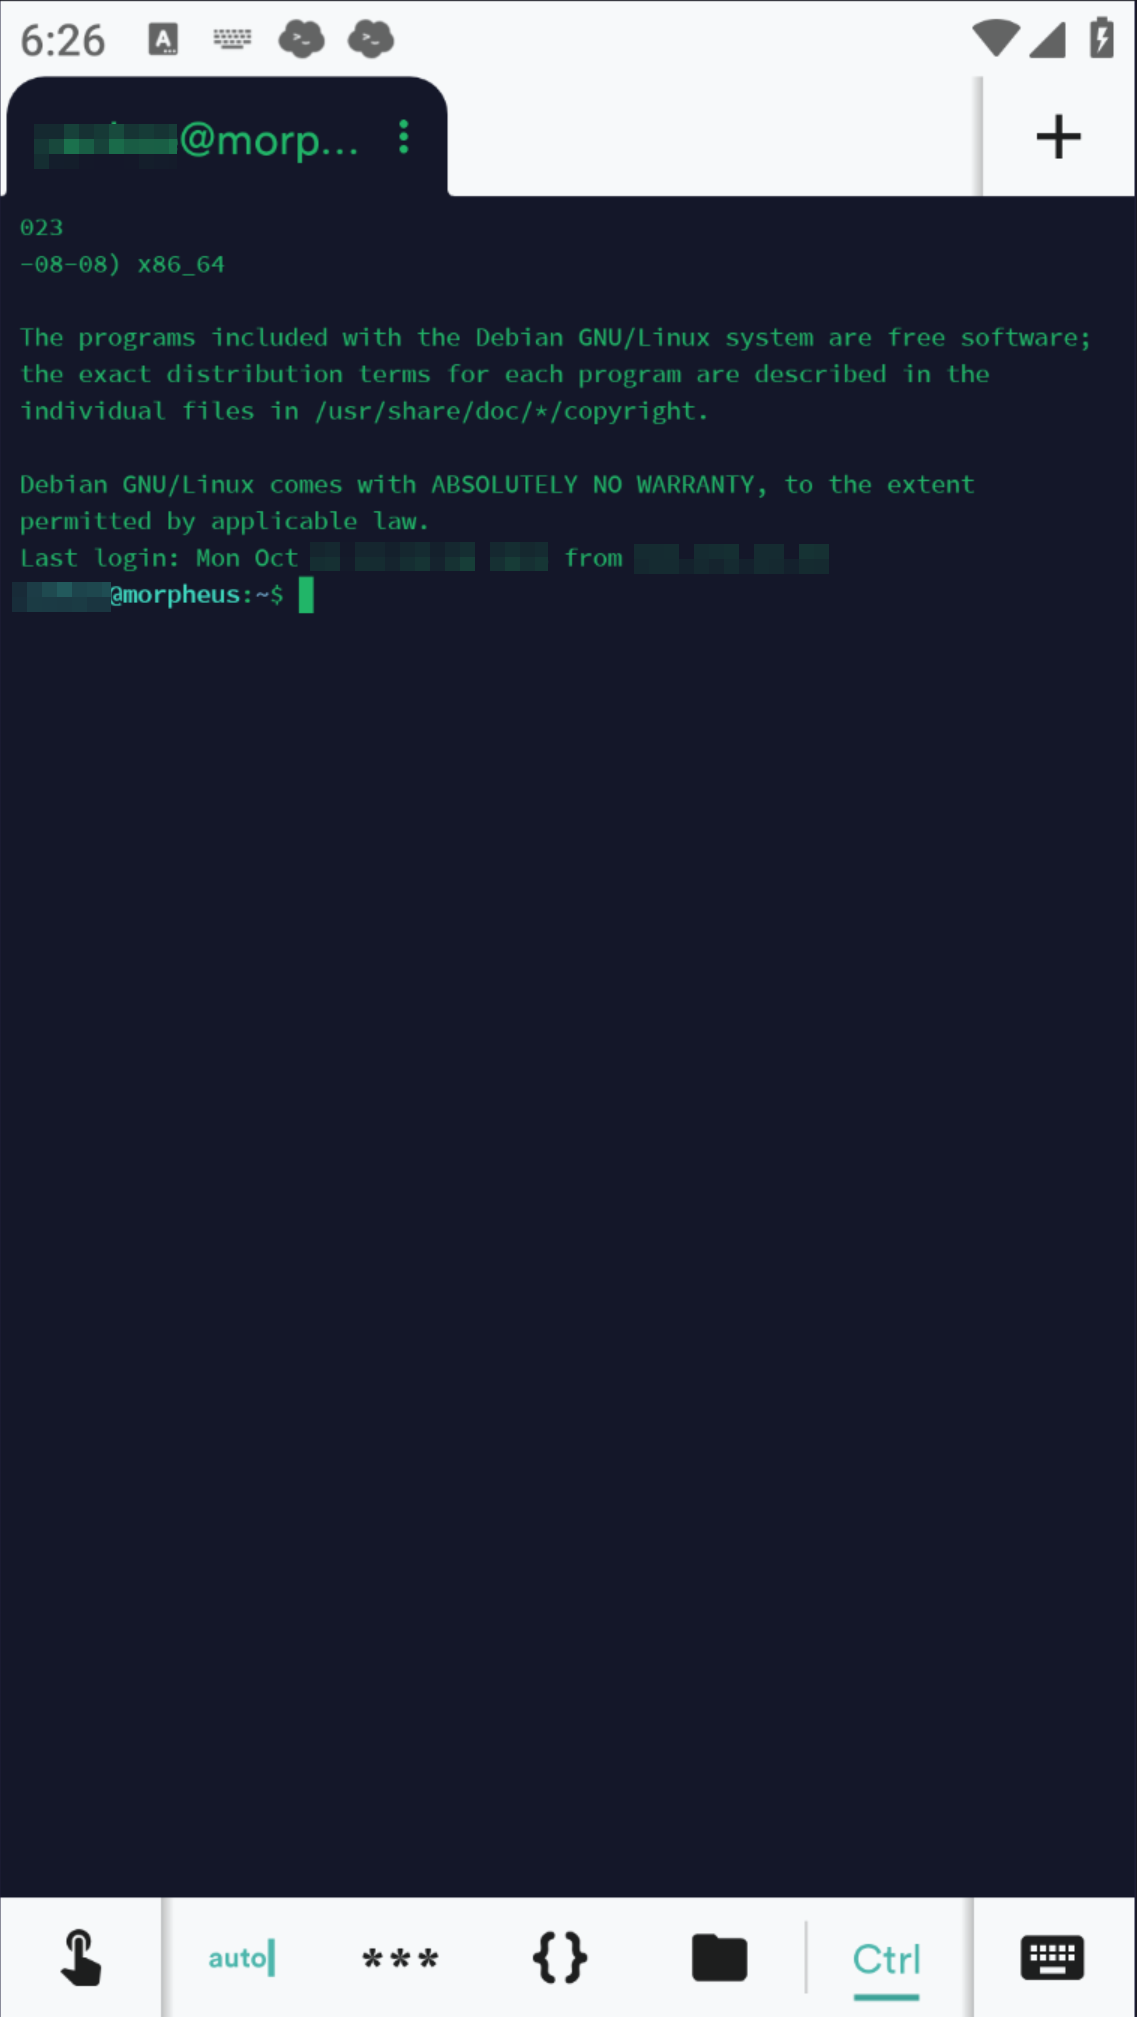
- You will now be presented with your terminal SSH access.
File Management & Transfer
FX File Explorer
- Powerful dual-pane file manager for local device and remote connections.
- Transfer, browse, delete, zip, and manage files over FTP, SFTP, WebDAV, SMB, DLNA and more.
- Convenient way to access and manage files on your hosted storage.
- Google Play Store link
Connection Details
- Open FX application and click upon the
Networkoption.
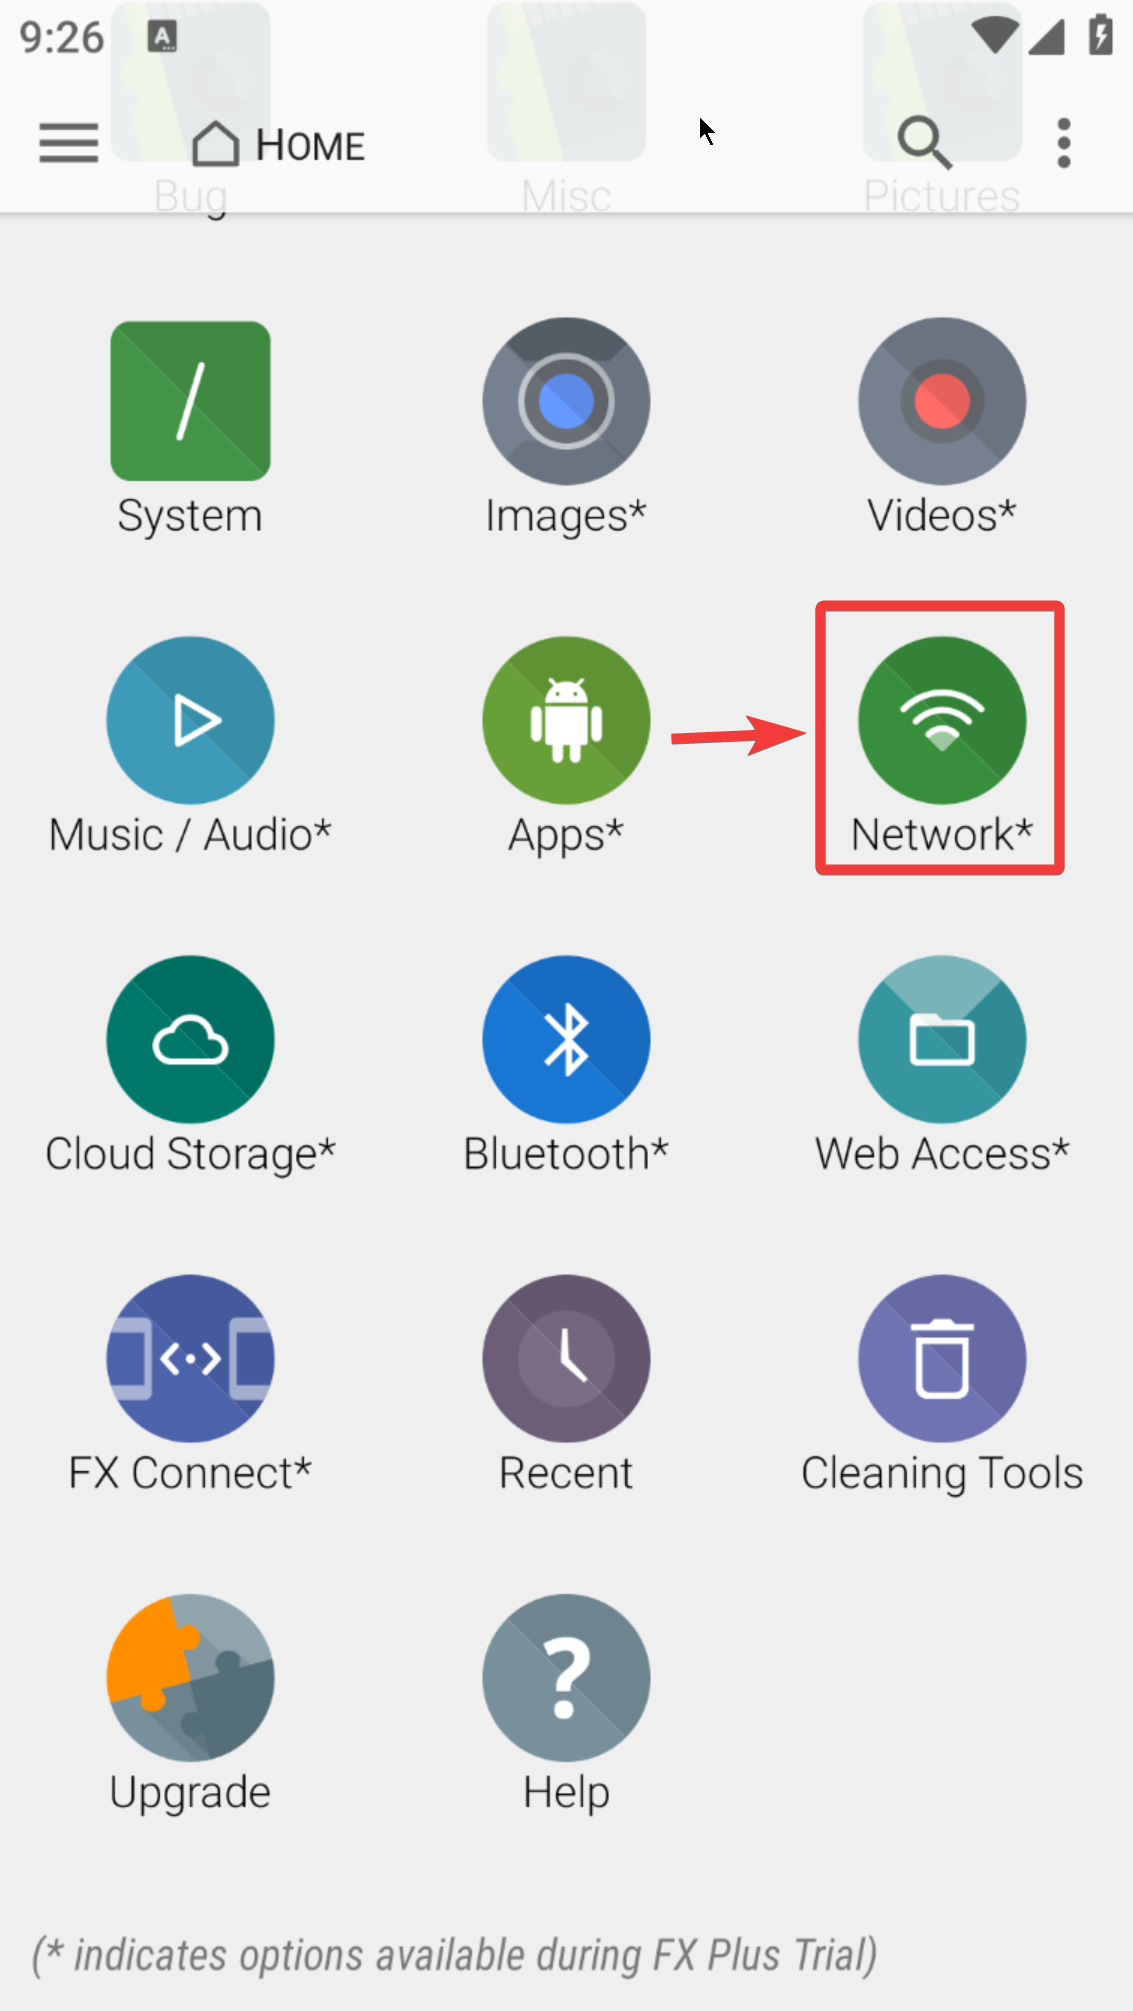
- Click the
+Icon at the bottom right to add network connection.
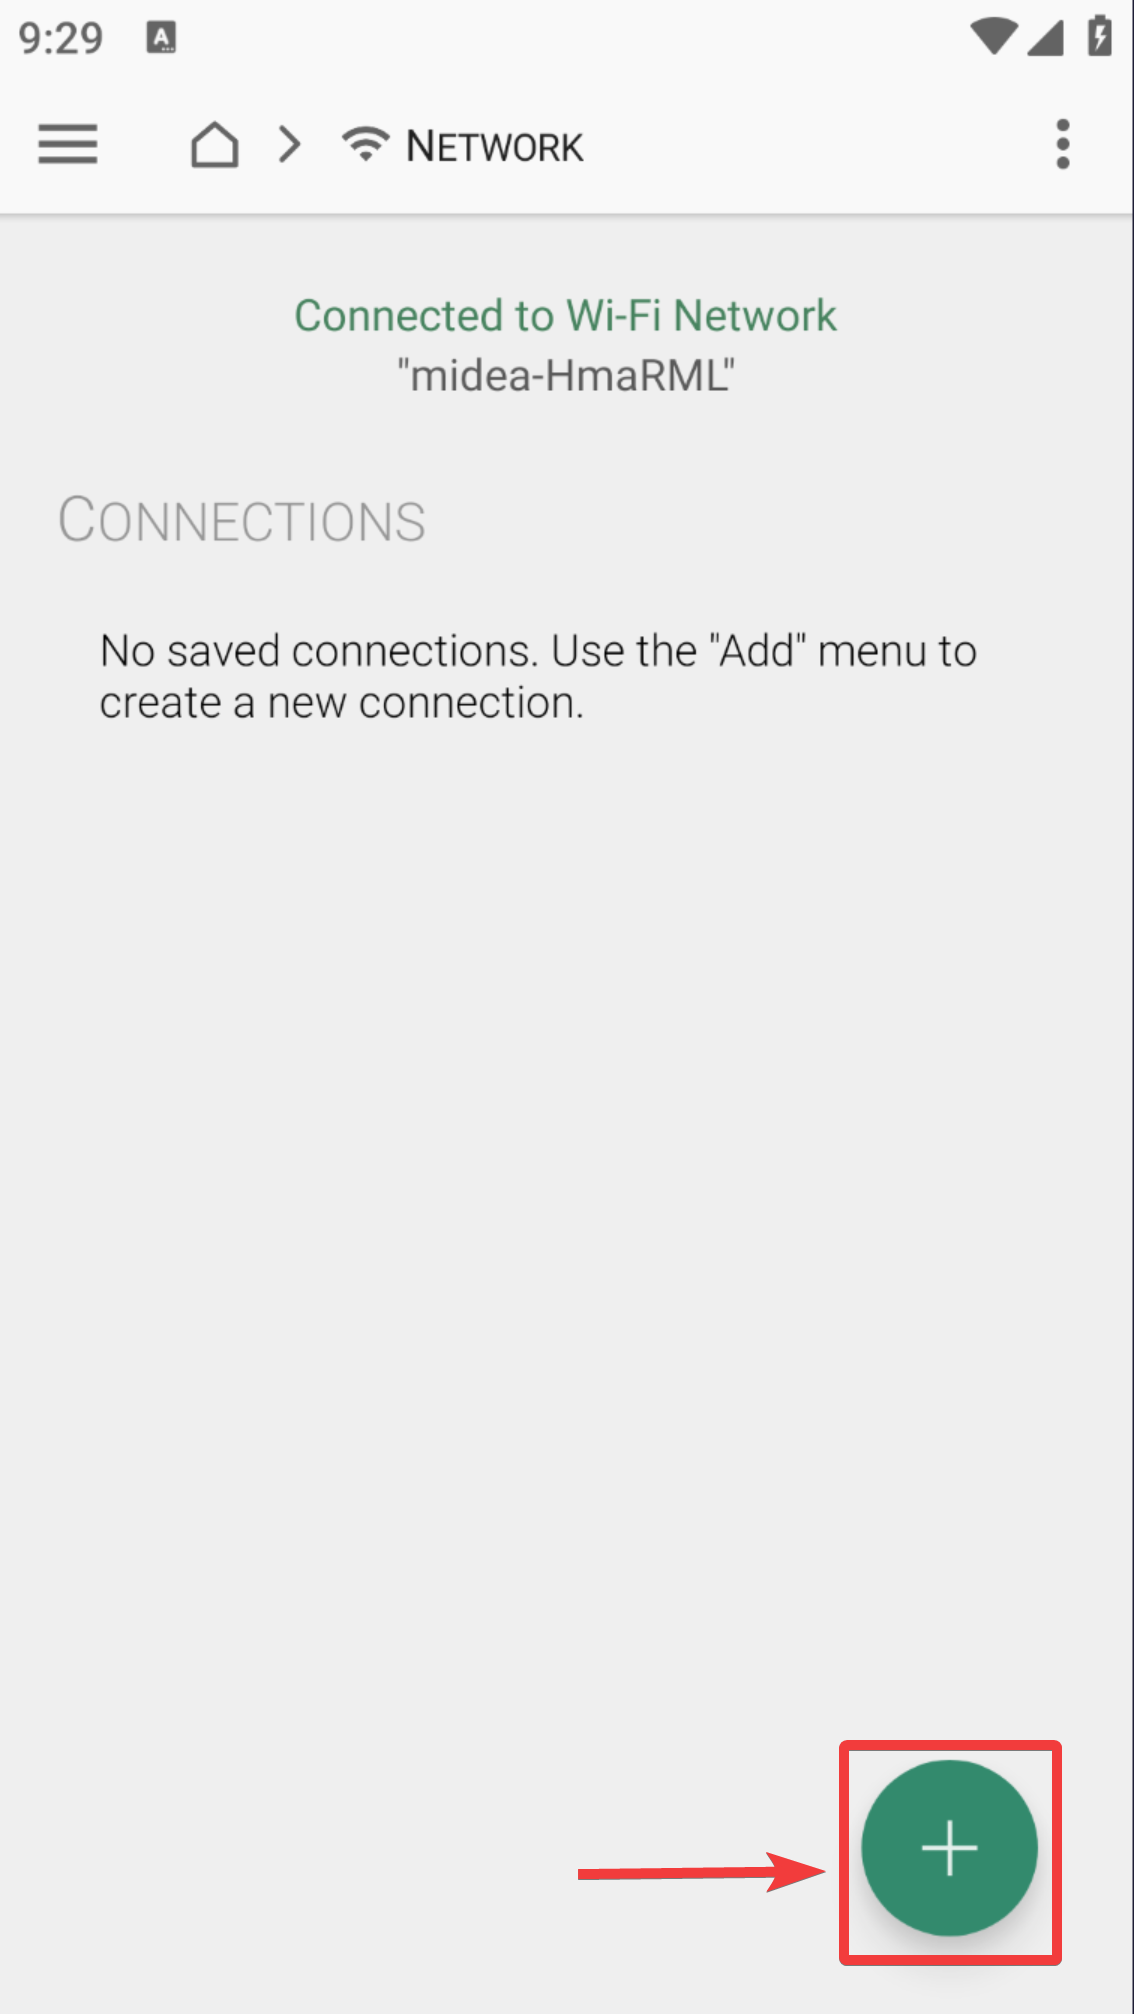
- Select
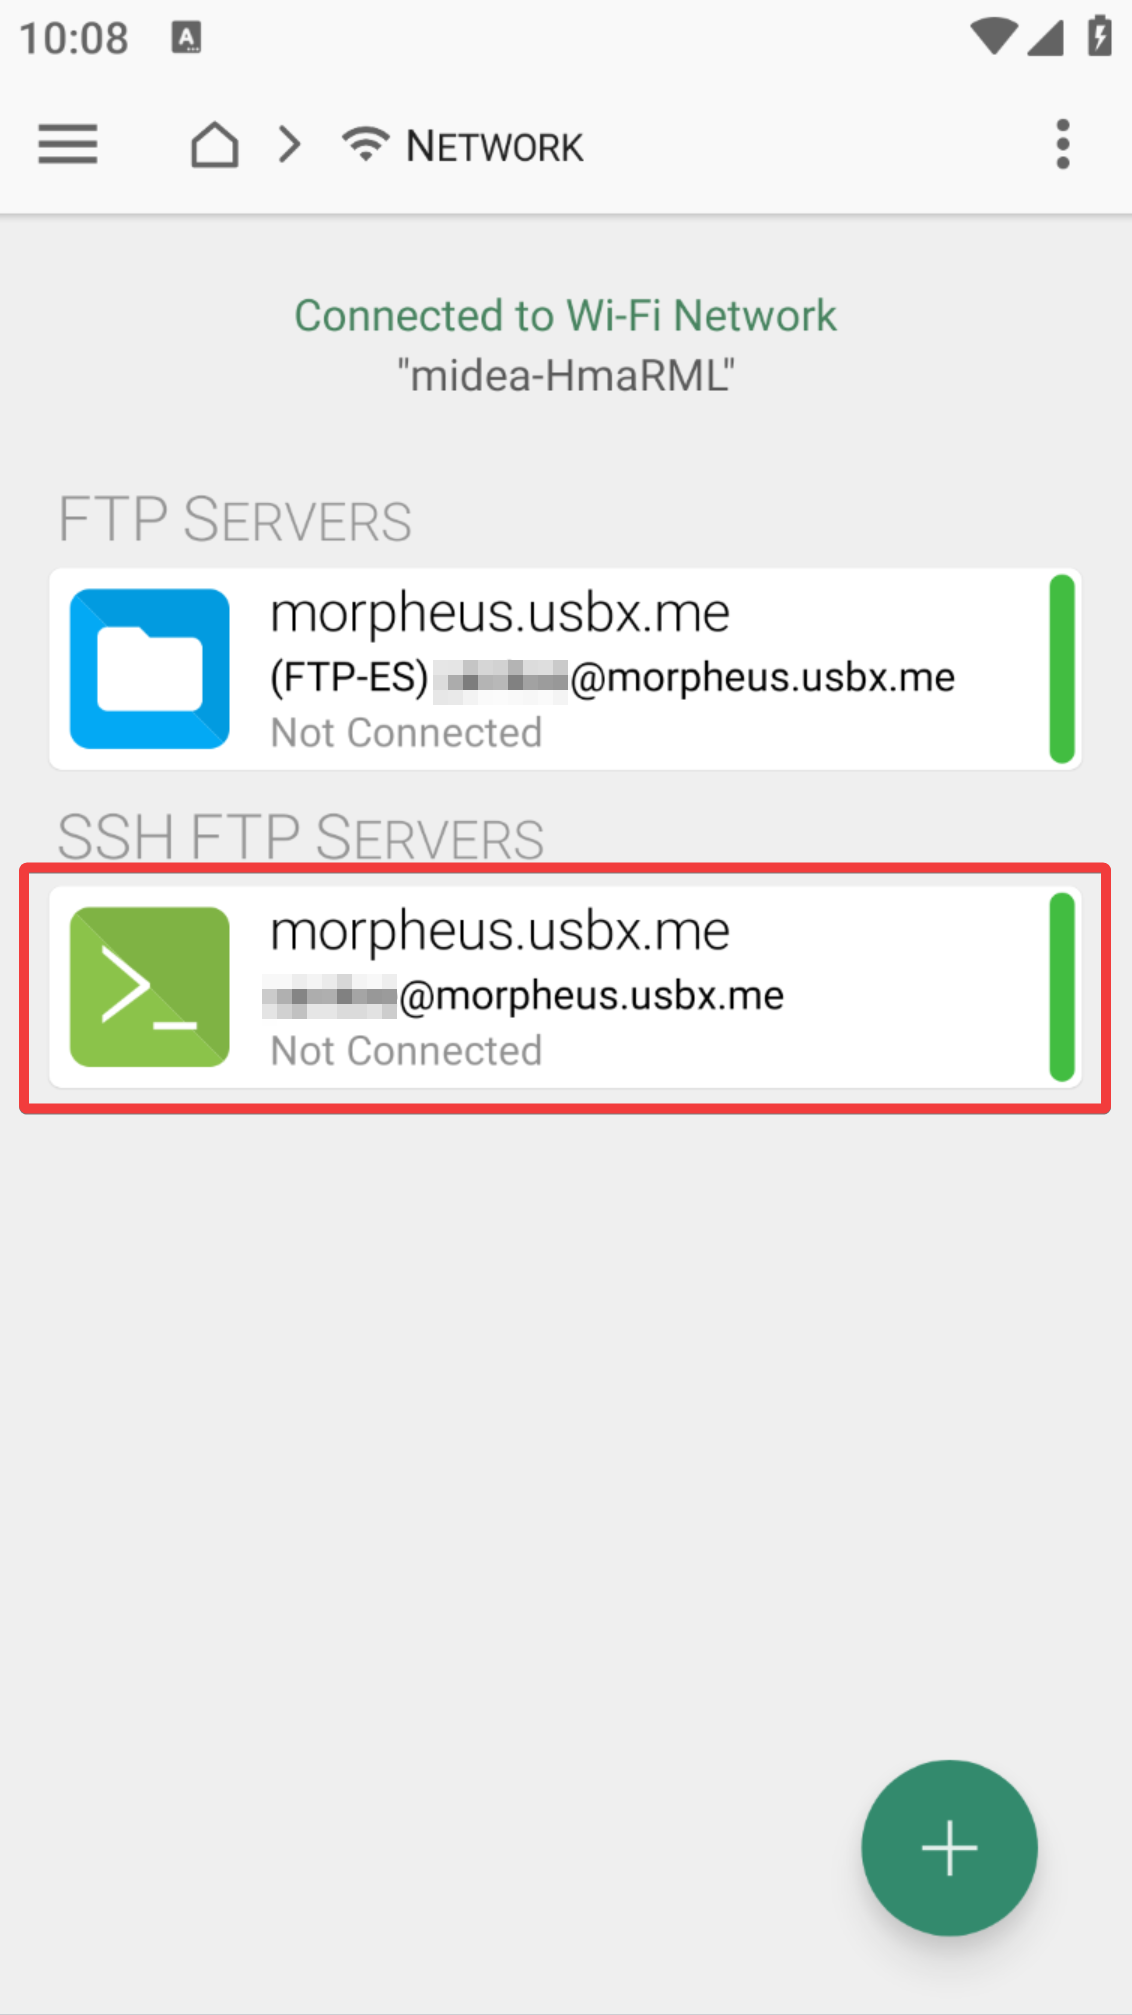
FTP Serverto add FTPS connection.
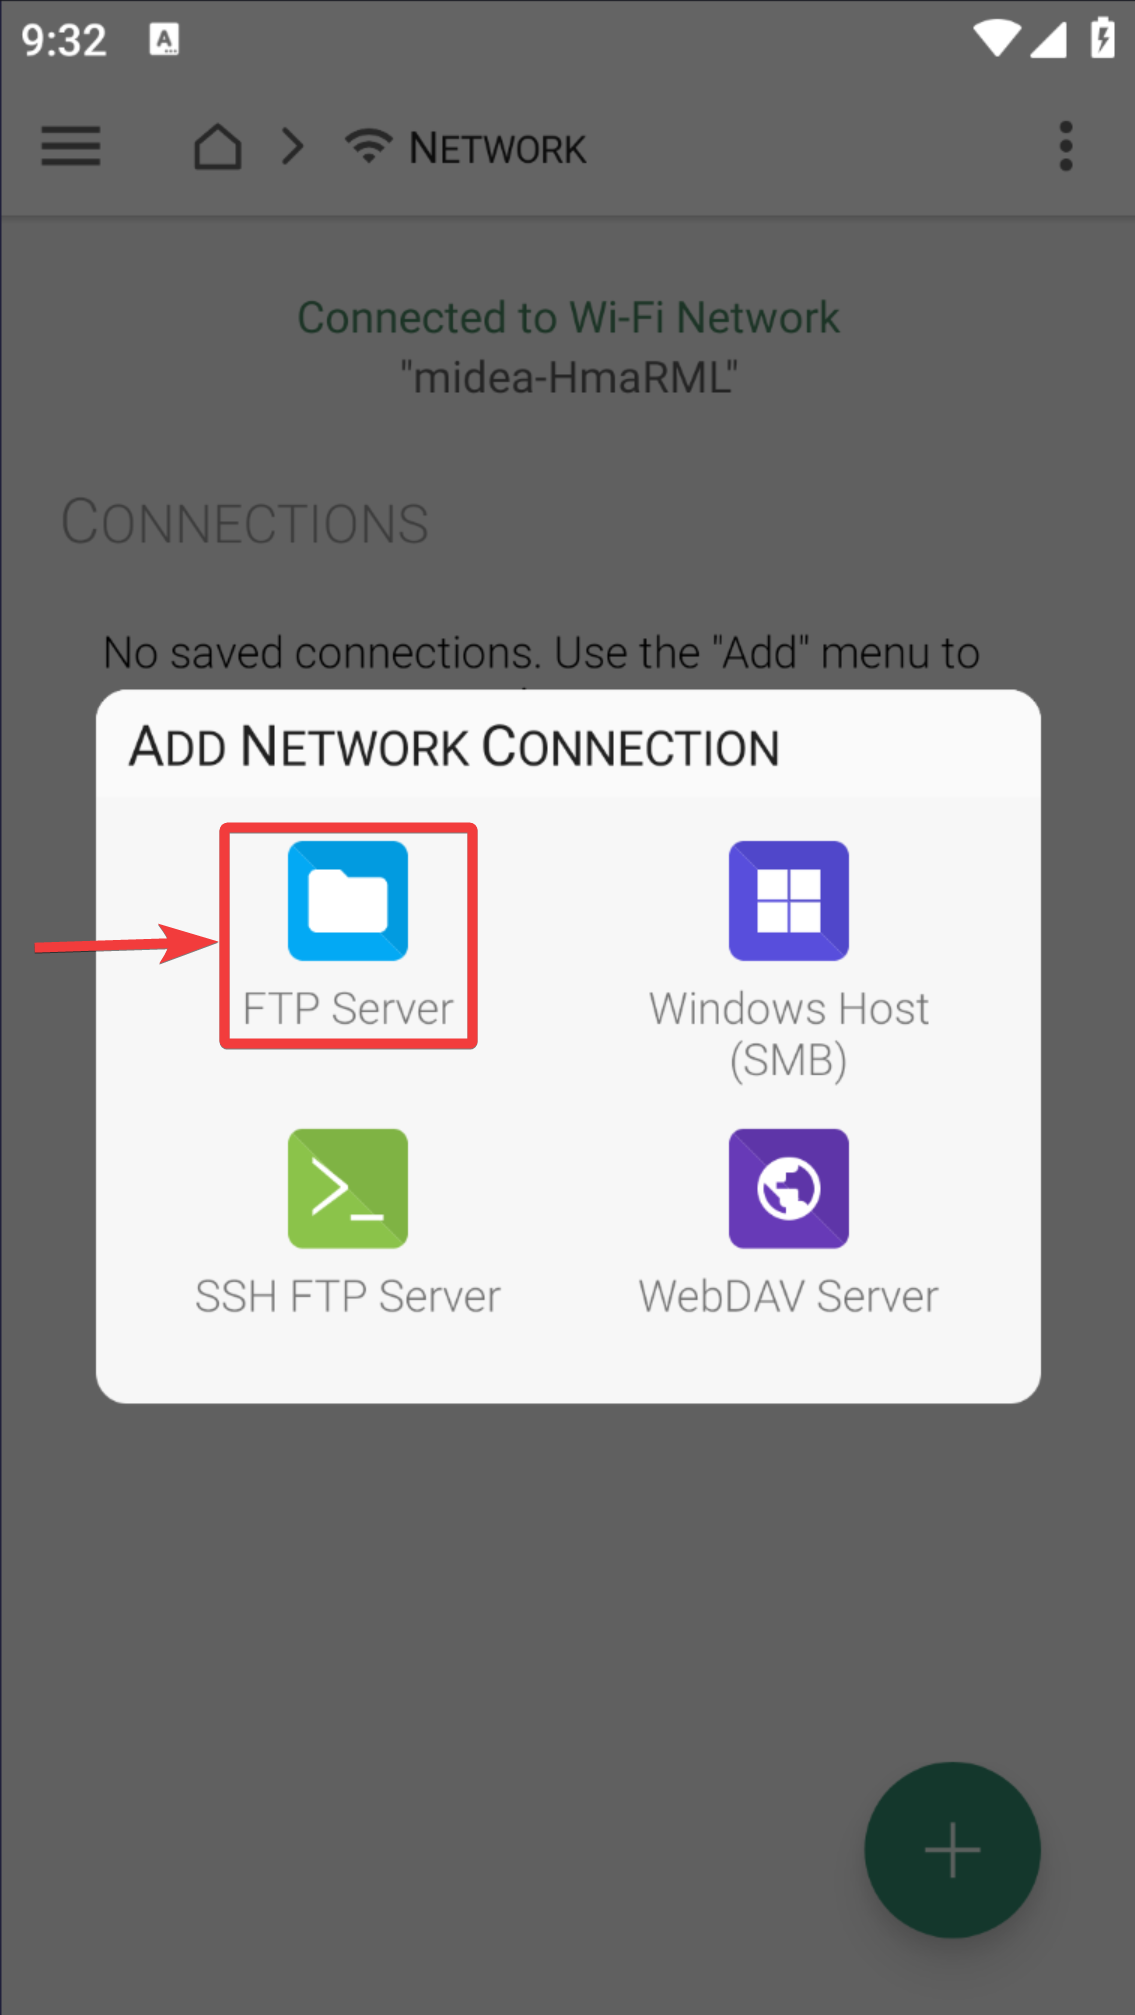
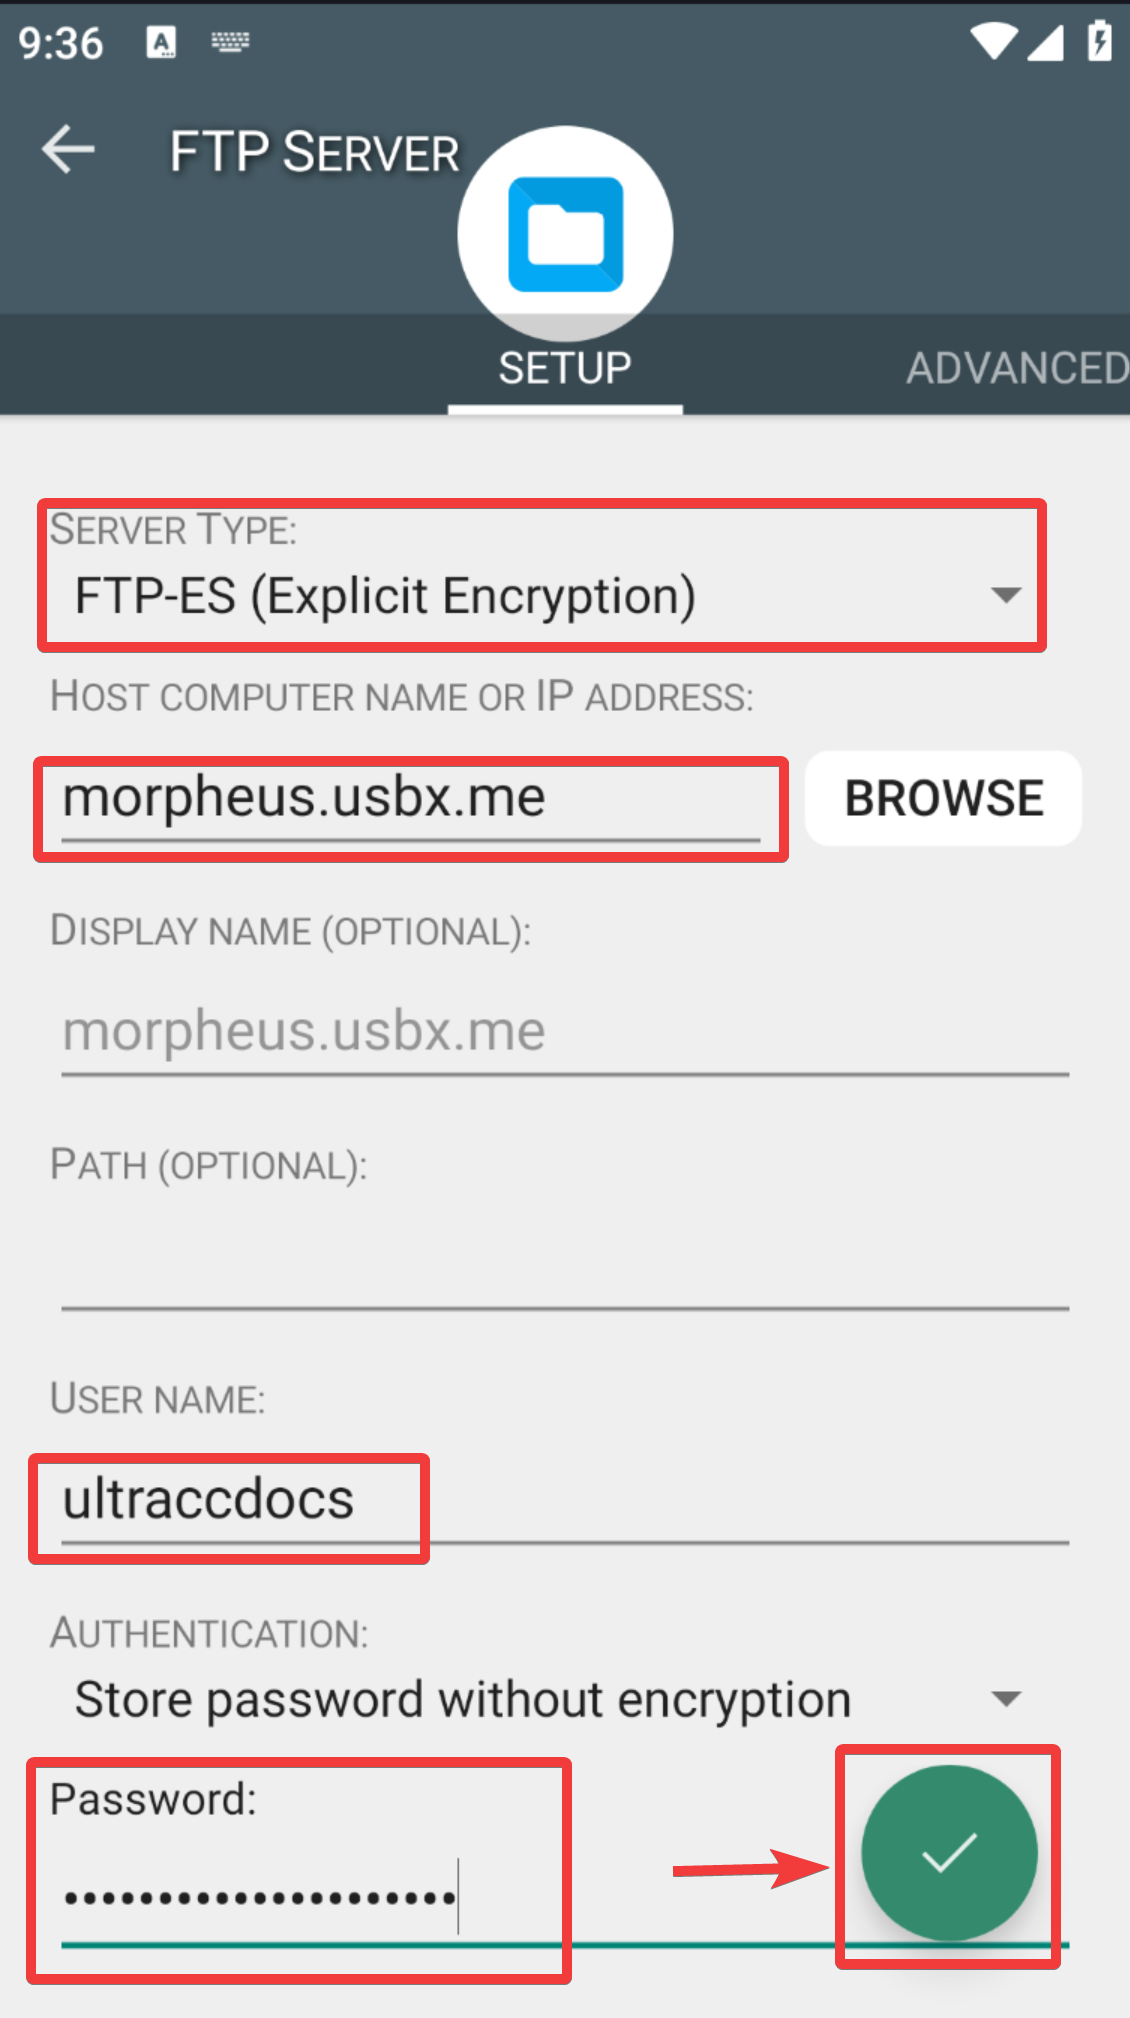
- Select the server type as:
FTP-ES (Explicit Encryption) - Next, enter the
Hostname or IP Address,UsernameandPassword.- Make sure to replace the above with your specific details, which can be found on the UCP.
- Click the Tick Mark Icon in the bottom right corner.
- Your FTP server is now added as a network access.
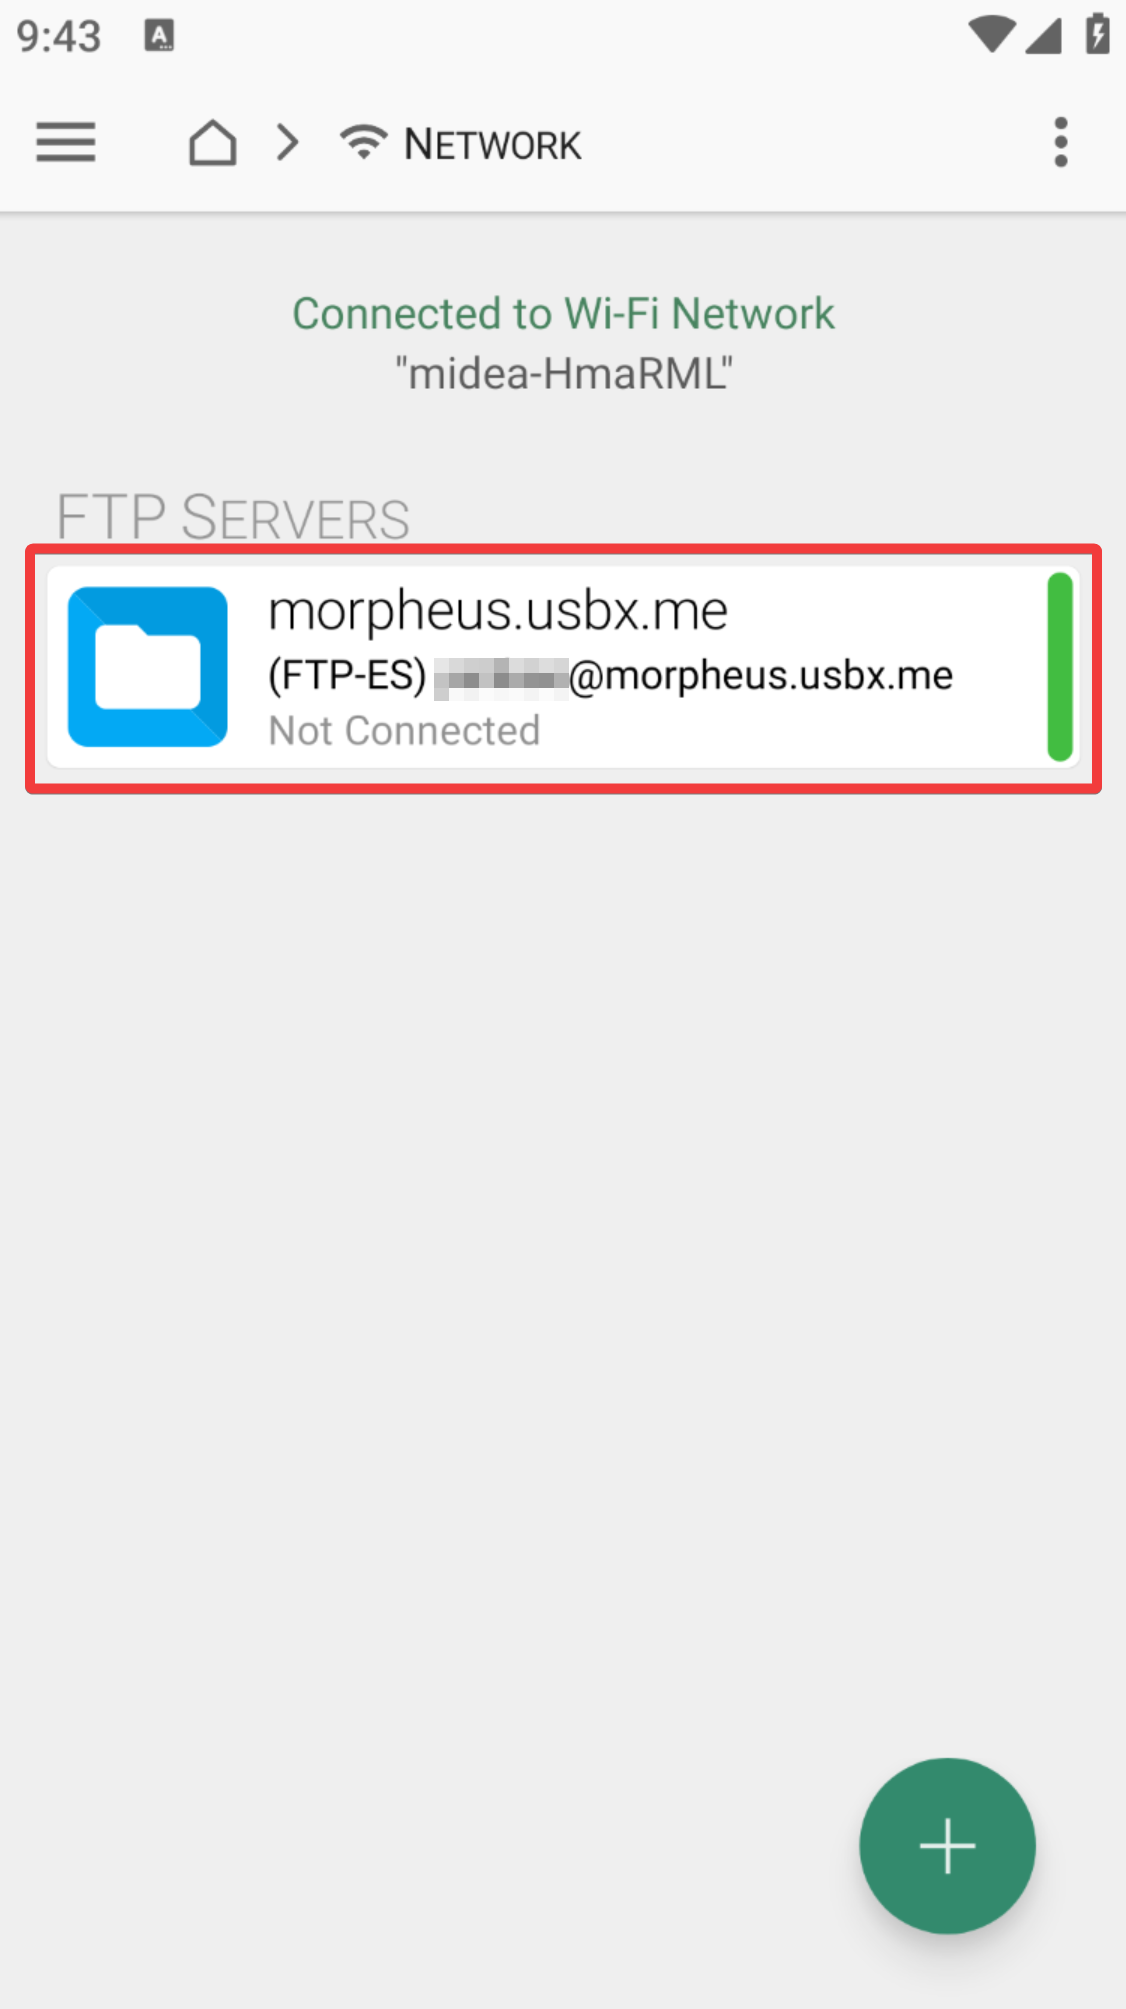
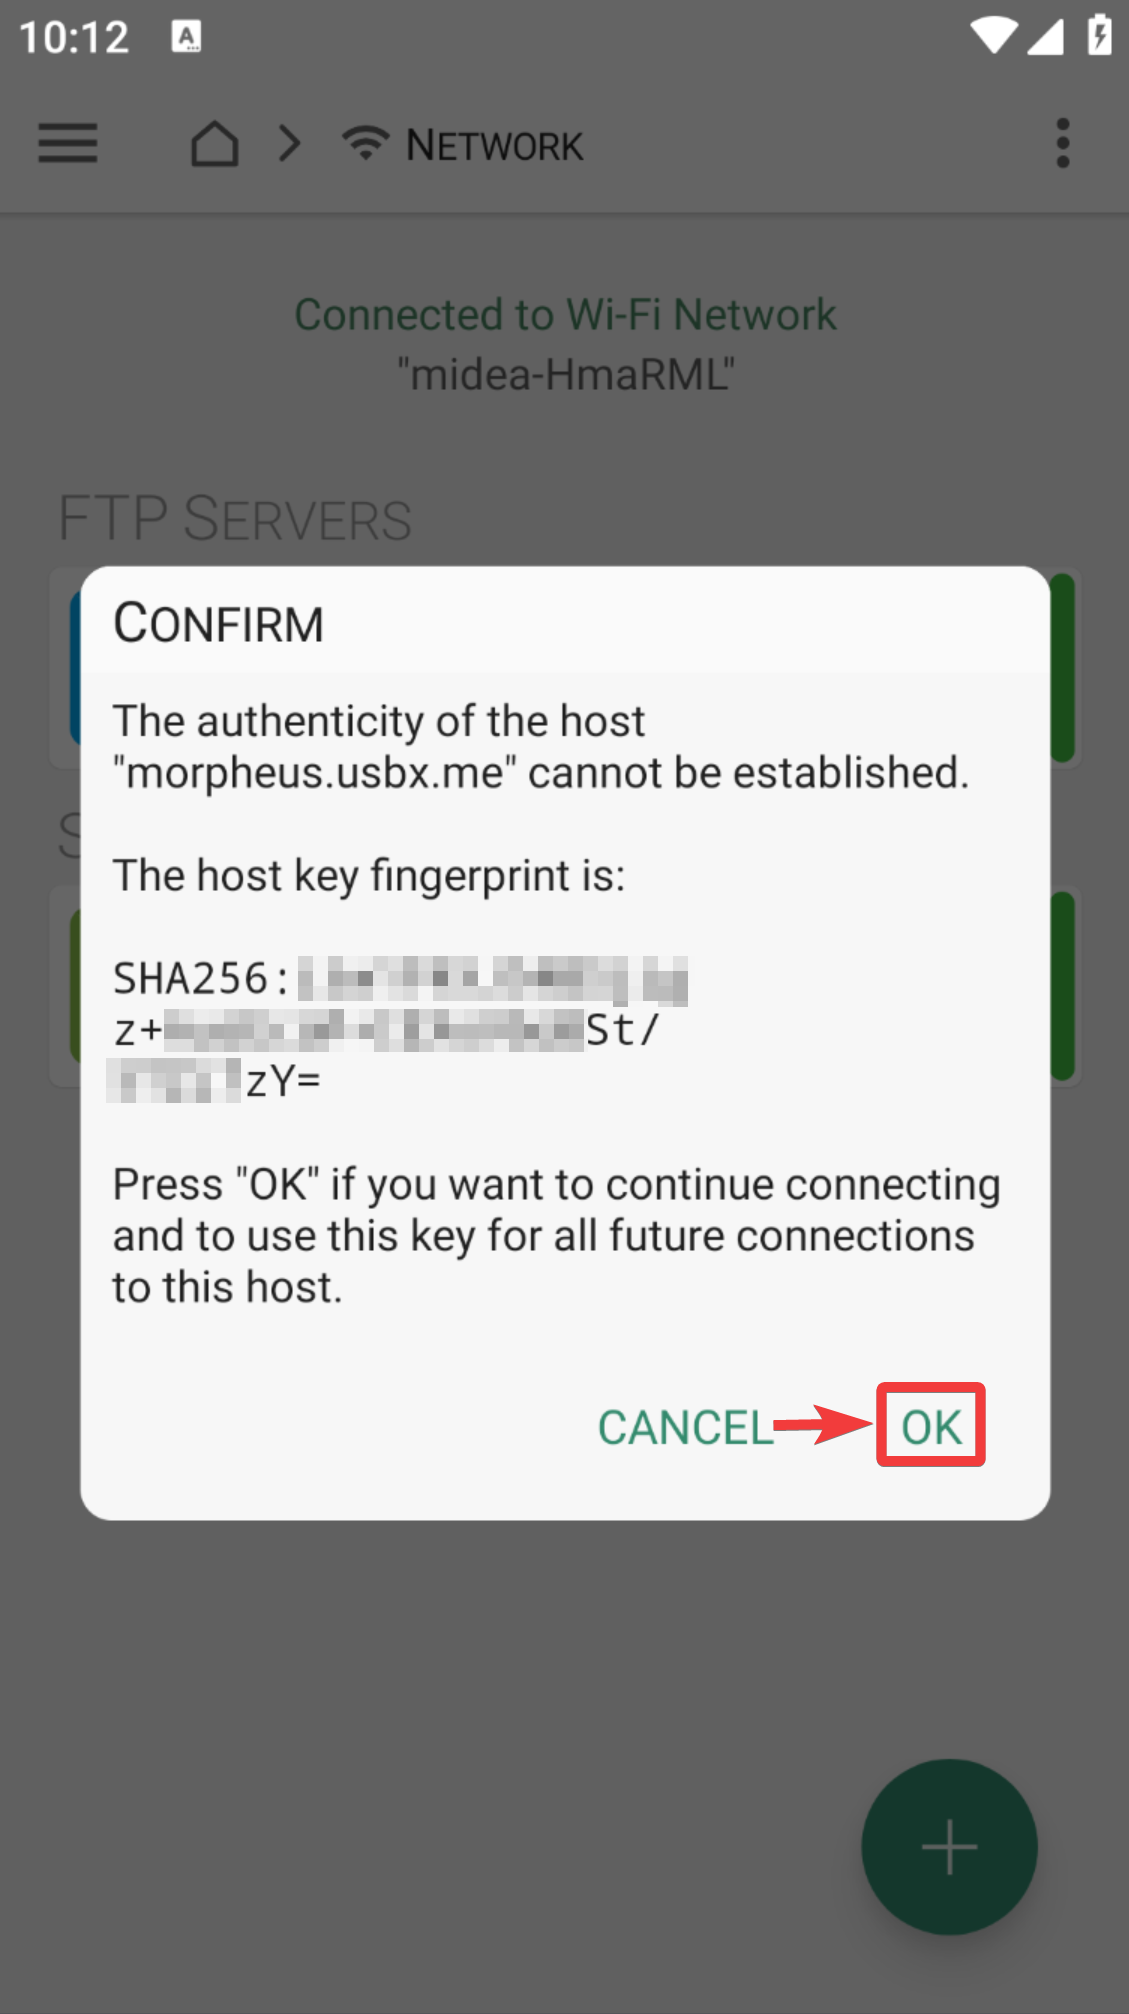
- Launch it, Check
Remember Certificateoption and press OK.
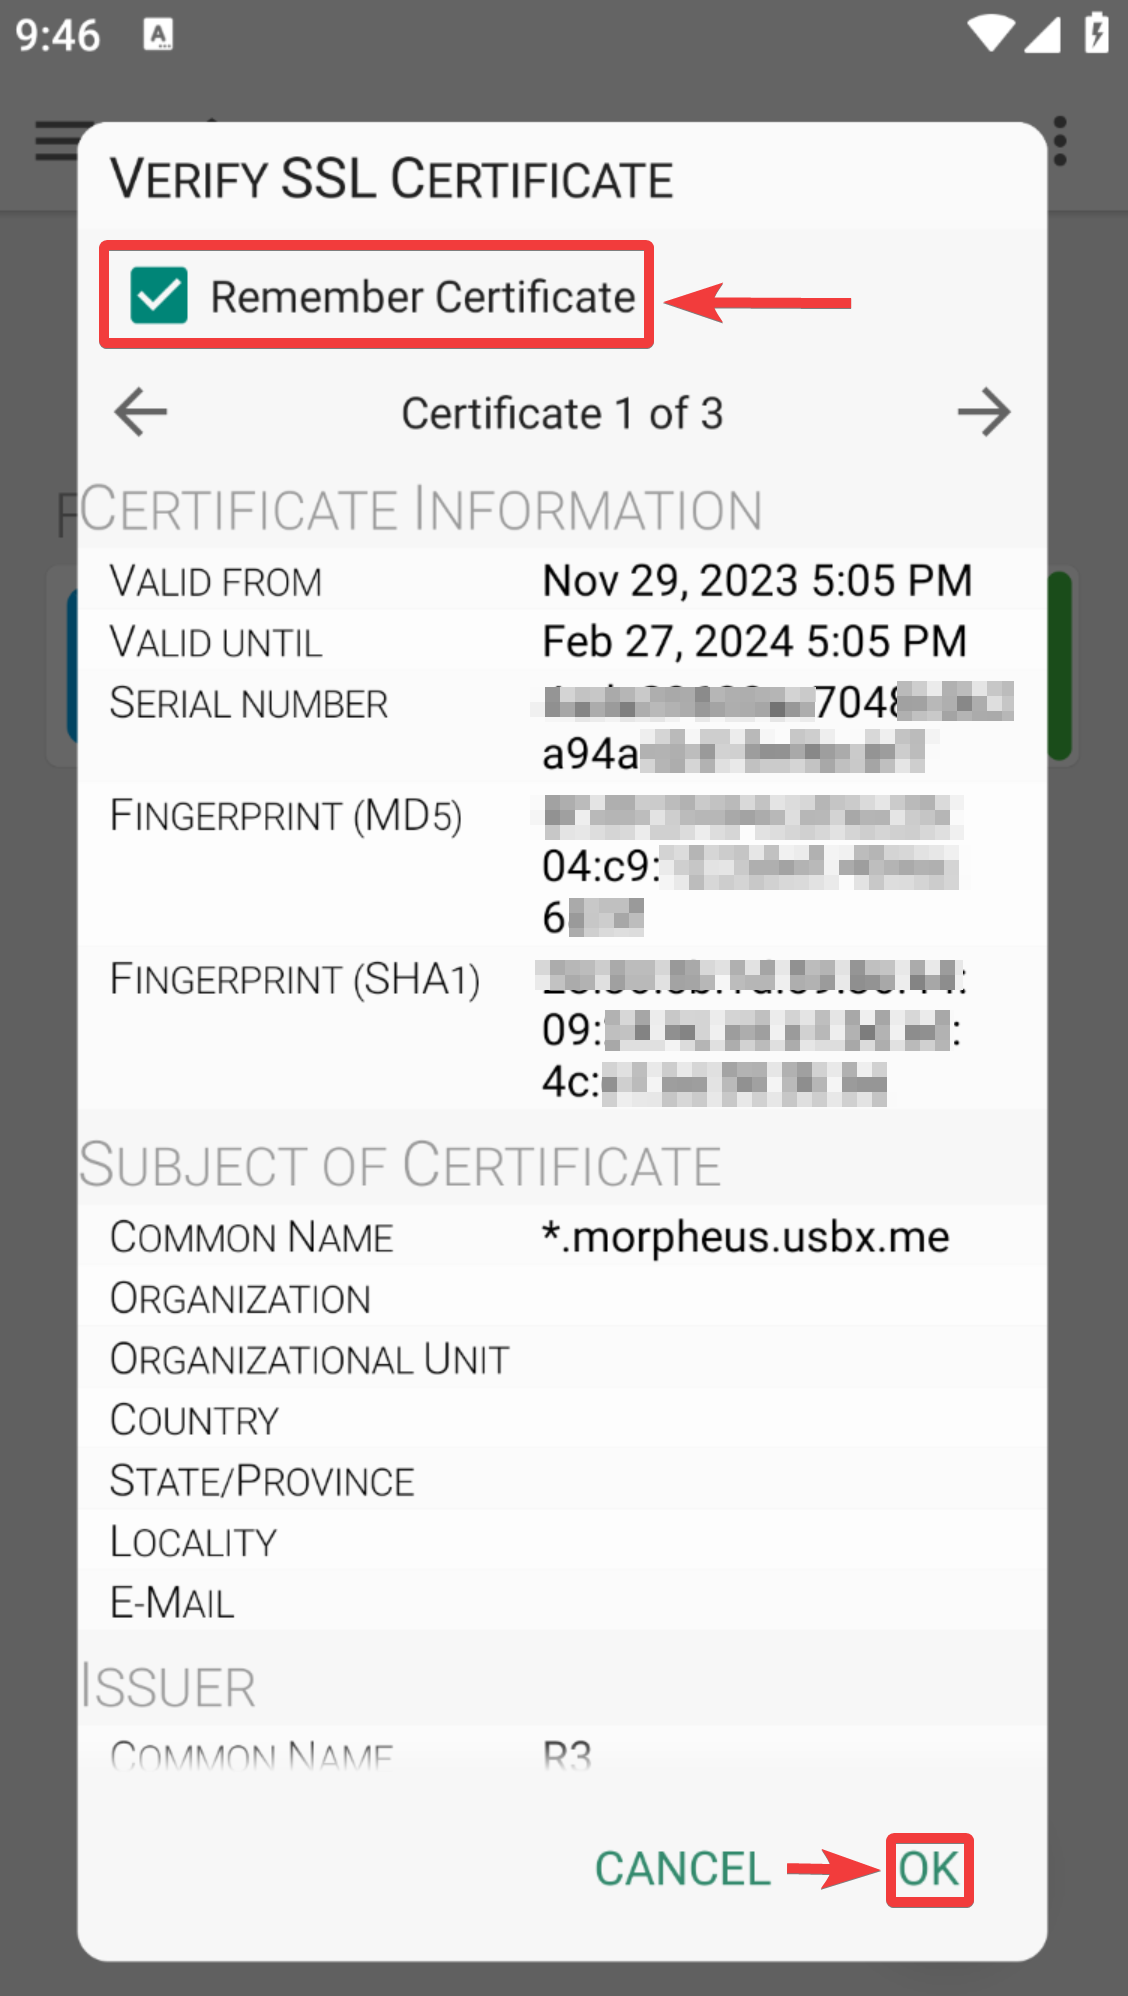
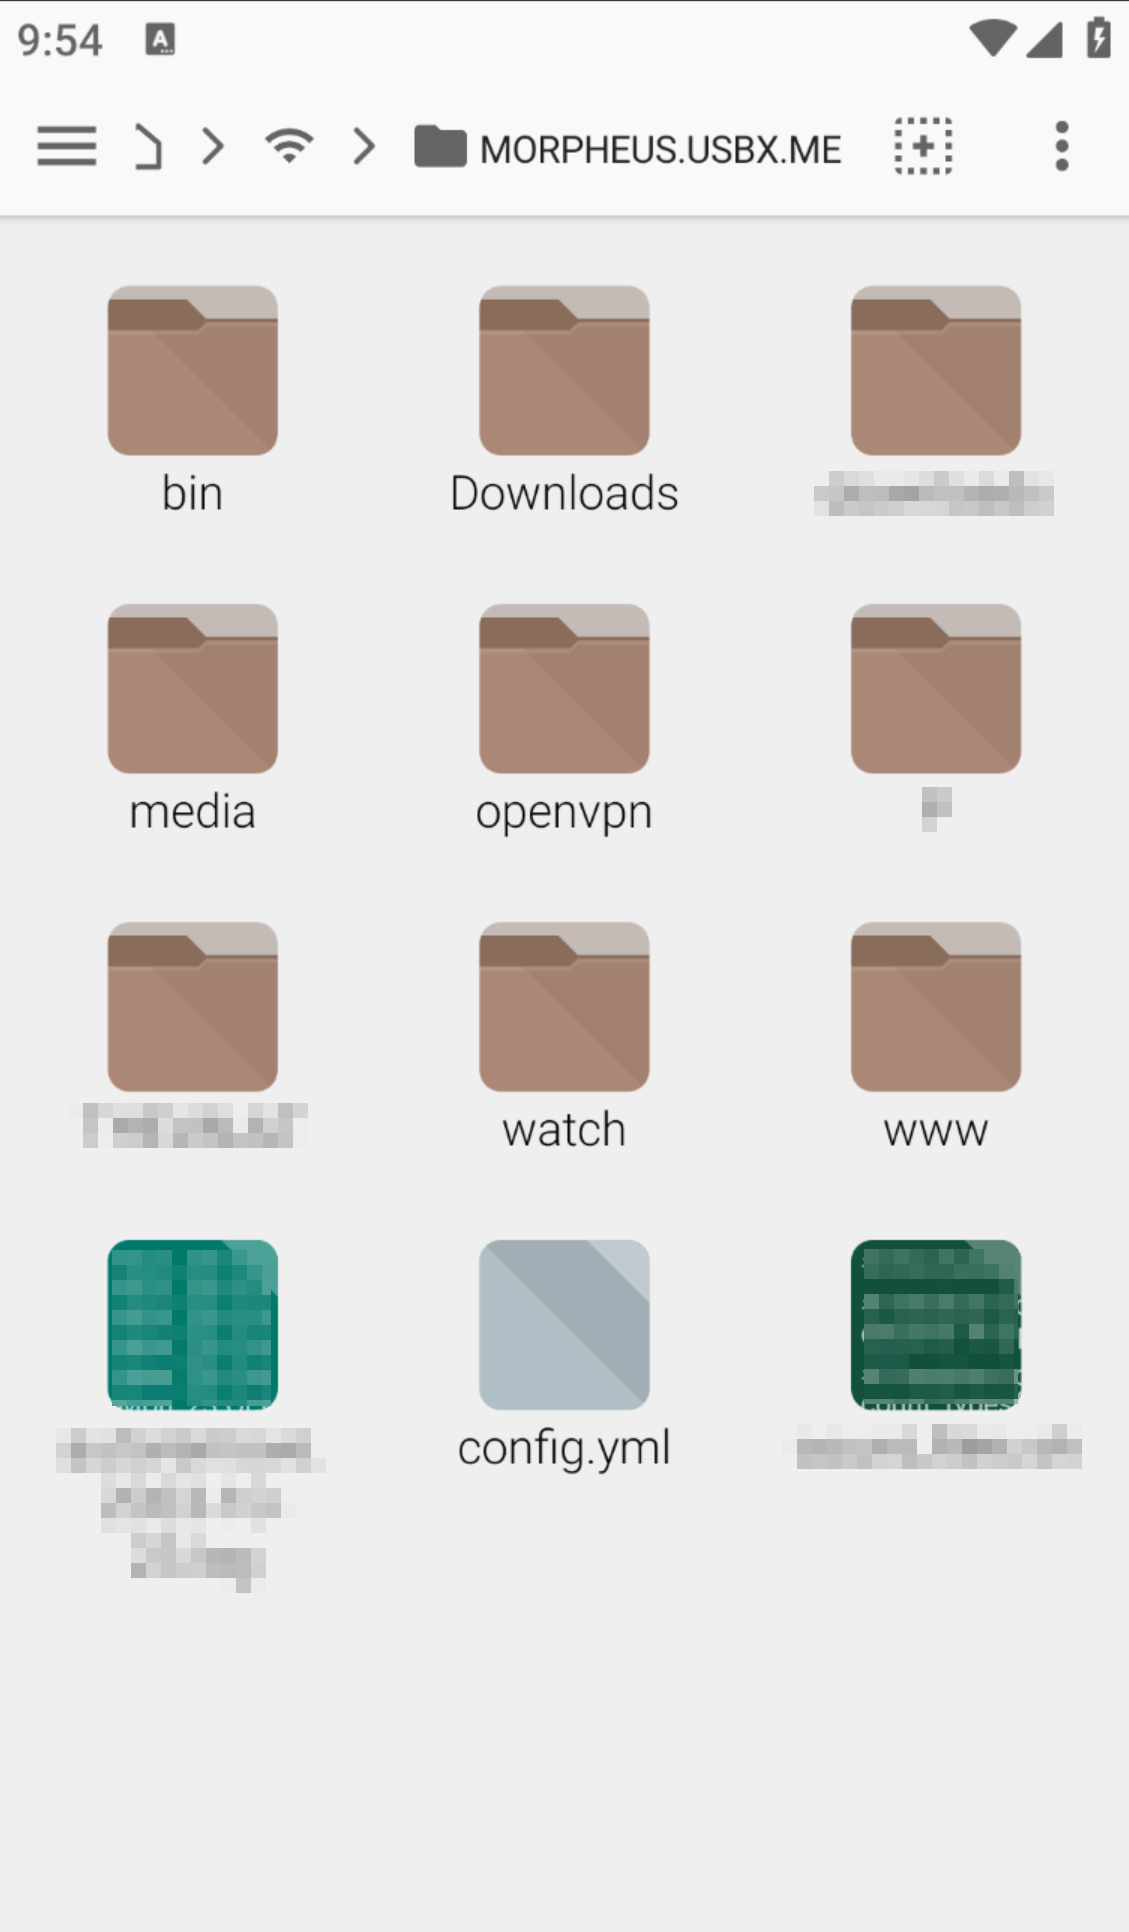
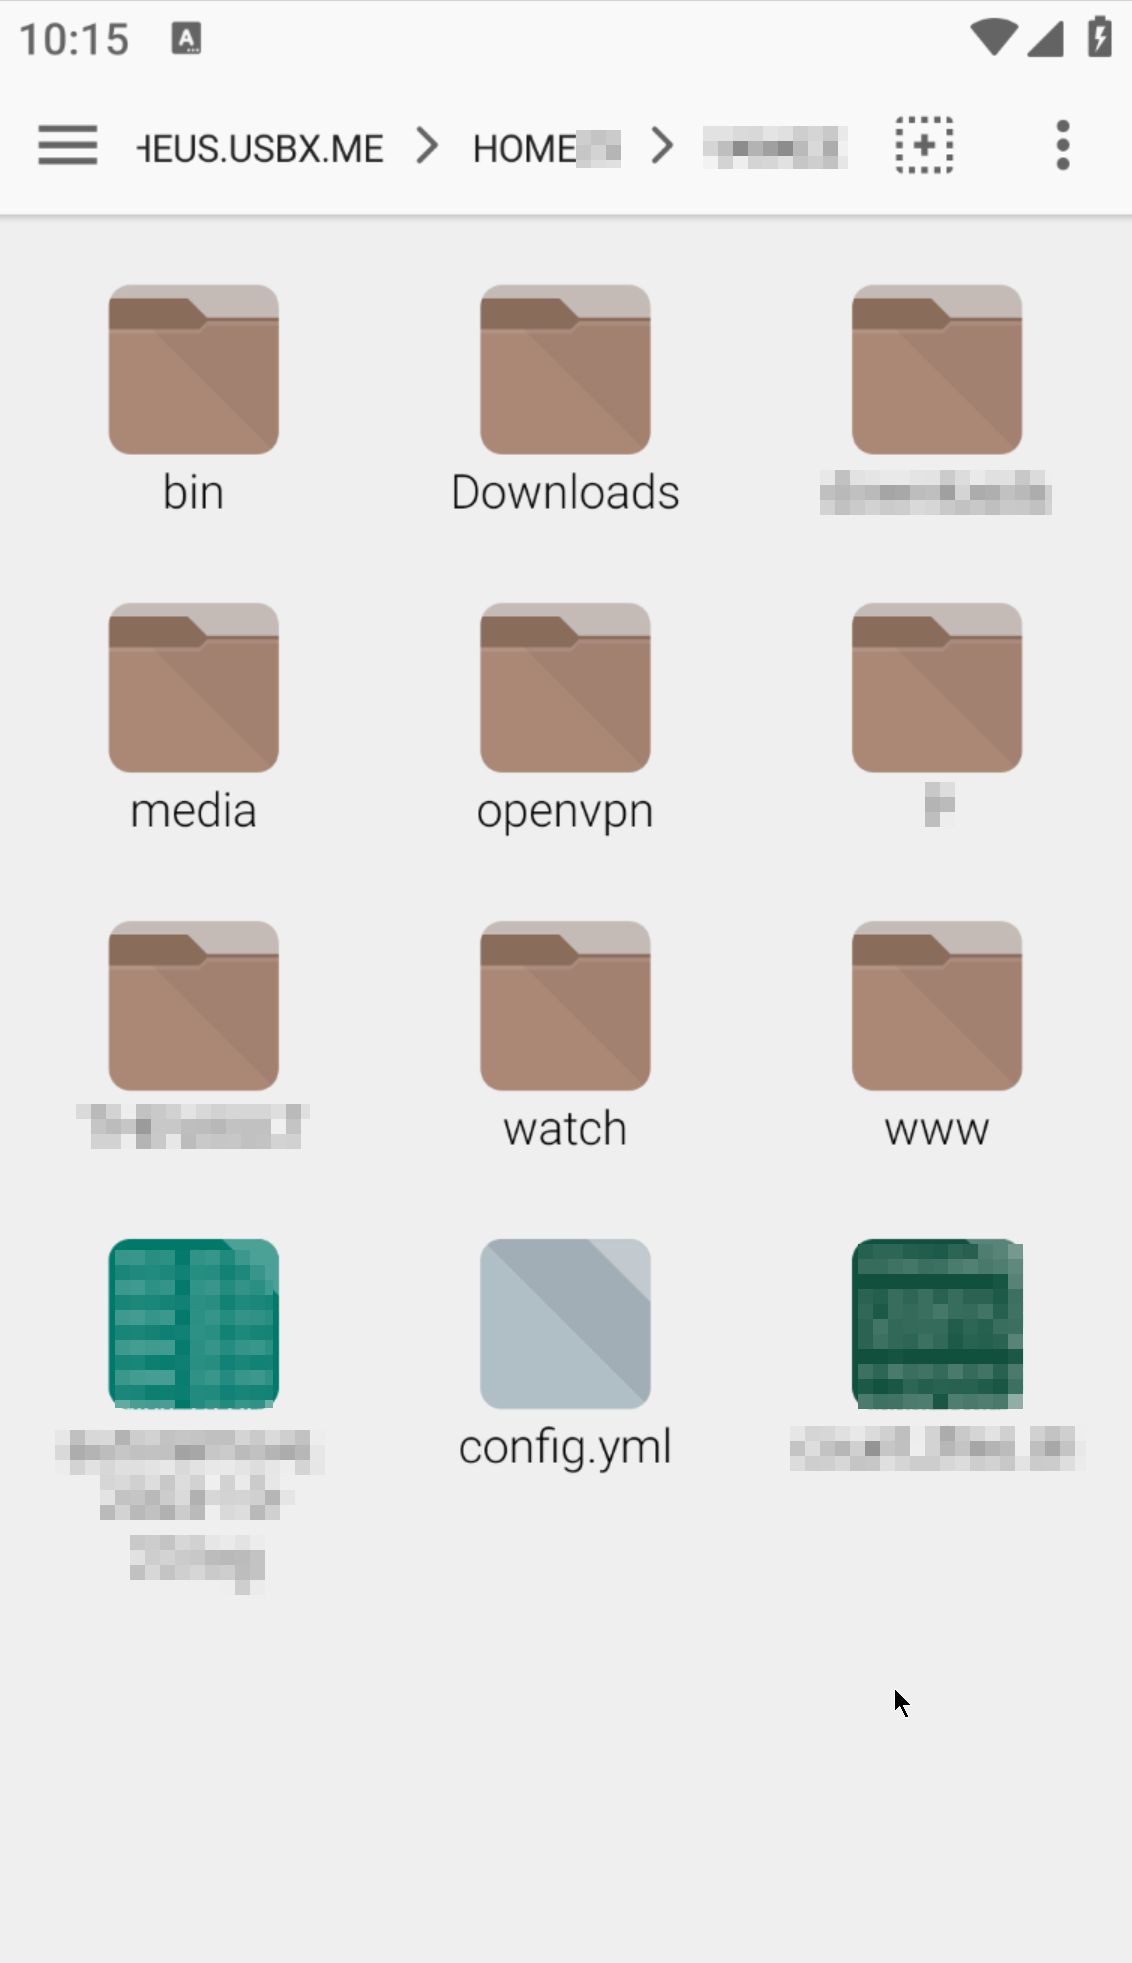
- You will be greeted by your directories and files now.
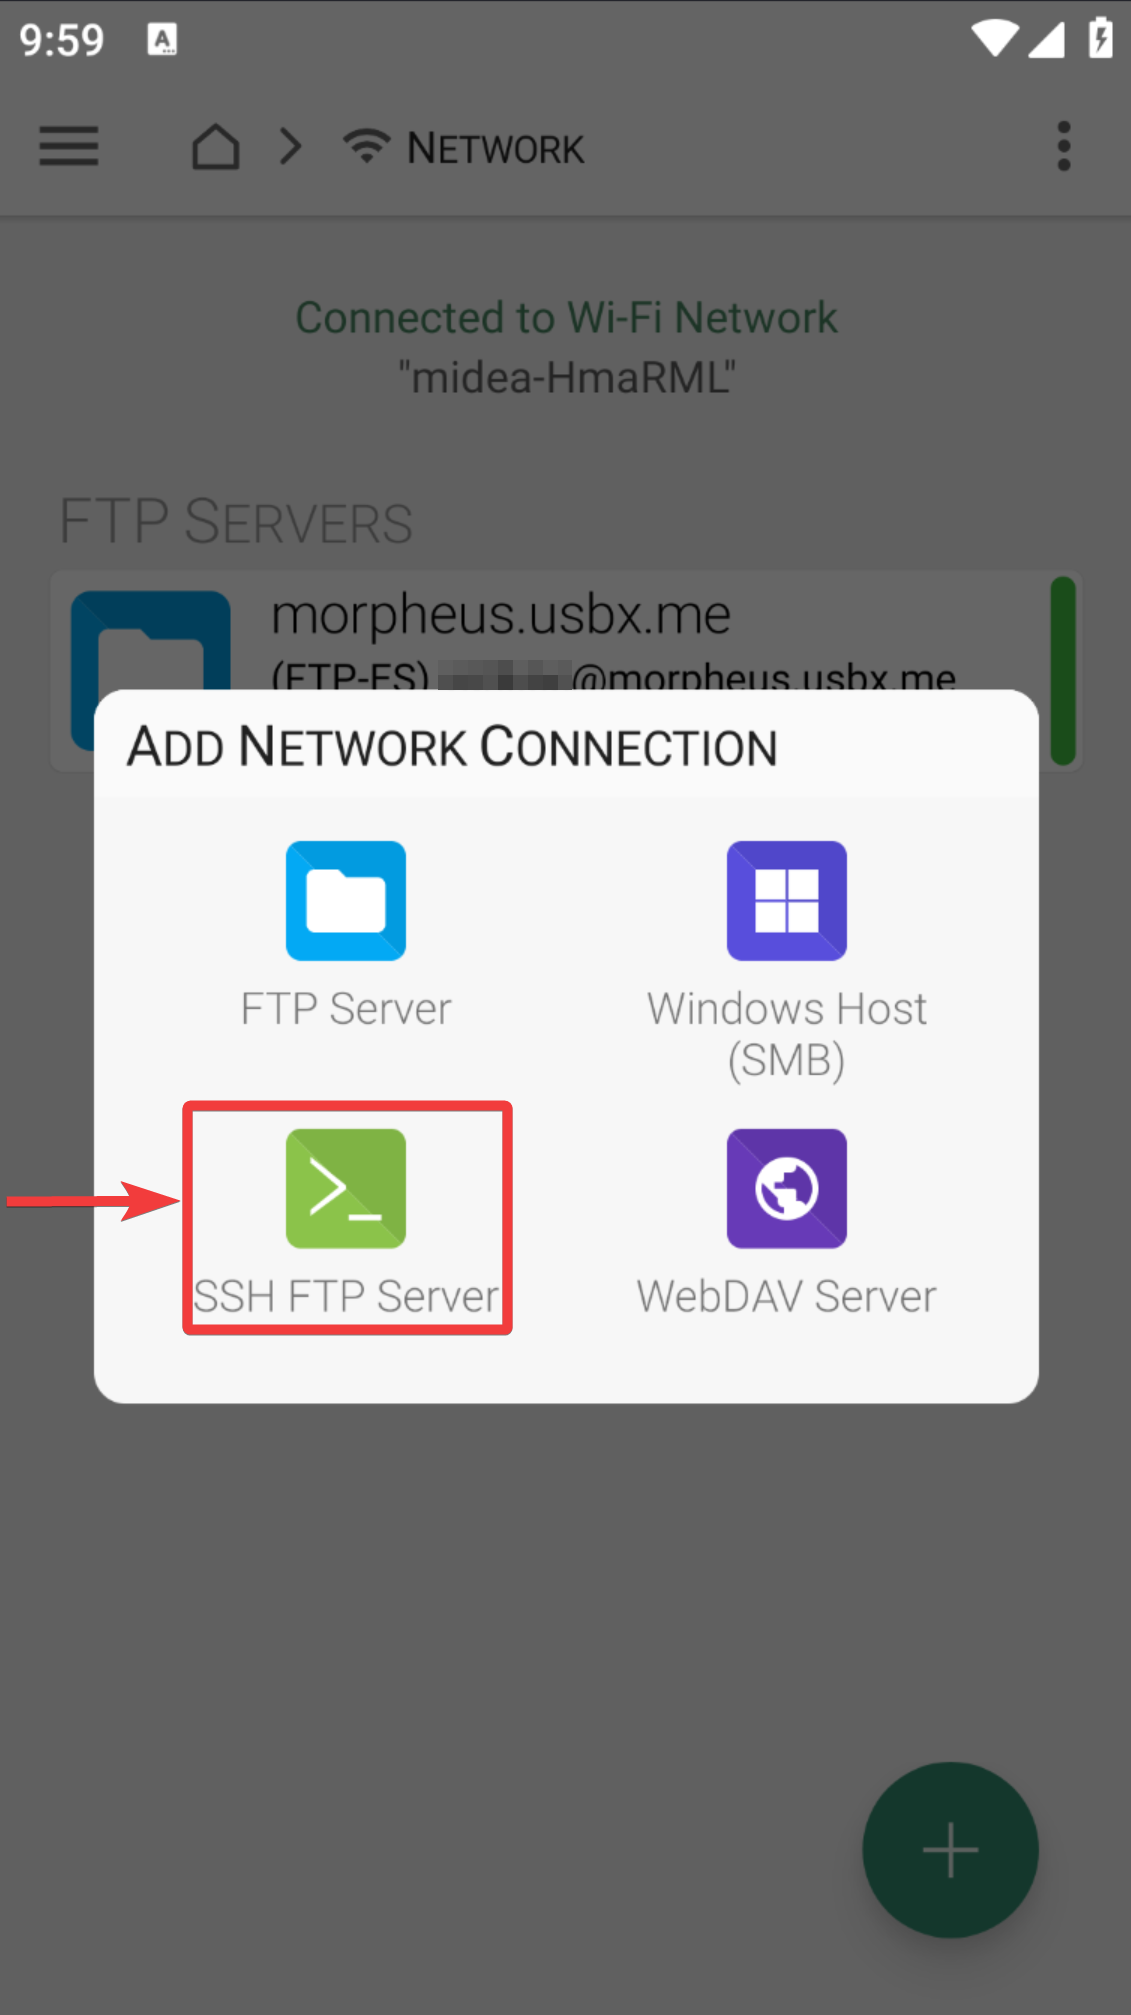
- Select
SSH FTP Serverto add SFTP connection.
- Next, enter the
Hostname or IP Address,UsernameandPassword.- Make sure to replace the above with your specific details, which can be found on the UCP.
- Click the Tick Mark Icon in the bottom right corner.
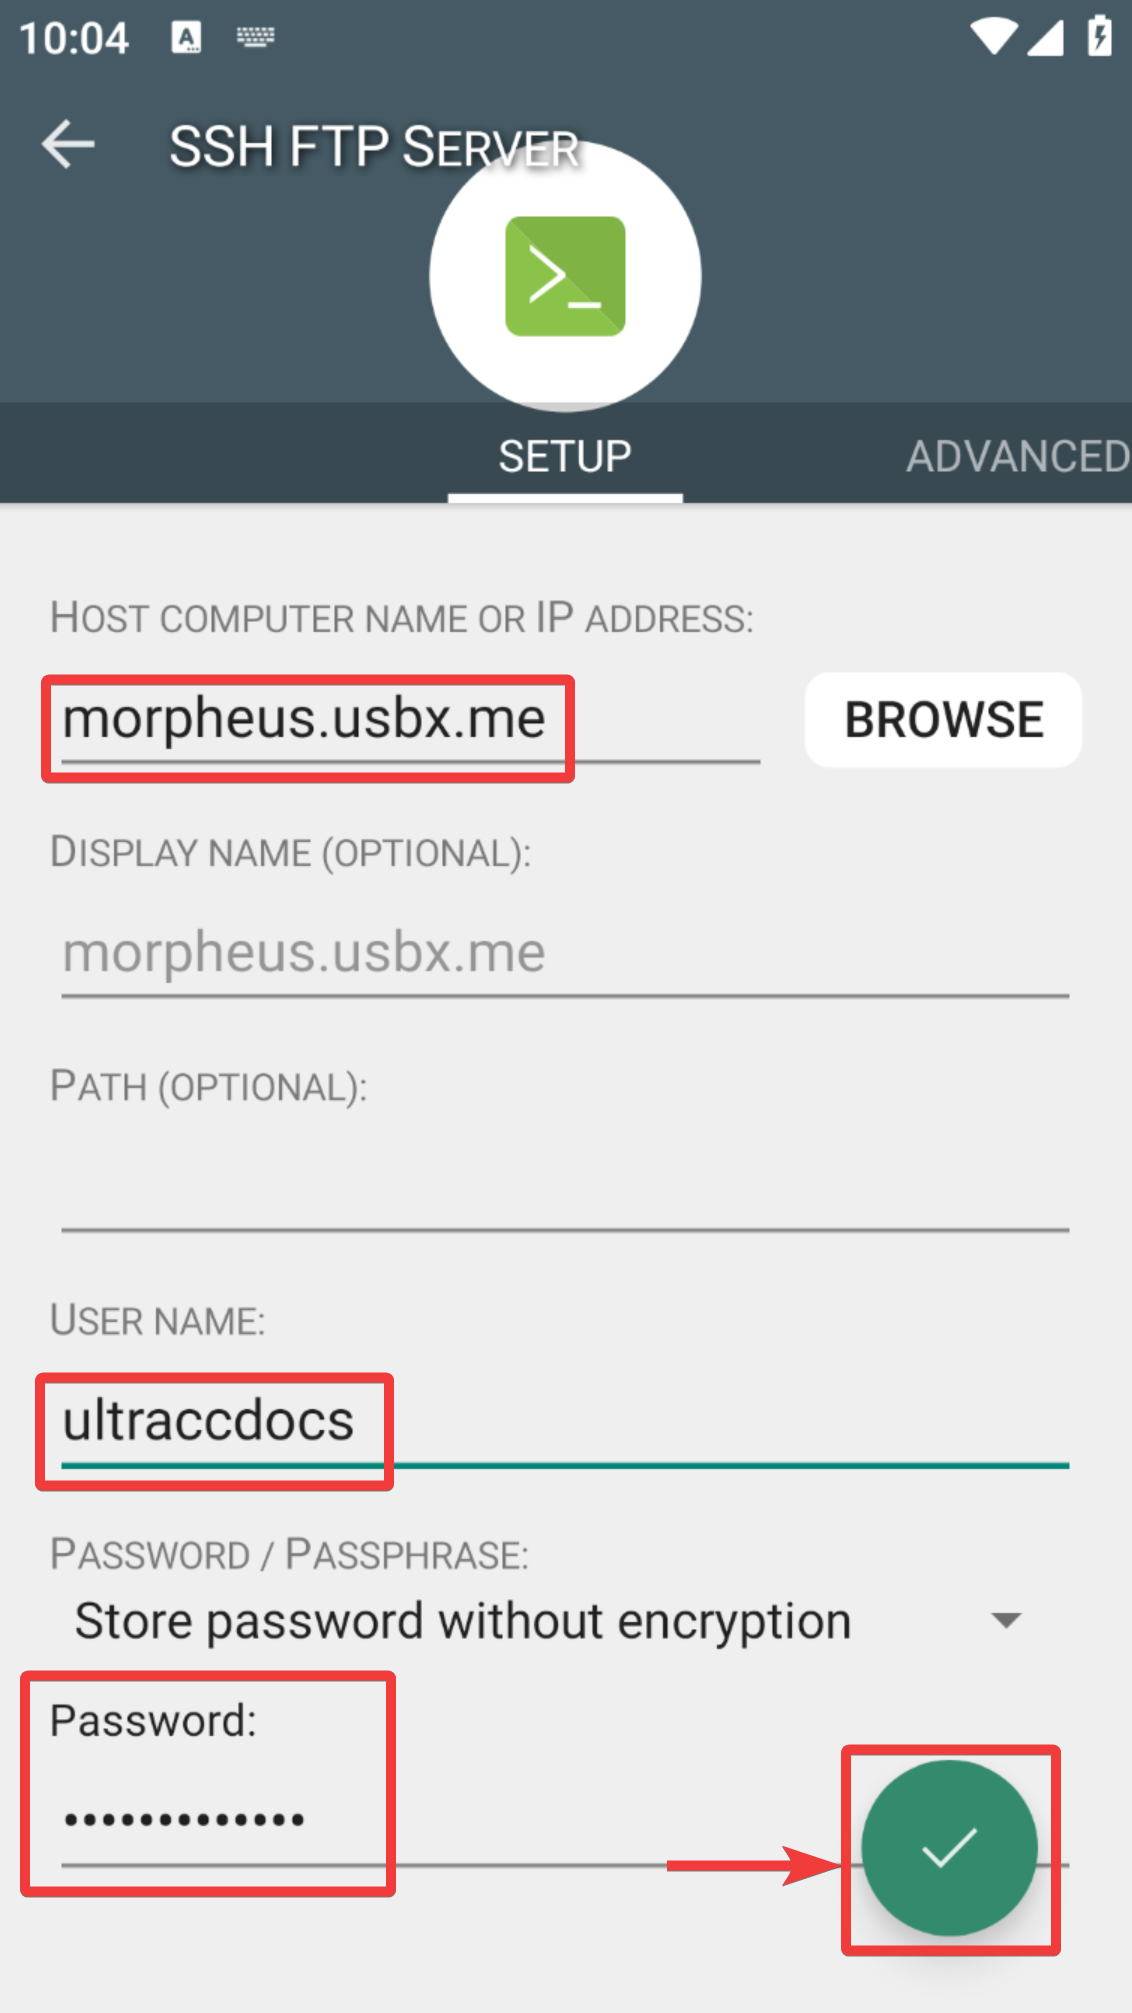
- Your SFTP server is now added as a network access.
- Launch it, and press OK to continue.
- You will be greeted by your directories and files now.
Torrent and Usenet Management
Transdrone
- Manage torrents in rTorrent, Deluge, qBittorrent and more.
- Add torrents via search, RSS feeds or URLs; monitor progress, get notifications.
- Torrent Management.
- Google Play Store link
Connection Details
- Open the application & click Settings in the upper right corner.
- Next, select Add New Server Option.
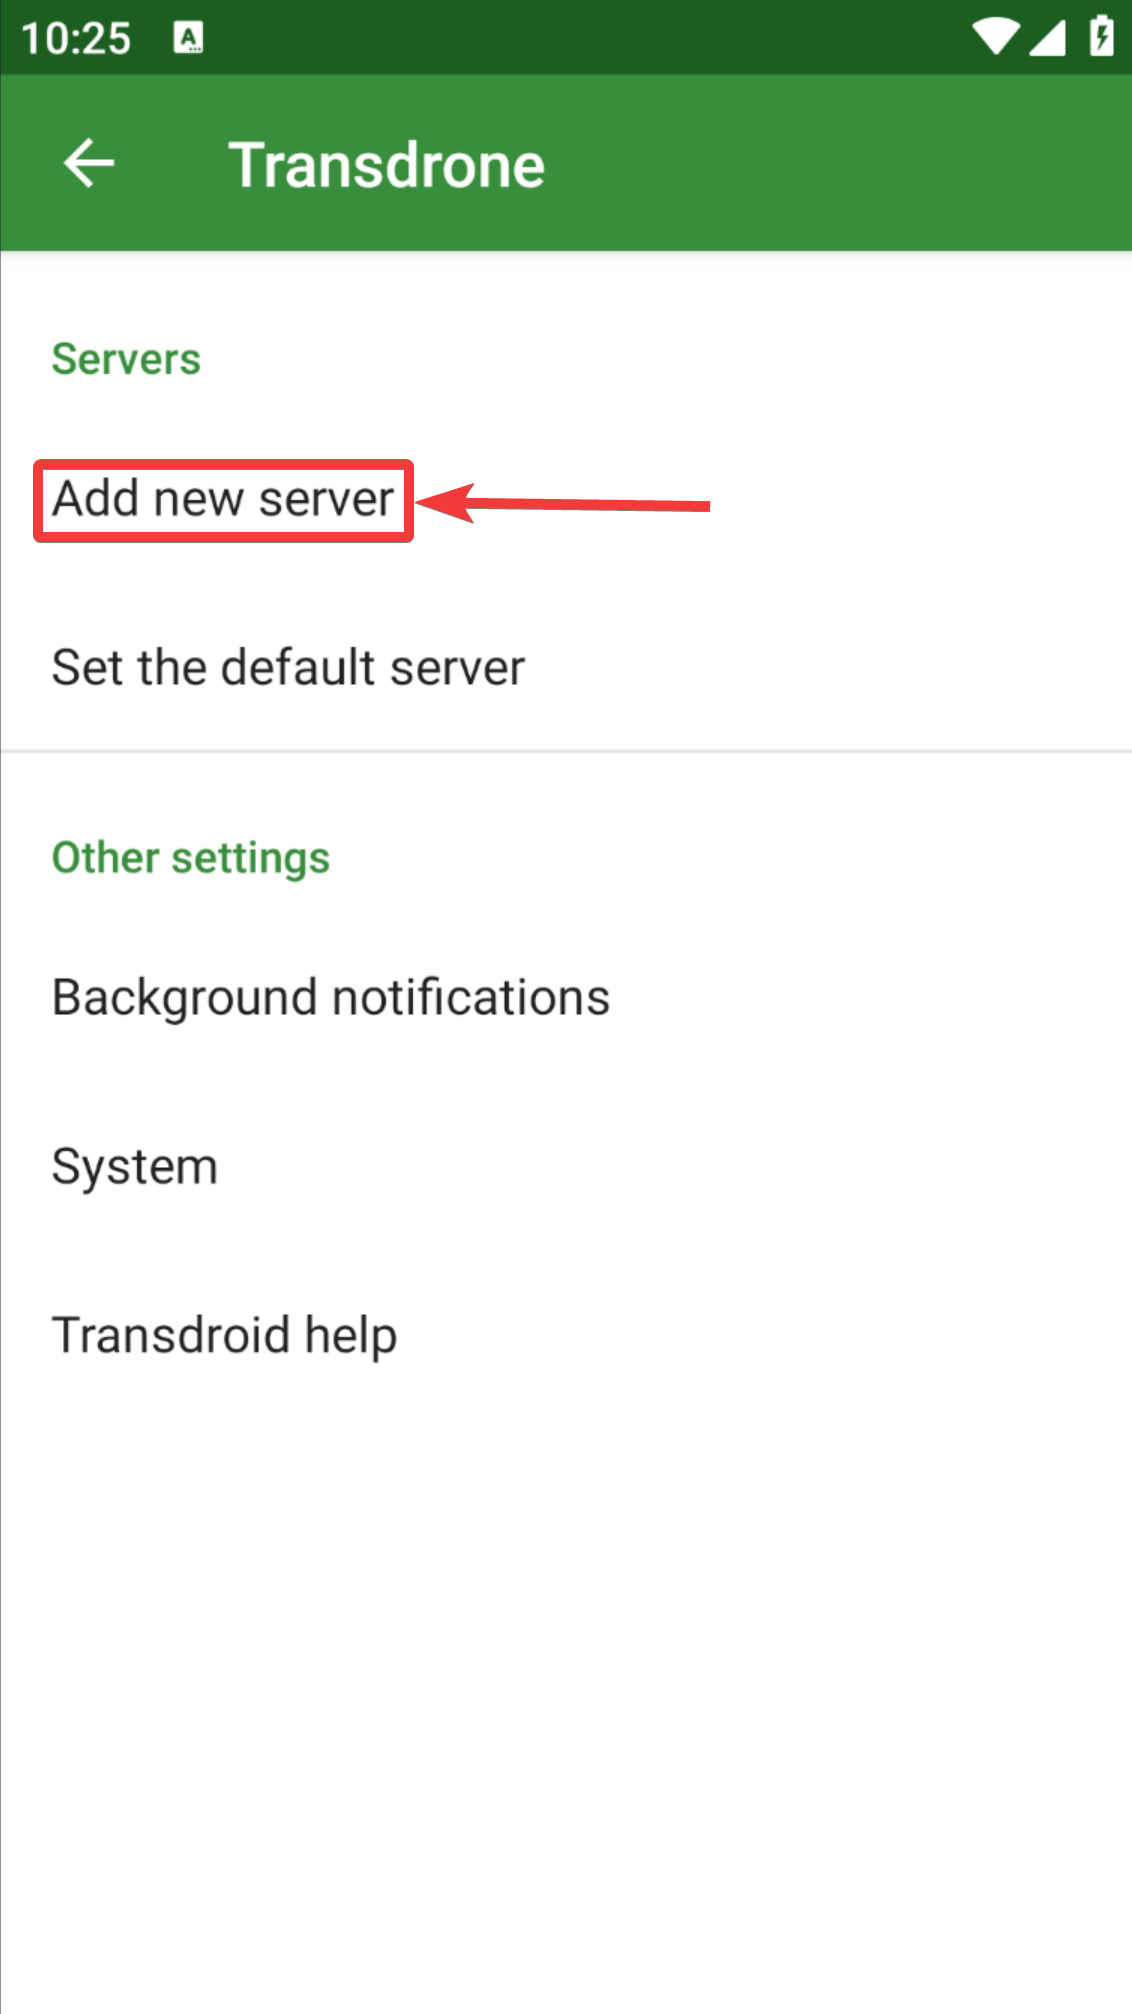
- Now, select Add normal, Custom Server option.
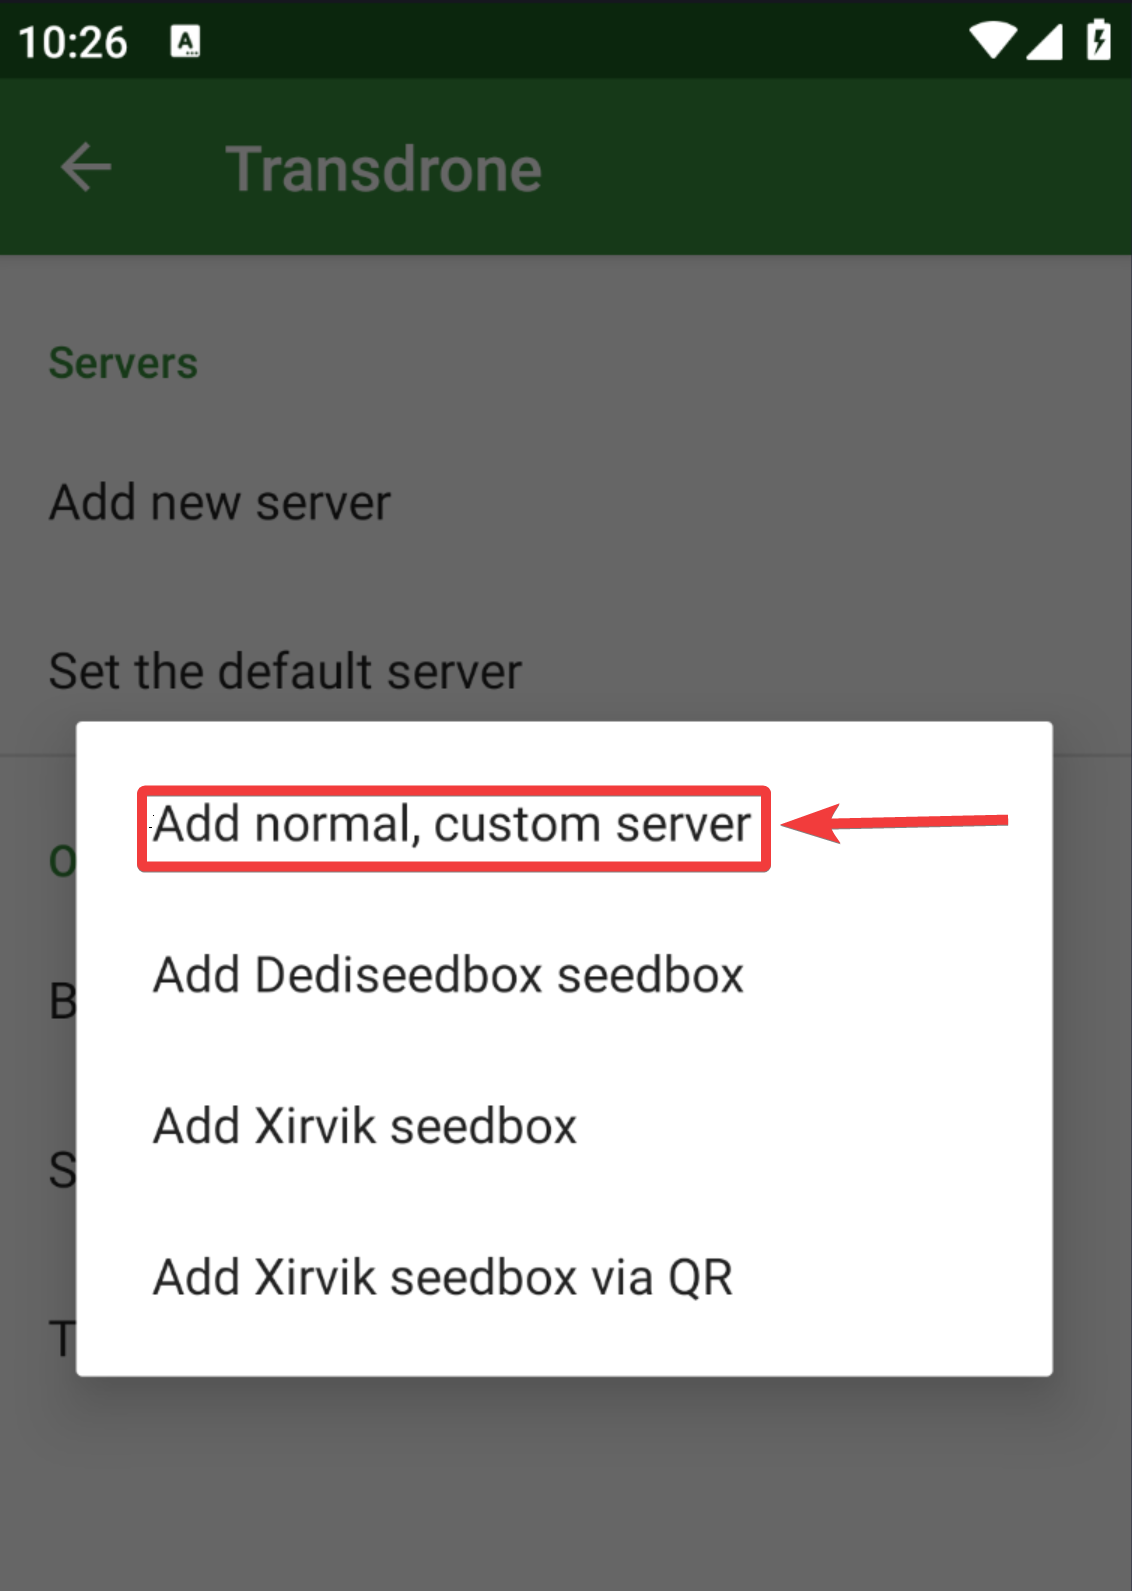
- The above three steps are common and will be repeated for adding different torrent clients in this application.
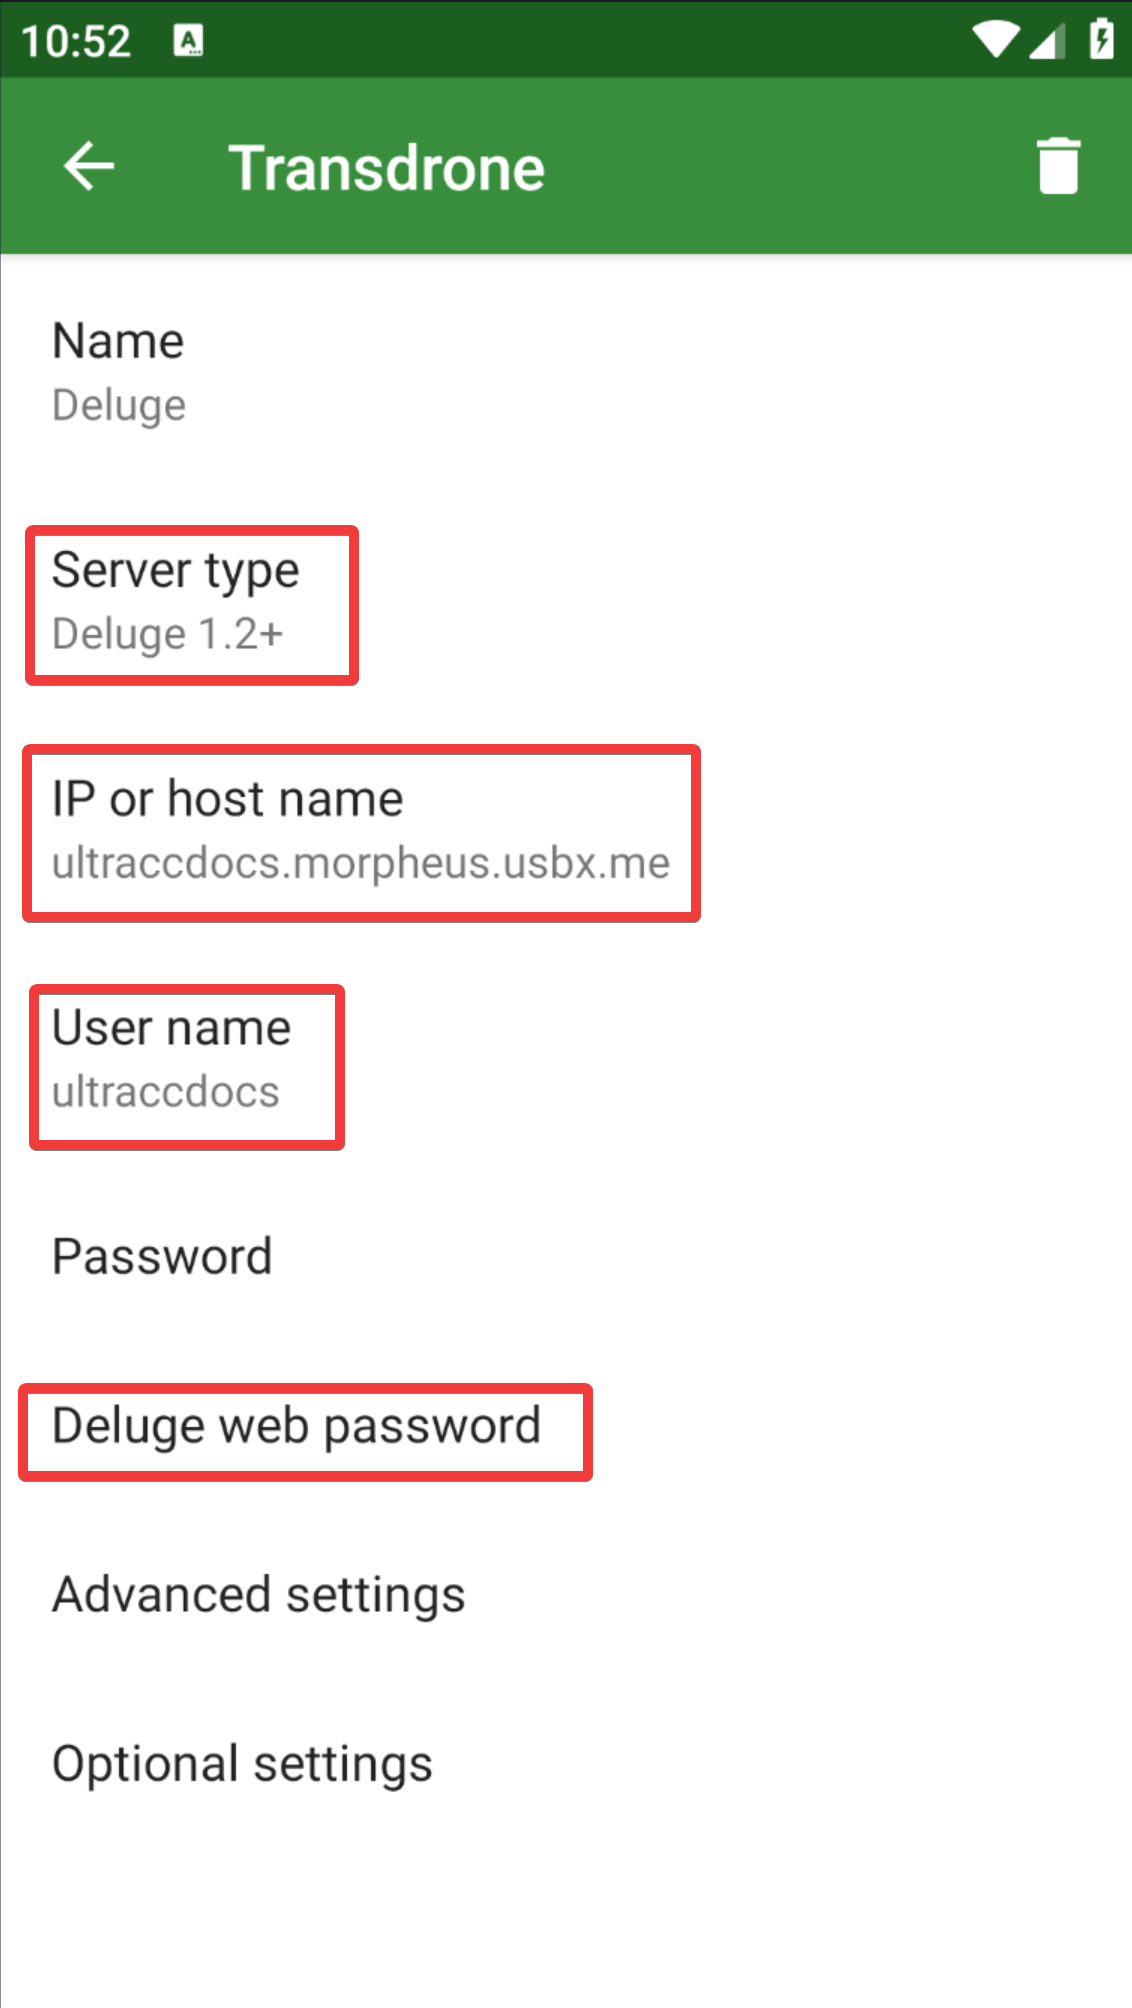
Deluge
-
Name: This is just for your reference and can be any name you wish.
-
Server Type: Here is where you choose which client you wish to interface with. For this section, we will be using Deluge 1.2+.
-
IP or hostname: Here, you need to add your Ultra.cc URL, which can be found in the first half of your Deluge Web UI URL. The format looks like this
username.hostname.usbx.me -
Username: Deluge username, which can be found on the Apps tab of the UCP under show info for Deluge.
-
Deluge web password: Deluge password, which can be found on the Apps tab of the UCP. Click show info for Deluge (you may need to click the eyeball icon to reveal it).
-
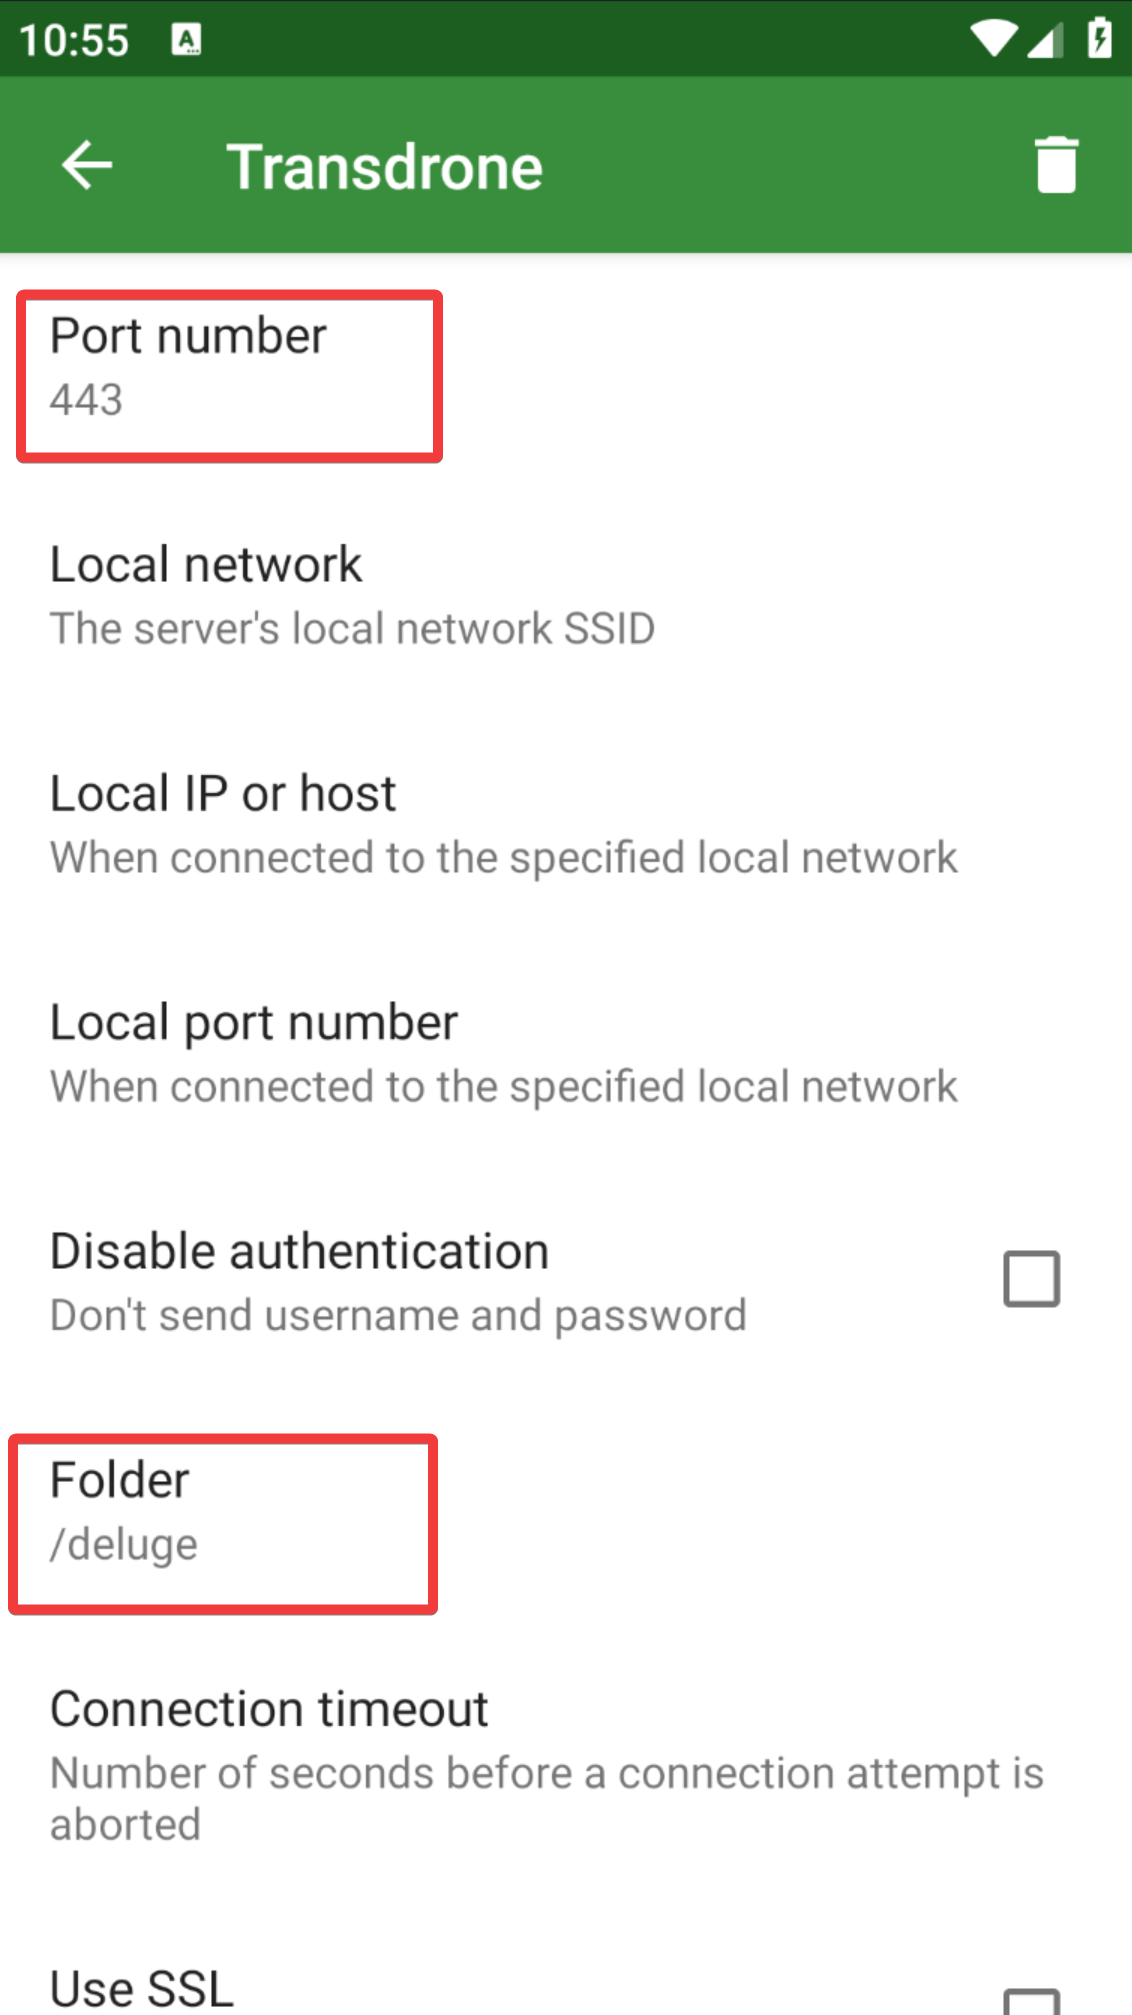
Advanced Settings: Advanced Settings only contains a few settings you need to address:
-
Port number: 443
-
Folder: /deluge
-
Use SSL: Yes
-
Accept all SSL certificates: Checked
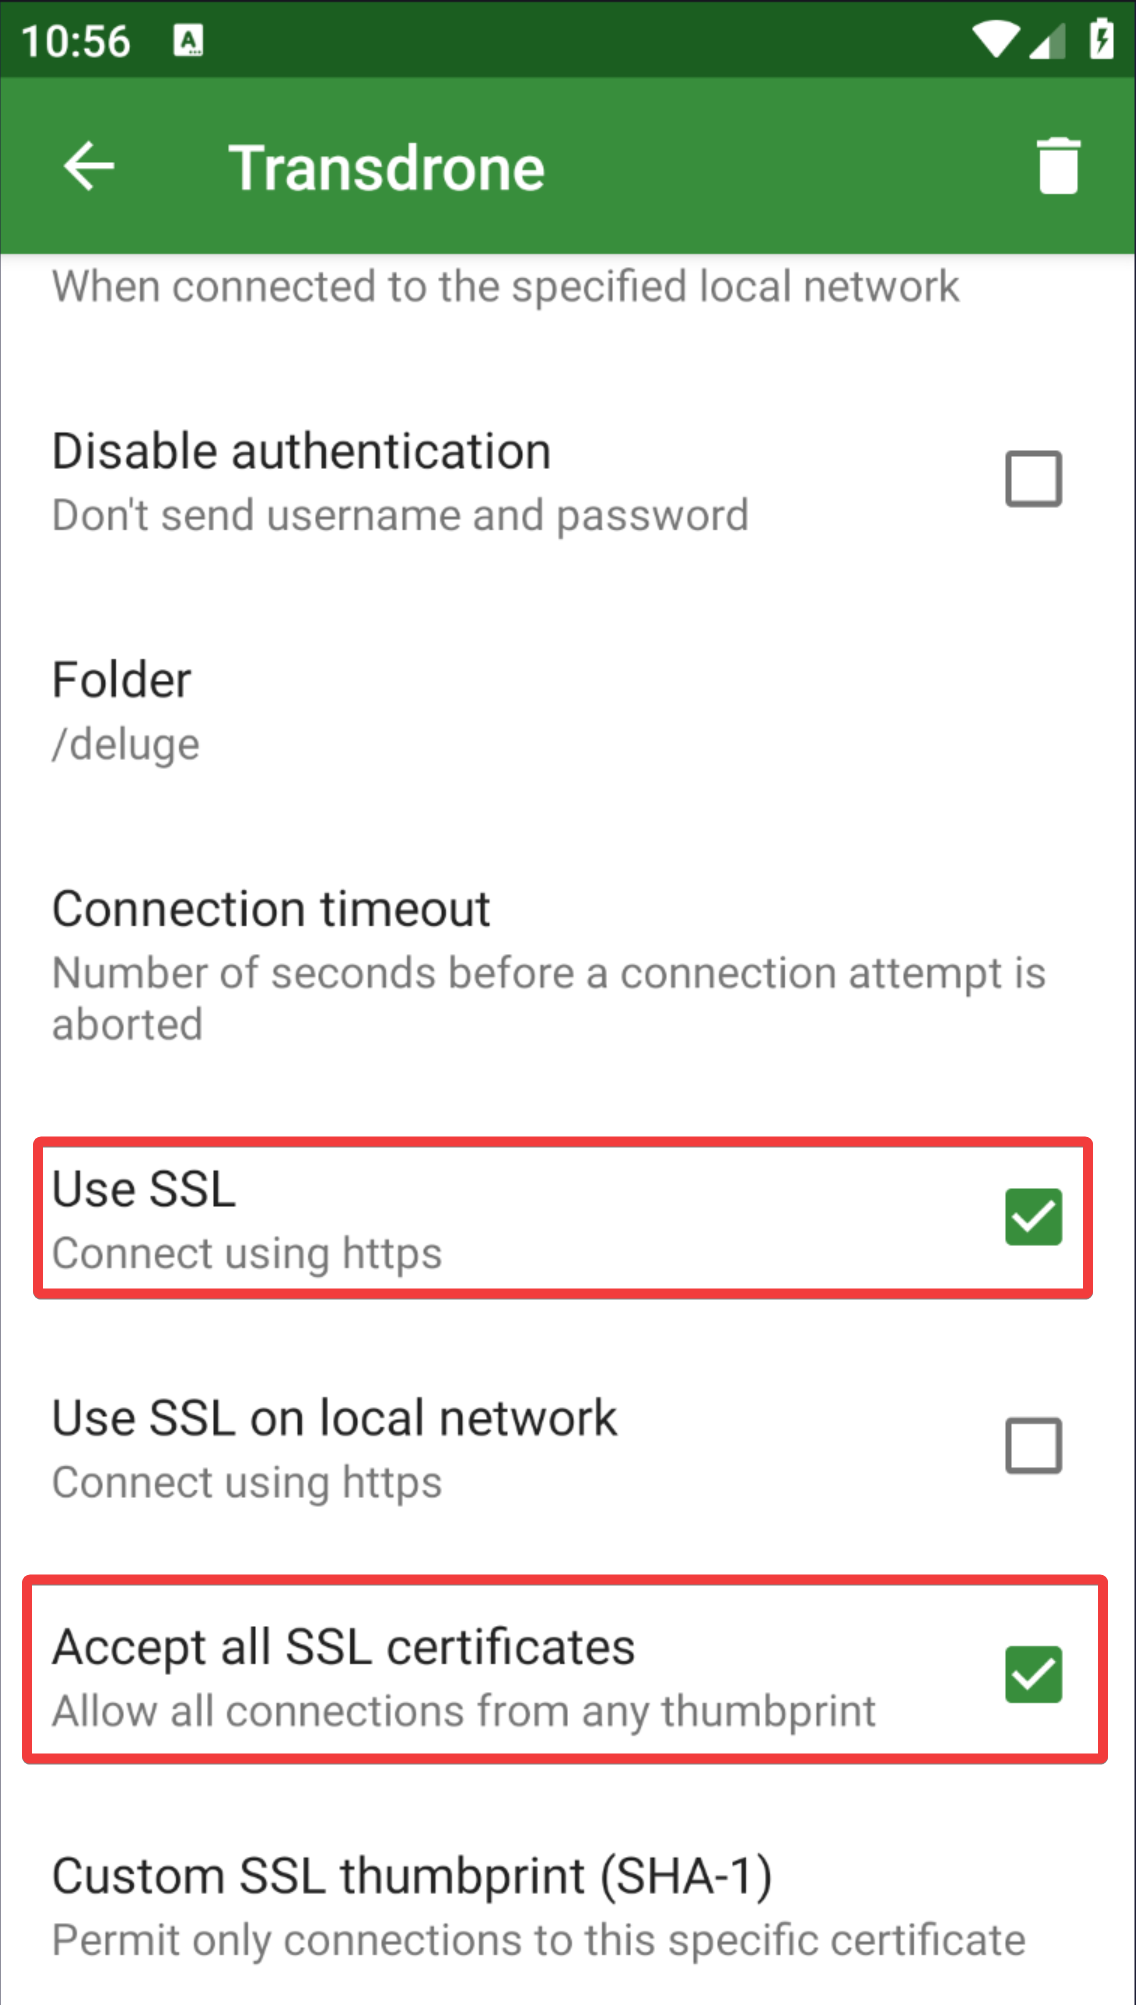
-
Optional Settings: Most of these options are non-applicable; however, depending on your preference, you may want to enable notifications for when a new torrent is added or has finished downloading.
-
Next, click the Back Arrow button in the top left corner.
-
Your Deluge client is now added.
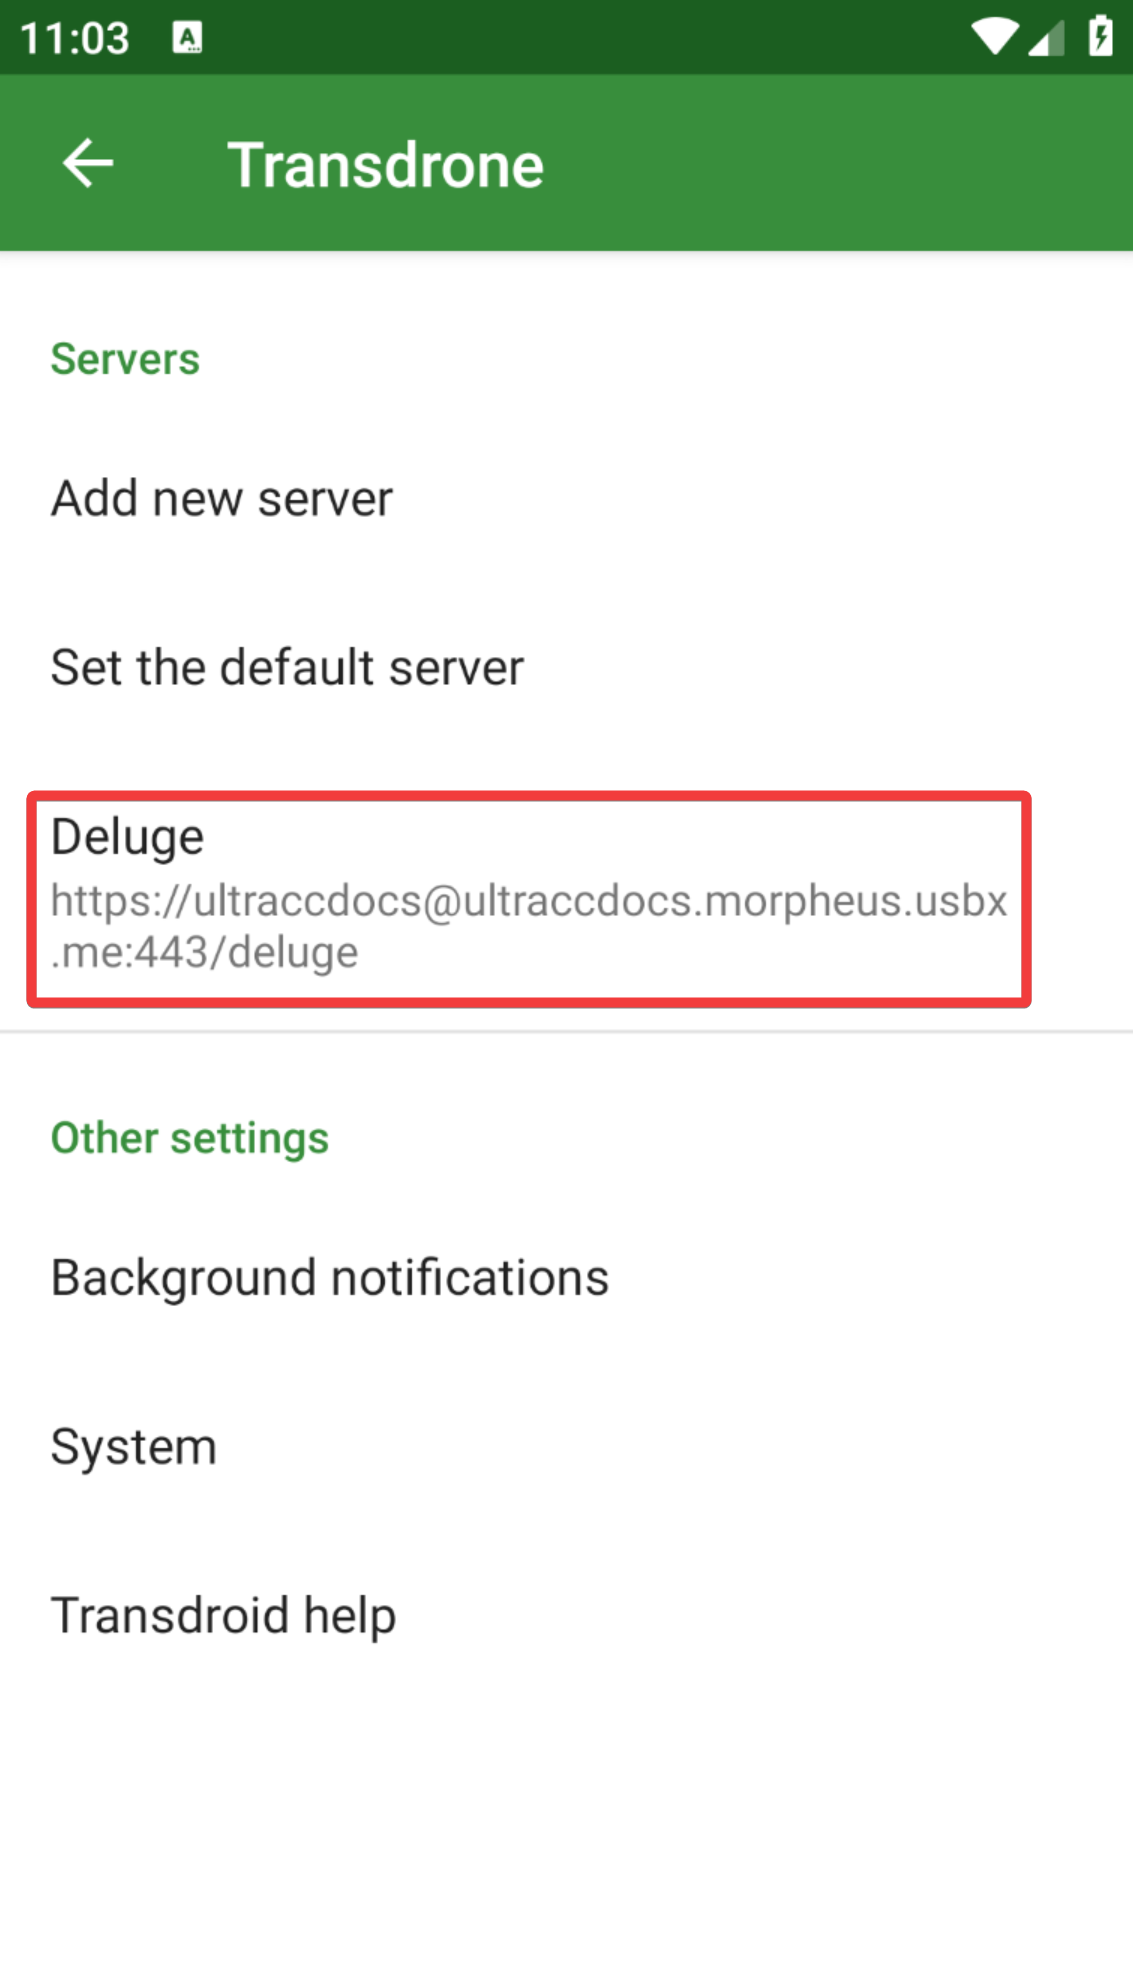
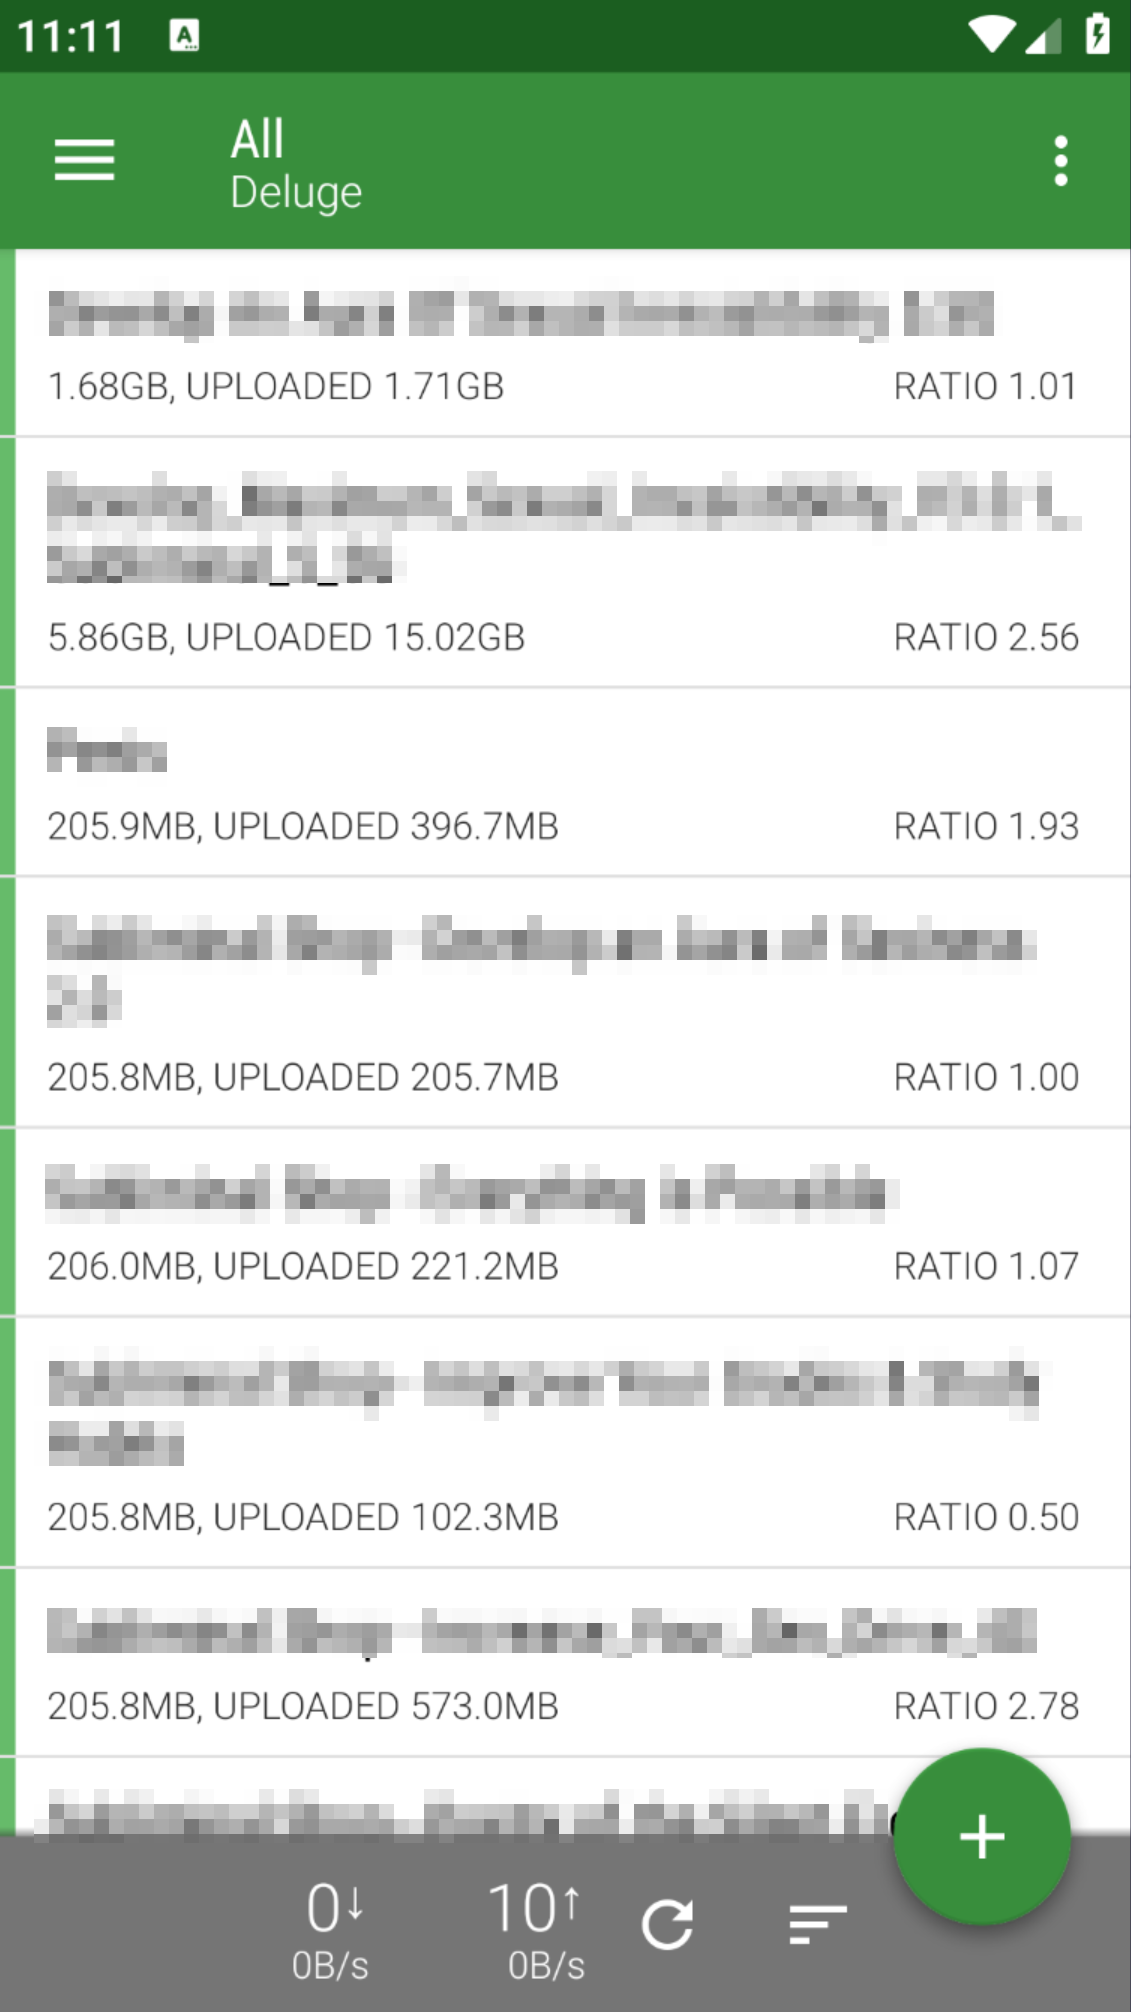
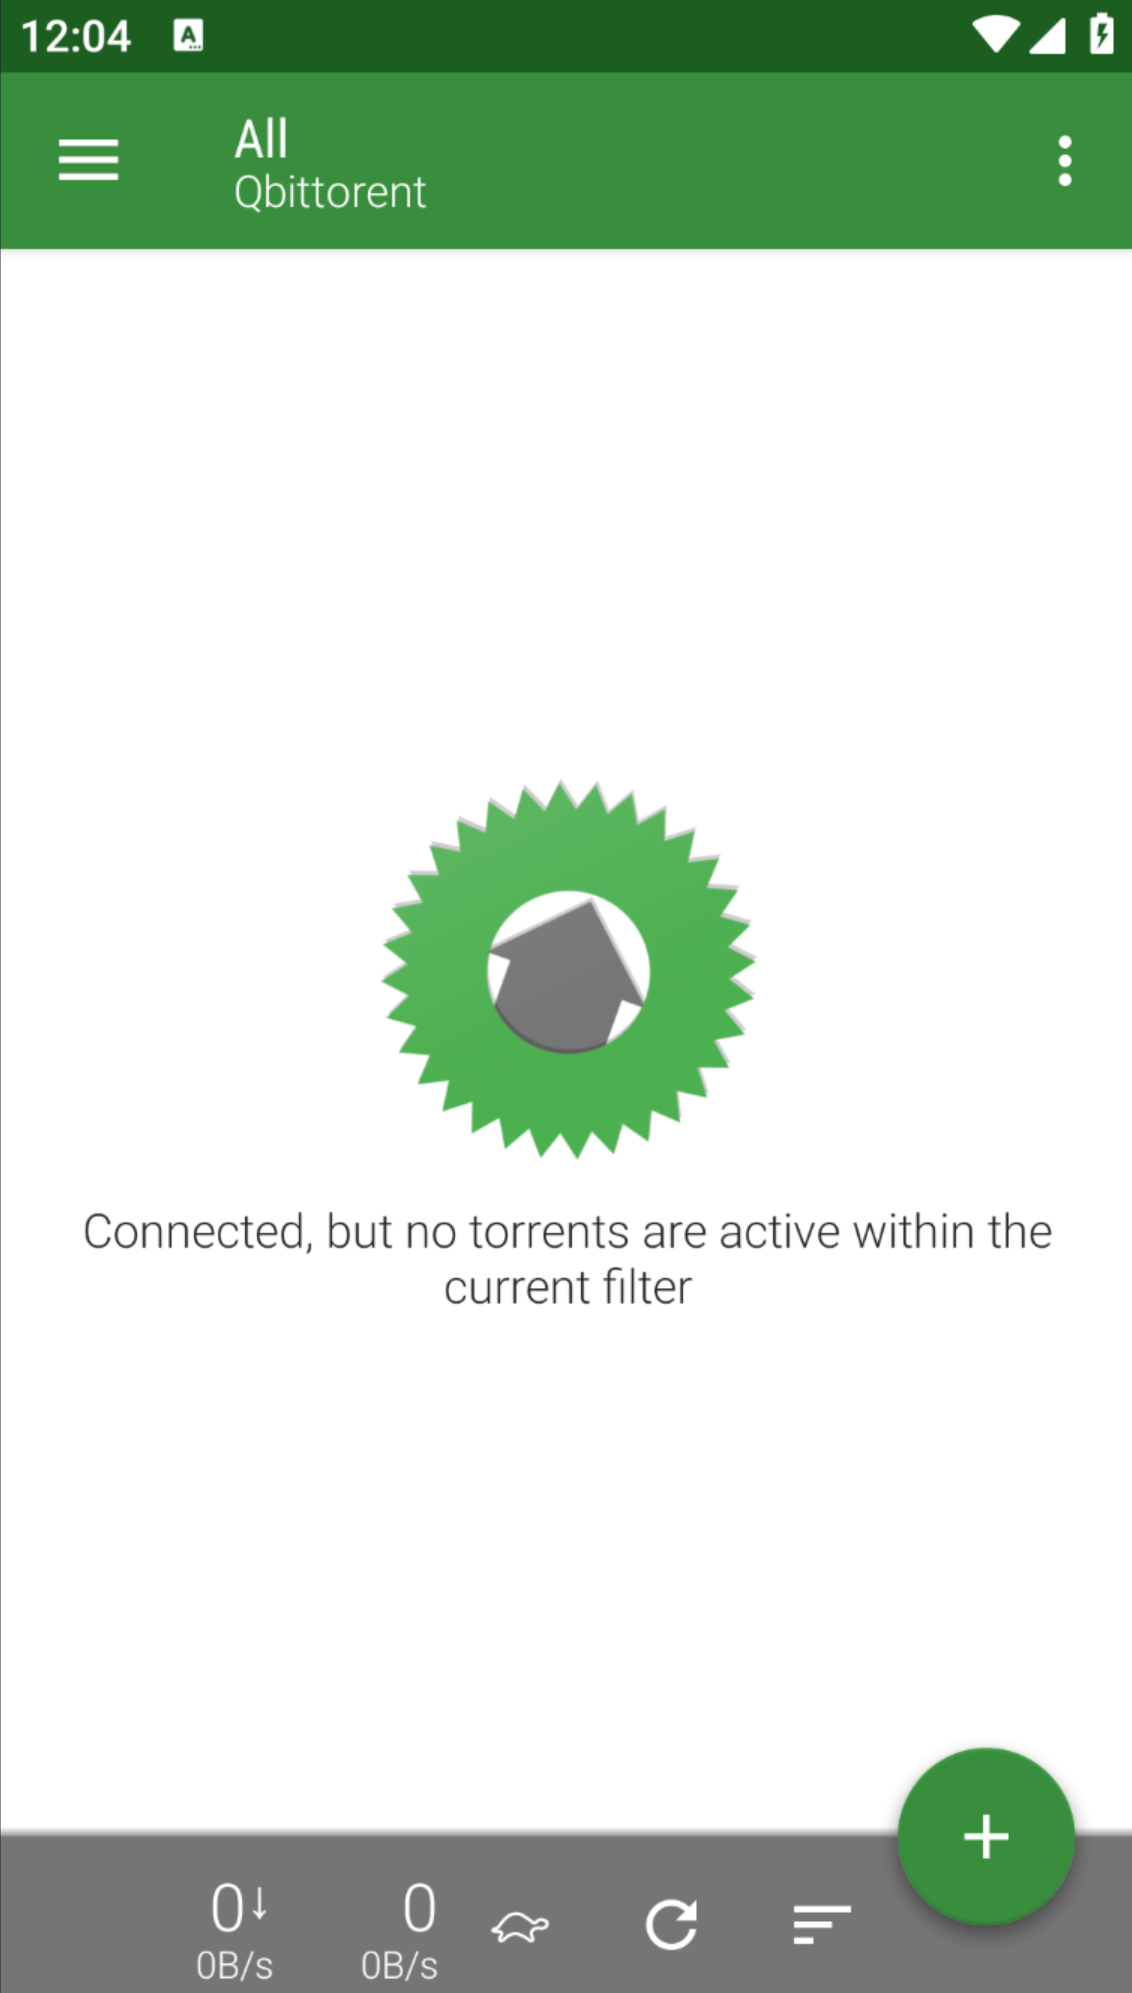
- Click the Back Arrow again to see your Deluge torrent listing.
ruTorrent
-
Name: This is just for your reference and can be any name you wish.
-
Server Type: Here is where you choose which client you wish to interface with. For this section, we will be using rtorrent.
-
IP or hostname: Here, you need to add your hostname, which can be found on the Apps tab of the UCP. The format used is
username.hostname.usbx.meMake sure to replaceusernameandhostnamewith your specific details. -
Username: ruTorrent username, which can be found on the Apps tab of the UCP under show info for ruTorrent.
-
Password: ruTorrent password, which can be found on the Apps tab of the UCP under show info for ruTorrent (you may need to click the eyeball icon to reveal it).
-
Advanced Settings: Advanced Settings contains four settings you need to address.
-
Port: 443
-
SCGI mount point: /RPC2
-
Use SSL: Yes
-
Accept all SSL certificates: Yes
-
Optional Settings: Most of these options are non-applicable; however, depending on your preference, you may want to enable notifications for when a new torrent is added or has finished downloading.
-
Next, click the Back Arrow button in the top left corner.
-
Your rTorrent client is now added.
- Click the Back Arrow again to see your rTorrent torrent listing.
Transmission
-
Name: This is just for your reference and can be any name you wish.
-
Server Type: Here is where you choose which client you wish to interface with. For this section, we will be using Transmission.
-
IP or hostname: Here, you need to add your hostname, which can be found on the Apps tab of the UCP. The format used is
username.hostname.usbx.meMake sure to replaceusernameandhostnamewith your specific details. -
Username: Transmission username, which can be found on the Apps tab of the UCP under show info for Transmission.
-
Password: Transmission password, which can be found on the Apps tab of the UCP under show info for Transmission (you may need to click the eyeball icon to reveal it).
-
Advanced Settings: Advanced Settings only contains a few settings you need to address:
-
Port number: 443
-
Folder: /transmission/rpc
-
Use SSL: Yes
-
Accept all SSL certificates: Yes
-
Optional Settings: Most of these options are non-applicable; however, depending on your preference, you may want to enable notifications for when a new torrent is added or has finished downloading.
-
Next, click the Back Arrow button in the top left corner.
-
Your Transmission client is now added.
- Click Back Arrow again to see your transmission torrent listing.
qBittorrent
-
Name: This is just for your reference and can be any name you wish.
-
Server Type: Here is where you choose which client you wish to interface with. For this section, we will be using qBittorrent.
-
IP or hostname: Here, you need to add your hostname, which can be found on the Apps tab of the UCP. The format used is
username.hostname.usbx.meMake sure to replaceusernameandhostnamewith your specific details. -
Username: qBittorrent username, which can be found on the Apps tab of the UCP under show info for qBittorrent.
-
Password: qBittorrent password, which can be found on the Apps tab of the UCP under show info for qBittorrent (you may need to click the eyeball icon to reveal it).
-
Advanced Settings: Advanced Settings only contains a few settings you need to address.
-
Port number: 443
-
Folder: /qbittorrent
-
Use SSL: Yes
-
Accept all SSL certificates: Yes

-
Optional Settings: Most of these options are non-applicable; however, depending on your preference, you may want to enable notifications for when a new torrent is added or has finished downloading.
-
Next, click the Back Arrow button in the top left corner.
-
Your qBittorrent client is now added.
- Click the Back Arrow again to see your qBittorent torrent listing.
NZB 360
- Comprehensive manager and automated tool for NZBGet and SABnzbd.
- Queue, categorize, monitor, search, download NZBs all in one app.
- Google Play Store link
Connection Details
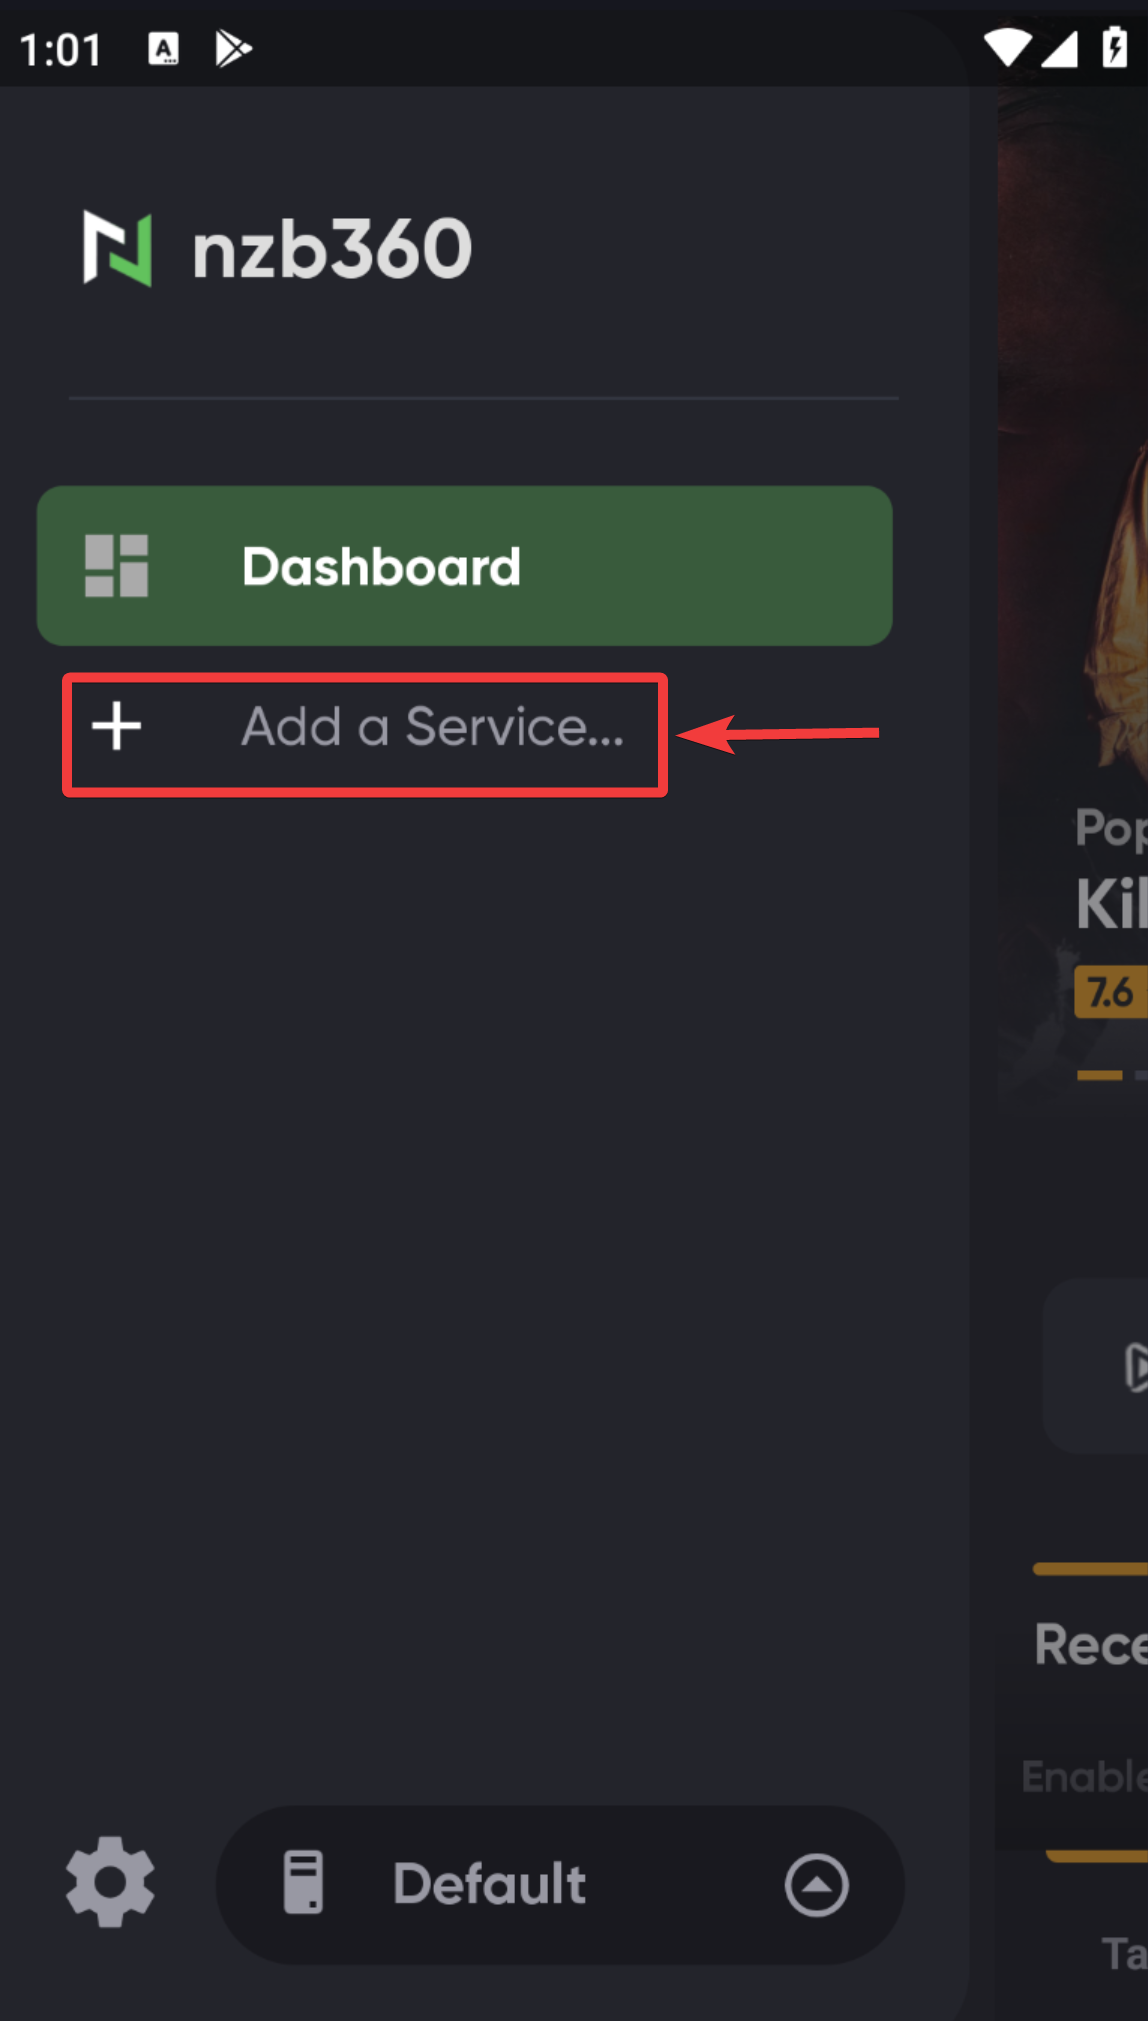
- Open the application and swipe left to open the dashboard menu.
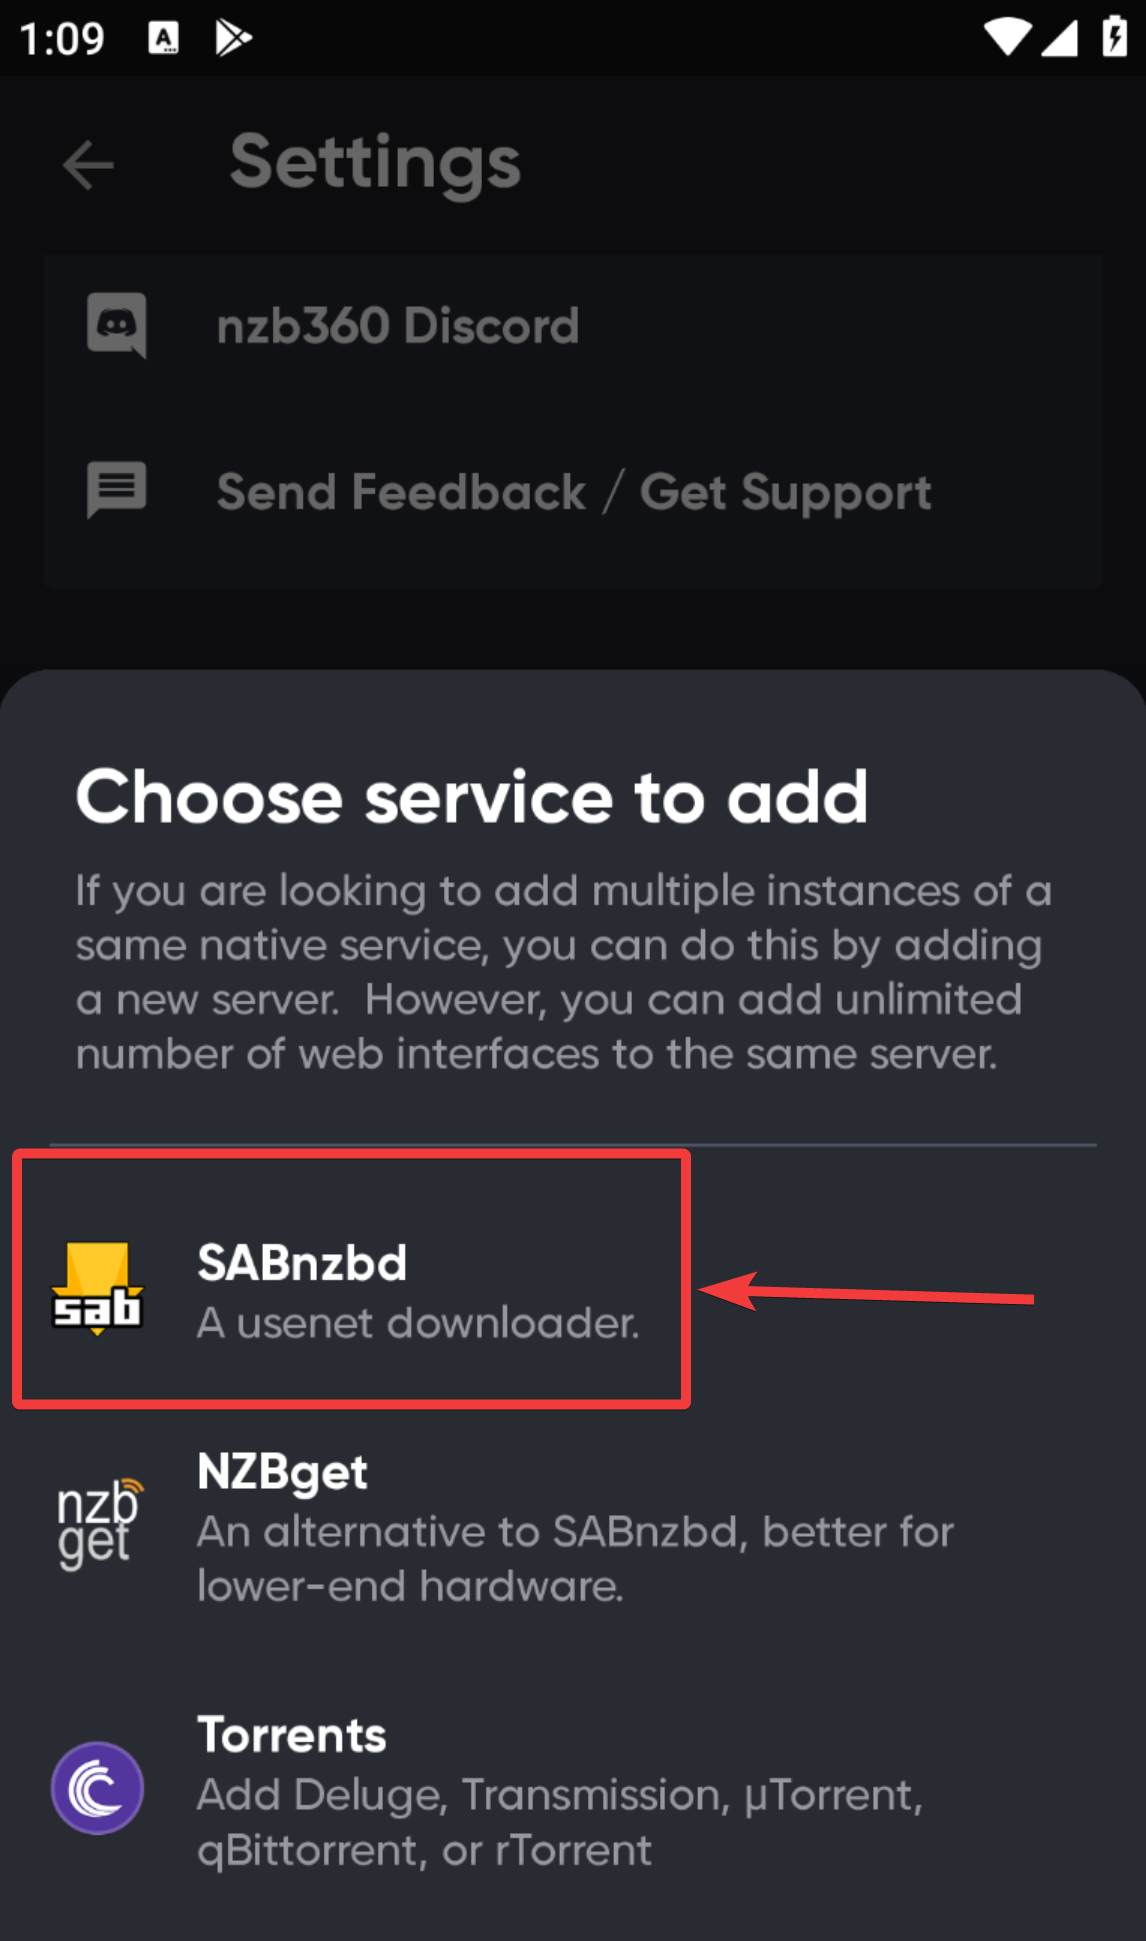
- Click the Add a service... option.
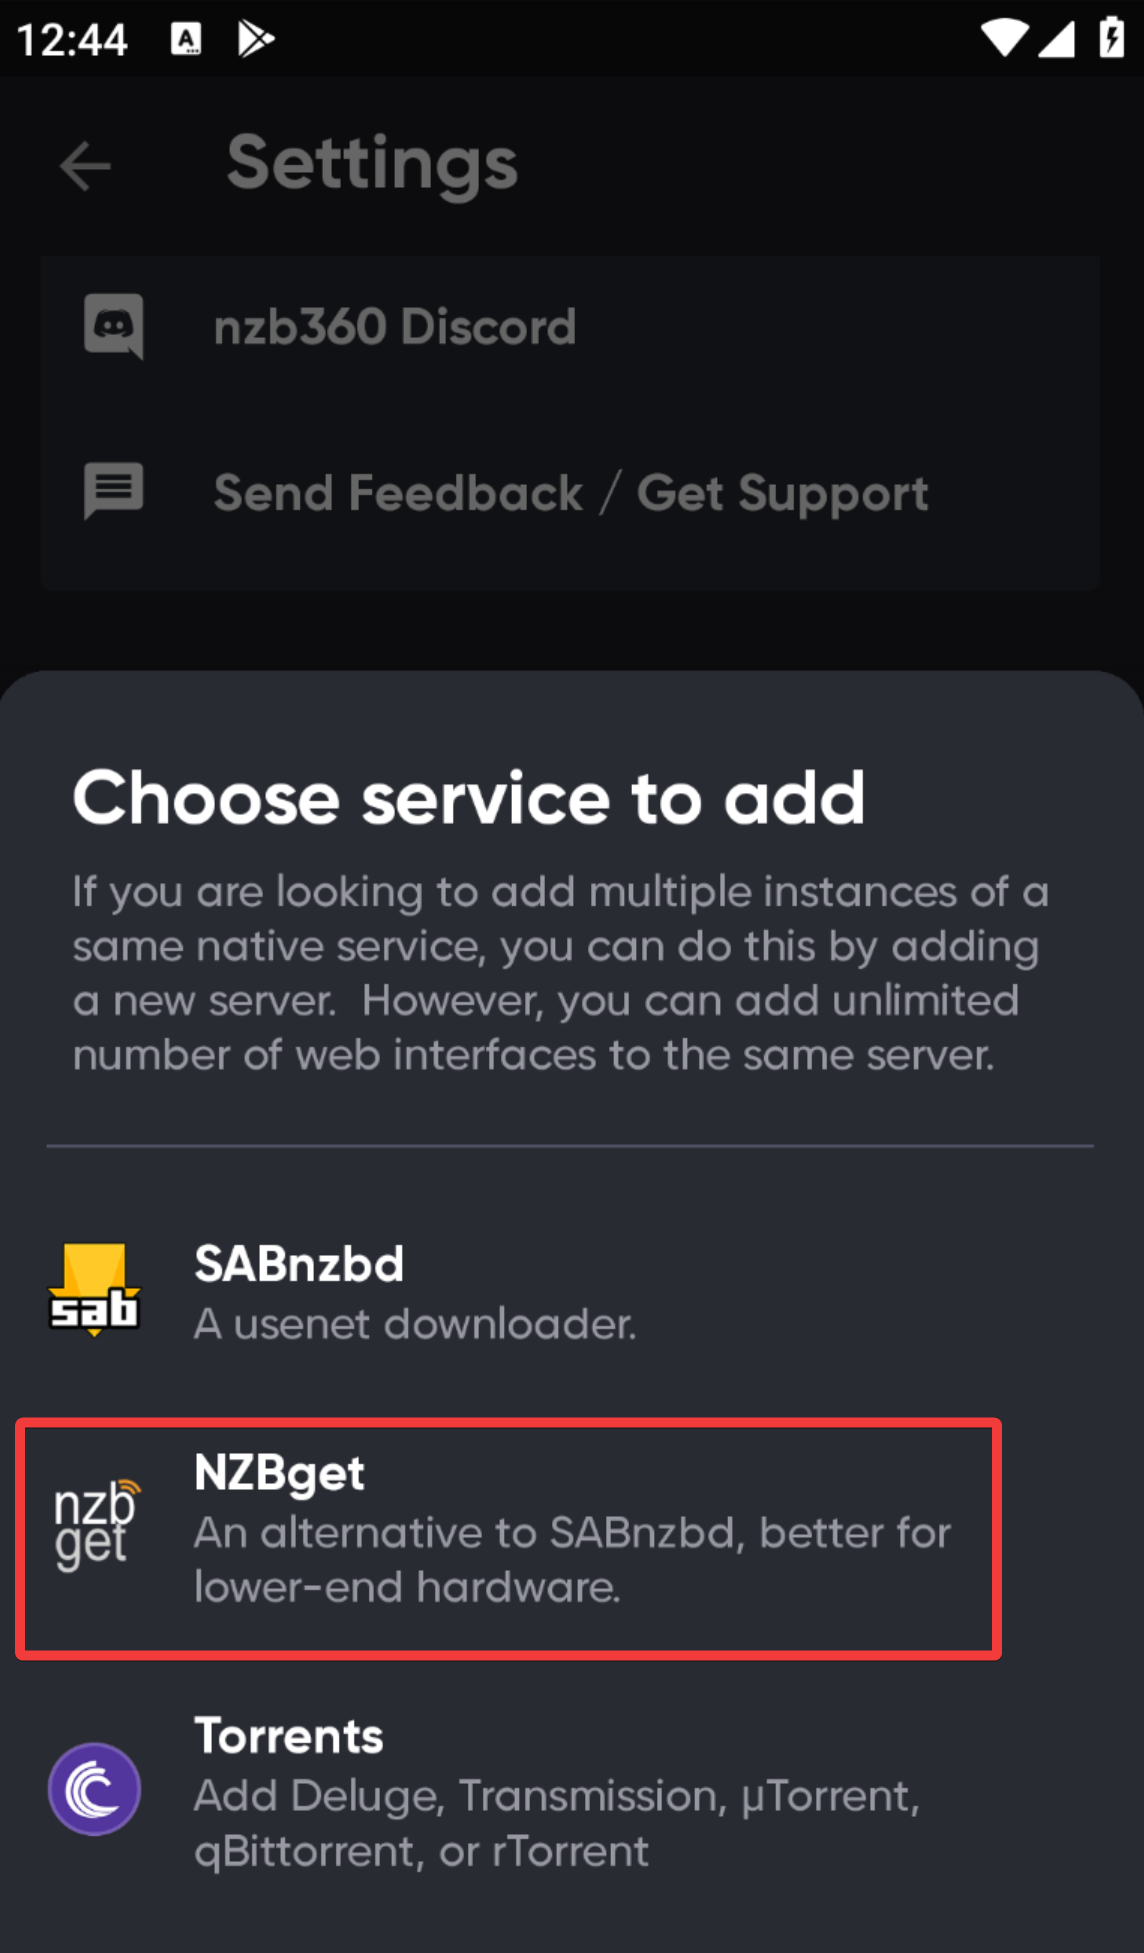
- Select NZBGet as a service to add.
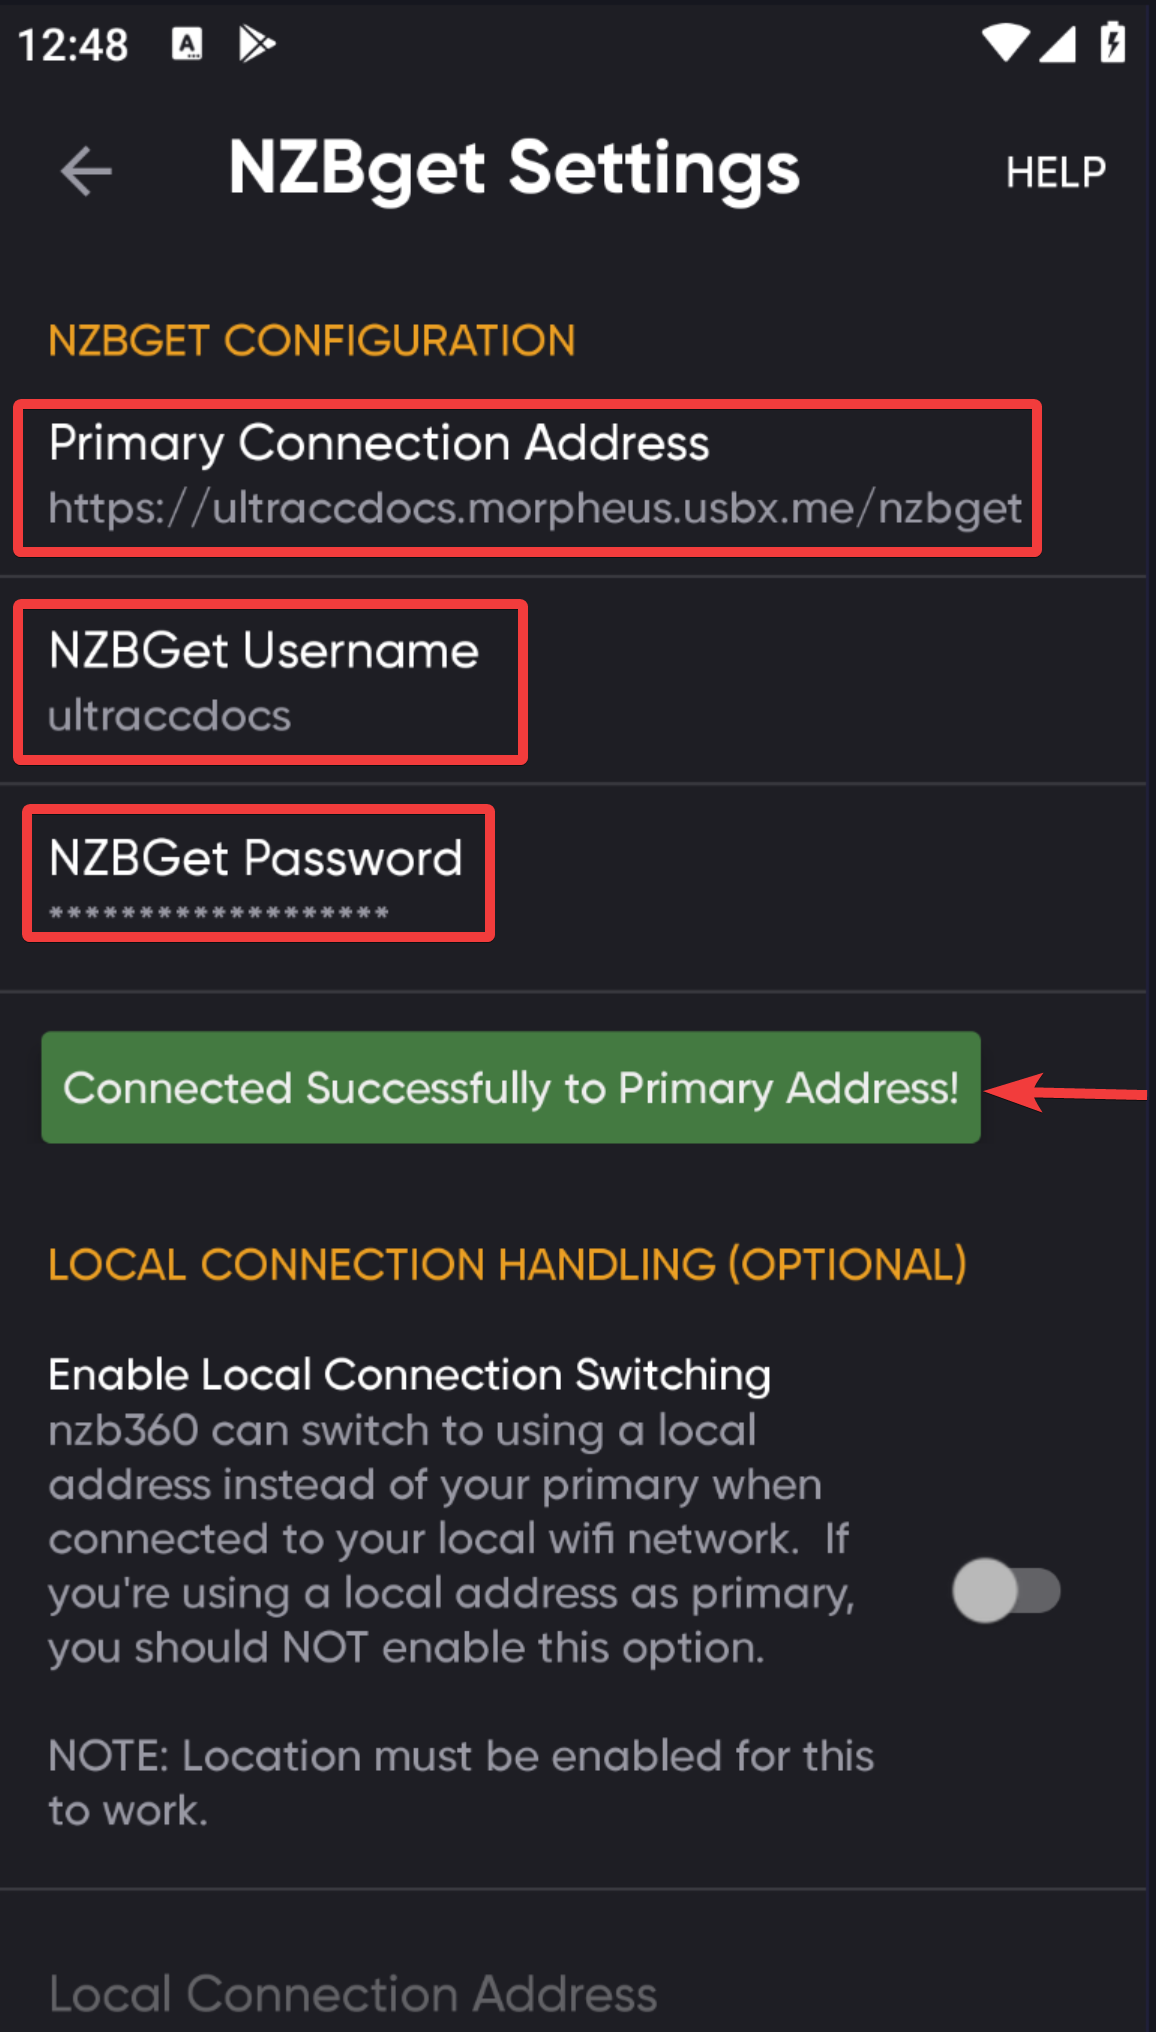
- Next, set the Primary address in this format:
https://username.hostname.usbx.me/nzbget. Enter your NZBget username and password as well, which can be found on the Apps tab of the UCP under show info for NZBGet. - Once done, press Test Connection button.
- Select SABnzbd as a service to add.
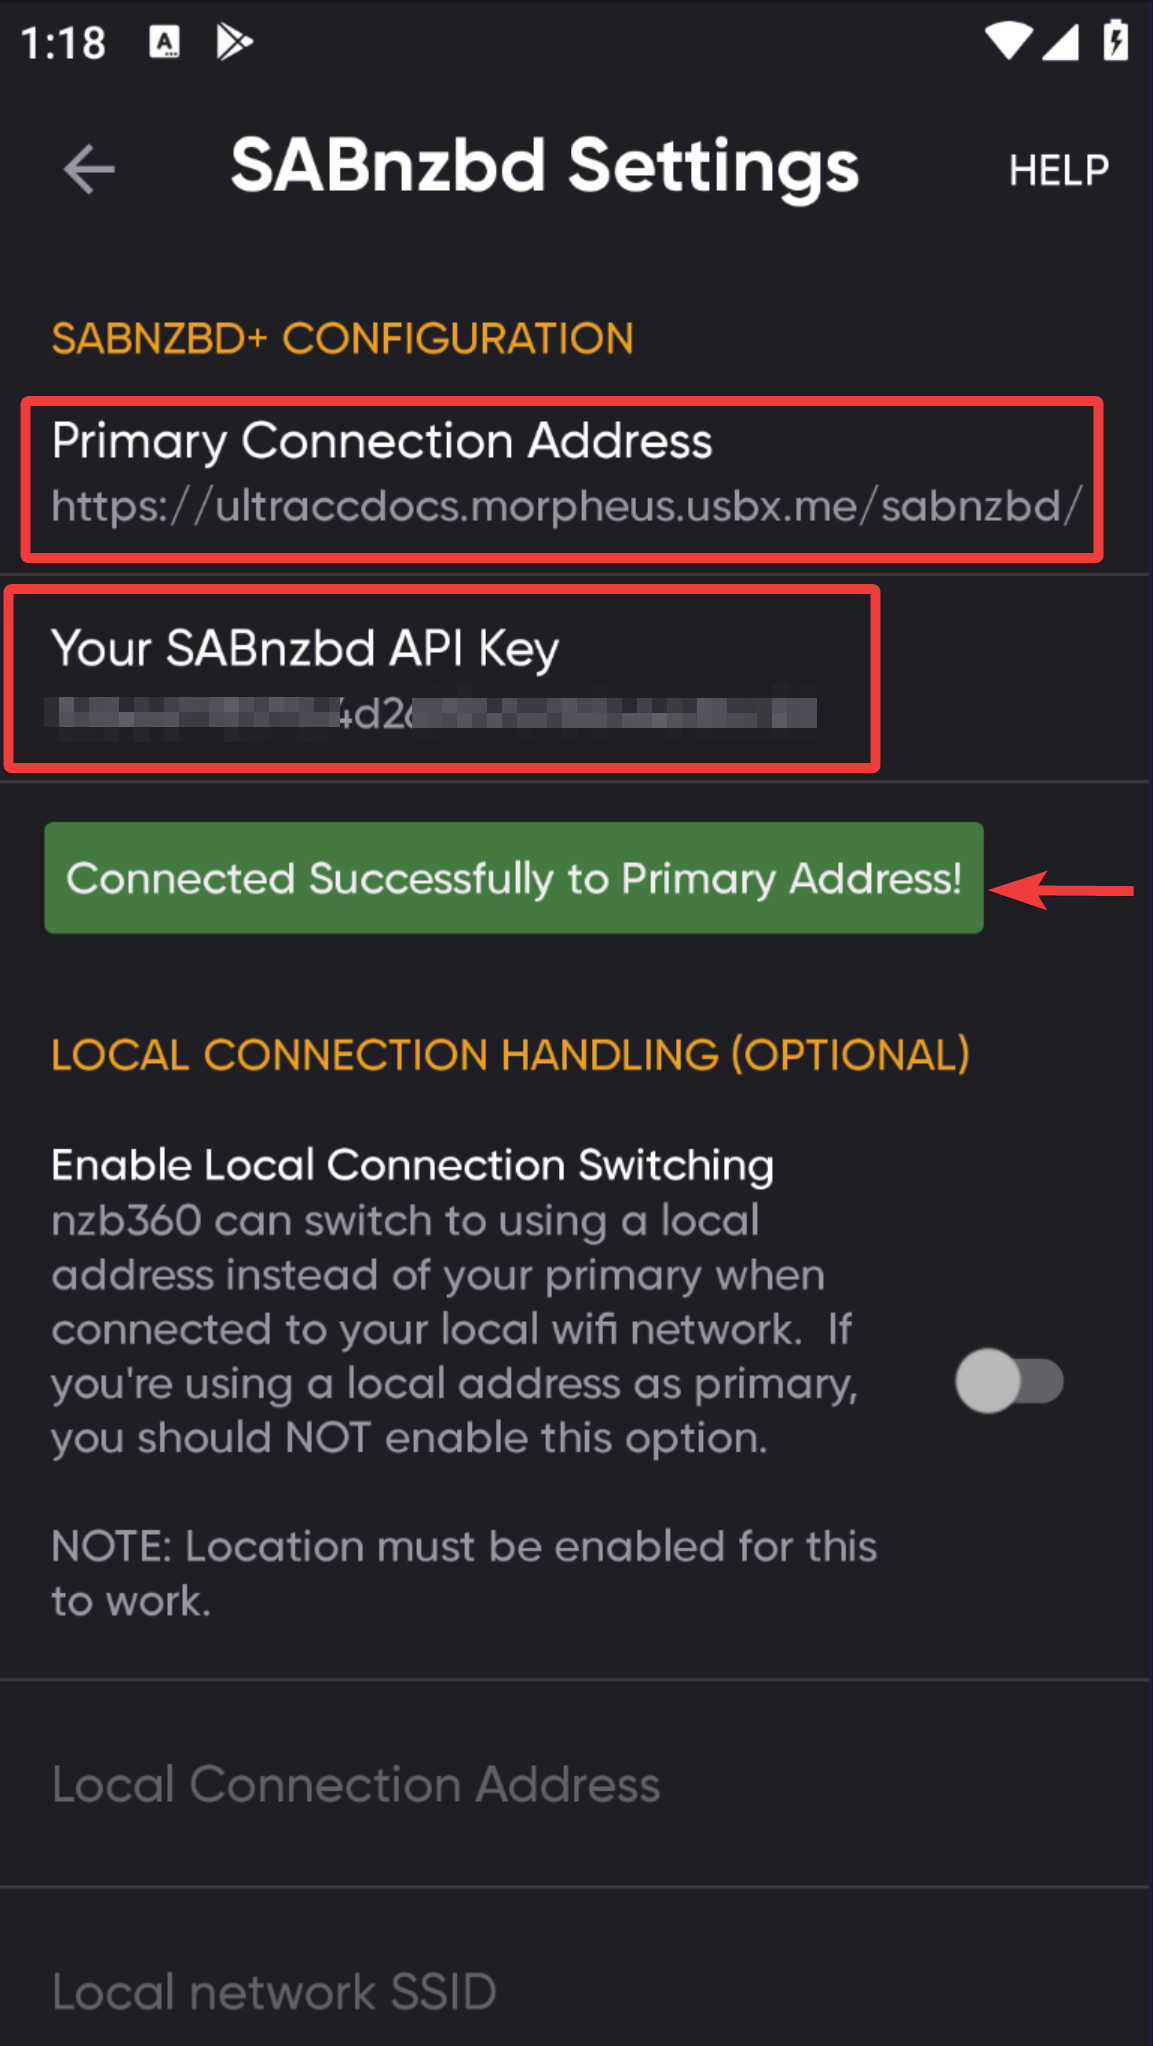
- Next, set the Primary address in this format :
https://username.hostname.usbx.me/sabnzbd. - Then enter your SABnzbd API Key. It can be accessed using the cog icon in the top right corner of the SABnzbd Web UI. To find the key itself you will need to navigate to General then scroll down to API Key.
- Once done, press Test Connection.
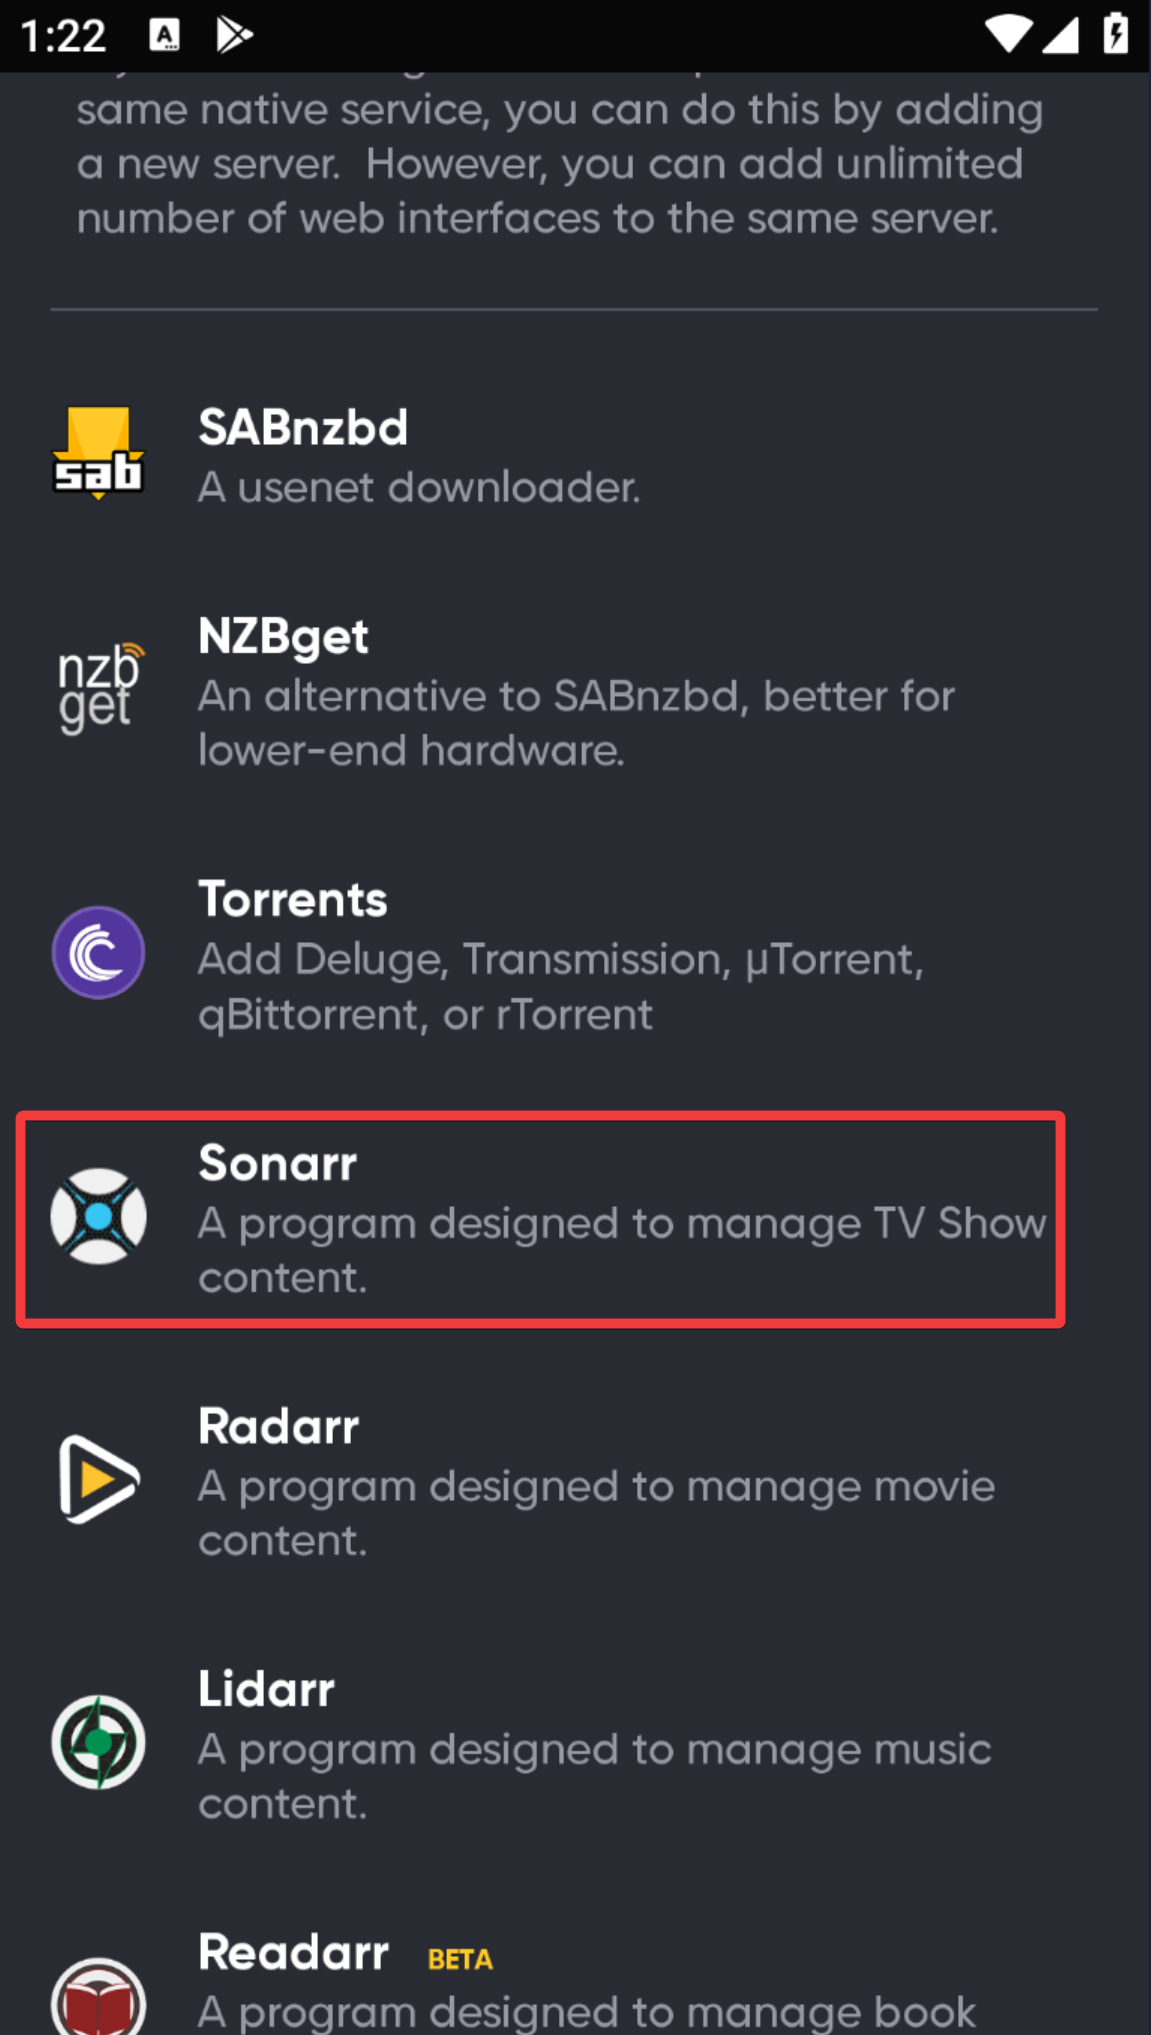
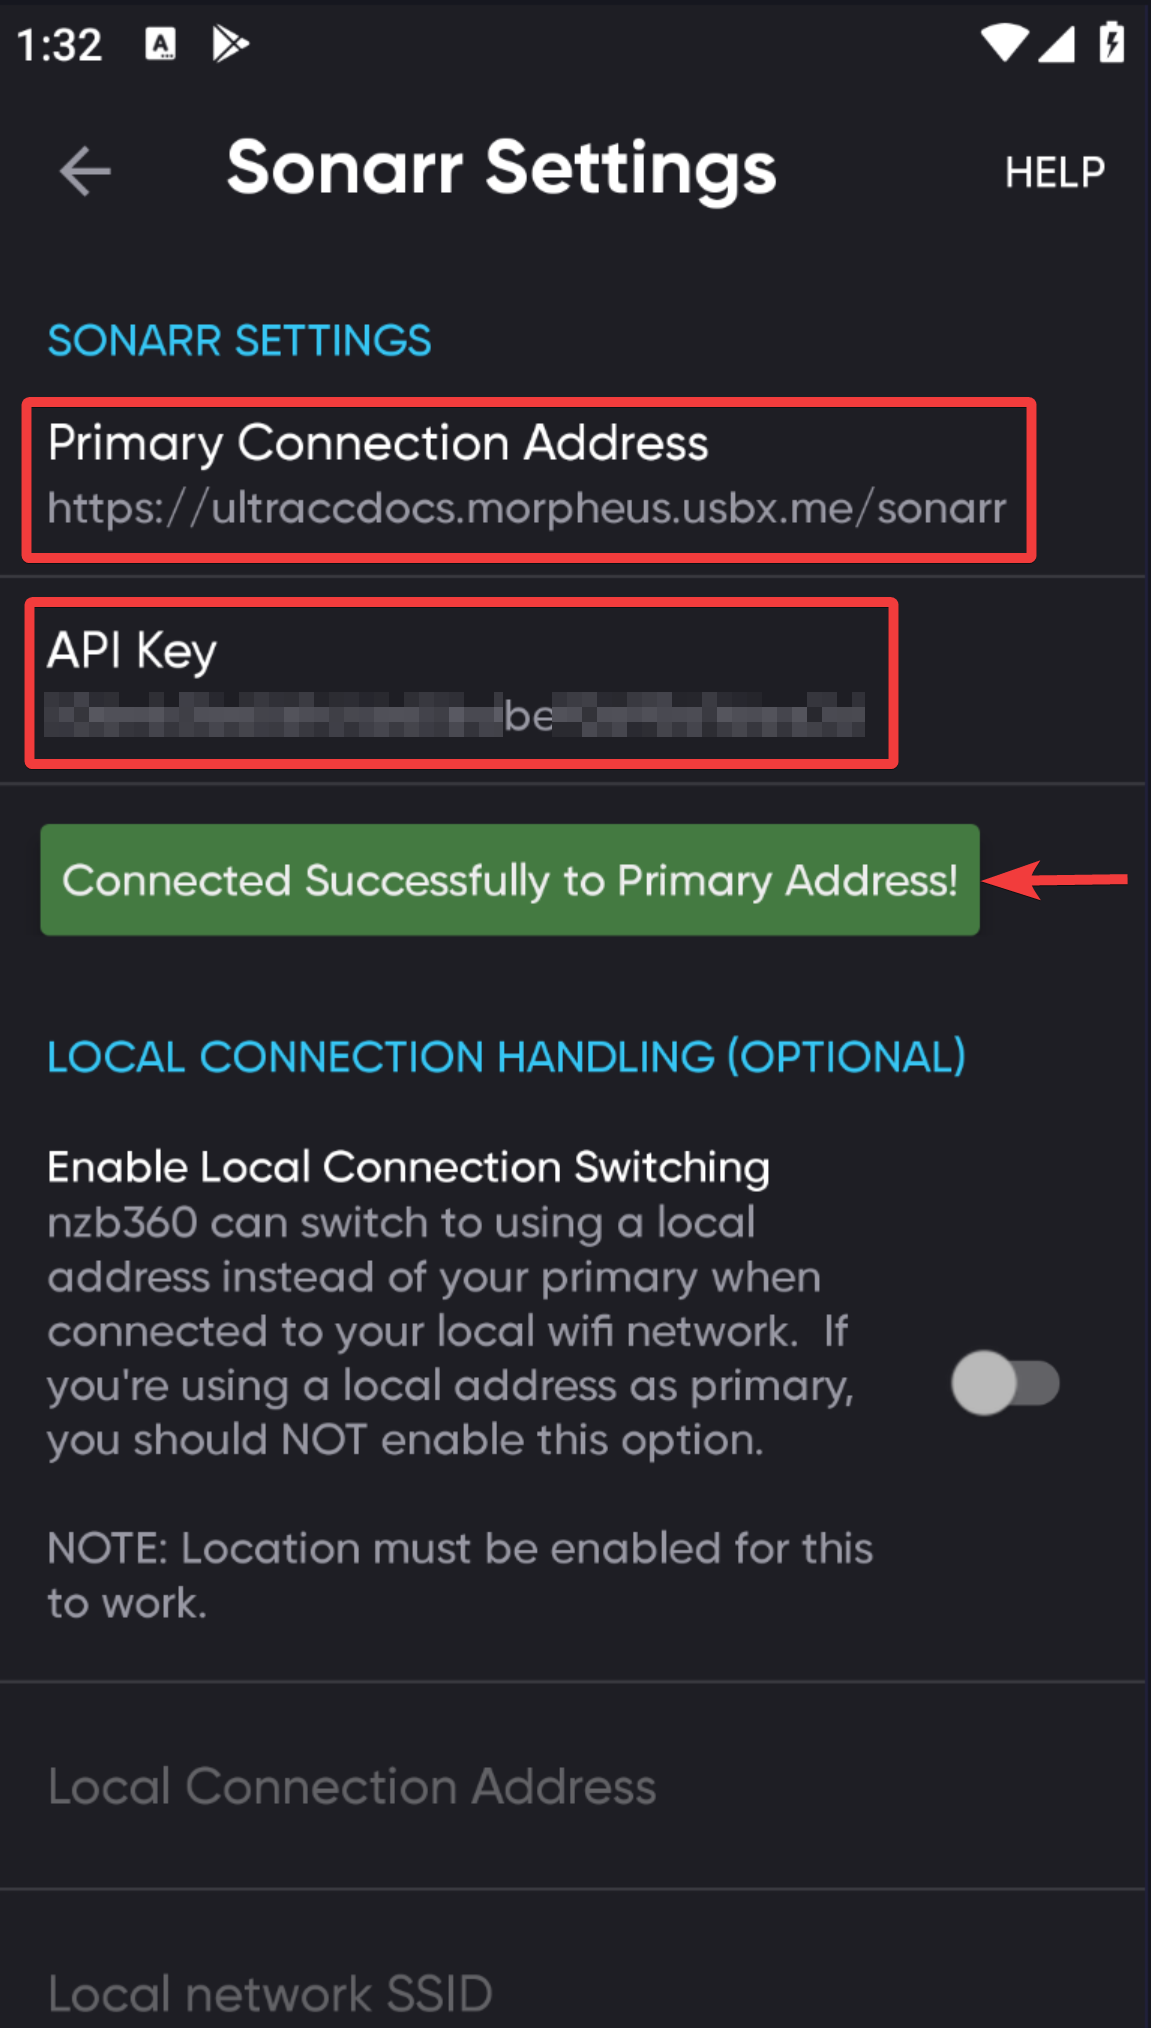
- Select Sonarr as a service to add.
- Set the Primary Address in this format :
https://username.hostname.usbx.me/sonarr. - Then enter your Sonarr API Key.
- You can find the API Key by navigating to the Sonarr Web UI. Next, open Settings > General. Your API key will be listed here, make a note of this.
- Once done, press Test Connection.
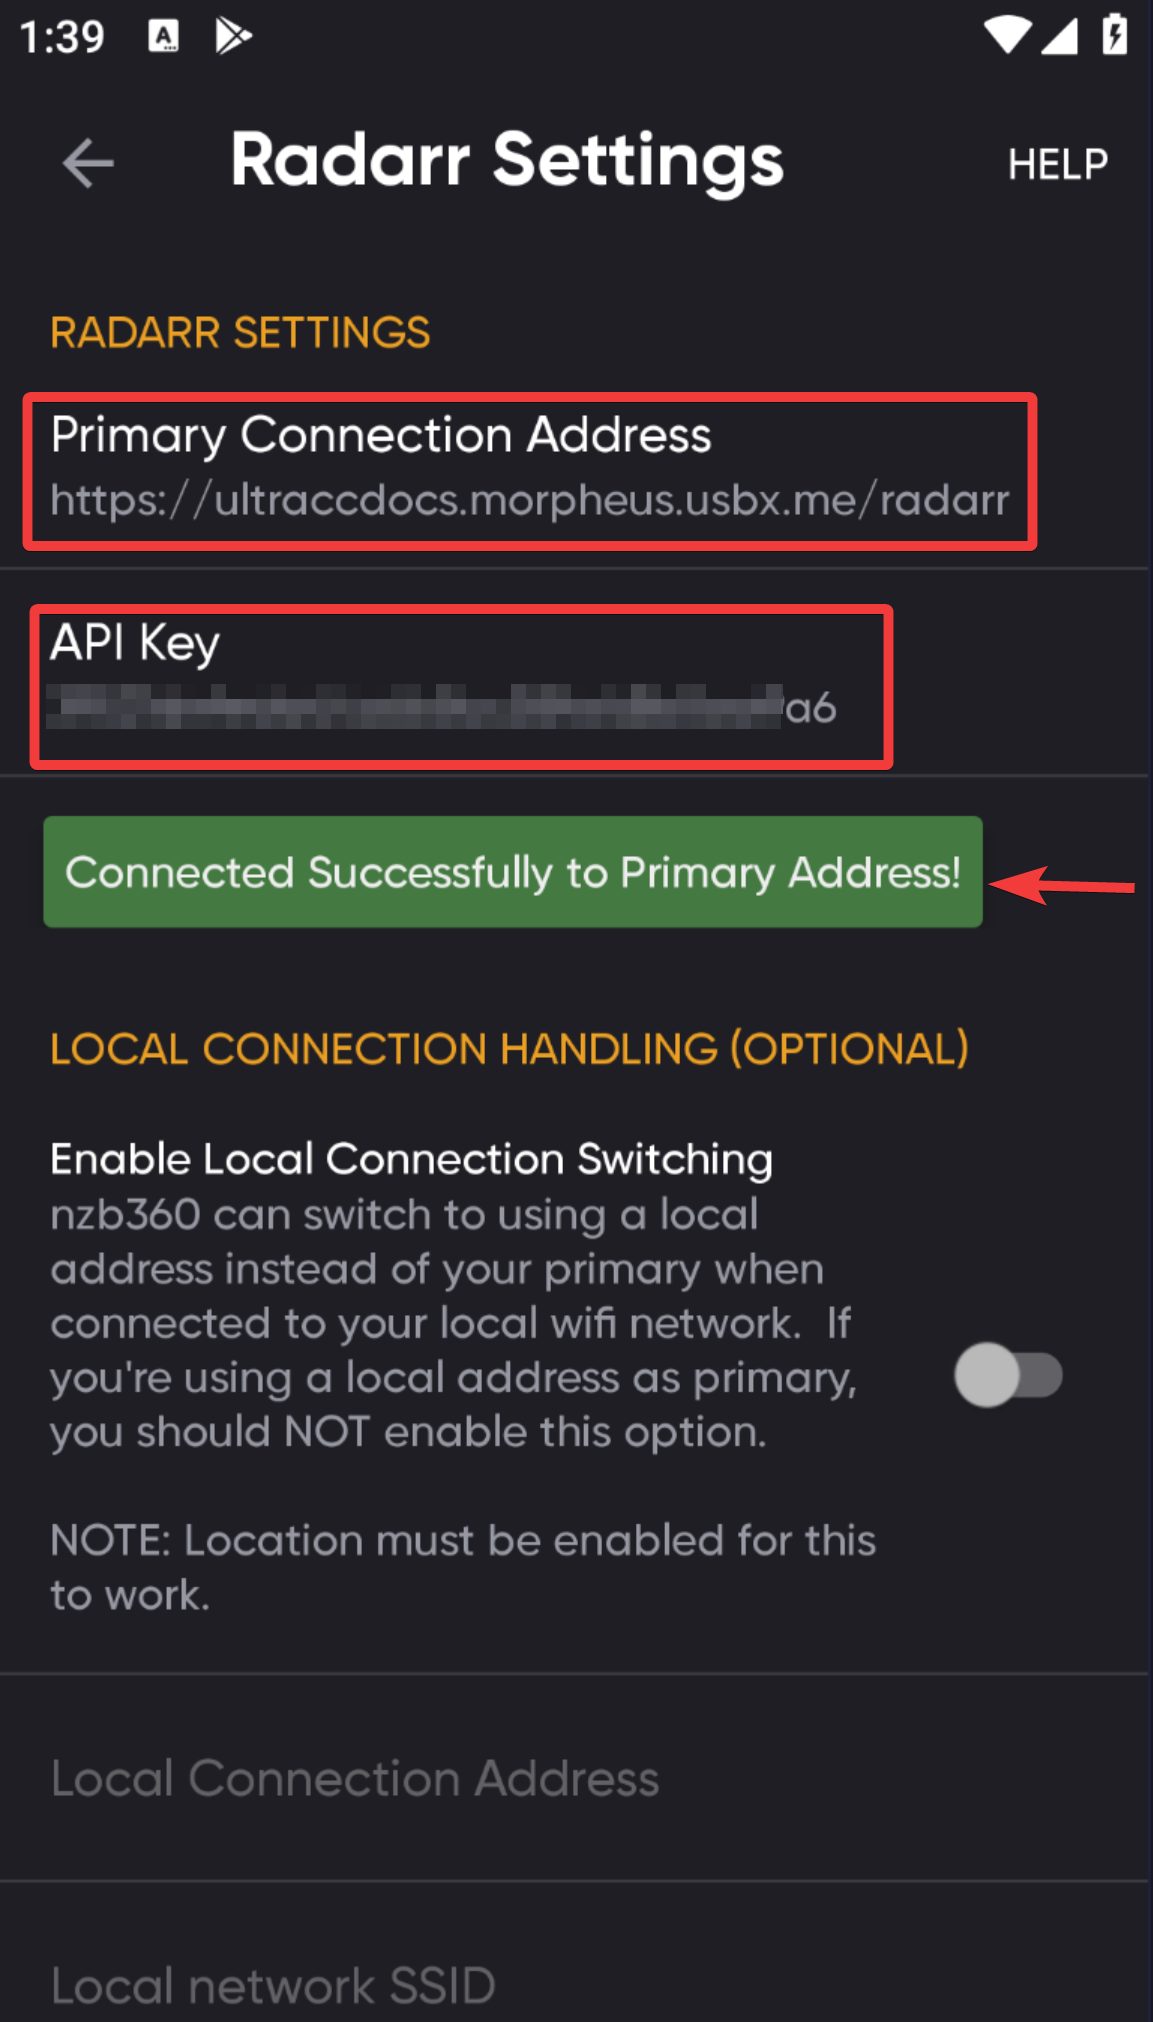
- Select Radarr as a service to add.
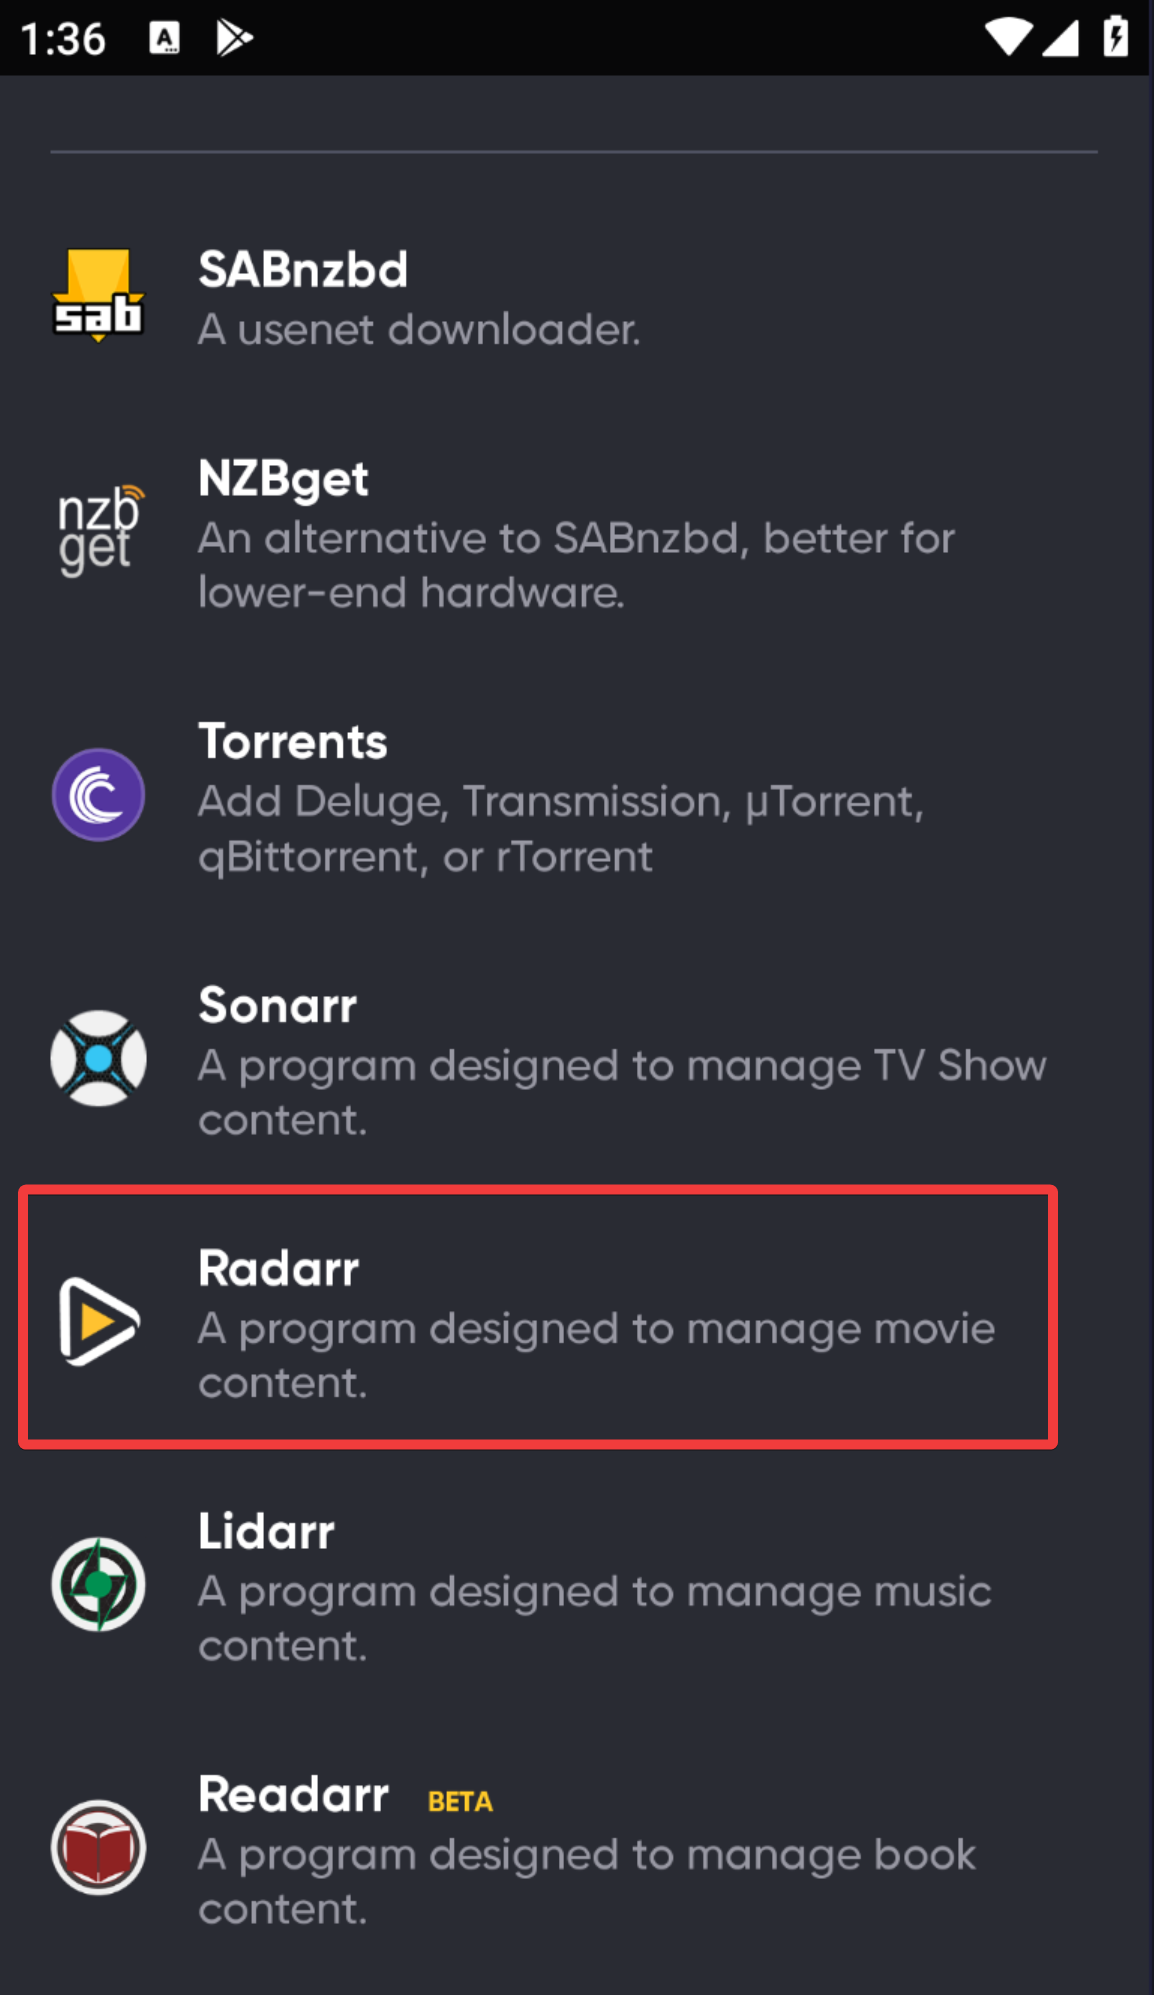
- Set the Primary Address in this format :
https://username.hostname.usbx.me/radarr. - Then enter your Radarr API Key.
- You can find the API Key by navigating to the Radarr Web UI. Next, open Settings > General. Your API key will be listed here, make a note of this.
- Once done, press Test Connection.
- Select Torrents as a service to add.
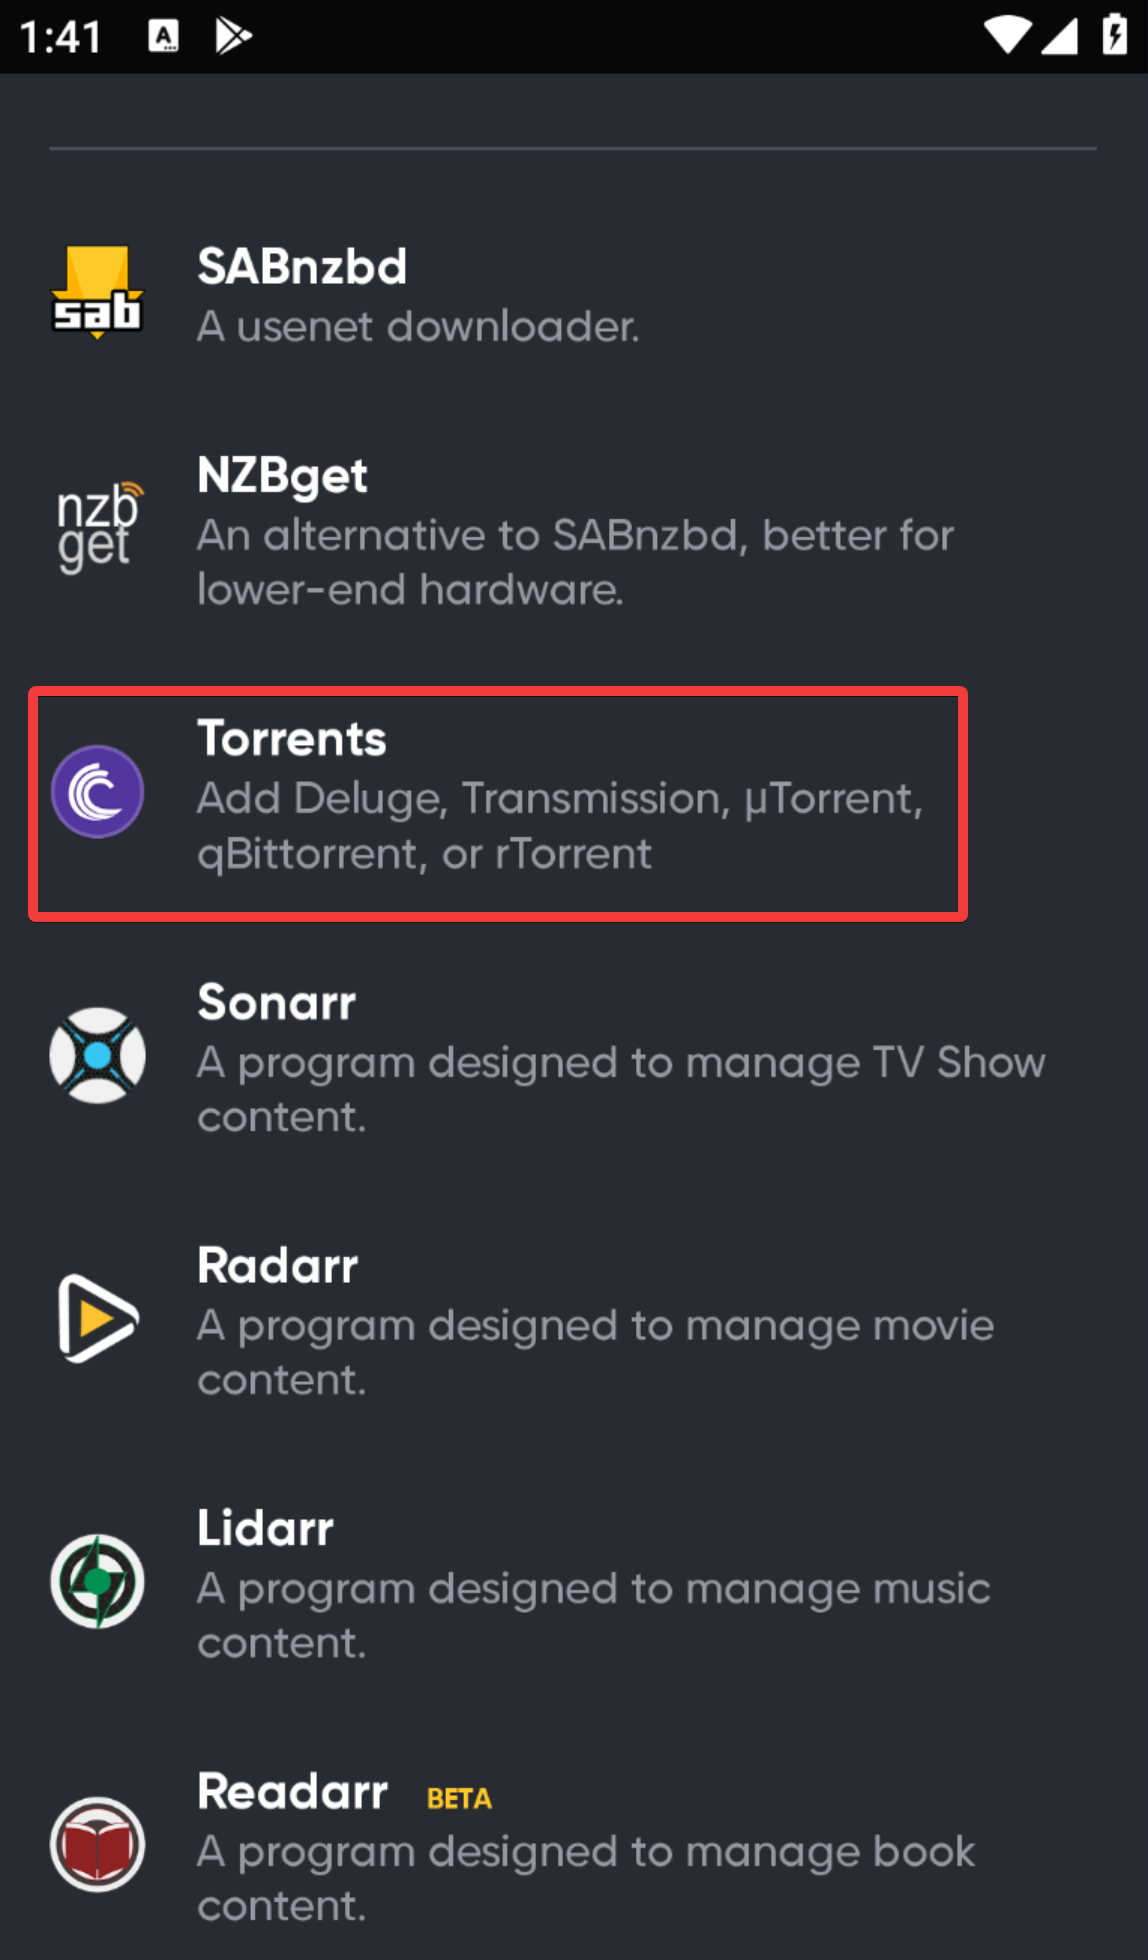
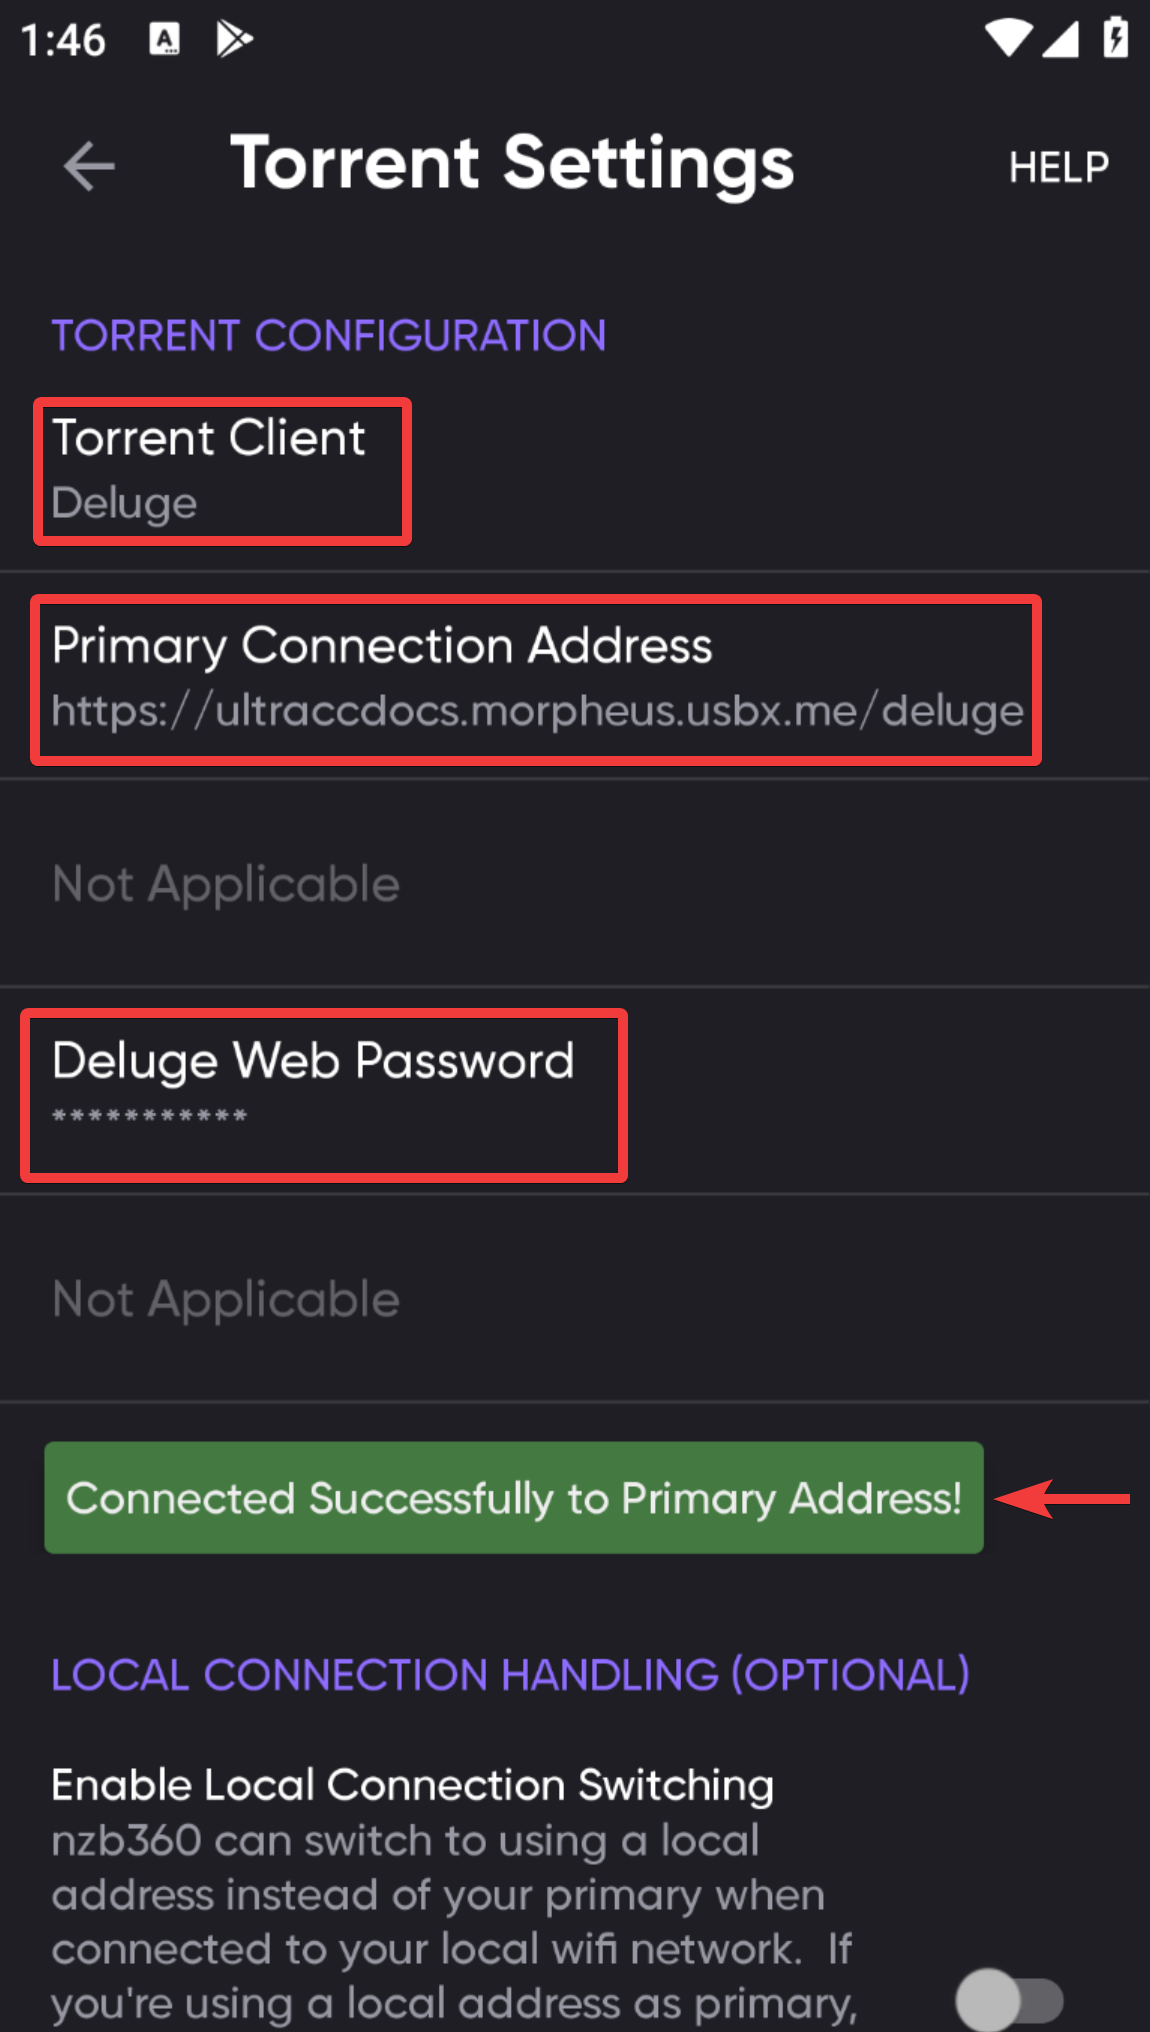
Deluge
- Torrent client field as Deluge.
- Enter, Primary connection address in this format:
https://username.hostname.usbx.me/deluge. - Password is the Deluge password, which can be found on the Apps tab of the UCP.
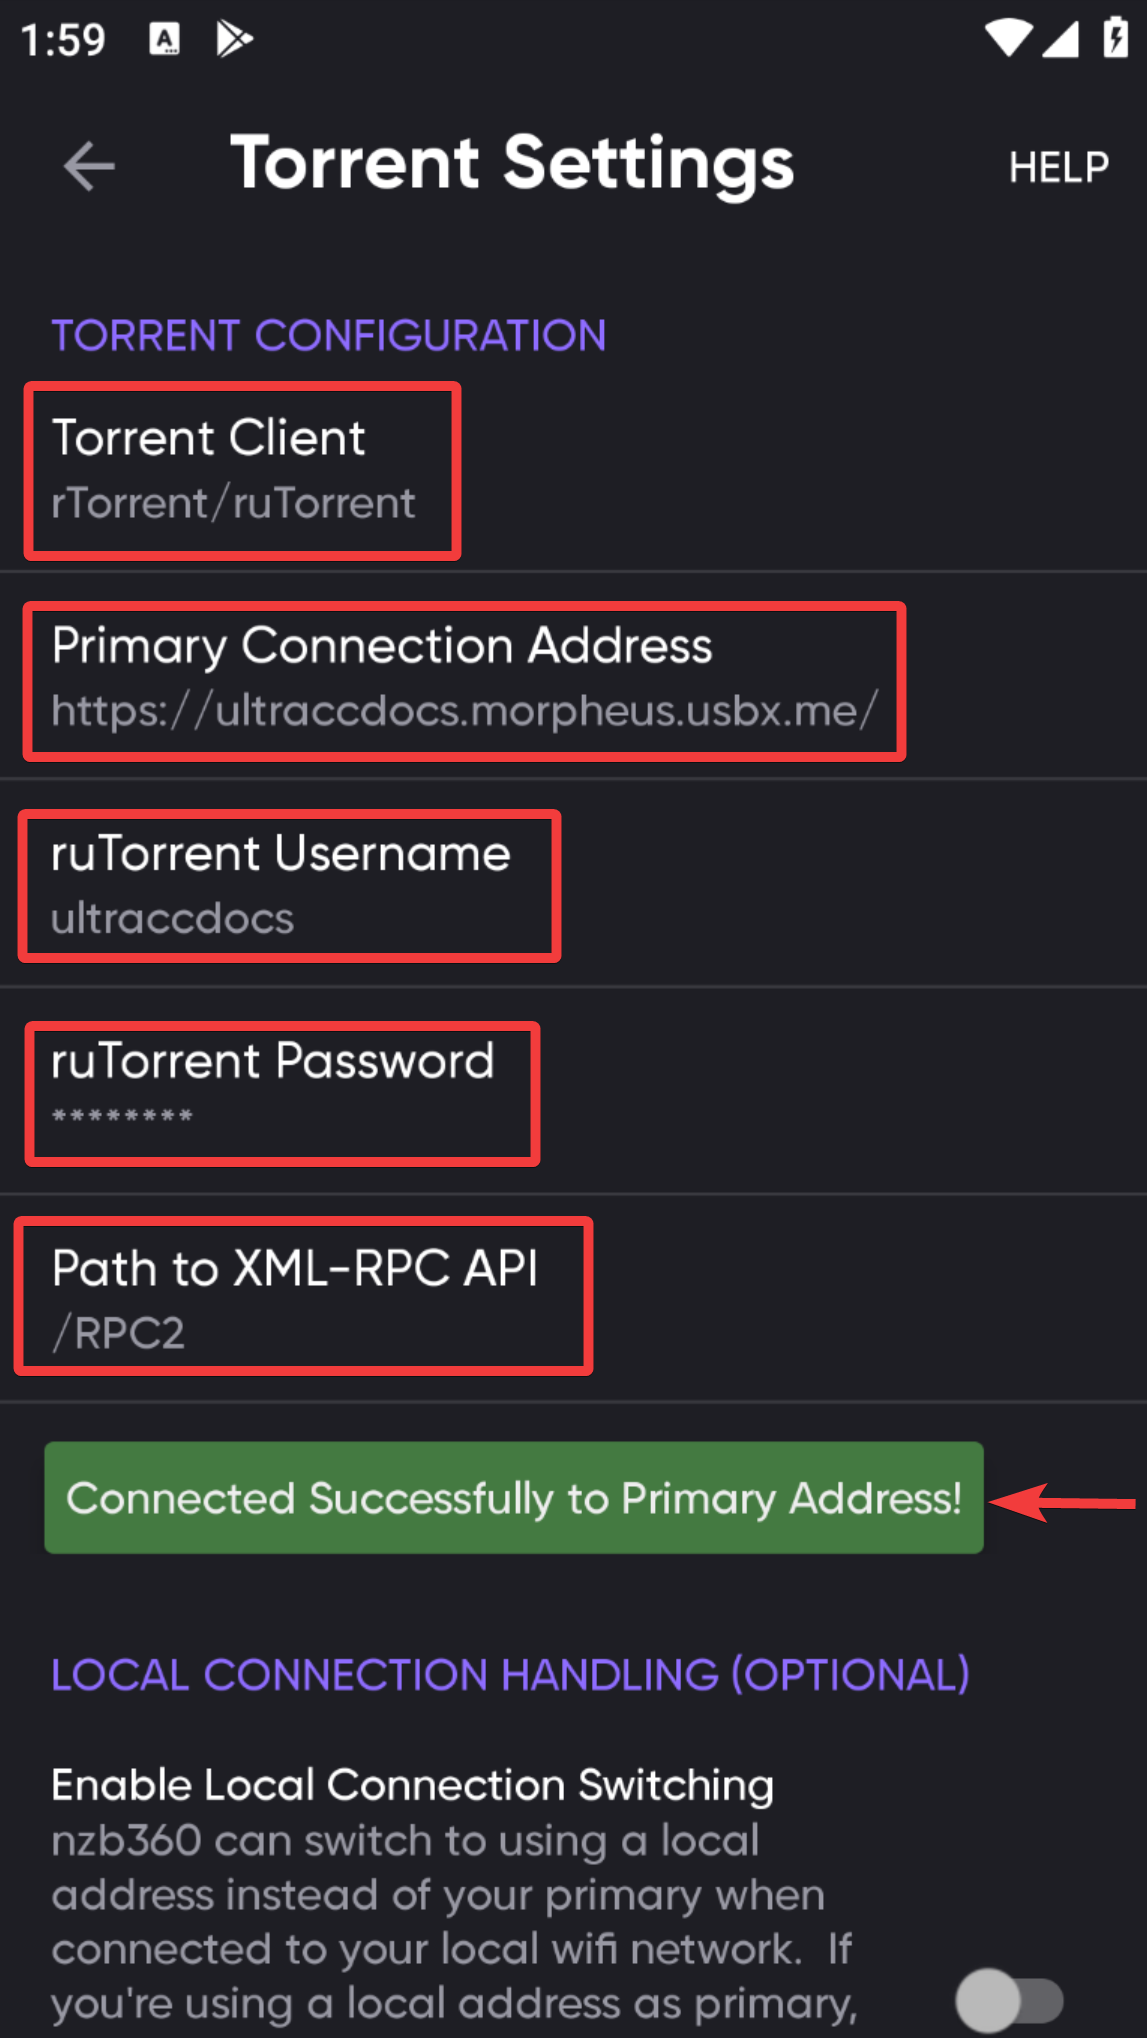
rTorrent
- Torrent client field as rTorrent/ruTorrent.
- Enter, Primary connection address in this format:
https://username.hostname.usbx.me - Username is ruTorrent username, which can be found on the Apps tab of the UCP under ruTorrent.
- Password is ruTorrent password, which can be found on the Apps tab of the UCP (you may need to click the eyeball icon to reveal it).
- Path to XML-RPC API is
/RPC2.
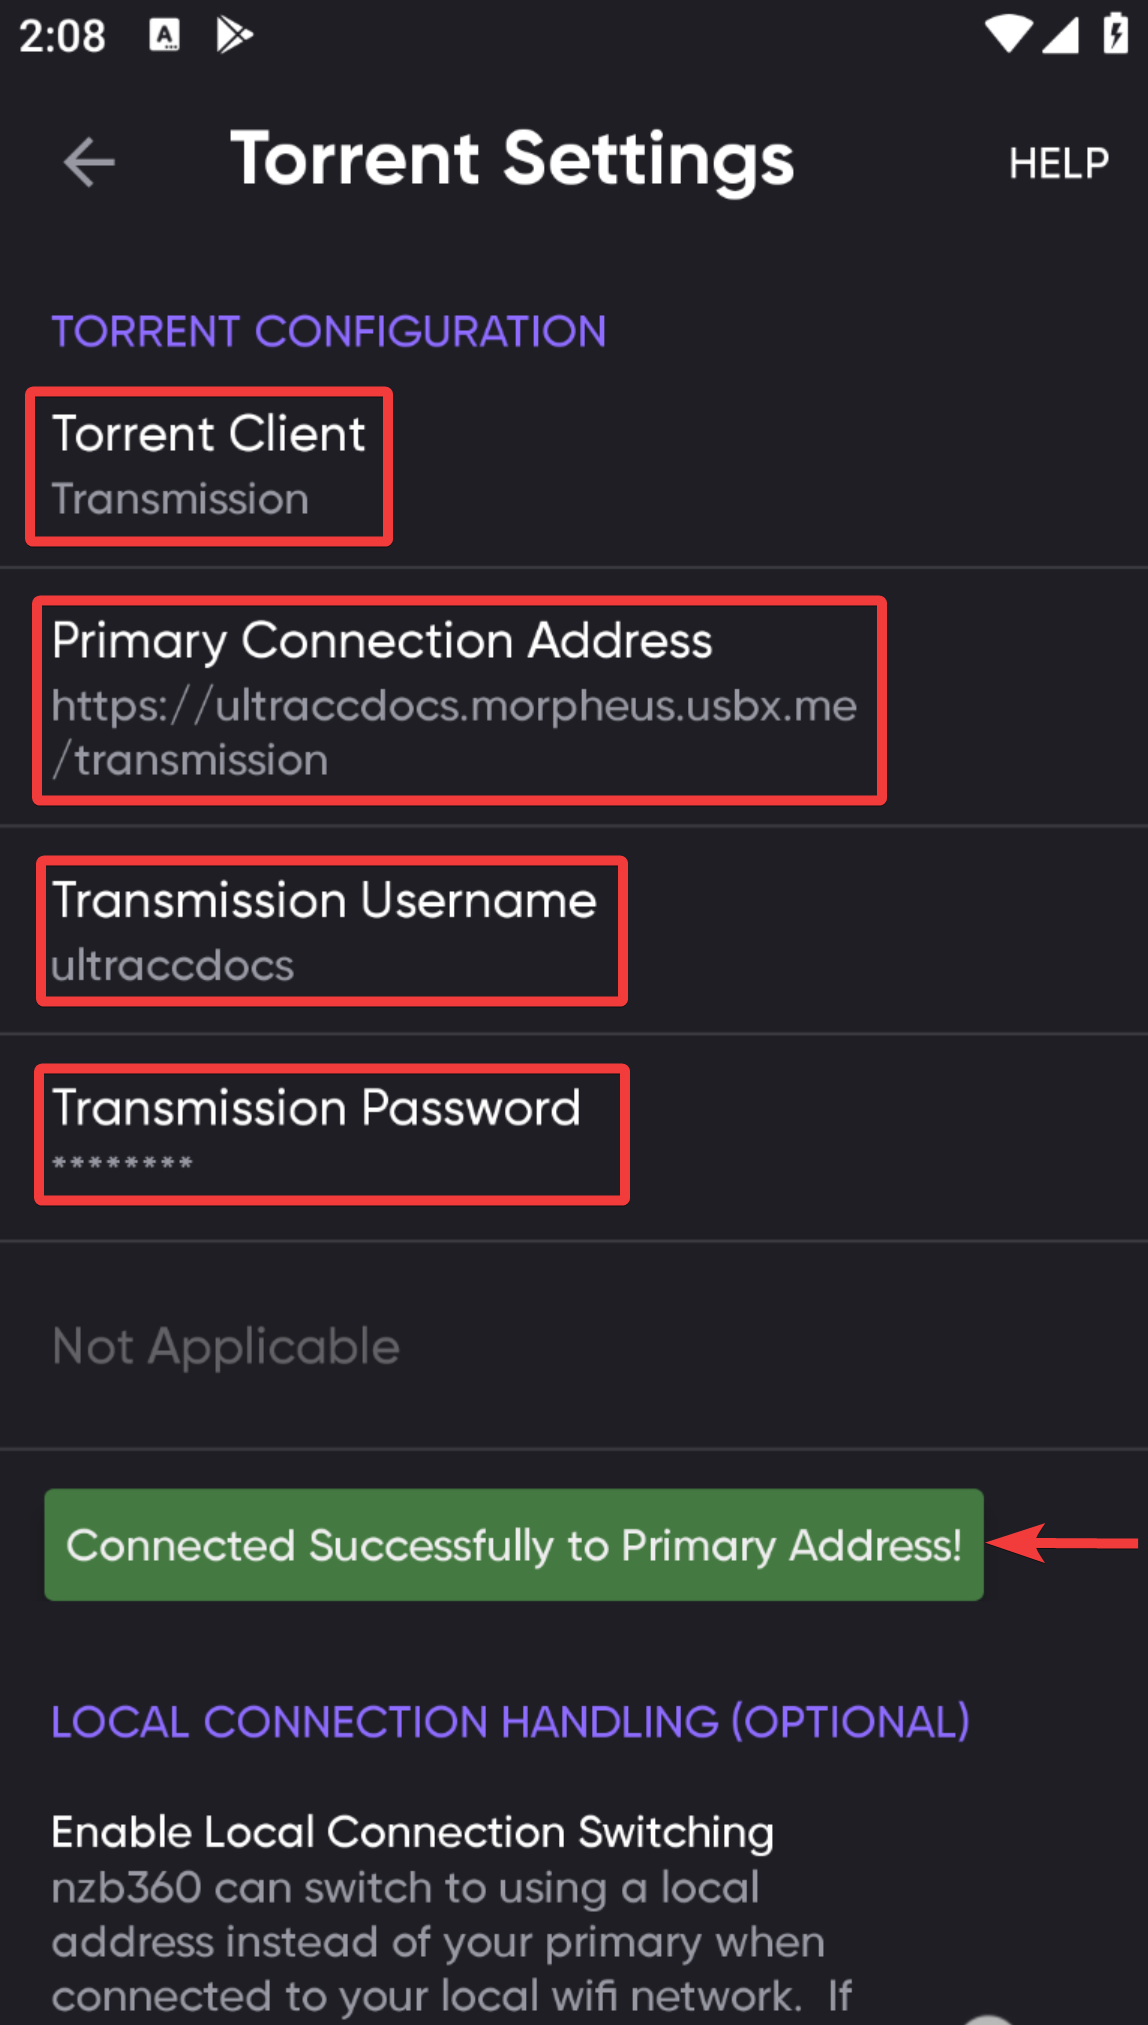
Transmission
- Enter, Primary connection address in this format:
https://username.hostname.usbx.me/transmission. - Username is Transmission username, which can be found on the Apps tab of the UCP under Transmission.
- Password is Transmission password, which can be found on the Apps tab of the UCP (you may need to click the eyeball icon to reveal it).
Media Servers
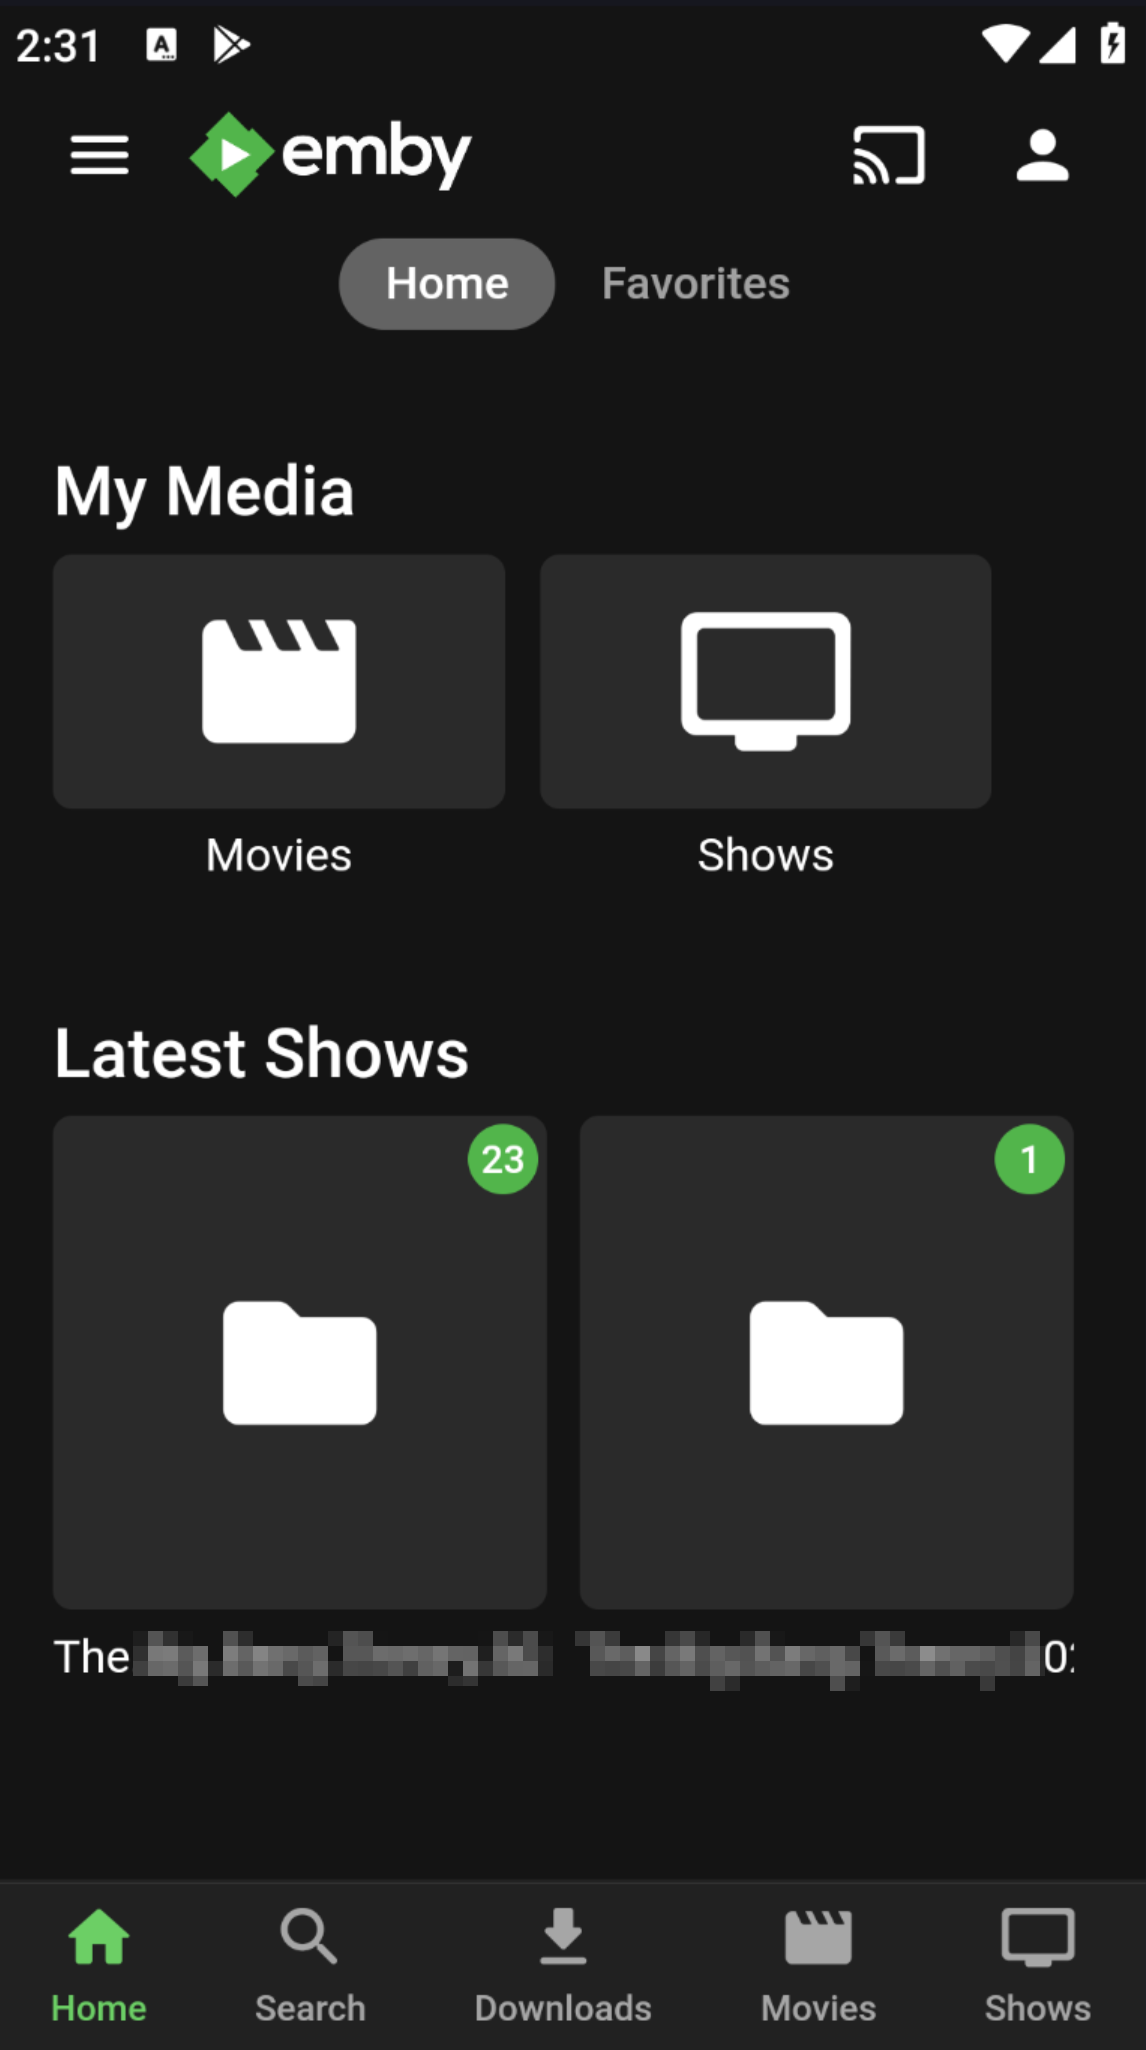
Emby
- Browse and stream media from Emby server.
- Syncs watch status across devices.
- Offline media playback support.
- Google Play Store link
Connection Details
- Open the application, Select Skip to connect manually.

- Enter the Host in this format:
https://username.hostname.usbx.me/emby. Leave port blank and press Connect.
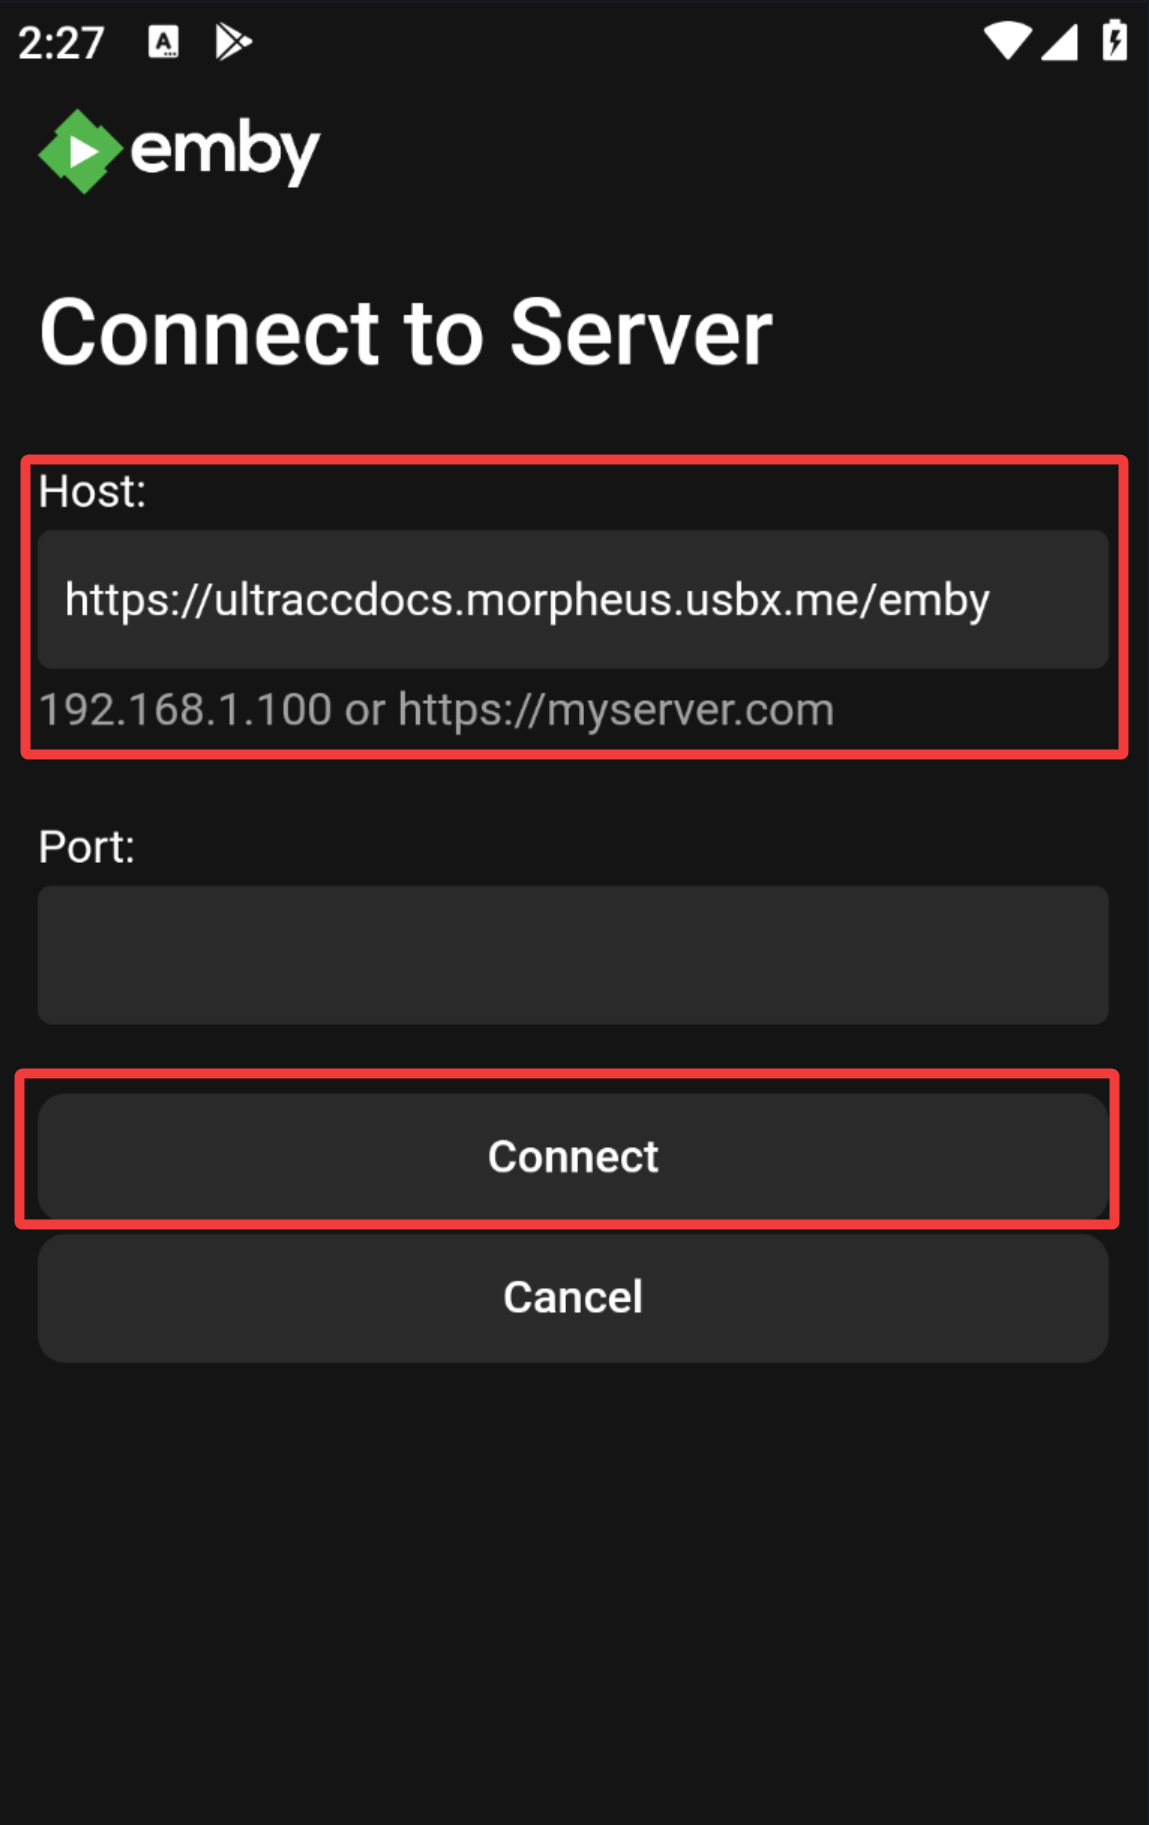
- Username: Your Ultra.cc service username.
- Password: Password set during Emby installation on the UCP.
- Click Sign In to continue.
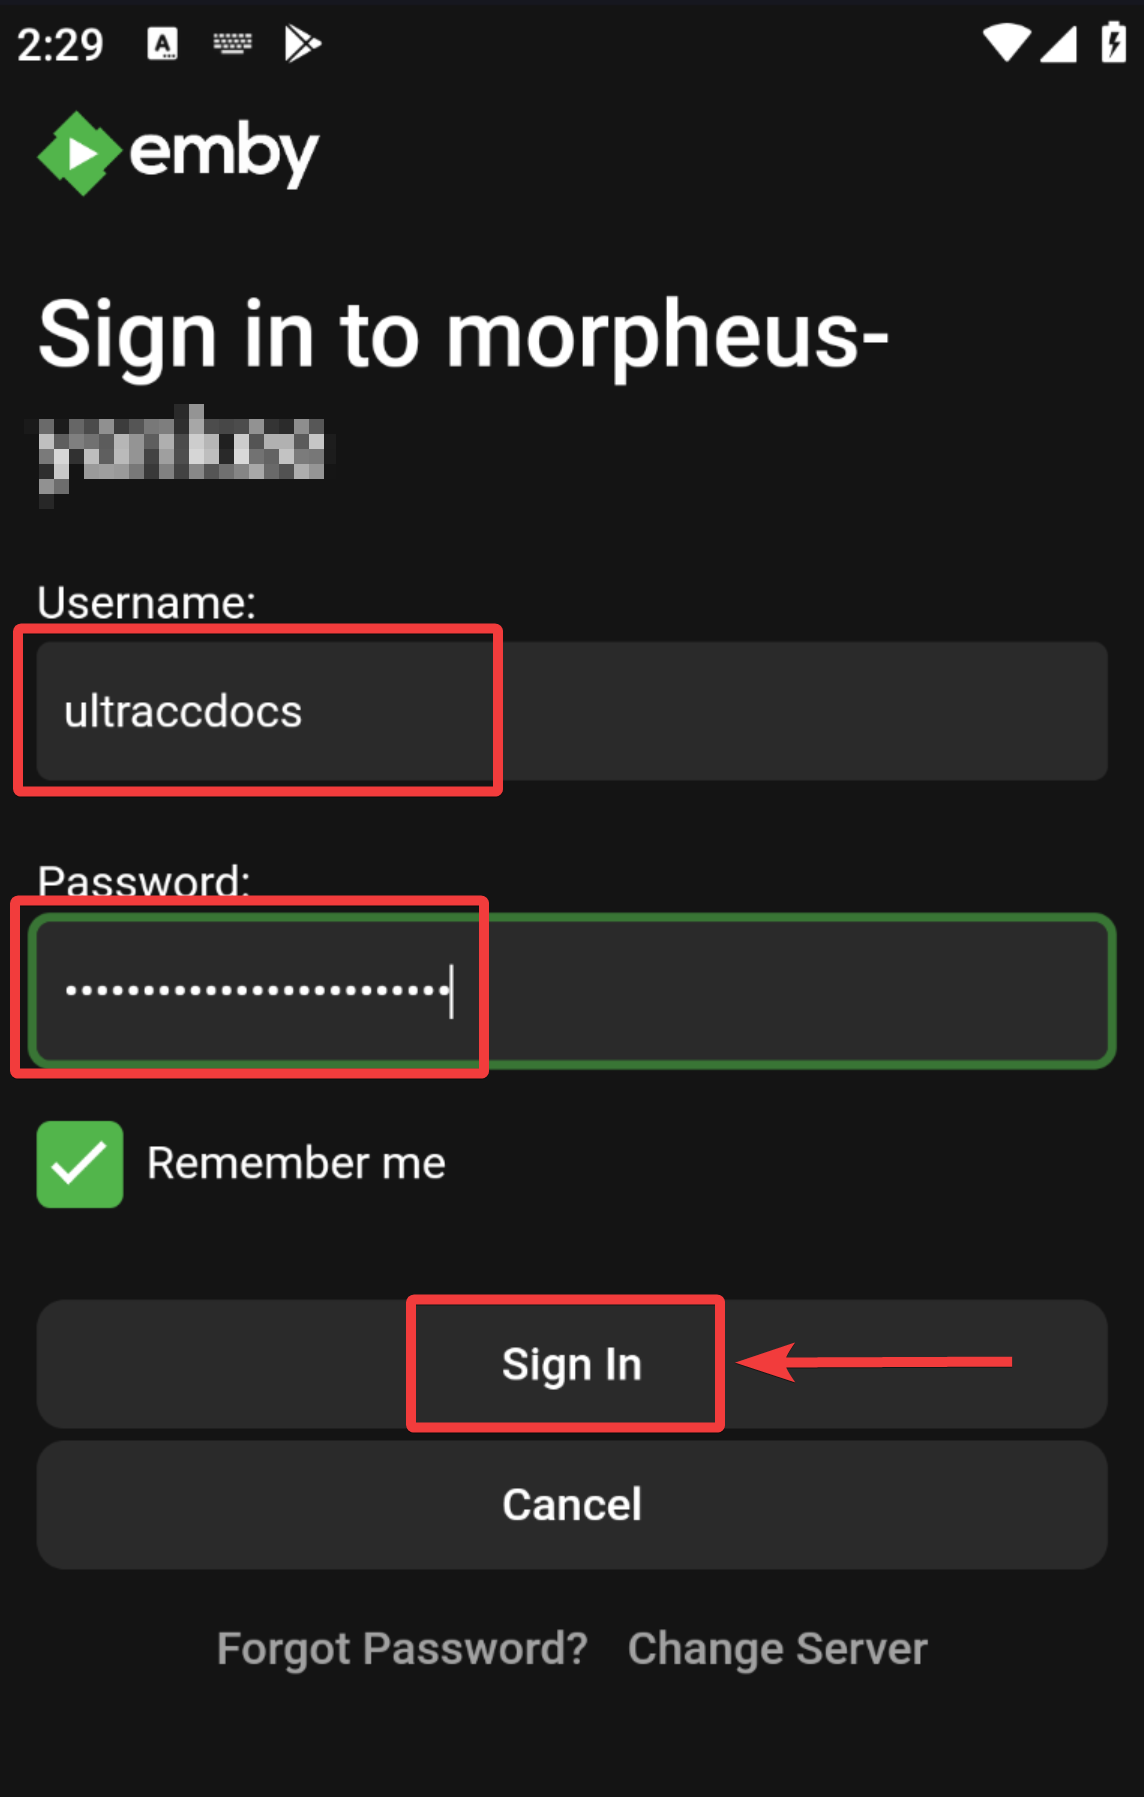
- You can now manage and stream your media with Emby.
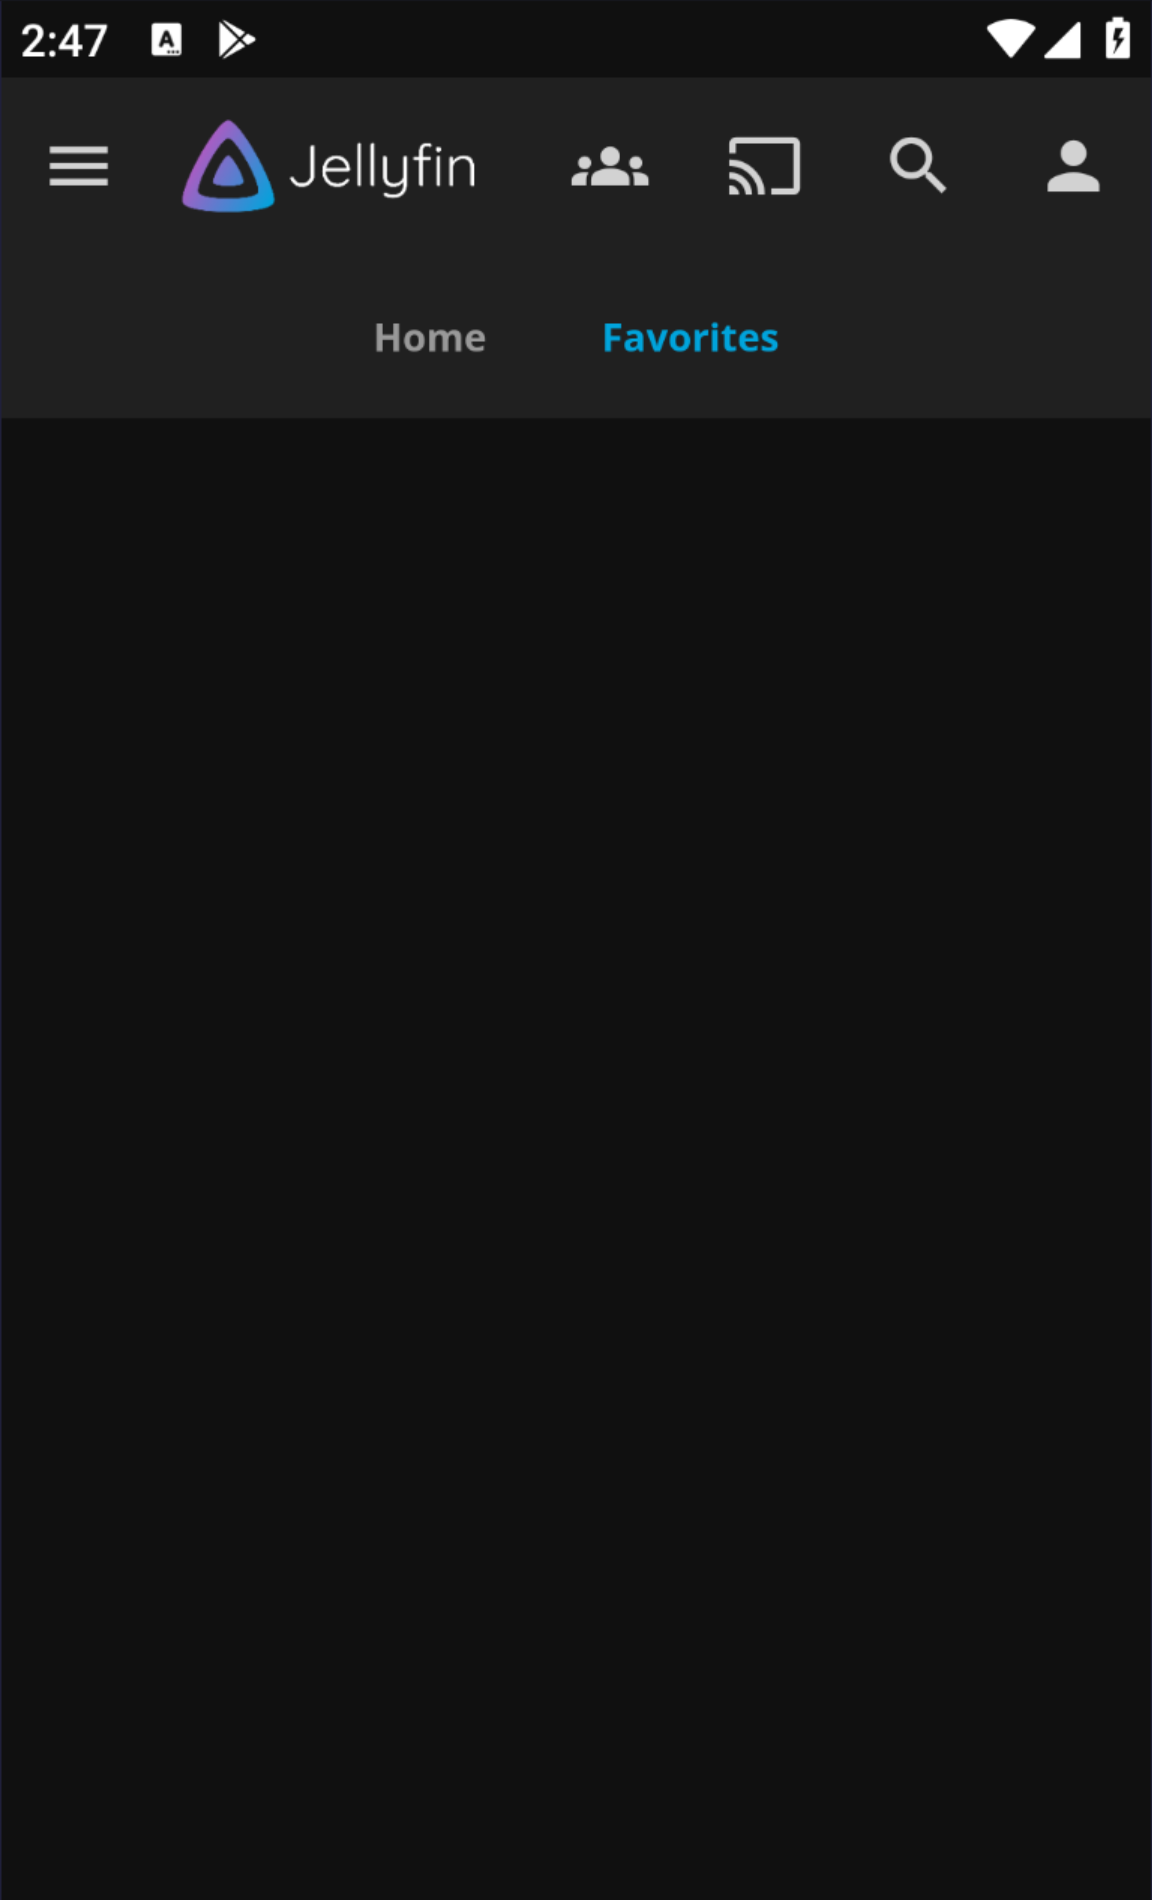
Jellyfin
- Feature-rich media server and client apps.
- Organizes and streams video, music, photos.
- Automatic media metadata retrieval.
- Google Play Store link
Connection Details
- Open application, enter Host in this format :
https://username.hostname.usbx.me/jellyfin& press Connect.
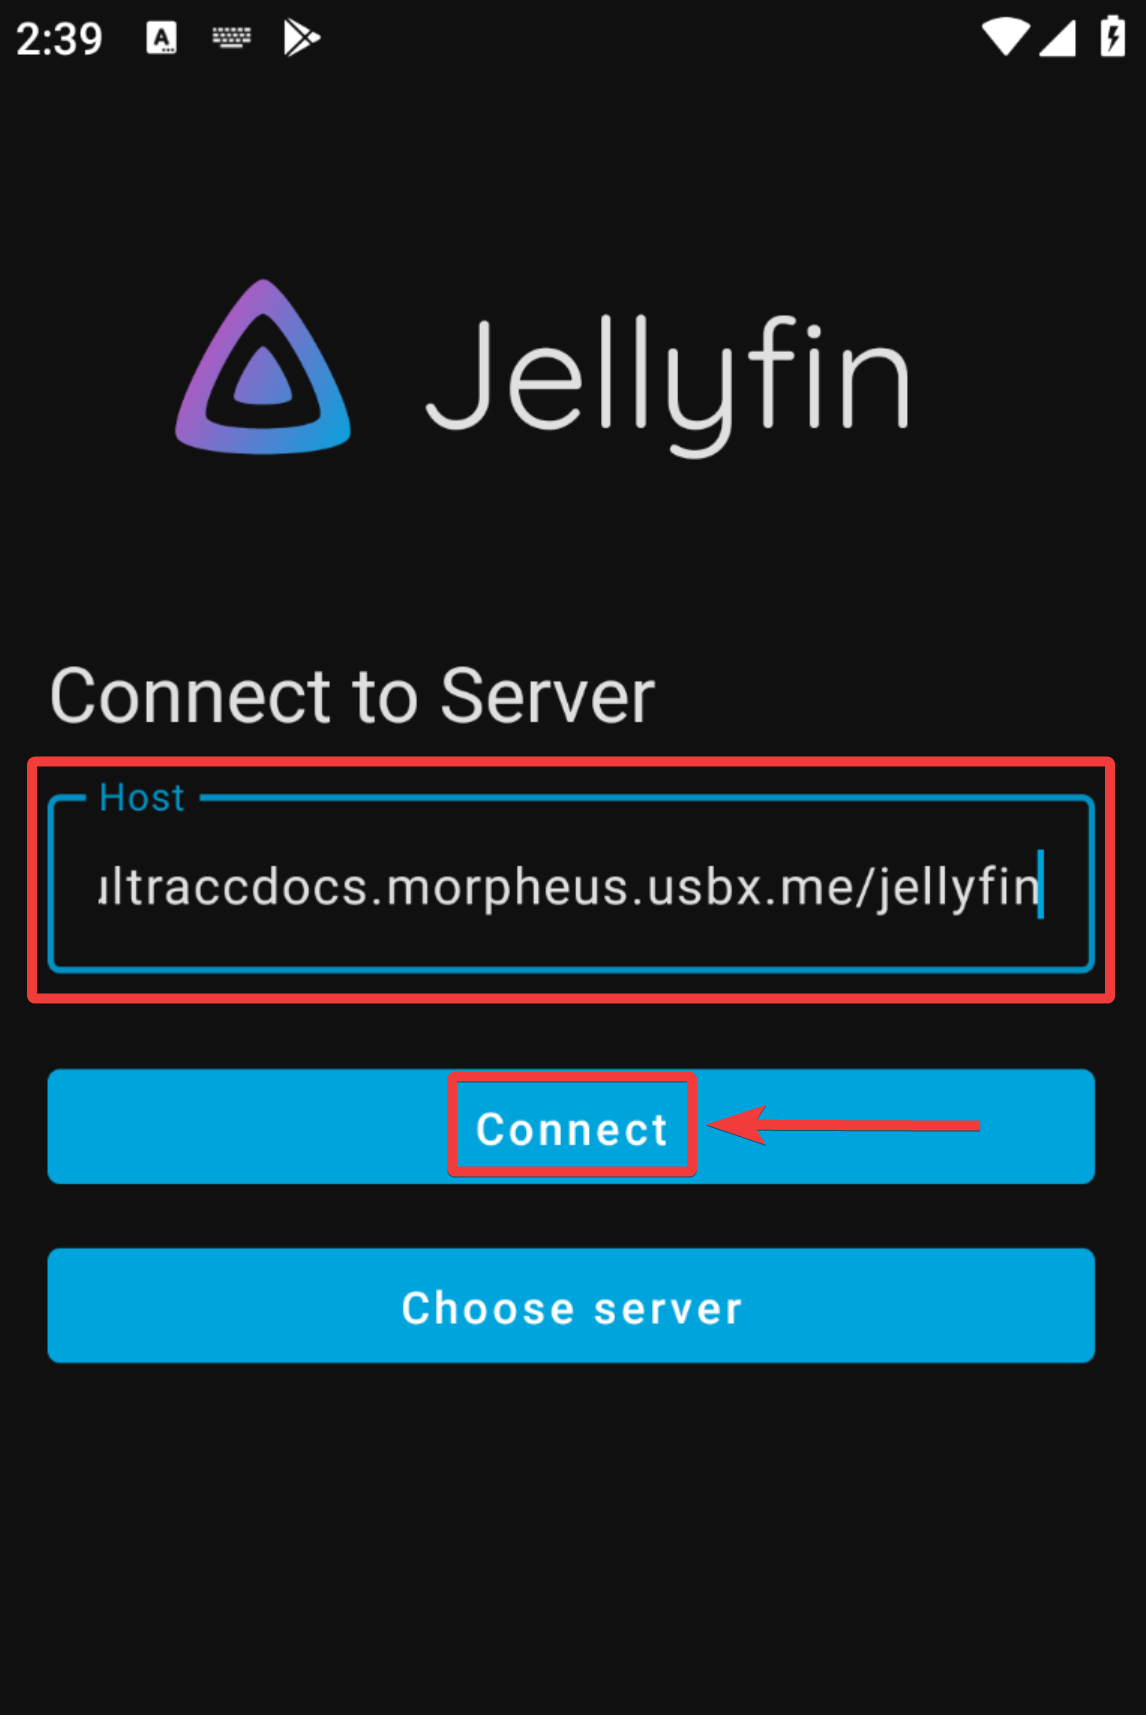
- Username: Your Ultra.cc service username.
- Password: Password set during Jellyfin installation on the UCP.
- Click Sign In to continue.

- You can now manage and stream your media with Jellyfin.
Kodi
- Media center software to play videos, music, podcasts, etc.
- Nice graphical interface to browse and view media.
- Support for add-ons and plugins.
- Google Play Store link
Connection Details
- Detailed connection Information can be accessed here.
Ebook Readers
Moon+ Reader
- Powerful, customizable eBook reader optimized for Android.
- Support for PDF, EPUB, MOBI, AZW, FB2, CHM, CBR, CBZ, UMD, DOCX and more.
- Sync reading progress across devices.
- Google Play Store link
Connection Details
- Detailed connection information for use with Calibre-Web can be accessed here.
Monitoring and Management
RCX - Rclone for Android
- RCX is an Android app integrating cloud providers using Rclone.
- Allows access to cloud storage as well as local device storage.
- Supports configuring and accessing Rclone remotes.
- Google Play Store link
Connection Details
- To add a new remote, open the application and click the
+icon in the bottom right corner.
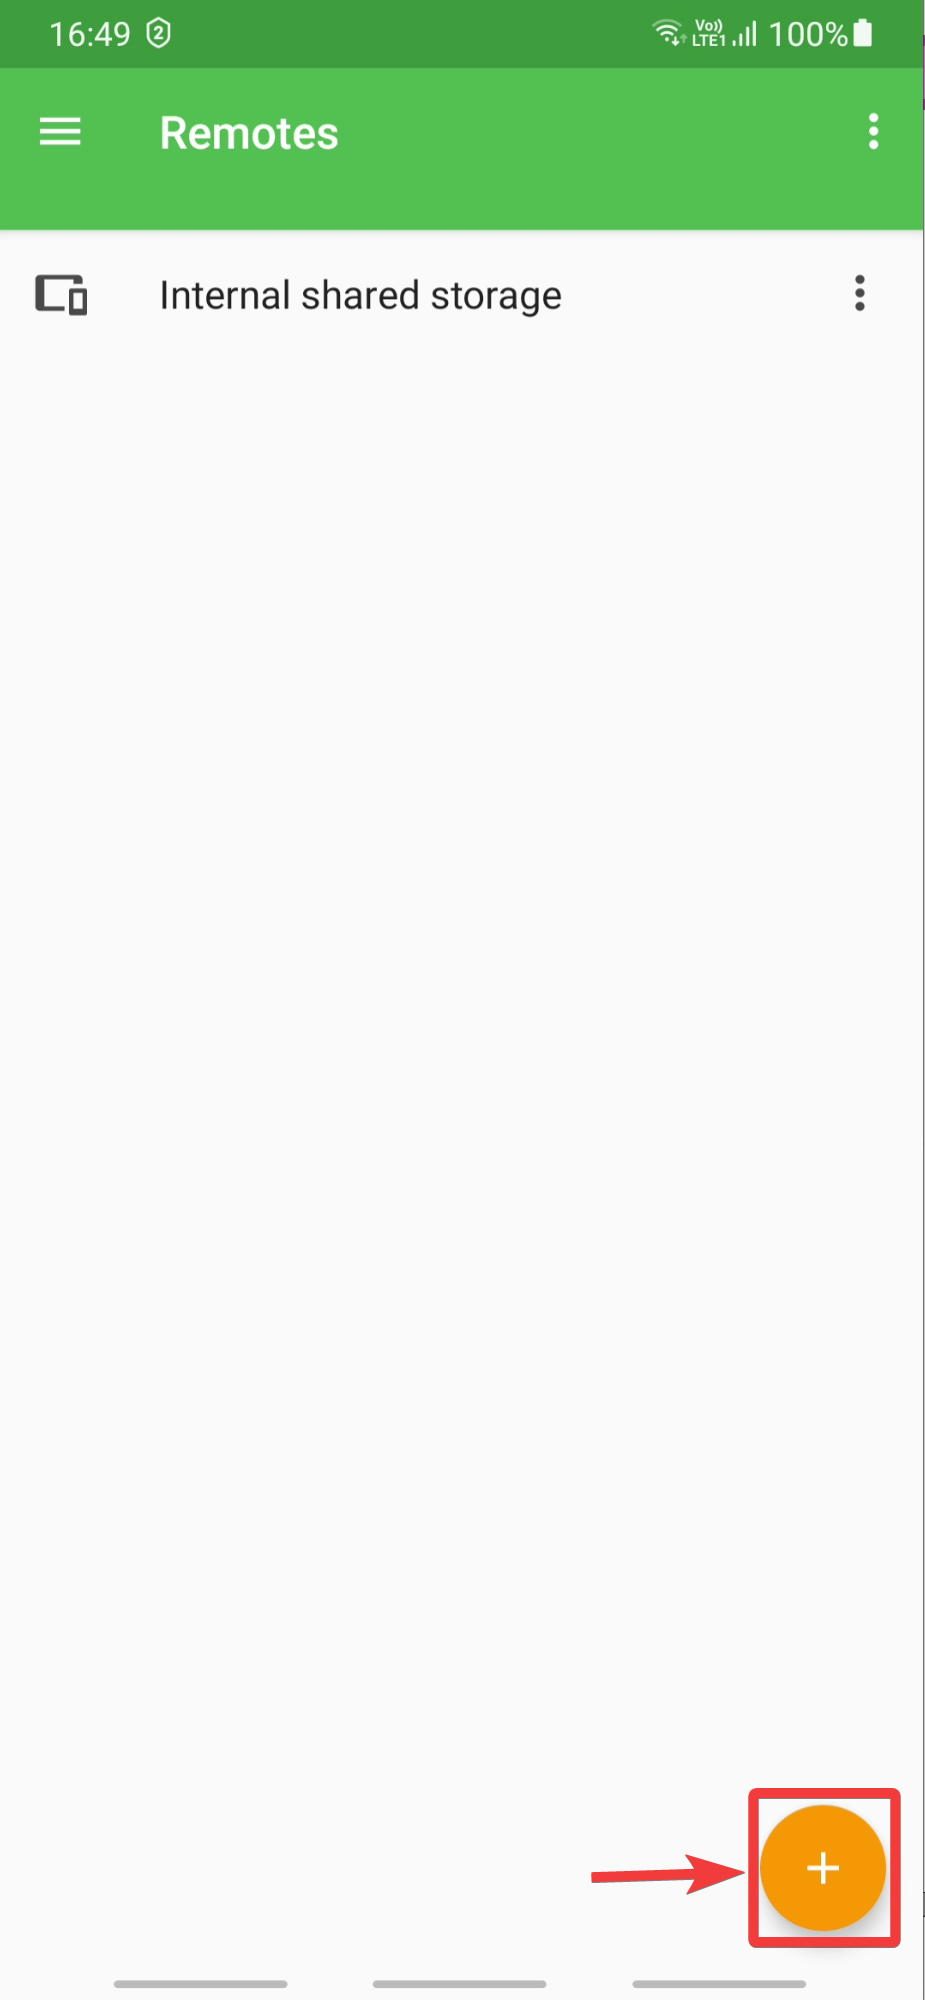
- The application is very versatile, you can add many types of remotes, including import and export of Rclone configs. In this guide, we will be creating an SFTP remote to our service.
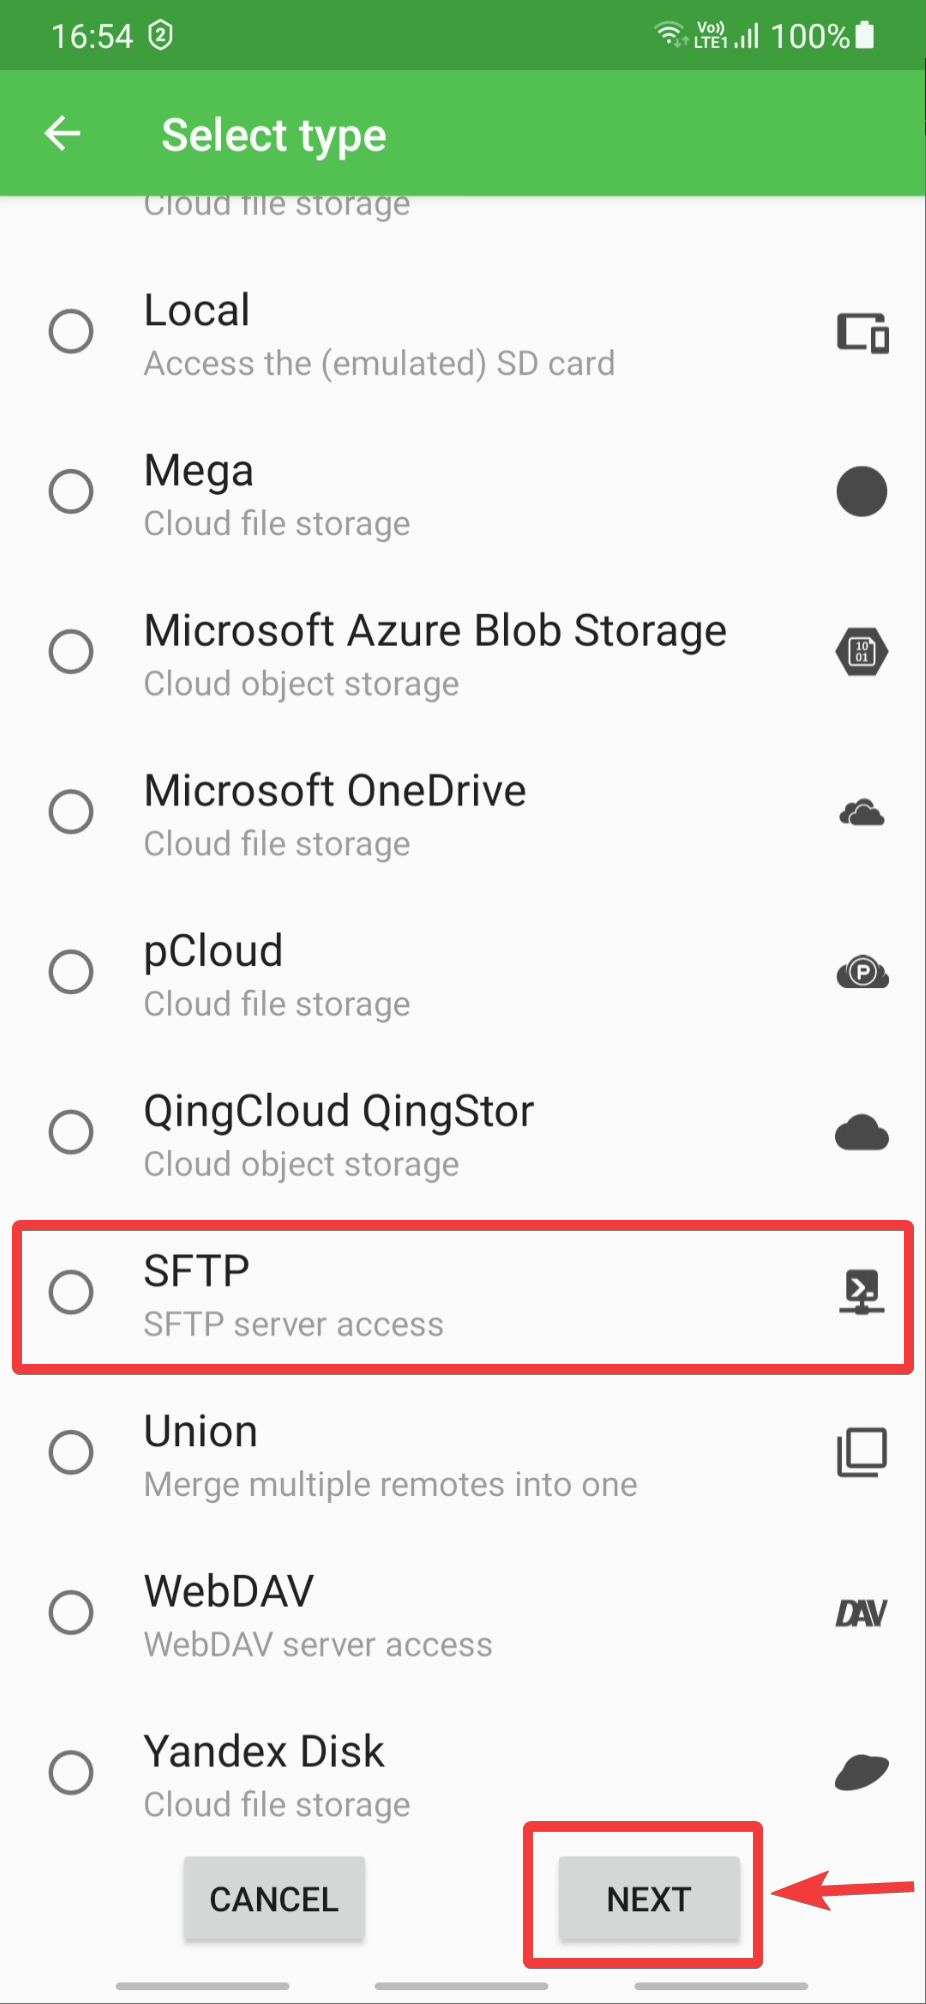
- Select
SFTPas the remote type. And press the Next button to continue.
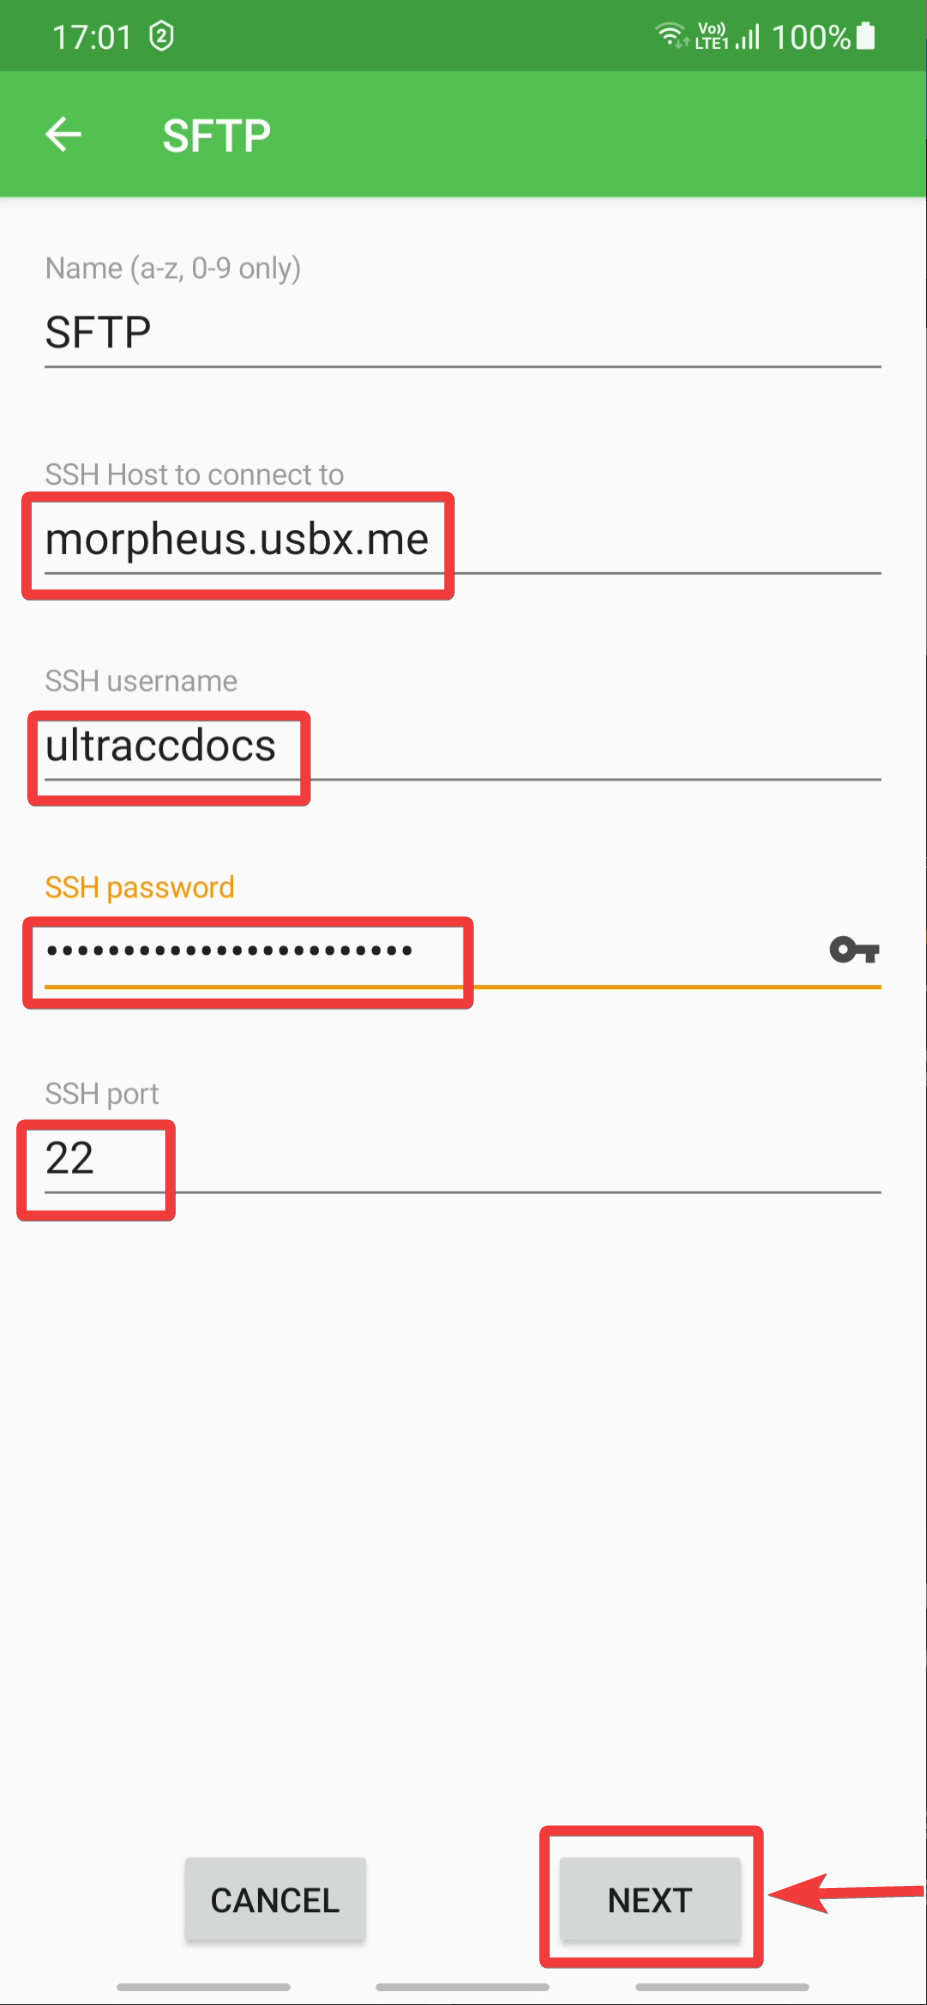
- Enter Host in this format:
hostname.usbx.me. - Enter SSH username and password, which can be found on the Connect tab on the UCP.
- Once done, press the Next button to continue.
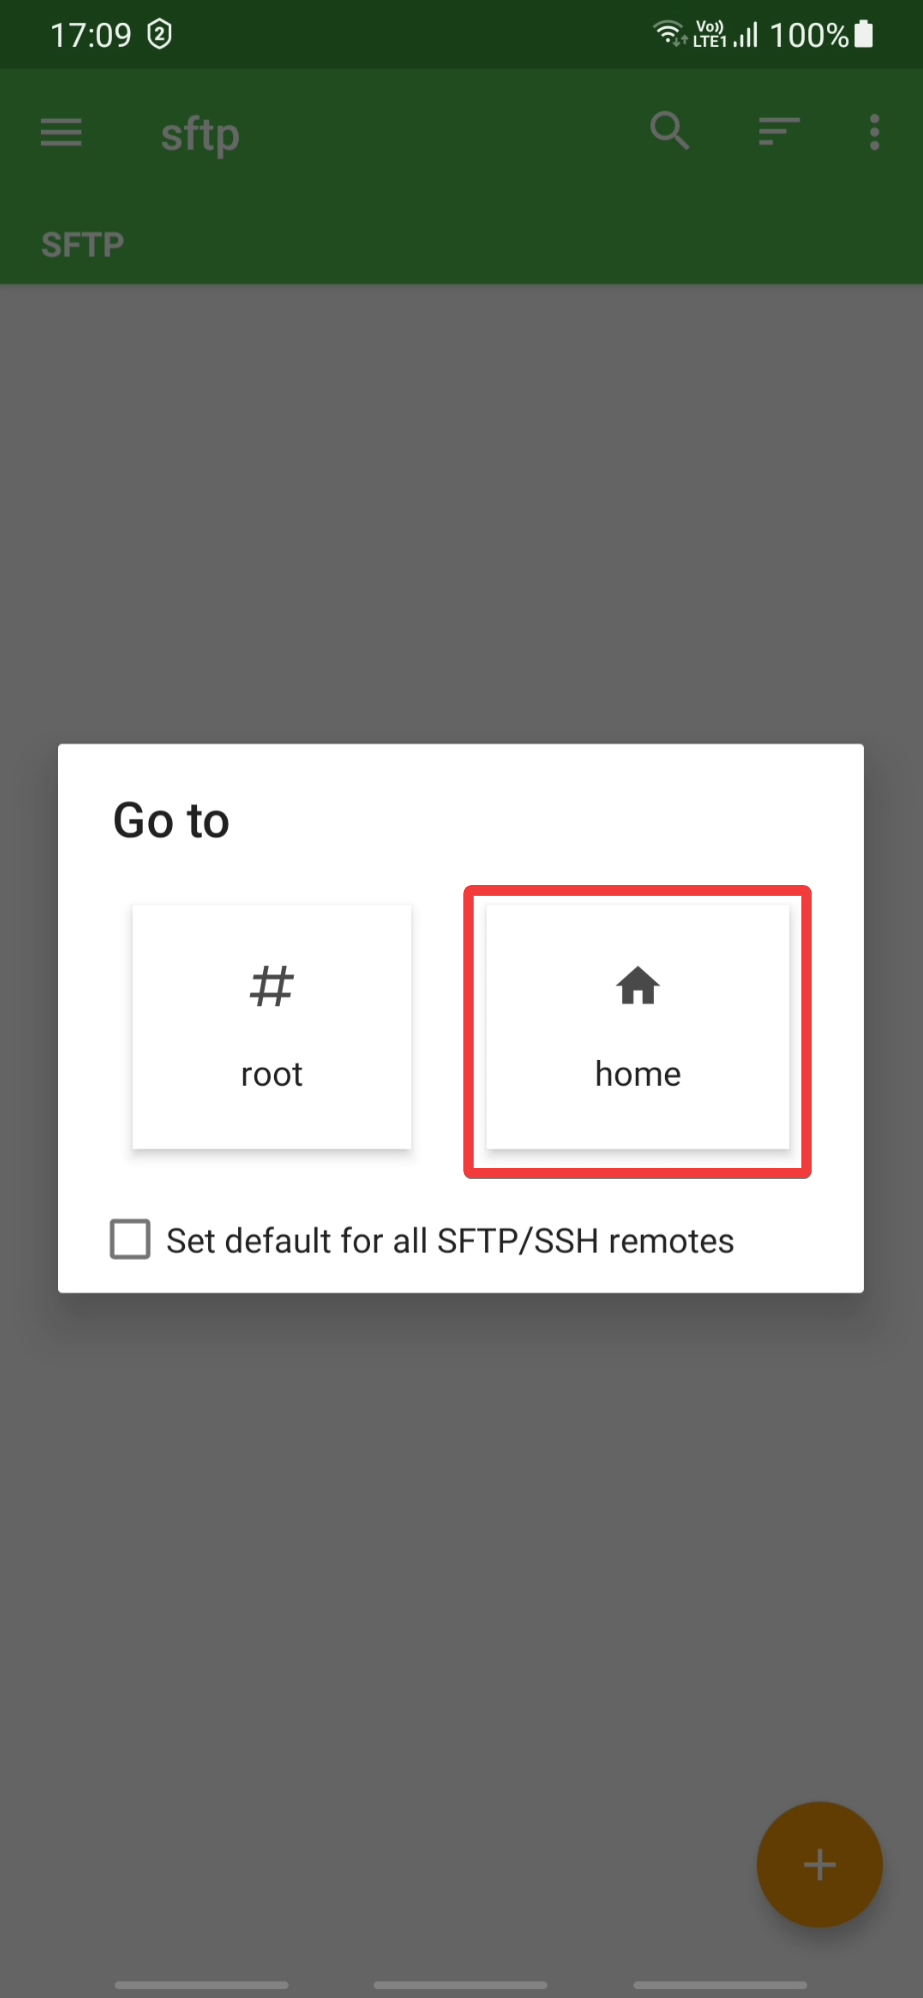
- The SFTP remote will be created and listed under Remotes.

- Click on the SFTP Remote to launch it and select Home to display your directories and files.

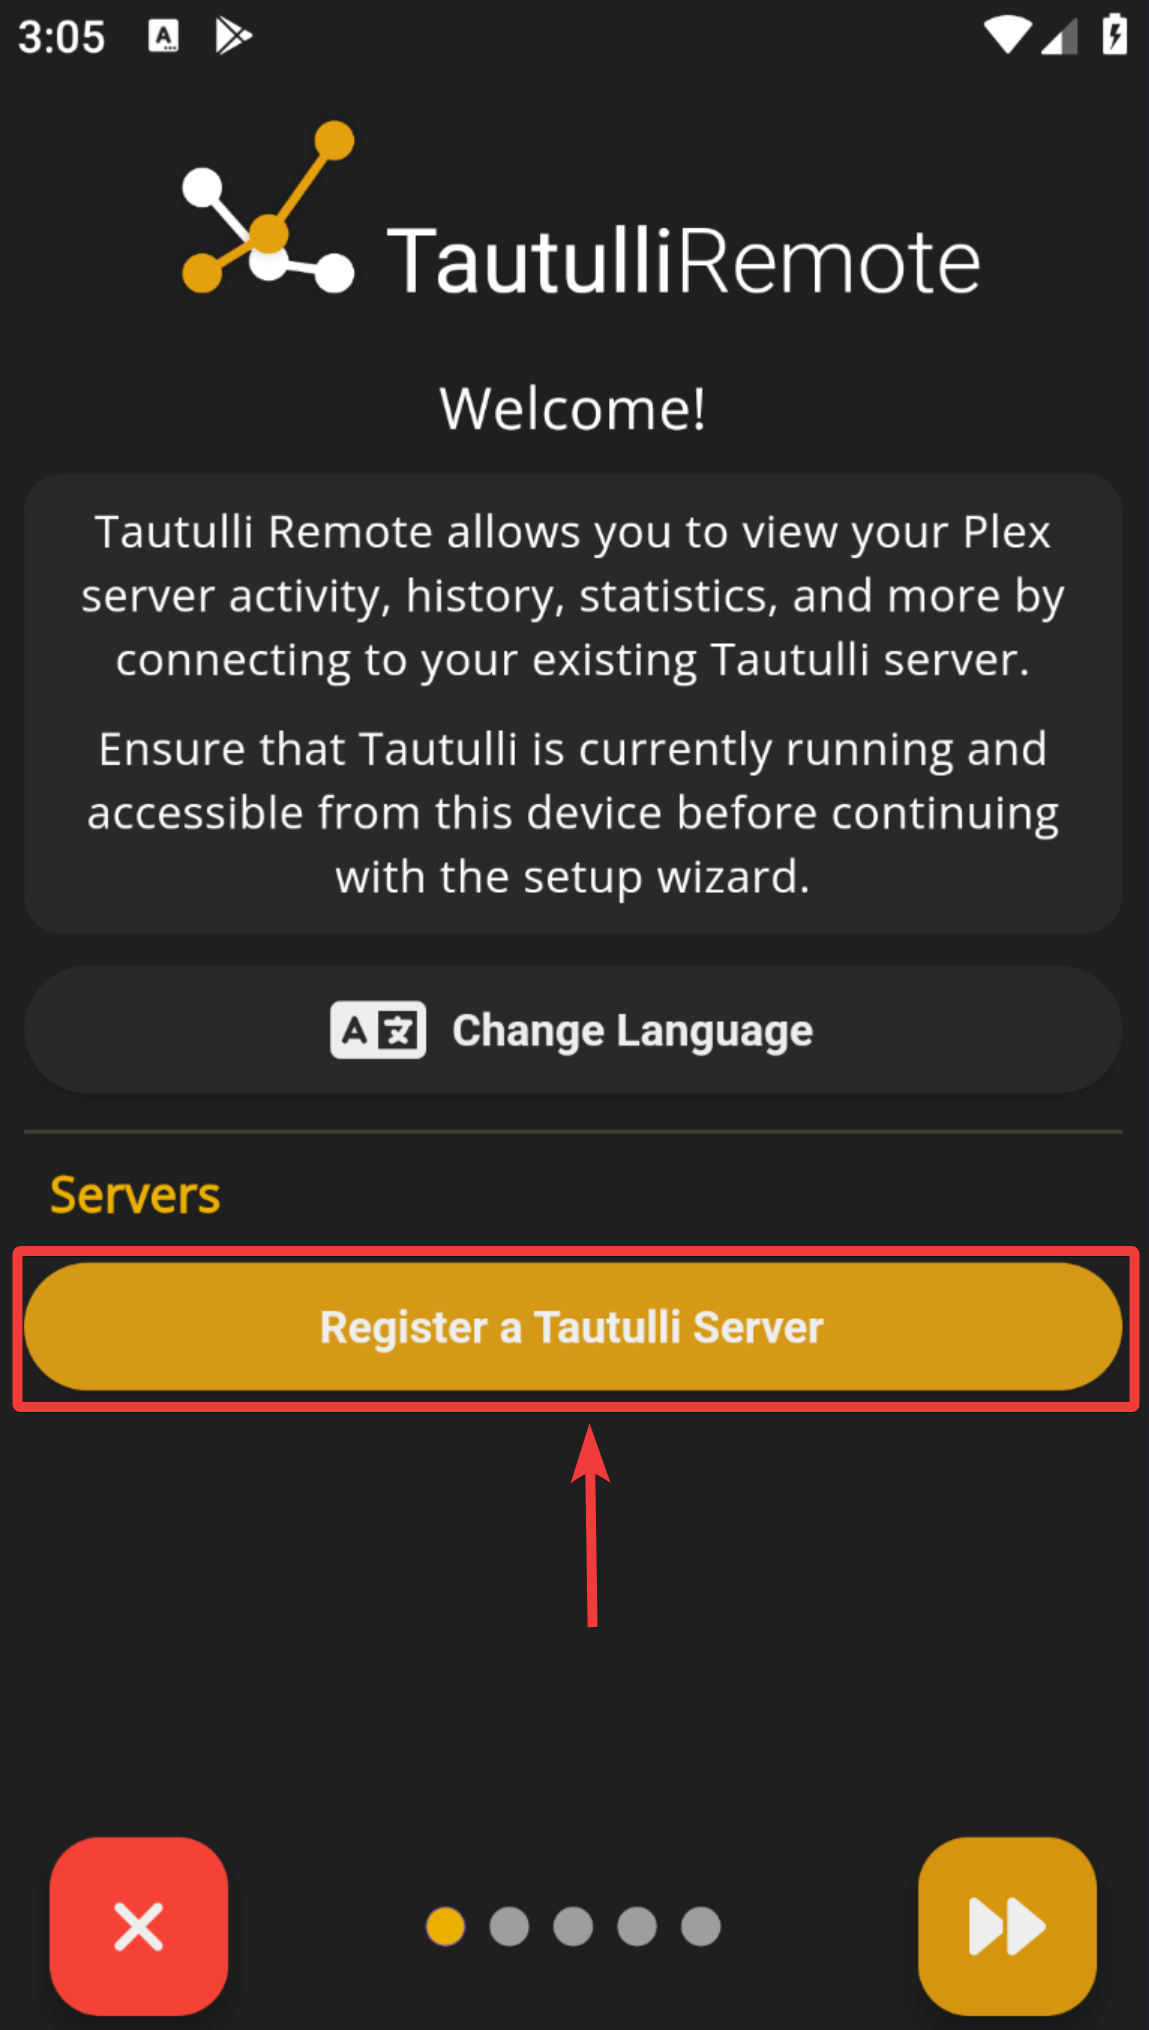
Tautulli
- Analytics and monitoring tool for Plex.
- Dashboard for activity statistics.
- Track user access and behavior.
- Google Play Store link
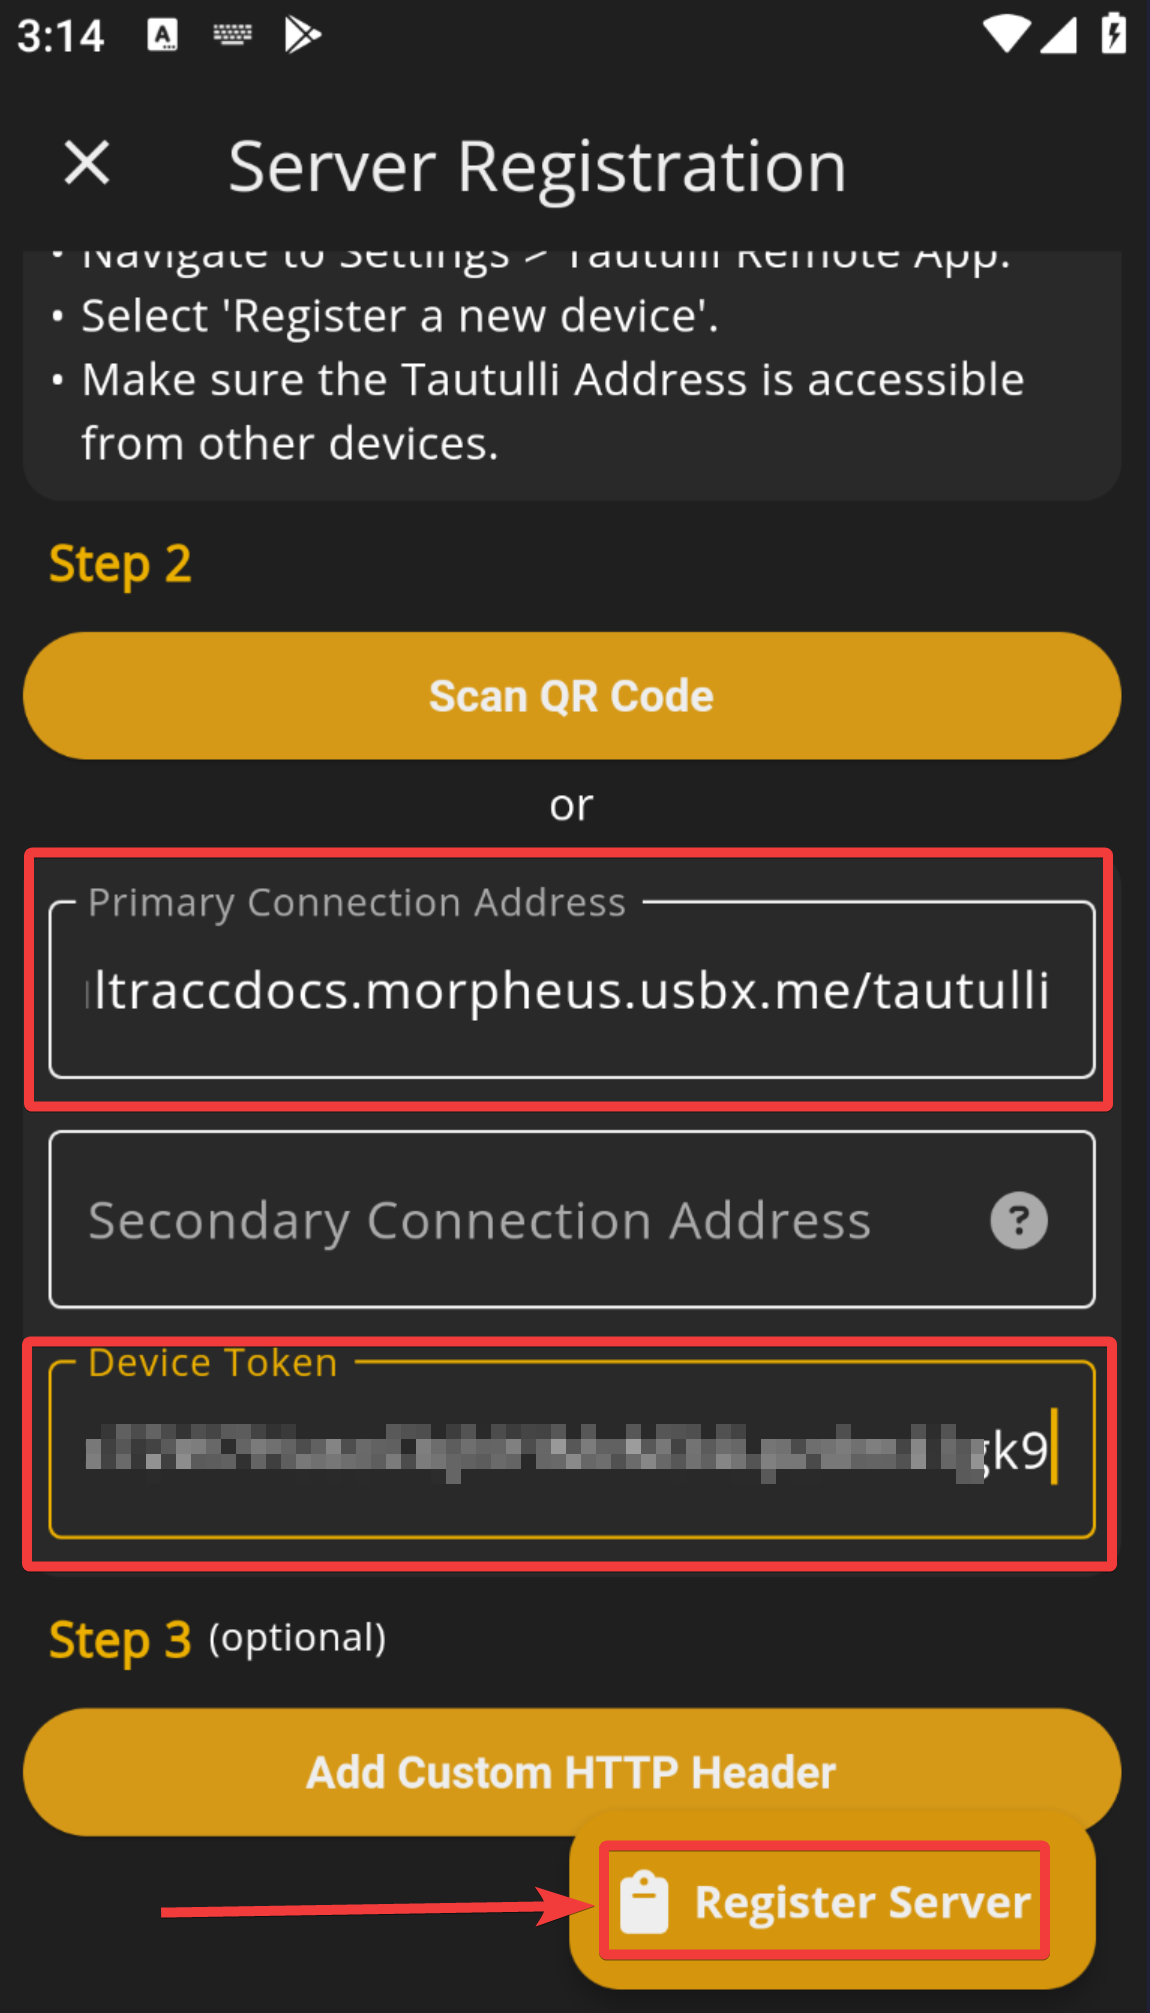
Connection Details
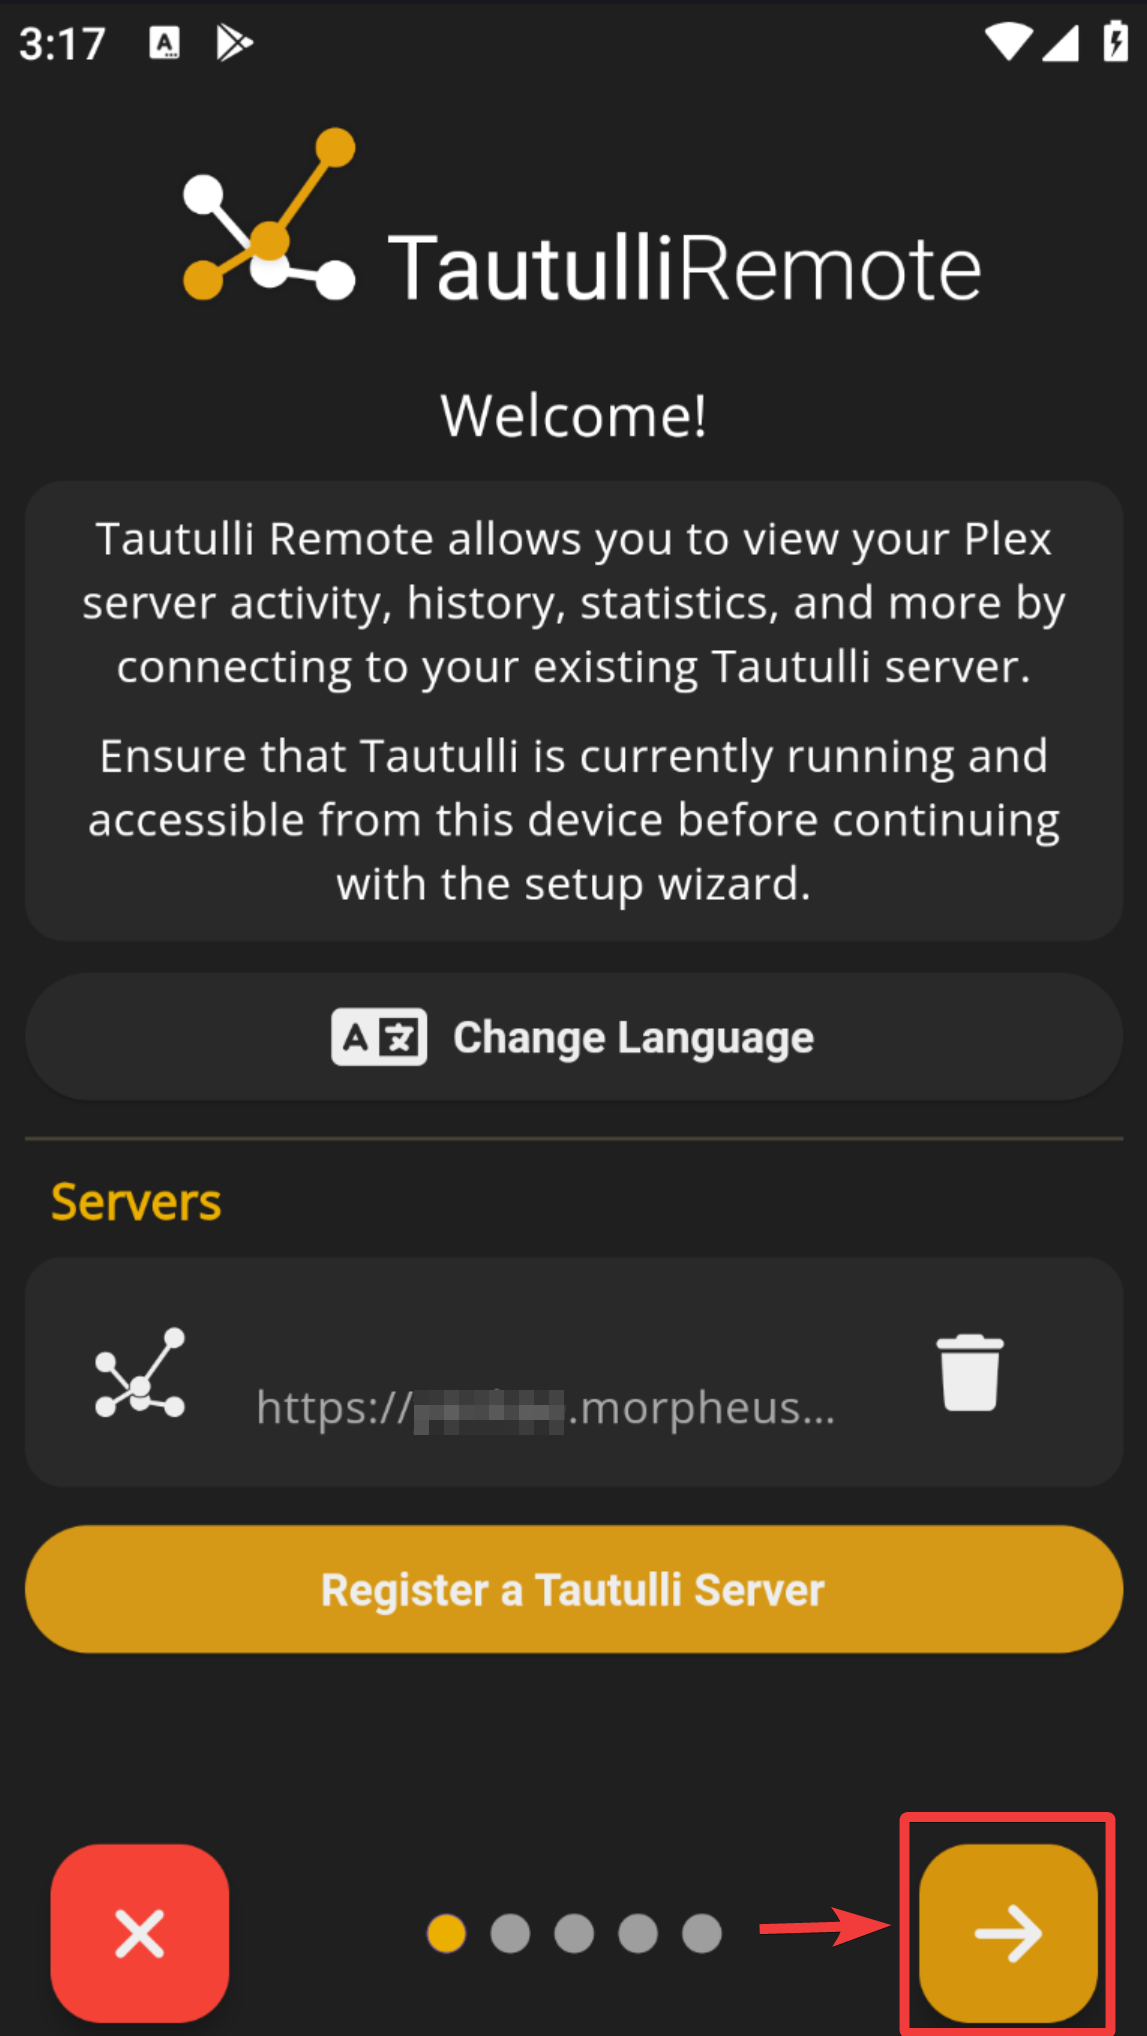
- Open the application and select Register a Tautulli Server option.
- Primary connection address in this format:
https://username.hostname.usbx.me/tautulli. - Secondary connection address is blank.
- Device token can be obtained from the Tautulli Web UI. Open Settings > Tautulli Remote App > Register a new Device > Device Token.
- Submit using Register Server button.
- The device is registered now, you can press the right arrow button to complete the setup procedure.
This covers some of the most useful Android applications to pair with services hosted on our platform. File managers allow easy transfer and downloads, torrent and NZB managers enable remote access to your downloads, and SSH apps grant direct terminal access among others.
If you are having trouble with this, you can open a support ticket here!
Feedback and suggestions regarding this article are welcome in our Discord server