Misc. Guides
A selection of miscellaneous guides to help you better manage your service and applications.
- Downloading from your Ultra.cc service
- Delete Data on your Ultra.cc service
- Restore Application Backup
- Microsoft Edge Smartscreen Warning
- Crontab Explainer
- Unofficial Installation Scripts
Downloading from your Ultra.cc service
Will these download clients use my upload quota? Yes, downloading or sharing files will use the upload quota. With the exception of FTP on Port 21 & SSH on Port 22.
Downloading Files
At Ultra.cc we offer an application hosting service that allow customers to store and access files. There are several methods available to download files from your Ultra.cc service, each with their own pros and cons. This guide provides an overview of the different file download options.
FTP/SFTP
FTP and SFTP are secure file transfer protocols used to transfer files between two locations, such as your Ultra.cc service and local machine.
Pros:
- Widely supported on devices and operating systems.
- Uses common ports (FTP port 21, SFTP port 22).
- SFTP allows using SSH keys for additional security.
Cons:
- Slower transfer speeds compared to segmented downloads.
See Connecting using FTP guide for details on settings and usage.
LFTP
LFTP allows for segmented downloads, which breaks files into smaller "segments", allowing you to maximize bandwidth by downloading segments in parallel.
Pros:
- Much faster transfer speeds.
- Useful for large files/folders.
Cons:
- Requires setup and some technical knowledge.
See Using LFTP guide for details on installation, configuration, and usage.
HTTP Access
HTTP Access provides a quick way to directly download files over HTTP from your Ultra.cc service using a web browser.
Pros:
- Simple downloads through web browser.
- Secure access with basic authentication.
Cons:
- Less features compared to sync or transfer tools.
- Counts against upload bandwidth allocation.
See Downloading using HTTP Access guide for details.
WebDAV Access
WebDAV Access is an extension of the HTTP protocol and offers an efficient way of managing your files remotely.
Pros:
- Efficient
- Secure access with basic authentication.
Cons:
- Less features compared to sync or transfer tools.
- Counts against upload bandwidth allocation.
See Access your Ultra service with WebDAV guide for details.
Rclone
Rclone is a command line program that can sync files from your Ultra.cc service using FTP, FTPS, or SFTP. It supports incremental syncing, meaning it will only download new or changed files after the initial transfer.
Key Features:
- Configure a remote pointing to your Ultra.cc service using your login credentials.
- Create a script that runs Rclone to sync data from your Ultra.cc service to a local folder.
- Automate the script to run on a schedule using cron.
Pros:
- Robust and flexible command line interface.
- Fast transfer speeds comparable to direct downloads.
- Easy to fully automate incremental syncs.
- Support for FTP, FTPS (implicit/explicit), and SFTP protocols.
Cons:
- Initial configuration requires some command line proficiency.
- Does not have a graphical interface.
- Sync can fail if files are locked or inaccessible.
For a step-by-step guide to setting up Rclone for automated transfers from your Ultra.cc service, click here.
Syncthing
Syncthing is a free, open-source, peer-to-peer file synchronization application. It synchronizes files between two or more computers.
Key Features:
Pros:
- Automatic file syncing between devices.
- No reliance on central cloud provider.
- Security features like encryption.
Cons:
- Configuration can be complex.
- Resource intensive if not properly limited.
- Not recommended by Ultra staff.
Be cautious of scanning intervals, file watcher settings, and bandwidth limits to avoid resource exhaustion. See Using Syncthing guide for full configuration details.
Resilio Sync
Resilio Sync is a peer-to-peer file sync and share tool that keeps folders matched between devices.
Key features:
- Sync folders to computers, phones and tablets.
- Secure transfer with AES-128 encryption.
- Set read/write permissions per user.
Pros:
- Resilio include easy cross-device syncing and configurable permissions.
Cons:
- No selective sync in free version.
- Local sync ability requires paid tier.
Resilio creates a decentralized sync network with military grade encryption, making it a versatile solution for sharing files from Ultra.cc. Refer to the Resilio setup guide for details.
Automated Sync Scripts
Scripts that can automatically sync Ultra.cc storage contents to another location on a regular schedule.
Pros:
- Easy way to keep folders automatically synced.
- Runs in background without manual intervention.
Cons:
- Require some technical knowledge to install and configure.
See Remote sync tool and FTP/SFTP transfer script guides for details on requirements, installation, and usage.
Recommendations
There are several methods available for downloading files from Ultra.cc that:
- Prioritize security.
- Transfer speed.
- Automation.
- Ease of use.
Review the pros and cons of each method to decide what works best based on your needs and technical background.
Sharing Files
Ultra.cc offers a variety of methods to share files from your ultra slot with friends, family or colleagues. This guide provides an overview of several options to match different use cases and comfort levels. These applications can be installed and managed from the UCP.
FileBrowser
FileBrowser provides seamless file management through your web browser.
With FileBrowser you can:
- Upload, download, preview, rename, and delete files.
- Create folders and organize your files.
- Set up user accounts with customized folder permissions.
The pros of FileBrowser are:
- Its simple web interface familiar to most users.
- It also enables granular control over what others can access in your account.
The only con is:
- It lacks some advanced functions found in protocols focused purely on file transfers.
For details on setting up File Browser, refer to the documentation Here.
Nextcloud
Nextcloud expands your Ultra.cc service into a private cloud platform with a sleek web interface.
Capabilities include:
- File hosting and transfers.
- Secure desktop and mobile sync clients.
- Public share links with passwords and expirations.
- In-browser document editing and previews.
The pros of Nextcloud are:
- Nextcloud delivers an extensive feature set for accessing, sharing and managing your files.
The Cons of Nextcloud are:
- The tradeoff is increased complexity in configuration and resource usage compared to simple sharing tools.
Follow the Nextcloud setup guide if interested Here.
ProFTPD
ProFTPD allows you to easily create FTP user accounts to share files from your Ultra.cc service.
The main benefits of ProFTPD are:
The tradeoff with ProFTPD is:
- That your users will need an FTP client to connect, so it's less user friendly than a web interface.
- But for secure file transfers, ProFTPD is a great fit.
To install and manage ProFTPD, follow this guide Here.
Recommendations
Consider aspects like:
- Your recipients' technical comfort.
- Frequency of access.
- Mobile device access needs.
- Number of users.
With various options like File Browser, Nextcloud and ProFTPD available at your disposal, you have flexible sharing capabilities on Ultra.cc to suit your needs!
If you are having trouble with this, you can open a support ticket here!
Feedback and suggestions regarding this article are welcome in our Discord server
Delete Data on your Ultra.cc service
We do not keep backups of your data. Please take care while deleting data, as it will not be recoverable once deleted. We take no responsibility for the data you delete.
In this guide, we will show you how to delete data on your Ultra.cc service. No matter what plan you have chosen for your service, you will have a limited storage. It is not possible to add extra storage to an active service without upgrading to a higher tier plan, more info can be found here.
If you reach the maximum limit of your storage, your webserver and applications will be temporarily taken offline. They will remain offline until you have freed up some storage space and restarted the applications. However, services such as FTP/SFTP and SSH will remain active and accessible, to facilitate a way of deleting data on your service.
It is important to remember that Linux do not have a trash or recycling bin functionality. This means that any files or directories deleted will be instantly deleted and permanently lost. You should always keep backups of important data.
Instructions
The fastest and simplest way of deleting all your data and resetting your service to a fresh state, is to use our unofficial factory reset script. More info can be found here. For a more granular control that allows deletion of individual files and folders, continue reading.
SSH
Before proceeding, make sure to set an FTP/SSH password under the Connect tab on the UCP.
- Connect to your Ultra.cc service via SSH
- Once connected, there are multiple ways of deleting your files and directories.
rm command
To avoid accidental deletion, add the -i option, and you will have to manually confirm each deletion.
The most basic way of deleting files and directories is by executing the rm command.
- To delete a file, simply execute:
rm ~/path/to/filename.mkv
- To recursively delete a directory and its content, add
-rand execute:
rm -r ~/path/to/directory
- If your file or directory name includes spaces in their name, you must state the filename within apostrophes, quotation marks or by using escape sequence:
-
rm '/path/to/file with space in name.mkv' -
rm "/path/to/file with space in name.mkv" -
rm ~/path/to/file\ with\ spaces\ in\ name.mkv
-
- Lastly, to see which files are actually being deleted when you execute the
rmcommand on a directory, you can include the verbose option:rm -rfv ~/path/to/directory
Midnight Commander
Deleting files via SSH can also be done from a CLI file explorer such as Midnight Commander aka mc. Detailed usage instructions can be found here.
Ncurses Disk Utility
Ncurses Disk Utility aka ncdu is another CLI file explorer that is available on all Ultra.cc servers. Detailed usage instructions can be found here.
FileBrowser
Just as the name suggests, FileBrowser is a webUI based application that lets you browse your files and directories from the comfort of a webUI. It also allows you to download, upload, delete, etc. Detailed usage instructions can be found in the dedicated FileBrowser guide.
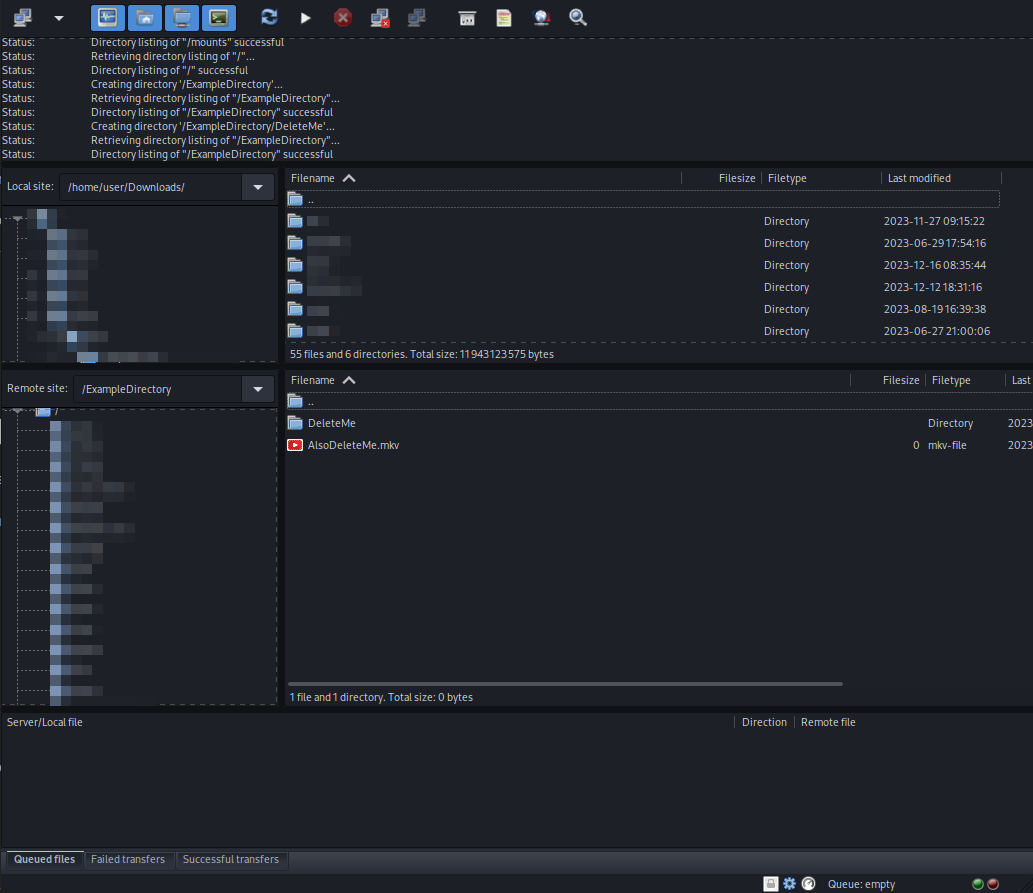
FTP
One of the most user-friendly ways of managing your files and directories is via FTP.
- Connect to your Ultra.cc service via FTP
- Once connected, you will be presented with a split file explorer showing your local and remote files.
- In the file explorer of your remote Ultra.cc service, navigate to the files and directories you want to delete.
- Mark the files and directories you want to delete and click
Delon your keyboard.- You can also right-click to open the context menu, and click Delete.
- A confirmation window will appear, click Yes to confirm deletion.
Network Drive
To delete files and directories from the comfort of your native Windows file explorer, you can mount your Ultra.cc service as a network drive. Detailed instructions can be found here.
Identifying Missing Free Space
A common mistake while comparing your used storage is to compare GiB with GB.
If the Disk Usage on the UCP does not update after you have deleted your data. There might be a variety of reasons for why this is happening. Besides checking your storage quota from the UCP, it can also be checked via SSH.
Once connected to your service via SSH, simply execute quota -s and you will see your storage allotment and usage.
GB v/s GiB
One of the most common causes of missing free space is to mistakenly compare GB vs GiB. The Disk Usage on your UCP is represented in terms of GB. On the other hand, most applications display data size in terms of GiB.
- 1 GiB = 1.07374 GB
- For example, if you are using 50 GiB of storage space as seen from rTorrent, it will be shown as 54 GB in your UCP, but it is the same amount of data represented in different units.
Hardlinks
If you are utilizing hardlinks, which is commonly used with Sonarr/Radarr. It is possible that you have only deleted one of the two linked files. To check if a file is hard linked, you can use the utility tool ncdu, as it will mark any hard linked file with an H in the far left column.
However, if you have already deleted one of the two hard linked files, it cannot be identified with ncdu. In this case, you need to manually check the two path locations. Usually, this would be your torrent downloads directory and your media directory.
Torrent Client Issues
When you delete torrents and their associated data from your torrent client, the change in storage space should be immediately updated. However, in some cases, the data will be held up by the torrent client and the UCP storage statistics will not be updated until you have restarted your torrent client.
Restore Application Backup
Take care while restoring an application backup to avoid accidental overwrites of data. Use at your own risk and only proceed if you are comfortable navigating a Linux terminal. If you are unsure, see our Your Ultra.cc Shell - A Beginner's Guide to get familiarized with the Linux terminal. Or you can request official support by submitting a ticket.
In this guide, we will show you how to create and restore a backup from one of the Ultra.cc officially supported applications. The majority of applications installed from the User Control Panel will have a configuration directory in ~/.apps. While torrent clients and some other applications are excepted from this, and you will find their configuration directories in ~/.config.
Introduction
An application backup is created when you press Upgrade & Repair on the UCP, or by manually executing app-<appname> upgrade or app-<appname> repair. Application backups are compressed into ZIP archives, and are stored in ~/.apps/backup. You can also create application backups manually by executing app-<appname> backup.
Backup
To create an application backup, follow the below instructions:
- Connect to your Ultra.cc service via SSH
- Once connected, execute the below command to create an application backup.
- Make sure to replace
<appname>with the name of the application you want to create a backup for. For example, to create a backup for Deluge, the command would beapp-deluge backup.
- Make sure to replace
app-<appname> backup
- Once the command has been successfully executed, a backup has been created in
~/.apps/backup
Restore
To restore an application backup, follow the below instructions:
- Connect to your Ultra.cc service via SSH
- Before resting the backup, stop the application from the UCP, or by executing the following command:
app-<appname> stop
- Manually backup the current application configuration directory by executing the following command:
cp -r ~/.apps/<appname> ~/.apps/<appname>.bak
- If the previous command was successful and without any errors, you can proceed with the process.
- Next, navigate to the application backup directory and list the directory contents:
ls -lah ~/.apps/backup
- The previous command will automatically list all the individual application backups with the naming format:
appname-date_time_uniqueID. - Next, select which backup you want to restore, and copy the filename.
- Next, to extract the backup, execute one of the following commands and include the copied filename.
- If the file name ends with
.zip, use theunzipcommand. - If the file name ends with
.tar.gz, use thetarcommand.
- If the file name ends with
unzip ~/.apps/backup/<appname>-2000-00-00_00-00_00000000.zip -d ~/
tar -xzvf ~/.apps/backup/<appname>-2000-00-00_00-00_00000000.zip -C ~/
- Once the extraction has finished, the application can be restarted.
app-<appname> restart
- Wait 1-2 minutes and check if the application is reachable via its Web UI.
- If the application still is not functioning, you can repeat the restoration procedure and try an older backup.
Microsoft Edge Smartscreen Warning
If you are using the Edge web browser and access our services on the usbx.me domain, you might encounter a SmartScreen browser warning. This warning is a false positive report and there is no need to worry.
There is unfortunately nothing we can actively do to remove this warning. However, we have contacted Microsoft and requested the warning to be removed. You can help by clicking on More information and then select "Report that this site doesn't contain phishing threats".
Removal Options
- Click on More information and then "Continue to the unsafe site (not recommened)" option

- Switch off Smartscreen. Click on Start and then type Reputation-based protection and switch off Smartscreen for Microsoft Edge
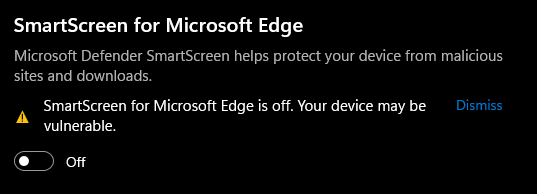
- Use a different browser, such as Firefox or Chrome.
Crontab Explainer
Crontab is a powerful utility tool included in the base package of almost all Linux distros. It enables you to automate your workflow by executing commands and scripts as scheduled tasks, aka cron jobs.
In essence, crontab is a command-line interface to the cron daemon (or crond), which runs in the background and executes tasks per the schedule specified in the crontab file.
When adding scripts to cron jobs, especially those that spawn processes or perform lengthy operations, it is crucial to exercise caution. If a script fails to exit properly or if multiple instances of the same script run simultaneously, it could quickly lead to unwanted behaviors. Your automation workflow can be interrupted, or your process limit can be reached, which results in your service becoming inaccessible.
To prevent such issues, ensure your script(s) includes proper exit conditions and, if needed, uses a locking mechanism. The file lock method is a simple yet effective solution. This approach ensures that only one instance of the script runs at any given time, preventing conflicts and potential interruption of your service. An example of where the lock file method has been used, can be found here.
The Crontab Format
Before setting up cron jobs, it is essential to understand the syntax of the crontab file. Each line in the crontab file represents a cron job consisting of a schedule and a command. A quick and straightforward way to configure cron schedules is to use crontab.guru.
- The basic structure of a cron job in a crontab file is:
* * * * * command_to_execute
-
This format includes five fields, followed by the command to be executed:
- Minute (0-59): The minute of the hour the command should run.
- Hour (0-23): The hour of the day the command should run.
- Day of the month (1-31): The day of the month the command should run.
- Month (1-12): The month the command should run.
- Day of the week (0-7): The day of the week the command should run. Both 0 and 7 represent Sunday.
For example, to run a command at 4:30 AM every day, the cron job would look like this:
30 4 * * * command_to_execute
- The schedule is on the system timezone, Central European Time (CET) or UTC+1.
- When entering the command to execute, always use the full path to your script.
Special Characters
Crontab also supports special characters that help in defining more complex schedules:
-
*(Asterisk): Represents all possible values for a field (e.g., every minute, every hour). -
,(Comma): Separates multiple values (e.g., 1,2,3 for the first three minutes). -
-(Hyphen): Specifies a range of values (e.g., 1-5 for the first five days of the month). -
/(Slash): Specifies step values (e.g., */2 in the minute field means every two minutes).
Configure Cron Jobs
To access the crontab, where you can create or edit cron jobs, connect to your service via SSH. Once connected, you can access the crontab by executing crontab -e.
- If this is your first time accessing the crontab, you will be asked to select an editor.
ultra@docs:~$ crontab -e
no crontab for ultra - using an empty one

Select an editor.  To change later, run 'select-editor'.
  1. /bin/nano        <---- easiest
  2. /usr/bin/vim.basic
  3. /usr/bin/mcedit
  4. /usr/bin/vim.tiny
  5. /bin/ed

Choose 1-5 [1]:
- For simplicity, select
nanoby pressing1and confirm withENTER. - Next, you will be presented with the crontab, and you can start creating cron jobs.
- As previously mentioned, each line in the crontab represents a cron job.
- Below are a couple of cron job examples.
1 12,00 * * * /home/username/scripts/myscript.sh >> /home/username/scripts/logs/myscript.log 2>&1
0 1 15,30 * * app-prowlarr upgrade >> /home/username/scripts/logs/prowlarr-upgrade.log 2>&1
0 2 15,30 * * app-jackett restart > /dev/null 2>&1
- Here's an explanation of the above cron job examples.
- The top cron job executes a script called
myscript.shand logs the output to a log file calledmyscript.log. - The middle cron job executes an upgrade of Prowlarr, and logs the command output to a log file called
prowlarr-upgrade.log. - The bottom cron job executes a restart of Jackett, but instead of piping the command output to a log file, it will be piped to
/dev/null(the void of nothingness).
- The top cron job executes a script called
- Once you have configured your cron jobs, press
CTRL+X, thenYandENTERto save and exit the crontab.
Unofficial Installation Scripts
Note: ALL scripts are deemed unofficial. That means official support will not be provided. The scripts are provided as-is and may not be updated or maintained by Ultra.cc. Clients are welcome to use and customize unofficial scripts for their unique needs and requirements. Unofficial support may be offered via Discord only and at the sole discretion of Ultra.cc staff. Only use these scripts if you are comfortable managing them, without official support.
In addition to the officially supported applications that can be installed from the User Control Panel, we also provide a wide variety of unofficial installation scripts. These scripts have been created for your convenience, to allow for easy installation of programming languages, applications and utility tools.