File Transfer Protocol (FTP)
The File Transfer Protocol (FTP) is a standard network protocol used for the transfer of computer files between a client and server on a computer network.
- Connecting to your Ultra.cc slot with FTP
- Recommended FTP Clients
- Userland ProFTPD
- FTP Troubleshooting Information
- Using Rclone FTPS
- MTR Guide
Connecting to your Ultra.cc slot with FTP
File Transfer Protocol (FTP) is one way you can manage your files on your Slot. With this, you can download and upload your files and directories, move them around, rename them, and much more.
This guide shows you how to change your Password and the general settings to put in an FTP client.
Connecting to your Ultra.cc Slot via FTP
Changing your SSH/FTP Password
Before logging into your FTP Client, you should first set your own SSH/FTP password.
-
Login to your User Control Panel and log in with the credentials you set and Press Connect.
-
Go to the Connect tab and click on Change password beside SSH access.
-
Set your Password to anything you wish.
- We recommend using a unique password that you do not use in any of your existing accounts and has the following:
- At least 12 characters
- An uppercase letter
- A lowercase letter
- At least 1 number
- At least 1 symbol
- We recommend using a unique password that you do not use in any of your existing accounts and has the following:
-
Once you're done, click Confirm change.
-
A popup saying Password successfully changed should appear on the lower right corner of the page, signifying that the Password is set successfully.
FTPS vs. SFTP
Ultra supports the File Transfer Protocol over SSL (FTPS) and SSH File Transfer Protocol (SFTP). These file transfer protocols provide secure file transfers between your slots and your PC. Also, both protocols do not count towards your allocated upload bandwidth.
File Transfer Protocol over SSL (FTPS)
- Widely Supported
- Runs over TCP port 21
- Site to site transfers possible
- Only supports username and password for authentication
SSH File Transfer Protocol (SFTP)
- Not all devices supported SFTP
- Runs on TCP port 22
- Can be more secure by using SSH key pairs as the authentication method, aside from username and Password
- Some utilities, such as
rsync,only supports SFTP to sync/transfer files
Recommendations
Both protocols are safe to use, but we recommended that you use SFTP with Public Key Authentication for file transfers and interacting with the Slots' terminal. This provides greater cryptographic strength than even long passwords provide and makes it easier for you to log in by providing automated, passwordless login to your service. However, higher greater cryptographic strength will almost always lead to slower transfer speeds. If you want faster transfer speeds, then FTPS is preferred.
Connecting to your Slot using FTP Client
Here are the settings you can use to connect to your Slot via FTP to manage your files.
File Transfer Protocol SSL (FTPS)
Hostname: <servername>.usbx.me or IP address: xxx.xxx.xxx.xxx
Username: <your-ultra-username>
Password: <your-ssh/ftp-password>
Port: 21
Encryption: Explicit FTPS
SSH File Transfer Protocol (SFTP)
Hostname: <servername>.usbx.me or IP address: xxx.xxx.xxx.xxx
Username: <your-ultra-username>
Password: <your-ssh/ftp-password>
Port: 22
For SFTP, you may also use Public Key Authentication in place of a password. This makes it more secure and convenient for you.
Recommended FTP Clients
Here are some FTP clients we recommend you use to manage your Ultra.cc service files.
FileZilla
Filezilla is a free FTP application that is available on most platforms. It supports Explicit FTPS and SFTP protocols in addition to the following features:
- Supports resume of files
- Parallel downloading of files (up to 10 simultaneous transfers)
- Tabbed User Interface
- Configurable Speed limits
Installation
Go here and download the latest version for your PC. Execute the downloaded file and follow the installation instructions.
Setting Up FileZilla
- When launching for the first time, you will be greeted by the main GUI of FileZilla.
- In the top menu bar, click the Site Manager
- A new window appears. Click the New Site button and name it.
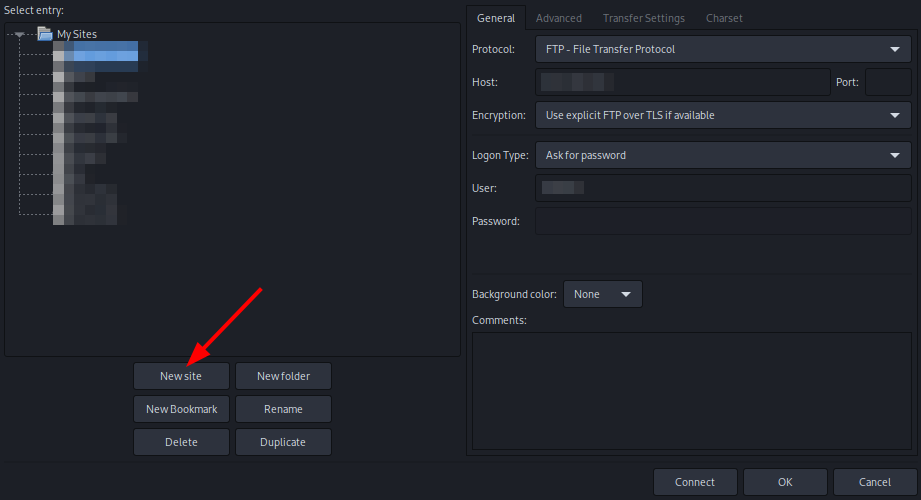
- Then, you can input the following information from either of the following configurations:
FTPS
Protocol: FTP - File Transfer Protocol
Host: servername.usbx.me
Port: 21
Encryption: Require explicit FTP over TLS

Logon type: Normal
Username: <your-ultra-username>
Password: <your-ssh/ftp-password>
SFTP (Normal Logon)
Protocol: SFTP - SSH File Transfer Protocol
Host: servername.usbx.me
Port: 22

Logon type: Normal
Username: <your-ultra-username>
Password: <your-ssh/ftp-password>
SFTP (Keyfile Logon)
For more information on this, you can refer to this guide: Public Key Authentication
Protocol: SFTP - SSH File Transfer Protocol
Host: servername.usbx.me
Port: 22
Encryption: Require explicit FTP over TLS

Logon type: Key file
Username: <your-ultra-username>
Key file: <your-ultra-public-key>
- Once that's done, press OK.
- Another window appears, asking if you want to save your password. We recommend selecting "Save passwords protected by a master password". Add your master password and click OK.
- Make sure to choose a strong password, see this guide.
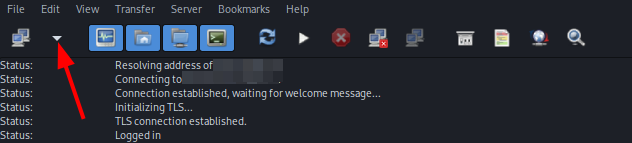
- Click the arrow icon to the right of the Site Manager icon, and select the site you previously created.
- When prompted, enter your master password.

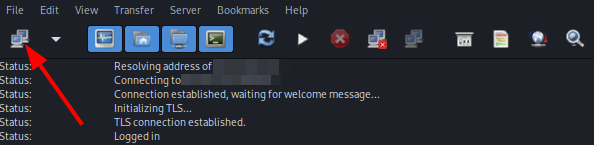
- If logging in the first time, you will see a message as shown in the above image. Click OK.
- Once logged in, you will see the files and folders of your Ultra.cc service on the right side of the GUI.
WinSCP
WinSCP (Windows Secure Copy) is a free and open-source SFTP, FTP, WebDAV, Amazon S3, and SCP client for Windows. It offers basic file manager and file synchronization functionality. For secure transfers, it uses Secure Shell (SSH) and supports the SCP protocol in addition to SFTP. In addition to this, WinSCP also offers the following features:
- Batch file scripting, command-line interface, and .NET wrapper
- Directory synchronization
- Integrated text editor
- Integration with PuTTY
Installation
To download and install WinSCP, go here and download the latest version.
Setting Up WinSCP
- When launching for the first time, the login dialog will show up first.
- Here, you can add the settings you wish
FTPS
Fle Protocol: FTP
Encryption: TLS/SSL Explicit Encryption
Host: servername.usbx.me
Port: 21

Username: <your-ultra-username>
Password: <your-ssh/ftp-password>
SFTP (Normal Logon)
Fle Protocol: SFTP
Host: servername.usbx.me
Port: 22

Username: <your-ultra-username>
Password: <your-ssh/ftp-password>
SFTP (Keyfile Logon)
For more information on this, you can refer to this guide: Public Key Authentication
Fle Protocol: SFTP
Host: servername.usbx.me
Port: 22

Username: <your-ultra-username>
Password: <blank>

To add keyfile, go to Advanced -> SSH -> Authentication -> Private key file
- Once it's added, click Save and add a name.
- You can check Save Password if you prefer. This is if you're using your own device.
- In this example, SFTP is used.


- After it has been added, double-click your newly created site to log in.

- If it is your first time logging in, a window as shown in the above image might appear. Just click Yes to continue.
- After a few moments, you will be logged in to your Ultra.cc service and can manage your files and folders.
Show Hidden Directories
- By default, files and folders that begin with a
.will be hidden. However, to allow these files and folders to be seen, you can pressCTRL+ALT+Hor by enabling Show hidden files in Preferences.
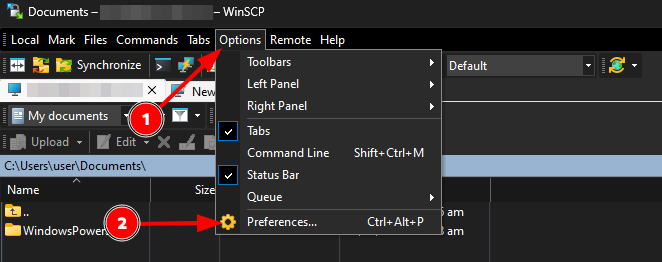
- To open Preferences, in the top menu bar, click on
 Options and then click
  Preferences, as shown in the above image.
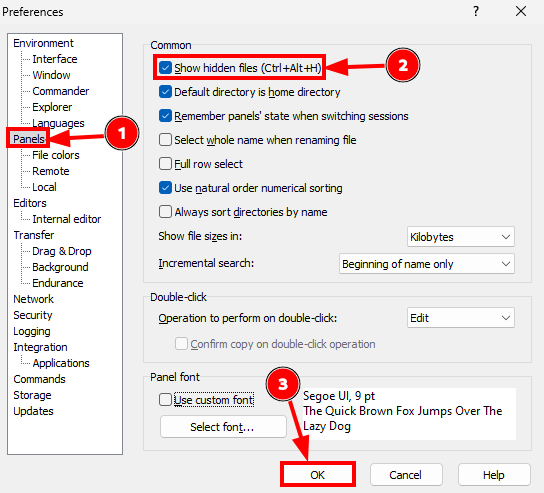
- Once the Preferences window appears, go to the Panels tab.
- Then, enable Show hidden files.
- Lastly, click the
 OK button.
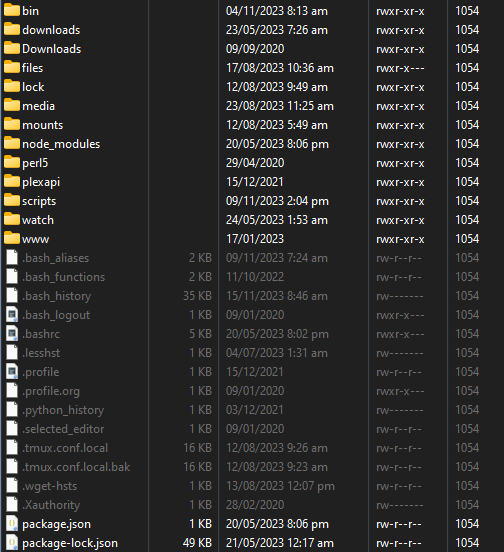
- If done successfully, you should now see hidden files in gray, as shown in the above image.
Userland ProFTPD
Please be aware, your upload quota will be used when using ProFTPD to download from your Ultra.cc service.
ProFTPD is a server that can offer FTP access to friends and family without revealing your slot's username and password. Instead, custom usernames and passwords can be set for each friend or family member.
In this section, we'll be installing and setting up Userland ProFTPD into your slot. We'll also be teaching you how to manage and uninstall ProFTPD.
Acquire Absolute path for FTP Root Folder
You will need to find your absolute path to the folder you wish to use for other users. Navigate to the folder with cd ~/path/to/folder then run the command pwd -P Keep this path to one side as this is required for the FTP Root Folder Input during installation
Please use the absolute path starting with /homeXX/ and not just /home/. Failing to do so will grant the ProFTPD user access to all directories on your service.
Installation
- Connect to your service via SSH
- Execute the following command to download the script and make it executable.
wget https://scripts.ultra.cc/main/ProFTPD/proftpd-install.sh
chmod +x proftpd-install.sh
- Run the script by running the following
./proftpd-install.sh
- Then, you'll see the following output. Enter what is needed.
ultradocs@lw816:~$ ./proftpd-install.sh
Disclaimer: This installer is unofficial, and Ultra.cc staff will not support any issues with it
Type confirm if you wish to continue: confirm
FTP Root Folder: /home12/ultradocs/files
Installing ProFTPD...
Configuring Authentication...
Username: ultradocs
Password: ********
ftpasswd: using alternate file: /home12/ultradocs/.config/proftpd/proftpd.passwd
ftpasswd: creating passwd entry for user usbdocs
ftpasswd: entry created
Do you want to create another user? (y/n) n
Installing Service...
Configuring TLS...
Generating RSA private key, 1024 bit long modulus (2 primes)
...............+++++
.................+++++
e is 65537 (0x010001)
Signature ok
subject=C = NL, ST = NH, L = Amsterdam, O = Ultra, CN = chaos.usbx.me
Getting Private key
Starting ProFTPD...
Downloading Scripts...
Cleaning Up...
Done!
Access your ProFTPD installation at ftp://chaos.usbx.me:32563
Run ./proftpd-uninstall.sh to uninstall | Run ./proftpd-users.sh to manage users
Be sure to take note of the port provided by the script in this line: Access your ProFTPD installation at ftp://hostname.usbx.me:12345
Managing Users
- To manage users, run the following command
./proftpd-users.sh
- You should see the following output below. Follow the instructions shown.
ultradocs@lw816:~$ ./proftpd-users.sh
What do you want to do?
1) Create a user
2) Delete a user
3) Change a user's password
4) Exit
Select an option:
Setting Permissions
- By default, ProFTPD will allow all created users access to the FTP root directory and all subdirectories.
- By setting up permissions, you can limit their access to only specific directories that you defined as their home.
- In ProFTPD,
~is the FTP user's home directory. This can be different from your actual home directory. - The following additional configuration will allow all FTP users full access to their FTP home directory.
- You can edit this by running your fave text editor
nano .config/proftpd/proftpd.conf
<Directory ~>
    <Limit ALL>
        AllowAll
    </Limit>
</Directory>
- You may need to use your full home path for permissions to apply to do so navigate to the directory you wish to share with
cd ~/path/to/folderthen run the commandpwd -Pthis will display a path similar to/home12/ultradocs/files - You can change the limited commands by replacing ALL with specific commands or groups of commands as listed on ProFTPD's <Limit> documentation.
- You can also add subdirectories by copying the entire block and changing
/home12/ultradocs/files>to/home12/ultradocs/files/directory>where the directory is the subdirectory you want to modify permissions. - Shown here is a permissions example
# Permissions example
<Limit ALL>
    # Limit everything
    DenyAll
</Limit>

<Directory /home12/ultradocs/files>
    # Allow everyone inside this folder
    <Limit ALL>
        AllowAll
    </Limit>
</Directory>

<Directory /home12/ultradocs/files/test1>
    # Allow "test1" inside this folder and all other users will be denied
    <Limit ALL>
        Order Allow,Deny
        AllowUser test1
        Deny ALL
    </Limit>
</Directory>
- Restart ProFTPD for the configuration changes to take effect.
systemctl --user restart proftpd
Connection Example
Protocol: FTP - File Transfer Protocol
Host: server.usbx.me
Port: Provided by Install Script
Encryption: Require explicit FTP over TLS
User: As set by /proftpd-users.sh
Pass: /proftpd-users.sh
Update Expired Certificates
- First run the following commands, one line at a time, to stop Userland ProFTPD and backup your original certificates
systemctl --user stop proftpd.service
mkdir ~/.config/proftpd/old-cert-backup
mv ~/.config/proftpd/{server.crt,server.key} ~/.config/proftpd/old-cert-backup/
- Then run the folloowing commands, one line at a time, to generate your new certificates
openssl genrsa -out ~/.config/proftpd/server.key 1024
openssl req -new -key ~/.config/proftpd/server.key -out ~/.config/proftpd/server.csr -subj "/C=NL/ST=NH/L=Amsterdam/O=Ultra/CN=$(hostname).usbx.me"
openssl x509 -req -days 365 -in ~/.config/proftpd/server.csr -signkey ~/.config/proftpd/server.key -out ~/.config/proftpd/server.crt
- Finally, restart your Userland ProFTPD with the following SSH command
systemctl --user start proftpd.service
FTP Troubleshooting Information
Why is my FTP not logging in?
This largely depends on the response of the FTP server. Here are some of the common errors and how to fix it.
Response: - 530 Non-anonymous sessions must use encryption.
Plain FTP is not supported at Ultra.cc. You must connect over the following:
- Explicit TLS over port 21
- Explicit Auth SSL over port 21
- SFTP/SSH2 protocol over port 22
We have a help document to provide more in-depth help here.
Response: [SFTP] Status: Access denied or [FTP] Response: 530 Login incorrect.
This usually means your password is either.
- not set or;
- is no longer valid in your UCP's access details due to technical issues or announcements.
We have an extensive guide for this here.
Response: ERRCONN REFUSED or Connection Refused
The server’s fail2ban has been triggered due to too many invalid authentication attempts in a period. It restricts your IP address from logging in until that period is expired.
You will need to wait 10 minutes before trying again.
FXP is not working.
FXP support can make a FTP server vulnerable to an exploit known as FTP bounce. As a result of this, our FTP servers have it disabled.
How to resolve slow download speed issues ?
A common issue that can affect you if you have a Windows 10 PC, the Receive Window Auto-Tuning Level setting in netsh is set improperly. Windows usually reset this during OS upgrades. This can affect a number of things such as FTP,VPN or single connection applications
Try running netsh interface tcp show global using Command Prompt or PowerShell running in Administrator mode. You should see the following settings.
PS C:\Windows\system32> netsh interface tcp show global
Querying active state...

TCP Global Parameters

----------------------------------------------
Receive-Side Scaling State      	: enabled
Receive Window Auto-Tuning Level	: normal
Add-On Congestion Control Provider  : default
ECN Capability                  	: disabled
RFC 1323 Timestamps             	: disabled
Initial RTO                     	: 1000
Receive Segment Coalescing State	: enabled
Non Sack Rtt Resiliency         	: disabled
Max SYN Retransmissions         	: 4
Fast Open                       	: enabled
Fast Open Fallback              	: enabled
HyStart                         	: enabled
Proportional Rate Reduction     	: enabled
Pacing Profile                  	: off
Receive Window Auto-Tuning Level should be set to normal, but some clients have better results by switching from normal to experimental. To do that, run the following command:
netsh int tcp set global autotuninglevel=experimental
The **experimental **option can give you full download speeds. Please make sure that you do a reboot before testing.
To go back to the default, run the following command:
netsh int tcp set global autotuninglevel=normal
Another cause of this is the use of VPNs. There are chances that the VPN is throttling your speeds, so make sure you disable your VPN connection whenever you download your files from your slot.
Another possible reason is that your disk has very high IO utilization. To check, run this command in your shell and pay attention to the last column named %util.
iostat -xk 2 $(findmnt -T ~ | awk 'END {print $2}')
If this is 100%, the disk you’re in is entirely saturated, affecting your apps’ performance. You may need to send a ticket to our support system so the Ultra.cc team can investigate.
I need plain FTP. Is there any way to use it?
Plain FTP is not supported on our slots due to our commitments to security and privacy for our clients.
However, should you really need plain FTP and you fully know the risks, you may install userland ProFTPD in your userspace.
Please see this help document for the installation of userland ProFTPD here.
Then, once you finished installing and setting up roFTPD, you will need to edit ~/.config/proftpd/proftpd.conf and change TLSRequired on to TLSRequired off using a text editor.
After that, run systemctl --user restart proftpd to reflect the changes in Userland ProFTPD.
Logging in with the username/password combo you created during the install will now be unencrypted.
Why does the FTP connection keep disconnecting with Error: “Disconnect after 20 seconds of inactivity”?
Most FTP clients create new threads when transferring files. All this means is that your original connection has timed out for being idle for too long.
If you're having latency issues, then it's likely you will also experience this error too.
Some of my files have duplicates in ~/files or ~/Downloads directory and ~/media directory. Are they using double disk space?
If you're using Radarr/Sonarr/Sickchill/CouchPotato/Medusa etc., they should not be taking any additional space. By default, these applications create a hardlink of the file to the default root directory of your application. A hard link can be described as a single file located at two different paths but pointing at the same block of data on the disk. Think of it as two signposts from other streets that direct you to the same destination. Hardlinks do not take any extra space. You can compare the inode numbers for both files from the Terminal (SSH Access) with ls -I on both files'. The inode number will be the same.
You can read more about Hard Links here: https://en.wikipedia.org/wiki/Hardlink.
Using Rclone FTPS
Rclone is a software primarily used with cloud storage providers; however, it is also an easy-to-use Command-line download manager for many protocols, including FTP/FTPS/SFTP. We will show you today how to install rclone onto a Linux machine on your local network and how to set up automatic downloading from your Ultra.cc Slot.
Requirements:
Host machine on your home/local network running a Linux distribution (Mac OS can also be used but is not in the scope of this guide; however, it may still work as a general guide)
Ultra.cc FTP Slot details
Installing Rclone on the Host Machine
Installing rclone is made incredibly easy by the developer. First login to your
Host via SSH; this can be under a sudo user, but it is recommended to
install rclone as root user and later set up rclone under a sudo/sub-user,
never set up under root.
Once logged in, run this curl command
curl https://rclone.org/install.sh | sudo bash
If you receive a message telling you that the “curl command cannot be found,”
you will need to install it and run the command above again. To install curl,
run apt-get install curl -y
Once rclone is installed, it is recommended you switch to a new user and configure under that user. If you have not created a new user, the steps are simple.
adduser ultra ultra is the username we will use in this guide.
Follow the on-screen prompts for user information and password. Once that is completed, it is an excellent idea to promote this user to sudo; this allows for the execution of higher privileged commands, which are not required for Rclone but are certainly worth setting up.
To add a user to sudo after creation, run this command.
adduser ultra sudo
If, for some odd reason, your distro did not have sudo installed, now might be a good time to run an install just in case:
apt-get install sudo -y
Now we can switch to our ultra user
su ultra
Type cd to jump to the user home folder. This isn’t strictly required but is
best practice.
Configuring our Rclone FTP remote
The first step is to invoke the rclone config menu with the rclone config
command
This will present a list of options
e) Edit existing remote

n) New remote

d) Delete remote

r) Rename remote

c) Copy remote

s) Set configuration password

q) Quit config

e/n/d/r/c/s/q\>
Press N then enter
Now enter a name: you will need this later when writing our automated script.
Now you will be presented with an extremely long list of options at the time of
writing this 11 is FTP, but this may change as updates release
| Field | Value |
|---|---|
| Host | Your Ultra Address (servername.usbx.me) or IP (185.123.123.123) |
| User | Your Ultra Username |
| Port | Port 21 is standard. You can press Enter |
| FTP password | Press Y, then enter your FTP Password. You will be asked for this twice. |
| Use FTPS over TLS (Implicit) | False |
| Use FTP over TLS (Explicit) | True |
| Edit advanced config? (y/n) | Press Y |
| Maximum number of FTP simultaneous connections, 0 for unlimited | Press enter |
| no_check_certificate | True |
| Disable using EPSV even if server advertises support | Press Enter |
| Enter a encoder.MultiEncoder value. Press Enter for the default ("Slash,Del,Ctl,RightSpace,Dot"). | Press Enter |
| y) Yes this is OK (default) | Press Y to complete the rclone configuration |
Testing Remote for access
Once the configuration of the remote is completed, it is a relatively simple job to check if all is configured correctly
One command should list all of the folders in your Ultra Slot Home folder.
rclone lsd ultra: Replace Ultra with your remote name
Automating download from Ultra.cc
Our first step is to write a simple script. We will set up a lock folder for
a file lock system so the script will not run if it is already running
Create the lock folder with mkdir -p ~/lock
`if you ever get a flock failed command delete any files in ~/lock with the
command rm -rdf ~/lock/*
And create the script file
nano FTP.sh
Paste the following lines into it :
#!/bin/bash

exec {lock_fd}>/home/ultra/lock/FTPLOCK || exit 1

flock -n "$lock_fd" || { echo "ERROR: flock() failed." >&2; exit 1; }

if [ -z "$STY" ]; then exec screen -dm -S FTP /bin/bash "$0"; fi

rclone copy -v remote:/ultraslotfoldertocopy /home/ultra/pathtosavefiles

flock -u "$lock_fd"
Save it by pressing Ctrl+X then Y Enter.
You will need to change the paths ultraslotfoldertocopy to match the folder
you wish to download. You will also be required to alter remotename to match
your rclone remote name, which can be found with the rclone config command
or rclone listremotes. These need to be run via the SSH Command line.
Now we need to allow it to run with the command chmod +x FTP.sh
And finally, run it
./FTP.sh
If the script is running and you were to rerun it, you may see an error message
“Flock Failed” this is a file lock to stop multiple downloads running and is
normal. If you are sure it isn’t running you can delete the lock file from
~/lock. You can also check the progress of the backup script, which is running
in a screen with the command screen -rd FTP
If all is well after the test, we can automate the check via crontab
Open crontab with
crontab -e
You may have a choice of editors. We recommend Nano
Inside the crontab add a single line under everything else in the file that looks like this
* * * * * /home/ultra/FTP.sh
Save it by pressing Ctrl+X then Y then Enter.
The script will now run every 1 minute, checking for files that have changed and syncing them to the destination folder
MTR Guide
This is a guide for gathering useful information on issues with the download and upload speeds that your local machine gets to and from your Ultra.cc service.
You will require your local machine's public IP address to perform all the steps listed in this guide. Disable any VPN/Proxy on your system and then check your IP at myip.com.
The guide shows you the following:
- Perform an MTR test from your Ultra.cc server to your Local Machine.
- Install MTR to your local machine and use it.
- Understand the results of the MTR tests you performed.
MTR
MTR is a diagnostic tool which can be used to determine which routers transmit data packets onto the destination host and which routers may be experiencing problems. This information allows us to figure out where a network problem lies. It is recommended by us to run a trace in both directions when troubleshooting.
(Local Machine -> Ultra.cc Server) & (Ultra.cc Server -> Local Machine).
MTR is installed by default on all our Ultra.cc servers.
MTR Usage on your Ultra.cc Slot
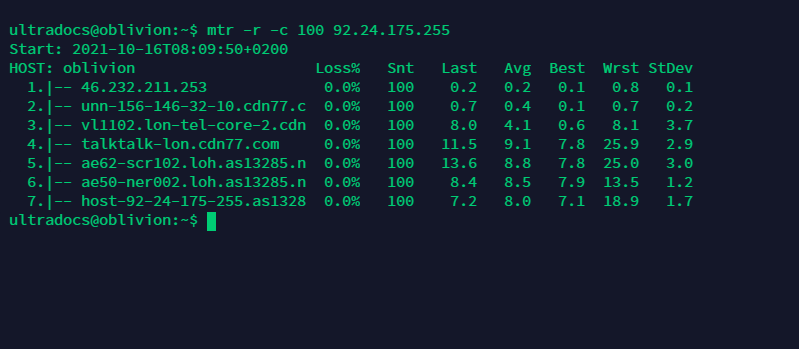
- Login to your Ultra.cc slot via SSH
- Execute the following command:
mtr -w -c 100 <Public IP address of your Local Machine>
Example:
Windows
MTR Installation
- Download WinMTR.
- Extract the compressed file using your favorite file archiver utiliy like WinRAR.
- Based on your system architecture; x32 or x64 navigate to the respective folder.
- Run WinMTR.exe
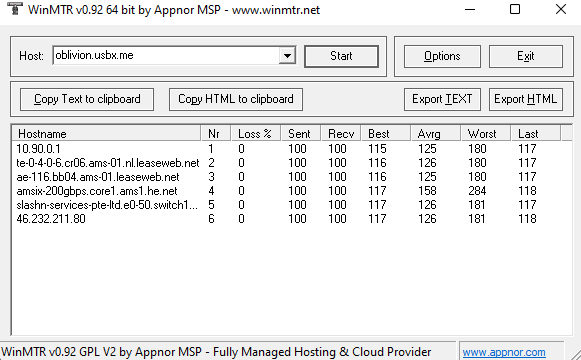
MTR Usage
- Enter your slot's hostname i.e
hostname.usbx.mein the Host field, then click on Start. - Wait for 100 packets to be sent, you can see this number under the Sent column.
- Once 100 packets are sent, click on Stop.
- In case results need to be shared with staff, the Copy Text to clipboard option will come in handy.
Example:
MacOS
MTR Installation
- Open a terminal window. You can do a spotlight search for it (Command + Space and then type Terminal).
- Install brew if you don't have it installed.
/bin/bash -c "$(curl -fsSL https://raw.githubusercontent.com/Homebrew/install/master/install.sh)"
- Install MTR using brew.
brew install mtr
- Check MTR version
ls /usr/local/Cellar/mtr/
- Change directory to MTR's install location.
cd /usr/local/Cellar/mtr/<version from Step 4>/sbin
Example:
cd /usr/local/Cellar/mtr/0.94/sbin
- Make MTR executable by your system.
cp -r mtr* /usr/local/bin/
In case the copy command fails due to permission error(s) run it again with sudo.
sudo cp -r mtr* /usr/local/bin/
MTR Usage
- Open a terminal window. You can do a spotlight search for it (Command + Space and then type Terminal).
- Execute the following command:
sudo mtr -w -c 100 servername.usbx.me
Example:
Linux
MTR Installation
MTR can be installed on the various Linux Distros using their particular package tools.
- Install MTR on Debian/Ubuntu using apt with the following command:
sudo apt update && sudo apt -y install mtr
- Install MTR on CentOS/RHEL/Fedora using yum with the following command:
sudo yum update && sudo yum -y install mtr
- Install MTR on Arch using pacman with the following command:
sudo pacman -Syyu && sudo pacman -S mtr
MTR Usage
- Open a terminal window.
- Run the following command:
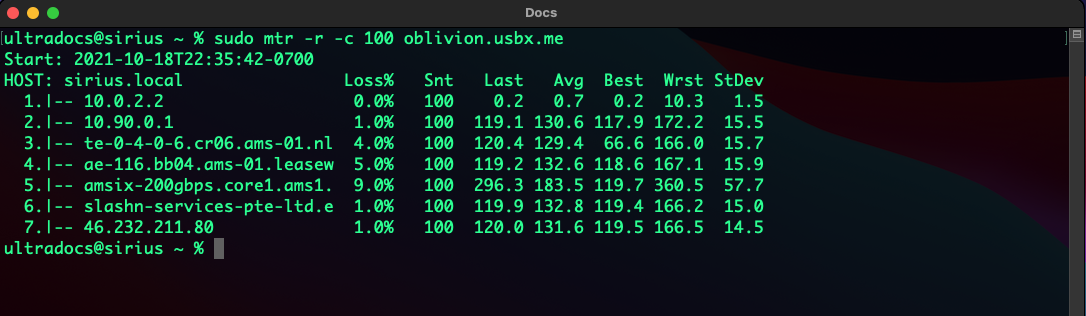
mtr -w -c 100 hostname.usbx.me
Example:
mtr -w -c 100 oblivion.usbx.me
Understanding MTR Results
You should now have two MTR results. One performed from your Ultra.cc slot and one performed from your local device. The former describes the route that your Ultra.cc server is taking to transfer data to your local machine and the latter describes the route that your ISP takes to transfer data from your local device to your Ultra.cc server.
The Loss% at each hop is of importance. If it's 0% then there are no issues with routing and your speed problems lie elsewhere. On the other hand, if there is a lot of loss at multiple hops there is an issue with the route - it is congested.
Unfortunately, in the case that your upload speed isn't great and the route from your local device to your Ultra.cc server is congested, we cannot do much. Your ISP must be queried for this and they must provide better routing.